In this week’s learning, shown the examples, we managed to establish a connection between the Arduino and the Processing programs, and in the recitation, we made some further attempts, like using the arduino to build a Etch A Sketch or a music instrument. I did the latter one, and my program and the video are below:
Processing:
import processing.serial.*;
int NUM_OF_VALUES = 2;

Serial myPort;
String myString;
int values[] = new int[NUM_OF_VALUES];

void setup() {
  size(500, 500);
  printArray(Serial.list());
  myPort = new Serial(this, Serial.list()[0], 9600);
  myPort.clear();
  myString = myPort.readStringUntil( 10 );
  myString = null;
}

void draw() {
  noStroke();
  colorMode(HSB, 100);
  for (int i = 0; i < 500; i++) {
      stroke(i/6,255,255);
      line(i,0,i,500);
  }
  for(int k=0;k<10;k++){
    strokeWeight(1);
    stroke(0);
    line(k*50,15,k*50,500);
    fill(0);
    textSize(12);
    text("Fqz."+(131+k*50),k*50,10);
  }
  line(499,0,499,500);
  fill(0);
  rectMode(CENTER);
  rect(mouseX,mouseY,10,20);
  values[0]=int(map(mouseX,0,500,131,631));
  values[1]=int(keyPressed);
  sendSerialData();
  echoSerialData(200);
}

void sendSerialData() {
  String data = "";
  for (int i=0; i<values.length; i++) {
    data += values[i];
    if (i < values.length-1) {
      data += ",";
    }else {
      data += "n";
    }
  }
  myPort.write(data);
}


void echoSerialData(int frequency) {
  if (frameCount % frequency == 0) myPort.write('e');
  String incomingBytes = "";
  while (myPort.available() > 0) {
    incomingBytes += char(myPort.read());
  }
  print( incomingBytes );
}
Arduino:
#define NUM_OF_VALUES 2
int tempValue = 0;
int valueIndex = 0;
int values[NUM_OF_VALUES];

void setup() {
  Serial.begin(9600);
  pinMode(3, OUTPUT);
}

void loop() {
  getSerialData();
  if (values[1] == 0) {
    noTone(3);
  }else{
    tone(3, values[0]);
  }
}

void getSerialData() {
  if (Serial.available()) {
    char c = Serial.read();
    switch (c) {
      case '0'...'9':
        tempValue = tempValue * 10 + c - '0';
        break;
      case ',':
        values[valueIndex] = tempValue;
        tempValue = 0;
        valueIndex++;
        break;
      case 'n':
        values[valueIndex] = tempValue;
        tempValue = 0;
        valueIndex = 0;
        break;
      case 'e':
        for (int i = 0; i < NUM_OF_VALUES; i++) {
          Serial.print(values[i]);
          if (i < NUM_OF_VALUES - 1) {
            Serial.print(',');
          }else {
            Serial.println();
          }
        }
        break;
    }
  }
}
Also, i made some modification to the prototype, like the black rectangle tracing the mouse movement. Besides, in decoration, i added the rainbow strips and i also added the interval lines with numbers above to indicate the range of frequency for the practical part.
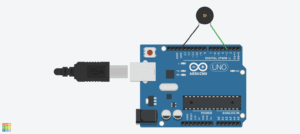
The circuit, on the other hand, is rather simple. As is shown in the program, i take port 3 as OUTPUT and GND as ground, and the whole circuit only consist of that two wire. The schemata is as follows.
