Week eight’s recitation required us to make two circuits and use both Arduino and Processing to build two mini projects. The most challenging part I found was deciphering which parts of the code had to be processed through either Arduino or processing, but as I continued to work on the two projects I learned to ask myself what am I trying to do and to what part of the circuit? So if I was trying to make a buzzer go off I knew the coding for it had to take place in Arduino and if I wanted something to be drawn on my computer screen it had to go through Processing.
Exercise 1:
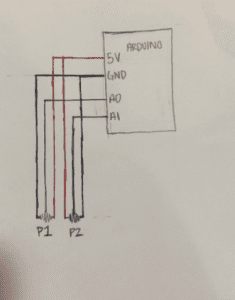
My first project was building an etch-a-sketch using two potentiometers and processing. One major flaw I encountered was that the “sketch” always starts at point (0,0), so there is a line from (0,0) to wherever the sketch is starting.

Code:
Arduino:
// IMA NYU Shanghai
// Interaction Lab
// For sending multiple values from Arduino to Processing
void setup() {
Serial.begin(9600);
}
void loop() {
int pot1 = analogRead(A0);
int pot2 = analogRead(A2);
//int xCoord = map(pot1, 0, 1023, 0, 255); //would this be the size of my screen in processing?
//int yCoord = map(pot2, 0, 1023, 0, 255);
// keep this format
Serial.print(pot1);
Serial.print(“,”); // put comma between sensor values
Serial.print(pot2);
Serial.println();
// too fast communication might cause some latency in Processing
// this delay resolves the issue.
delay(100);
}
Processing:
// IMA NYU Shanghai
// Interaction Lab
// For receiving multiple values from Arduino to Processing
/*
* Based on the readStringUntil() example by Tom Igoe
* https://processing.org/reference/libraries/serial/Serial_readStringUntil_.html
*/
import processing.serial.*;
String myString = null;
Serial myPort;
int NUM_OF_VALUES = 2;
int[] sensorValues;
int xCoord;
int yCoord;
int pxCoord;
int pyCoord;
void setup() {
size(500, 500);
background(255);
setupSerial();
}
void draw() {
updateSerial();
printArray(sensorValues);
xCoord = int( map(sensorValues[0], 0, 1023, 0, 500));
yCoord = int (map(sensorValues[1], 0, 1023, 0, height));
strokeWeight(2);
line(pxCoord, pyCoord, xCoord, yCoord);
pxCoord = xCoord;
pyCoord = yCoord;
}
void setupSerial() {
printArray(Serial.list());
myPort = new Serial(this, Serial.list()[ 3 ], 9600);
myPort.clear();
myString = myPort.readStringUntil( 10 );
myString = null;
sensorValues = new int[NUM_OF_VALUES];
}
void updateSerial() {
while (myPort.available() > 0) {
myString = myPort.readStringUntil( 10 );
if (myString != null) {
String[] serialInArray = split(trim(myString), “,”);
if (serialInArray.length == NUM_OF_VALUES) {
for (int i=0; i<serialInArray.length; i++) {
sensorValues[i] = int(serialInArray[i]);
}
}
}
}
}
Exercise 2:
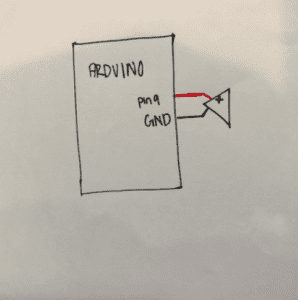
This exercise took me a bit longer than anticipated. For me it was hard at first to decide wether or not my project had multple values or just one. Once I figured out it was just one it was easier from there. I did have trouble with my processing code when I tried to make different rings have different pitches. At first the frequency would only go up one “step” instead of the intended 3 or 4 steps. I soon found out it was because I said if any value above the initial value is pressed on then the buzzer will sound, but it had to be any number less than the pressed value so that the frequency associated to that specific value is made.

Code:
Arduino:
// IMA NYU Shanghai
// Interaction Lab
// This code receives one value from Processing to Arduino
char valueFromProcessing;
void setup() {
Serial.begin(9600);
pinMode(9, OUTPUT);
}
void loop() {
// to receive a value from Processing
while (Serial.available()) {
valueFromProcessing = Serial.read();
}
if (valueFromProcessing == ‘S’) {
noTone(9);
} else if (valueFromProcessing == ‘H’) {
tone(9, 500, 100);
} else if (valueFromProcessing == ‘L’) {
tone(9, 1000, 100);
} else if (valueFromProcessing == ‘M’) {
tone(9, 2000, 100);
delay(10);
}
}
Processing:
// IMA NYU Shanghai
// Interaction Lab
// This code receives one value from Arduino to Processing
import processing.serial.*;
Serial myPort;
int valueFromArduino;
int x = 250;
int y = 250;
void setup() {
size(500, 500);
background(0);
printArray(Serial.list());
myPort = new Serial(this, Serial.list()[ 3 ], 9600);
}
void draw() {
noStroke();
fill(255, 0, 0);
ellipse(x, y, 3, 3);
stroke(255, 0, 0);
strokeWeight(3);
noFill();
ellipse(x, y, 50, 50);
noFill();
stroke(255);
strokeWeight(5);
ellipse(x, y, 100, 100);
noFill();
stroke(0, 255, 0);
strokeWeight(8);
ellipse(x, y, 150, 150);
// to read the value from the Arduino
while ( myPort.available() > 0) {
valueFromArduino = myPort.read();
}
println(valueFromArduino);//This prints out the values from Arduino
println(mouseX, mouseY);
}
void mousePressed() {
if(mouseX == x){
myPort.write(‘S’);
}else if (dist(x, y, mouseX, mouseY) <26) {
myPort.write(‘H’);
} else if (dist(x, y, mouseX, mouseY)<51) {
myPort.write(‘L’);
} else if (dist(x, y, mouseX, mouseY)<76) {
myPort.write(‘M’);
}
}