- Conception and Design
Dancing Digits was an interactive project that utilized full-hand motion in order to play. A big factor to the design of the game required a comfortable and eye-catching stage or platform. The stage was created so that players would know to use their fingers to press the corresponding keys they see displayed on the screen.
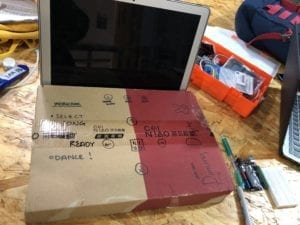
The stage was first designed to cover the keyboard half of a laptop to simulate the feel of an arcade game where it is just the player, the screen, and the dancefloor. The first design also incorporated three buttons a leaderboard button, reset, and start. As for the sensors we first thought about using piezo vibration sensors with the hopes of allowing players to just tap the sensor and not have to push a button
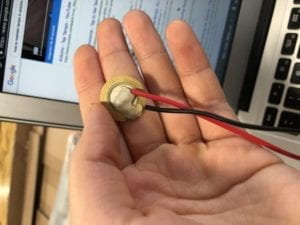
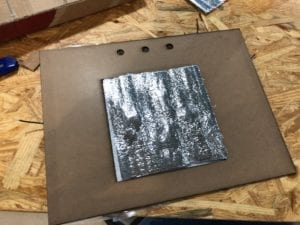
We then went forward with laser cutting the stage and first, we used the brown, really opaque wood with the center stage cut out and attempted to add in a flashy stage made of foam and under it, the piezo vibration sensor would be attached. But this design was rejected as it did not portray the dark and neon theme we had in mind for the game.
To fulfill the flashy theme the game was to have lights shine from the inside of the stage piece, so in order for the light to show through the platform we had to laser cut again but with less opaque acrylic. This time the platform had the game’s title along with instructions cut out from it on either side of the center stage. Then the platform was painted black except for the stage and the front panel.
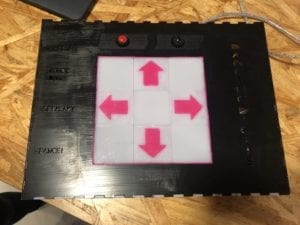
This look was the final decision as it was the most practical and matched the theme. This time the stage was not cut out but rather sketched out (engraved into the acrylic) which made tracing it with the neon pink paint easier.
- Fabrication and Production
The most significant aspects of the game were the visual appeal and the ability to maintain the user’s attention with proper song choice, adequate engagement, and competitiveness. Finding the right visual design took a lot of trial and error as well as three attempts of laser cutting the platform. We first printed the platform out on the brown stiff cardboard material but during the user testing we had the actual cardboard prototype on display and it’s visuals were not well-liked. The user testing session could have been more helpful if more of the game completed at the time. However, with what little was done it has received a lot of helpful constructive criticism. Most users enjoyed the aesthetics of the game on the screen so that is how the dark and neon platform theme came to be. Users also asked for the game to be faster and more challenging which was a success. The game soon worked well at a reasonable tempo but was difficult to play and master on the first and sometimes second tries.
This is what users during user testing had to work with. Not very engaging the prototype did not portray what the game meant to.

The list of suggestions was pretty extensive but the most important one was the suggestion for better instant feedback for the player. This suggestion influenced the changes from piezo vibration sensors to the usage of buttons, more bright colors on the screen when the player does something whether it be good or bad, an attempt to implant lights onto the platform.
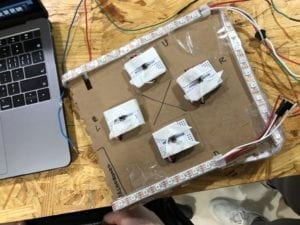
User testing led to the addition of mini push buttons to be placed underneath each corresponding directional arrow key. The buttons gave the user instant physical feedback. As the user pressed on the arrow key they felt a click indicating they have successfully clicked the arrow and that whether or not they timed it well would be the deciding factor of receiving points. This feedback coupled with the visual instant feedback was beneficial for a game like Dancing Digits.
- Conclusion
The goal of Dancing Digits was to allow music loving gamers to have their own portable version of the famous Dance Dance Revolution. In terms of interaction, this game seems to be quite interactive as you have to use Arduino sensors to interact with what is being visualized on the screen. The platform in which the sensors are placed allows for an increase of interaction as the game gets more difficult. The user would have to improve over time to be able to accomplish harder levels. I think that if a user did not care for having the cool and eye-catching platform piece of the game then Dancing DIgits can be denoted to being just another rhythm computer game. However, it is difficult to do so because the platform is a part of the Dancing Digits experience.
When audiences interact with the game they know without further explanation of what they are expected to do. Some questions may stem from when they should be pressing buttons, but to add to the difficulty of the game I believe the player should be wise enough to figure out the timing of the game eventually.
To improve Dancing DIgits I would like to incorporate working lights into the platform so it is more enticing for the users. I would also like to expand the song library and song difficulty. For example, allow users to press two directional arrows at the same time rather than only one at a time. I have learned to plan thoroughly before starting to build parts for projects. I felt as if this project could have been much less wasteful if I had better planned the visual aspect of the game much earlier and quicker than when I made the platform.
I believe that the platform is what separates Dancing Digits from just being classified as a computer-friendly version of Dance Dance Revolution. Despite the platform use, Dancing Digits is a tribute to the dying arcade game Dance Dance Revolution, however, Dancing Digits is just a more modern and office friendly version. I believe that making miniature more portable versions of vintage or soon-to-be vintage games allows the game’s legacy to continue to live. Dance Dance Revolution for me holds a lot of sentimental memories of having fun as a very little girl and would hate to see it disappear, so this project was very fun. It was also quite touching to witness my personal growth from being a young girl who played the original version to a student who made her own version of the childhood favorite.
- Code
Arduino
// IMA NYU Shanghai
// Interaction Lab
// For sending multiple values from Arduino to Processing
const int LEFT = 4;
const int RIGHT = 5;
const int UP = 6;
const int DOWN = 7;
int start = 12;
int restart = 13;
void setup() {
Serial.begin(9600);
pinMode(start, INPUT);
pinMode(restart, INPUT);
pinMode(LEFT, INPUT);
pinMode(RIGHT, INPUT);
pinMode(UP, INPUT);
pinMode(DOWN, INPUT);
}
void loop() {
int l=digitalRead(LEFT);
int r=digitalRead(RIGHT);
int u=digitalRead(UP);
int d=digitalRead(DOWN);
int startState = digitalRead(start);
int restartState = digitalRead(restart);
// keep this format
//Serial.print(pause);
Serial.print(l);
Serial.print(“,”); // put comma between sensor values
Serial.print(r);
Serial.print(“,”);
Serial.print(u);
Serial.print(“,”); // add linefeed after sending the last sensor value
Serial.print(d);
Serial.print(“,”);
Serial.print(startState);
Serial.print(“,”);
Serial.print(restartState);
Serial.println();
// too fast communication might cause some latency in Processing
// this delay resolves the issue.
delay(100);
}
Processing
-
-
- Final Code
- import ddf.minim.*;
Minim minim;
AudioPlayer file;// IMA NYU Shanghai
// Interaction Lab
// For receiving multiple values from Arduino to Processing/*
* Based on the readStringUntil() example by Tom Igoe
* https://processing.org/reference/libraries/serial/Serial_readStringUntil_.html
*/import processing.serial.*;
String myString = null;
Serial myPort;int NUM_OF_VALUES = 6; /** YOU MUST CHANGE THIS ACCORDING TO YOUR PROJECT **/
float[] sensorValues; /** this array stores values from Arduino **/Arrow left;
Arrow right;
Arrow up;
Arrow down;
int screenState;void setup() {
size(1400, 800);
smooth();
setupSerial();
PFont font;
font = loadFont(“AvenirNext-Heavy-48.vlw”);
textFont(font);
left = new Arrow(0, -50, -60, 0, 0, 50, 0, -30, 80, 60, width/2, 600);
right = new Arrow(0, -50, 60, 0, 0, +50, -80, -30, 80, 60, width/2, 600);
up = new Arrow(+60, +80, -60, +80, 0, 0, -30, 80, 60, 80, width/2, 600);
down = new Arrow(-60, +80, 0, +160, 60, 80, -30, 0, 60, 80, width/2, 600);
score=0;
back = loadImage(“background.jpg”);
sback =loadImage(“sback.jpg”);
screenState=0;
minim = new Minim(this);
file = minim.loadFile(“Erebus.aiff”);
}void draw() {
updateSerial();
printArray(sensorValues);if (screenState==0) {
startScreen();
} else if (screenState==1) {
//file.rewind();
//file.play();
gamePlay();
} else if (screenState==2) {
//file.pause();
endScreen();
}
// use the values like this!
// sensorValues[0]// add your code
//
//if (sensorValues[4]==1) {
// if (screenState==0) {
// gamePlay();
// }
//}//if(screenState==0&&sensorValues[2]>0){ //works without buttons
// screenState=1;
//}//if (sensorValues[5]==1) {
// screenState=0;
//}//if(screenState==2&&sensorValues[3]>0){ //works without buttons
// screenState=0;
//}if (onScreen==true) {
if (sensorValues[2]>0&&dir==3) { //UP ARROW
float cPX= up.x;
float cPY= up.y;
int tDist = int(dist(700, 50, cPX, cPY));
if (tDist<100) {
fill(250, 255, 13);
rect(600, 50, 200, 100);
score+=100;
if (tDist<50) {
fill(48, 255, 31);
rect(600, 50, 200, 100);
score+=100;
}
}
}
}
if (sensorValues[3]>0&&dir==4) { //DOWN ARROW
float cPX= down.x;
float cPY= down.y;
int tDist = int(dist(700, 50, cPX, cPY));
if (tDist<100) {
fill(250, 255, 13);
rect(600, 50, 200, 100);
score+=100;
if (tDist<50) {
fill(48, 255, 31);
rect(600, 50, 200, 100);
score+=100;
}
}
}if (sensorValues[0]>0&&dir==1) { //LEFT ARROW
float cPX= left.x;
float cPY= left.y;
int tDist = int(dist(700, 50, cPX, cPY));
if (tDist<100) {
fill(250, 255, 13);
rect(600, 50, 200, 100);
score+=100;
if (tDist<50) {
fill(48, 255, 31);
rect(600, 50, 200, 100);
score+=100;
}
}
}if (sensorValues[2]>0&&dir==2) { //RIGHT ARROW
float cPX= right.x;
float cPY= right.y;
int tDist = int(dist(700, 50, cPX, cPY));
if (tDist<100) {
fill(250, 255, 13);
rect(600, 50, 200, 100);
score+=100;
if (tDist<50) {
fill(48, 255, 31);
rect(600, 50, 200, 100);
score+=100;
}
}
}
}void keyPressed(){
if(key==’r’||key==’R’){
screenState=0;
}if(key==’s’||key==’R’){
screenState=1;
}}
void setupSerial() {
printArray(Serial.list());
myPort = new Serial(this, Serial.list()[ 3 ], 9600);
// WARNING!
// You will definitely get an error here.
// Change the PORT_INDEX to 0 and try running it again.
// And then, check the list of the ports,
// find the port “/dev/cu.usbmodem—-” or “/dev/tty.usbmodem—-”
// and replace PORT_INDEX above with the index number of the port.myPort.clear();
// Throw out the first reading,
// in case we started reading in the middle of a string from the sender.
myString = myPort.readStringUntil( 10 ); // 10 = ‘\n’ Linefeed in ASCII
myString = null;sensorValues = new float[NUM_OF_VALUES];
}void updateSerial() {
while (myPort.available() > 0) {
myString = myPort.readStringUntil( 10 ); // 10 = ‘\n’ Linefeed in ASCII
if (myString != null) {
String[] serialInArray = split(trim(myString), “,”);
if (serialInArray.length == NUM_OF_VALUES) {
for (int i=0; i<serialInArray.length; i++) {
sensorValues[i] = int(serialInArray[i]);
}
}
}
}
}void great(){
}
void good(){
}
- import ddf.minim.*;
- Arrows
- class Arrow {
//feilds
float x, y, xp, yp, a, b, c, d, e, f, m, n, o, p;//constructor
Arrow(float _a, float _b, float _c, float _d, float _e, float _f, float _m, float _n, float _o, float _p, float _x, float _y) {
x=_x;
y=_y;a=_a;
b=_b;
c=_c;
d=_d;
e=_e;
f=_f;m=_m;
n=_n;
o=_o;
p=_p;
}
//methods
void display() {
pushMatrix();
noStroke();
fill(255, 31, 188);
triangle(x+a, y+b, x+c, y+d, x+e, y+f);
rect(x+m, y+n, o, p);
y-=54;
popMatrix();
//}
}
}
- class Arrow {
- End Screen
- void endScreen() {
image(sback,0,0,width,height);
fill(0);
rect(0,height/2.3,width,150);
file.rewind();
//background(0);
textAlign(CENTER);
fill(255, 31, 188);
textSize(50);
text(“Game over”, width/2, height/2);
textSize(40);
text(“Score: ” + score, width/2, (height/2)+50);
textSize(28);
text(“Press R to play again”, width/2, (height/2)+85);
if (keyPressed==true) {
if (key==’r’||key==’R’) {
screenState=0;
}
}
}
- void endScreen() {
- Game Play
- float time;
int score;
PImage back;
PImage sback;
int interval = 100;
float lastAddTime = 0;
boolean start = false;
boolean onScreen = true;
int dir =int(random(1, 5));void gamePlay() {file.play();
screenState=1;
background(255);
image(back, 0, 0, width, height);
line(0, 100, width, 100);
//rectMode(CENTER);
fill(0);
rect(600, 50, 200, 100);
fill(255);
textSize(40);
text(“Score: ” + score, width/3, 600);
time++;
if (time==300) { //fix time for song
file.pause();
screenState=2;
}if (onScreen==true) {
if (dir==1) {
left.display();
if (left.y<=50) {
onScreen=false;
arrows();
}
} else if (dir==2) {
right.display();
if (right.y<=50) {
onScreen=false;
arrows();
}
} else if (dir==3) {
up.display();
if (up.y<=5) {
onScreen=false;
arrows();
}
} else if (dir==4) {
down.display();
if (down.y<=5) {
onScreen=false;
arrows();
}
}
} else if (onScreen==false) {
dir=int(random(1, 5));
onScreen=true;
}
}void arrows() {
left = new Arrow(0, -50, -60, 0, 0, 50, 0, -30, 80, 60, width/2, 600);
right = new Arrow(0, -50, 60, 0, 0, +50, -80, -30, 80, 60, width/2, 600);
up = new Arrow(+60, +80, -60, +80, 0, 0, -30, 80, 60, 80, width/2, 600);
down = new Arrow(-60, +80, 0, +160, 60, 80, -30, 0, 60, 80, width/2, 600);
}
- float time;
- Start Screen
- void startScreen() {
image(sback,0,0,width,height);
fill(0);
rect(0,height/2.3,width,130);
score=0;
//background(0);
fill(255, 31, 188);
textAlign(CENTER);
textSize(40);
text(“Dancing Digits”, width/2, height/2);
textSize(30);
text(“Press S to Start”, width/2, height/2+50);
time=0;
}
- void startScreen() {
- Final Code
-