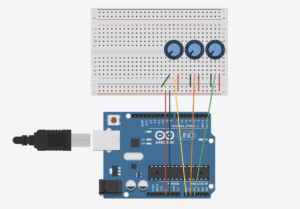
For this week’s recitation, I created a Processing sketch to control the movement, size and color of an image. Data from Arduino are sent to Processing, which thus decides the image’s attributes. I used three potentiometers to adjust the analog values, and used the “serial communication” sample code as the basis for further modifications.
It was not hard to build the circuit, since we use potentiometers quite often. After finishing the circuit, I started to write the code. I adjusted the “Serial. print()” and “Serial. Println()” functions to send the data from Arduino to Processing smoothly. I chose an image from the famous cartoon “Rick and Morty” as my media. I decided to let the three potentiometers control the movement, size and color of the image respectively. I used the “map()” function to limit the analog values. It was not difficult to write the code for changing the image’s size and position, but changing colors was a bit complicated. I chose colorMode(RGB) to set the image with various colors, instead of only with white, grey and black. I used the “tint()” function to set the color. But since I only have one potentiometer controlling the color of the image, I can only set the image with analogous color schemes.

This is my code for Processing:
import processing.serial.*;

String myString = null;
Serial myPort;
PImage img;
int NUM_OF_VALUES = 3;
int[] sensorValues;

void setup() {
  size(800, 800);
  img = loadImage("rickk.png");
  setupSerial();
  colorMode(RGB);
}

void draw() {
  background(0);
  updateSerial();
  printArray(sensorValues);
  float a = map(sensorValues[0],0,1023,0,800);
  float b = map(sensorValues[1],0,1023,0,255);
  float c = map(sensorValues[2],0,1023,400,800);
  tint(b, 30, 255);
  image(img,a,200,c,c);
}

void setupSerial() {
  printArray(Serial.list());
  myPort = new Serial(this, Serial.list()[5], 9600);
  myPort.clear();
  myString = myPort.readStringUntil( 10 );
  myString = null;
  sensorValues = new int[NUM_OF_VALUES];
}

void updateSerial() {
  while (myPort.available() > 0) {
    myString = myPort.readStringUntil( 10 );
    if (myString != null) {
      String[] serialInArray = split(trim(myString), ",");
      if (serialInArray.length == NUM_OF_VALUES) {
        for (int i=0; i<serialInArray.length; i++) {
          sensorValues[i] = int(serialInArray[i]);
        }
      }
    }
  }
}
This is my code for Arduino:
void setup() {
Serial.begin(9600);
}
void loop() {
int sensor1 = analogRead(A0);
int sensor2 = analogRead(A1);
int sensor3 = analogRead(A2);
Serial.print(sensor1);
Serial.print(“,”);
Serial.print(sensor2);
Serial.print(“,”);
Serial.print(sensor3);
Serial.println ();
delay(100);
}
Reflection:
This week’s reading, Computer Vision for Artists and Designers, inspired me a lot. According to the article, Myron Krueger, the creator of Videoplace, firmly believed that the entire human body should have a role in people’s interactions with computers. In my previous definition of an interactive experience, I also mention this idea. Videoplace, an installation that captured the movement of the user, makes my hypothesis concrete and clear. In the project that I made for this recitation, the user can interact with the device only with the potentiometers, which makes the interactivity here quite low. Besides, the whole process is too simple and it does not convey any meaning implications, compared with the other art works mentioned in the reading, such as LimboTimeand Suicide Box. In conclusion, an interactive experience should let the user fully engaged, probably by physical interaction and building up a meaningful theme. The project that I made this time is not highly interactive due to various limitations, but I will try to create a satisfying interactive experience for the final project.
Reference:
Computer Vision for Artists and Designers:
https://drive.google.com/file/d/1NpAO6atCGHfNgBcXrtkCrbLnzkg2aw48/view