Introduction
This activity served as an introduction to working with Arduino. It consisted in building 4 circuits, the fourth being optional. My partner and I were able to complete all of them.
I’ve copied the materials from the original assignment below for quick reference.
Materials:
1 * Arduino Uno
1 * USB A to B cable
1 * breadboard
1 * buzzer
2 * LEDs
2 * 220 ohm resistors
2 * 10K ohm resistors
2 * pushbuttons
A handful of jumper cables
Process and Results
Circuit 1: Fade
Instructions for this circuit and its code: https://www.arduino.cc/en/Tutorial/Fade
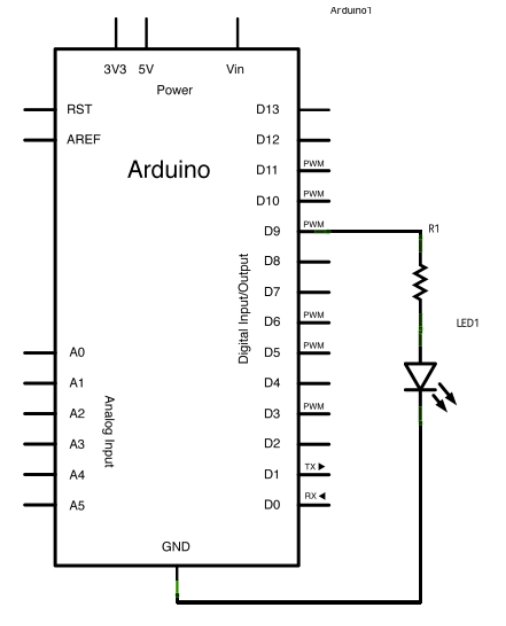
Circuit 2: Fade
Instructions for this circuit and its code: https://www.arduino.cc/en/Tutorial/Fade
Circuit 3: Speed game
Instructions for this circuit and its code: https://www.tinkercad.com/things/6MzvN5rlZlr-race-the-led-spring19.
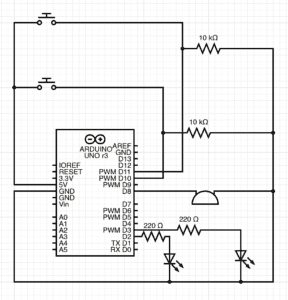
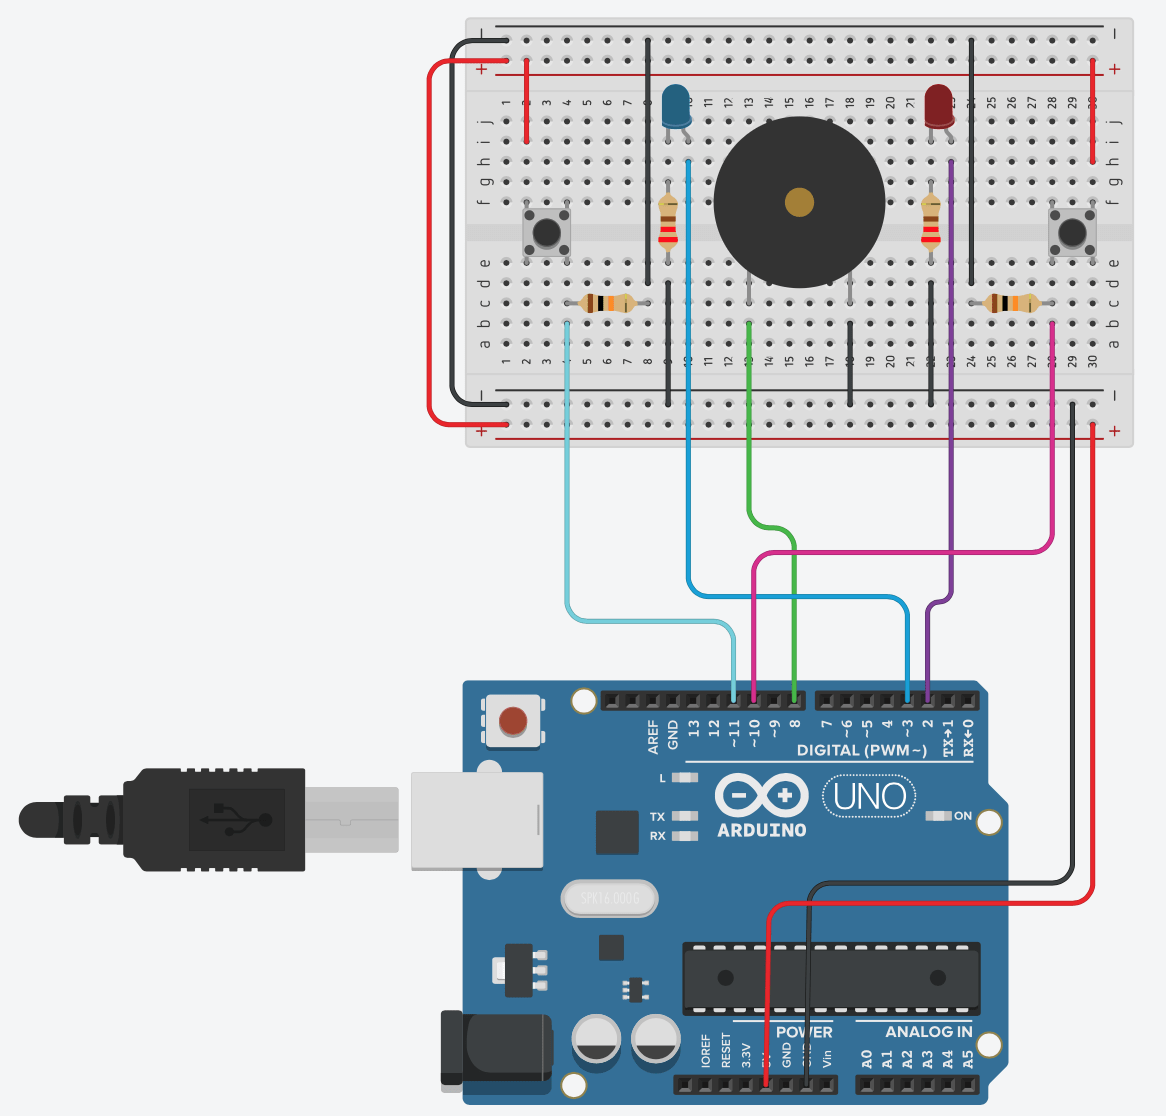
Circuit 4: Four-player speed game
We adapted the code from circuit three to include two more players by creating variables for player 3 and player 4. We used another group’s third circuit and connected it to ours via the positive and negative terminals (so that electricity would also flow through it). We also added pins 5 and 6 for buttons 3 and 4, and pins 4 and 7 for LEDs 3 and 4.
Code:
int buzzerPin = 8;
int button1 = 11;
int button2 = 10;
int button3 = 5;
int button4 = 6;
int led1 = 3;
int led2 = 2;
int led3 = 4;
int led4 = 7;
int goal = 10;
//button
//player 1
int buttonState1 = LOW;
int previousState1 = LOW;
//player 2
int buttonState2 = LOW;
int previousState2 = LOW;
//player 3
int buttonState3 = LOW;
int previousState3 = LOW;
//player 4
int buttonState4 = LOW;
int previousState4 = LOW;
int counter1 = 0;
int counter2 = 0;
int counter3 = 0;
int counter4 = 0;
boolean winner1 = false;
boolean winner2 = false;
boolean winner3 = false;
boolean winner4 = false;
// the follow variables are long’s because the time, measured in miliseconds,
// will quickly become a bigger number than can be stored in an int.
long time = 0; // the last time the output pin was toggled
long debounce = 100; // the debounce time, increase if the output flickers
void setup() {
// put your setup code here, to run once:
Serial.begin(9600);
pinMode(buzzerPin, OUTPUT);
pinMode(button1, INPUT);
pinMode(button2, INPUT);
pinMode(led1, OUTPUT);
pinMode(led2, OUTPUT);
Serial.println(“******************* RACE THE LED *******************”);
delay(1000);
Serial.println(“READY”);
delay(1000);
Serial.println(“SET”);
delay(1500);
Serial.println(“GO!!!!!!!!!!!!!!!!”);
}
void loop() {
// put your main code here, to run repeatedly:
buttonState1 = digitalRead(button1);
buttonState2 = digitalRead(button2);
buttonState3 = digitalRead(button3);
buttonState4 = digitalRead(button4);
//Serial.println(buttonState1);
//this checks the times player 01 has pressed the button
if (counter1 < goal && winner2 == false && winner3 == false && winner4 == false) {
if (buttonState1 != previousState1 && millis() – time > debounce) {
if (buttonState1 == HIGH) {
counter1++;
Serial.print(“player 01: “);
Serial.println(counter1);
time = millis();
}
}
previousState1 = buttonState1;
if (counter1 == goal && winner2 == false && winner3 == false && winner4 == false) {
winner1 = true;
digitalWrite(led1, HIGH);
Serial.println(“PLAYER 01 WINS”);
playMelody();
}
}
//this checks the times player 02 has pressed the button
if (counter2 < goal && winner1 == false && winner3 == false && winner4 == false) {
if (buttonState2 != previousState2 && millis() – time > debounce) {
if (buttonState2 == HIGH) {
counter2++;
Serial.print(“player 02: “);
Serial.println(counter2);
time = millis();
}
}
previousState2 = buttonState2;
if (counter2 == goal && winner2 == false && winner3 == false && winner4 == false) {
winner2 = true;
digitalWrite(led2, HIGH);
Serial.println(“PLAYER 02 WINS”);
playMelody();
}
}
//this checks the times player 03 has pressed the button
if (counter3 < goal && winner1 == false && winner2 == false && winner4 == false) {
if (buttonState3 != previousState3 && millis() – time > debounce) {
if (buttonState3 == HIGH) {
counter3++;
Serial.print(“player 03: “);
Serial.println(counter3);
time = millis();
}
}
previousState3 = buttonState3;
if (counter3 == goal && winner1 == false && winner2 == false && winner4 == false) {
winner3 = true;
digitalWrite(led3, HIGH);
Serial.println(“PLAYER 03 WINS”);
playMelody();
}
}
//this checks the times player 03 has pressed the button
if (counter4 < goal && winner1 == false && winner2 == false && winner3 == false) {
if (buttonState4 != previousState4 && millis() – time > debounce) {
if (buttonState4 == HIGH) {
counter4++;
Serial.print(“player 04: “);
Serial.println(counter4);
time = millis();
}
}
previousState4 = buttonState4;
if (counter4 == goal && winner1 == false && winner2 == false && winner3 == false) {
winner4 = true;
digitalWrite(led4, HIGH);
Serial.println(“PLAYER 04 WINS”);
playMelody();
}
}
}
void playFreq(double freqHz, int durationMs) {
//Calculate the period in microseconds
int periodMicro = int((1 / freqHz) * 1000000);
int halfPeriod = periodMicro / 2;
//store start time
int startTime = millis();
//(millis() – startTime) is elapsed play time
while ((millis() – startTime) < durationMs) {
digitalWrite(buzzerPin, HIGH);
delayMicroseconds(halfPeriod);
digitalWrite(buzzerPin, LOW);
delayMicroseconds(halfPeriod);
}
}
void playMelody() {
playFreq(262, 100);
playFreq(294, 100);
playFreq(349, 100);
playFreq(294, 100);
playFreq(440, 200);
delay(100);
playFreq(440, 400);
playFreq(392, 400);
delay(300);
playFreq(262, 100);
playFreq(294, 100);
playFreq(349, 100);
playFreq(294, 100);
playFreq(392, 200);
delay(100);
playFreq(392, 400);
playFreq(349, 400);
}
Question 1:
Reflect how you use technology in your daily life and on the circuits you just built. Use the text Physical Computing and your own observations to define interaction.
When I use technology, it reacts to me. It is an interactive experience- I push a button or tap a screen and I am given new information to work with. My environment might change (as it does when I press the buttons on an AC remote or a massage chair) or I may get more options to explore and choose from (like I do when I use apps and browsers).
This class felt like a first step in demystifying this interactive process. I got to experience first-hand how it all comes down to the flow of electricity. Although I still don’t fully understand how the technology I use in my daily life works, I no longer see it as a undecryptable blackbox. I am curious to learn more about it.
Question 2:
Why did we use the 10K resistor with the push button?
We used a 10K resistor with the push button because it didn’t need 5V. Had we not put the resistor, the component could have over-heated and malfunctioned. A 10K resistor allows us to provide the ideal voltage for it to work.
Question 3:
If you have 100,000 LEDs of any brightness and color at your disposal, what would you make and where would you put it?
A really bright Christmas tree was my first thought. But no one really wants that/needs that. I would make an art installation that reacts to sound. Basically just a portable light show that would make any musical performance into a concert.
great documentation Nathalie.
just missing your reflections, but it is great that you added your code here.
Regarding to the question about the 10K resistor, you are close with your answer. We use it because if we don’t use it we would have a shortcut every time we push the button, without the resistor we would be connecting 5V directly to Ground.
check out this video: https://www.youtube.com/watch?v=RqI9MqVRB5A
Noted, thank you!