Writer: Daniel Chin
Recitation partner: Linhui
This is a write up for Interaction Lab SP18 Recitation on Electronics and Soldering on Feb 15, 2019.
Components: what are they?
Breadboard
A pre-organized cable layout, easy to plug in jumper cables and other units’ legs. Good for organizing circuit. Good for when you want to start building a circuit but your mind is a blank.
LM7805 Voltage Regulator
Turns 12V DC to 5V DC. This, with the power supply, gives our buzzer and LED a friendly 5V.
Buzzer
Add direct current and it plays a 2200 Hz pitch. In our circuit, it is the output. It signals the user that the button is pressed.
Push-Button Switch
Use a finger to tell it whether to let current pass.
Arcade Button
A cooler Push-Button Switch. Acts as the input in our interactive circuit.
220 ohm Resistor
Add resistance. In our circuit, it alleviates some voltage off our LED, so that the LED won’t pop.
LED
Consumes electricity and emits red light. Very picky about which way the current goes. In our circuit, it is the output.
100 nF (0.1uF) Capacitor
To let the Voltage Regulator work.
10K ohm Variable Resistor (Potentiometer)
A resistor whose resistance we can control by rotating a disk. In our circuit, it controls the brightness of the LED.
12 volt power supply
Turns 220V AC to 12V DC. Today we plugged it into the wall and we have a safe voltage to play with.
Barrel Jack
The cable of the power supply doesn’t go into the breadboard. The barrel jack solves the problem.
Multimeter
Measures U, I, and R. We used it to find the right resistor. Also, as documented below, we used it to check for short circuit.
Several Jumper Cables (Hook-up Wires)
Cables that are easy to use with the breadboard. Makes building circuits as easy as drawing lines.
The circuits
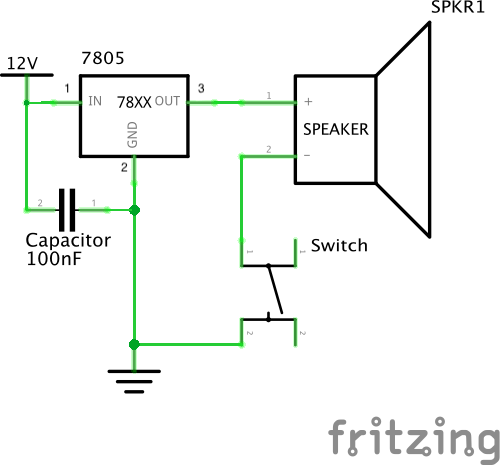
Scheme of buzzer ↓
buzzer working ↓
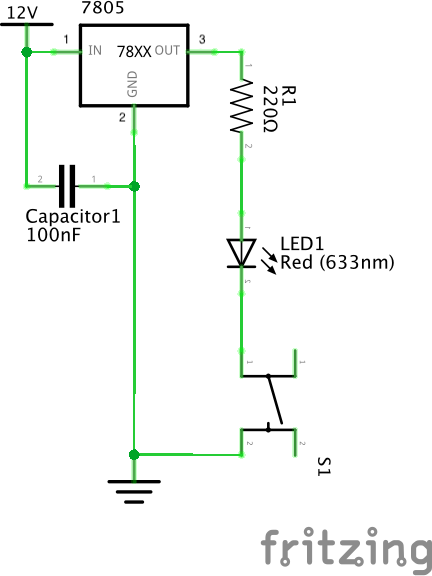
Scheme of LED ↓
LED working ↓
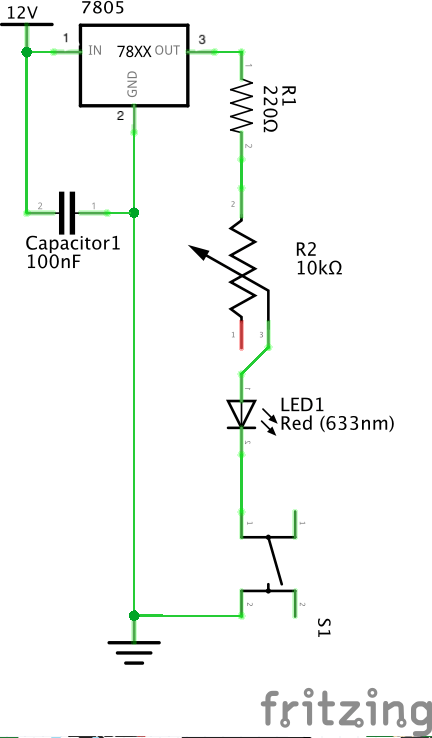
Scheme of dimmable LED ↓
Dimmable LED working ↓
Problems and how we solved them
We encountered several problems during the recitation.
1. Voltage regulator: which leg is which?
We found the spec in recitation instruction webpage.
2. Push-Button Switch: Four legs??? We only need two
We asked Tristan. Problem solved.
“Imagine they are claws.” Each claw has two fingers. The fingers of the same claw are connected. The button controls the connectivity between the two claws.
3. Untitled
Before plugging in, we checked for short-circuit with the multimeter on last time.
It seemed to short! (The overall resistance of the circuit was 0)
We checked the circuit and the current flow, and solved the problem.
4. Untitled
When final double checking, we found we missed a cable (from regulator IN to 12V).
We added the cable.
5. Oh no, we still got the legs wrong
Circuit plugged in for 10 sec, Linhui reports abnormal smell.
We detached power immediately. I found the voltage regulator very hot.
We asked Leon. It turned out we got the voltage regulator spec perspective direction wrong.
“Think about it as a chair. This is the back side of the chair.”
We rotated the voltage regulator 180 degrees. Finally, the circuit worked as expected.
Questions and my answers
After reading The Art of Interactive Design, in what way do you think that the circuits you built today include interactivity? Please explain your answer.
I think the circuits we built today provide feedback, but no interactivity is provided as is defined by The Art of Interactive Design. What we built are simple circuits, and are less interactive than the fridge example mentioned in the article. Here is why I think that. As defined in the article, interaction is the repeated process of “listen, think, speak” between two “actors”. In the fridge example, the “thinking” is simple, but the “speaking” is richer than the doorbell and LED we made today: When the fridge light powers on, the user sees the contents in the fridge, and that information input is way more dynamic and engaging than a simple LED.
How can Interaction Design and Physical Computing be used to create Interactive Art? You can reference Zack Lieberman’s video or any other artist that you know.
I personally believe that even a piece of writing, if good, can be interactive. Through carefully designed words, the writer can make the reader read, think, and respond to the text. Of course, the writing “thinks” too, and responds to the reader through the pre-determined but unpredictable chapters/paragraphs.
The multi-model communication that Physical Computing offers only assist the good writing. Certainly, the power of real-time computing makes non-predetermined response possible, but any system, no matter how dynamic, requires “playwriting” or “designing” before the user steps into the picture. I think the quality of this playwriting is critical.
For example, the game Undertale is highly praised for its integration of its relationship/emotion system and its combat system, but what I find interesting about Undertale is its character speeches. They are very smartly designed. It is good writing. Without good writing, assistive technology like an interactive gaming environment can never make an experience truly engaging.
In conclusion, I think Interaction Design and Physical Computing are tools that open more options for expressing and listening, but to make something interactive, good playwriting is at the core. In the end, the creation only speaks for the creator. If the creator does not have something interesting to say, the creation would at most be a fancy toy.