Recitation 8: Serial Communication
By Lifan Yu (ly1164)
Exercise 1: Make a Processing Etch A Sketch
This one is my FAVOURITE WORK! Drawing the letters “NYU” using my potentiometers:
At first, my ellipse could only move up and down. It could not move to left and right. Then I found out that one of my potentiometers wasn’t connected well enough to the breadboard. I pressed on my potentiometers. Then the ellipse can move to every direction.
Then, when I wrote the code for the next step—drawing lines and ran my code, I saw dots, mot lines, like this:
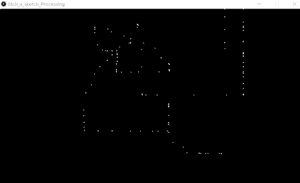
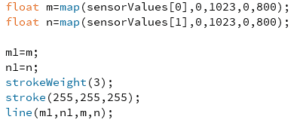
(As is shown in the screenshot below) This is because I put “float m=map(sensorValues[0],0,1023,0,800);float n=map(sensorValues[1],0,1023,0,800);” and “m1=m; n1=n;” all in front of “line(m1,n1,m,n);”.
This is the same thing as sending the values of sensorValue[0]and [1] directly to m1 and n1. When these code are put together, m has the same value as m1, so do n and n1. However, to make a line, the values of m1 and n1 should be given values a step after m and n received their values. This ensures that point (m1, n1) and (m, n) are different points. (m1, n1) is a previous point, (m, n) is a new point.
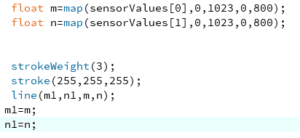
However, when I put “m1=m, n1=n” after “line” function, I added “float” in front of “m1” and “n1”.

My lines then looked like this:
After I deleted “float”, I finally got this right. (As is shown below)
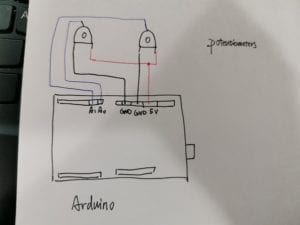
Schematic of my circuit:
Reflection on Interaction:
For the circuit, the input is the potentiometers’ rotation controlled by me. The “processing” process is how the motion was uploaded to my computer, collected in “sensorValues[0]” and “sensorValues[1]” and then sent to processing through serial communication. The output the ellipses and lines appeared on the canvas.
For the user: input: seeing lines on the canvas, seeing positions of the lines.
Thinking: according to what have been seen, deciding where to draw the next line.
Output: according to decisions, rotate the potentiometers to draw lines.
My code:
For Arduino
// IMA NYU Shanghai
// Interaction Lab
// For sending multiple values from Arduino to Processing
void setup() {
Serial.begin(9600);
pinMode (11, OUTPUT);
}
void loop() {
int sensor1 = analogRead(A0);
int sensor2 = analogRead(A1);
//int sensor3 = analogRead(A2);
// keep this format
Serial.print(sensor1);
Serial.print(“,”); // put comma between sensor values
Serial.print(sensor2);
//Serial.print(“,”);
//Serial.print(sensor3);
Serial.println(); // add linefeed after sending the last sensor value
// too fast communication might cause some latency in Processing
// this delay resolves the issue.
delay(100);
}
For Processing
// IMA NYU Shanghai
// Interaction Lab
// For receiving multiple values from Arduino to Processing

/*
 * Based on the readStringUntil() example by Tom Igoe
 * https://processing.org/reference/libraries/serial/Serial_readStringUntil_.html
 */

import processing.serial.*;

String myString = null;
Serial myPort;


int NUM_OF_VALUES = 2;   /** YOU MUST CHANGE THIS ACCORDING TO YOUR PROJECT **/
int[] sensorValues;      /** this array stores values from Arduino **/
float m=0;
float n=0;
float m1=0;
float n1=0;


void setup() {
  size(1000, 1000);
  background(0);
  setupSerial();
}


void draw() {
  updateSerial();
  printArray(sensorValues);

  // use the values like this!
  // sensorValues[0]
  //fill(random(0,500), random(0,500),random(0,500));
  float m=map(sensorValues[0],0,1023,0,800);
  float n=map(sensorValues[1],0,1023,0,800);


  strokeWeight(3);
  stroke(255,255,255);
  line(m1,n1,m,n);
 m1=m;
 n1=n;


//ellipse(m,n,30, 30);
  // add your code

  //
}


void setupSerial() {
  printArray(Serial.list());
  myPort = new Serial(this, Serial.list()[ 0 ], 9600);
  // WARNING!
  // You will definitely get an error here.
  // Change the PORT_INDEX to 0 and try running it again.
  // And then, check the list of the ports,
  // find the port "/dev/cu.usbmodem----" or "/dev/tty.usbmodem----"
  // and replace PORT_INDEX above with the index number of the port.

  myPort.clear();
  // Throw out the first reading,
  // in case we started reading in the middle of a string from the sender.
  myString = myPort.readStringUntil( 10 );  // 10 = '\n'  Linefeed in ASCII
  myString = null;

  sensorValues = new int[NUM_OF_VALUES];
}


void updateSerial() {
  while (myPort.available() > 0) {
    myString = myPort.readStringUntil( 10 ); // 10 = '\n'  Linefeed in ASCII
    if (myString != null) {
      String[] serialInArray = split(trim(myString), ",");
      if (serialInArray.length == NUM_OF_VALUES) {
        for (int i=0; i<serialInArray.length; i++) {
          sensorValues[i] = int(serialInArray[i]);
        }
      }
    }
  }
}
Exercise 2: Make a musical instrument with Arduino:
I used an array whose values can be set to 1 or 0 to represent “mousePressed==true” and “mousePressed==false”. Like this:

“mousePressed” can’t be used in Arduino, but this array can sent information of mouse interactions to Arduino through serial communication. Like this:
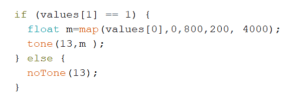
At first my code did not work. Tones could change according to my mouse’s X coordinate, but the buzzer kept working even when my mouse wasn’t pressed. Then I found out that I forgot to use double “=” in the if statement in Arduino. (As is shown below)
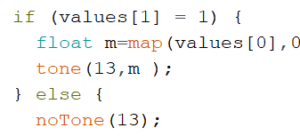
After adding another “=”, my circuit began to work properly.
Schematic of my circuit:
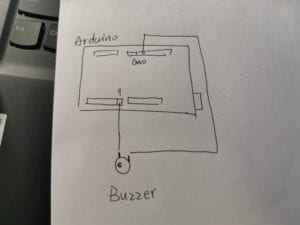
Reflection on Interaction:
For circuit: input: the X positions of the mouse and information of mouse interactions that are stored in arrays.
“thinking”: The process where values stored in arrays were sent to the circuit through serial communication.
Output: The buzzer works according to values sent to it.
For the user: input: hearing the buzzer’s sounds.
Thinking: according to the buzzer’s sounds, deciding on what tunes can be played next..
Output: according to decisions, move the mouse to different places on the canvas.
My code:
For Processing
// IMA NYU Shanghai
// Interaction Lab


/**
 * This example is to send multiple values from Processing to Arduino.
 * You can find the arduino example file in the same folder which works with this Processing file.
 * Please note that the echoSerialData function asks Arduino to send the data saved in the values array
 * to check if it is receiving the correct bytes.
 **/


import processing.serial.*;

int NUM_OF_VALUES = 2;  /** YOU MUST CHANGE THIS ACCORDING TO YOUR PROJECT **/


Serial myPort;
String myString;

// This is the array of values you might want to send to Arduino.
int values[] = new int[NUM_OF_VALUES];

void setup() {
  size(500, 500);
  background(0);

  printArray(Serial.list());
  myPort = new Serial(this, Serial.list()[ 0 ], 9600);
  // check the list of the ports,
  // find the port "/dev/cu.usbmodem----" or "/dev/tty.usbmodem----"
  // and replace PORT_INDEX above with the index of the port

  myPort.clear();
  // Throw out the first reading,
  // in case we started reading in the middle of a string from the sender.
  myString = myPort.readStringUntil( 10 );  // 10 = '\n'  Linefeed in ASCII
  myString = null;
}


void draw() {
  background(0);

if (mousePressed){
  values[1]=1;
  println("pressed");
}else{
  values[1]=0;
  println("not pressed");
}
values[0]=mouseX;
  // changes the values
  //for (int i=0; i<values.length; i++) {
  //  values[i] = i;  /** Feel free to change this!! **/
  //}

  // sends the values to Arduino.
  sendSerialData();

  // This causess the communication to become slow and unstable.
  // You might want to comment this out when everything is ready.
  // The parameter 200 is the frequency of echoing.
  // The higher this number, the slower the program will be
  // but the higher this number, the more stable it will be.
  echoSerialData(200);
}

void sendSerialData() {
  String data = "";
  for (int i=0; i<values.length; i++) {
    data += values[i];
    //if i is less than the index number of the last element in the values array
    if (i < values.length-1) {
      data += ","; // add splitter character "," between each values element
    }
    //if it is the last element in the values array
    else {
      data += "n"; // add the end of data character "n"
    }
  }
  //write to Arduino
  myPort.write(data);
}


void echoSerialData(int frequency) {
  //write character 'e' at the given frequency
  //to request Arduino to send back the values array
  if (frameCount % frequency == 0) myPort.write('e');

  String incomingBytes = "";
  while (myPort.available() > 0) {
    //add on all the characters received from the Arduino to the incomingBytes string
    incomingBytes += char(myPort.read());
  }
  //print what Arduino sent back to Processing
  print( incomingBytes );
}
For Arduino
// IMA NYU Shanghai
// Interaction Lab
/**
This example is to send multiple values from Processing to Arduino.
You can find the Processing example file in the same folder which works with this Arduino file.
Please note that the echo case (when char c is ‘e’ in the getSerialData function below)
checks if Arduino is receiving the correct bytes from the Processing sketch
by sending the values array back to the Processing sketch.
**/
#define NUM_OF_VALUES 2 /** YOU MUST CHANGE THIS ACCORDING TO YOUR PROJECT **/
/** DO NOT REMOVE THESE **/
int tempValue = 0;
int valueIndex = 0;
/* This is the array of values storing the data from Processing. */
int values[2];
void setup() {
Serial.begin(9600);
pinMode(13, OUTPUT);
}
void loop() {
getSerialData();
// add your code here
// use elements in the values array
// values[0]
// values[1]
if (values[1] == 1) {
float m=map(values[0],0,800,200, 4000);
tone(13,m );
} else {
noTone(13);
}
}
//recieve serial data from Processing
void getSerialData() {
if (Serial.available()) {
char c = Serial.read();
//switch – case checks the value of the variable in the switch function
//in this case, the char c, then runs one of the cases that fit the value of the variable
//for more information, visit the reference page: https://www.arduino.cc/en/Reference/SwitchCase
switch (c) {
//if the char c from Processing is a number between 0 and 9
case ‘0’…’9′:
//save the value of char c to tempValue
//but simultaneously rearrange the existing values saved in tempValue
//for the digits received through char c to remain coherent
//if this does not make sense and would like to know more, send an email to me!
tempValue = tempValue * 10 + c – ‘0’;
break;
//if the char c from Processing is a comma
//indicating that the following values of char c is for the next element in the values array
case ‘,’:
values[valueIndex] = tempValue;
//reset tempValue value
tempValue = 0;
//increment valuesIndex by 1
valueIndex++;
break;
//if the char c from Processing is character ‘n’
//which signals that it is the end of data
case ‘n’:
//save the tempValue
//this will b the last element in the values array
values[valueIndex] = tempValue;
//reset tempValue and valueIndex values
//to clear out the values array for the next round of readings from Processing
tempValue = 0;
valueIndex = 0;
break;
//if the char c from Processing is character ‘e’
//it is signalling for the Arduino to send Processing the elements saved in the values array
//this case is triggered and processed by the echoSerialData function in the Processing sketch
case ‘e’: // to echo
for (int i = 0; i < NUM_OF_VALUES; i++) {
Serial.print(values[i]);
if (i < NUM_OF_VALUES – 1) {
Serial.print(‘,’);
}
else {
Serial.println();
}
}
break;
}
}
}