My project is to create a modern Chime, whose appearance and sound is a mimicry of an ancient Chinese Chime. I think when people know it is an instrument, especially a chime instrument, they will have the intuitive to play with it in a way of playing with Chime. Therefore, I add a selfie for the audience because the way of playing the original chime is using a stick. Then, in order to make the installation more like a musical instrument, I decided to paint it into bronze and arrange each part from high to low, which, on the one hand, is to make the appearance more harmonious and cover the original color and brand in case the branding power will distract the audience’s attention from sound itself, on the other hand, is to evoke their memory of this instrument or indicate the audience of this piece of instrument. Another aim of this arrangement from high to low is to indicate the musical scale. The concept behind this sound installation is to compare the consumerism culture in modernity and the traditional music culture, therefore, I choose the materials that are very normal in our life, for example, the box of food delivery, the coffee cup, and the glass bottle, to inspire the reflection of the audience. In order to show the comparison, I use the processing to show different parts of the original ancient instruments and use the sound file from the original musical instrument. Instead of using the buttons, I choose the captive sensor in serial communication part. More than considering its sensitivity, I also consider some people might feel more unexpected and prefer to touch it, especially children. In order to cater to their interaction need, I use the captive sensor, despite the way that touching with hands deviates my initial point and intuitive. I increase the sound visualization part to increase the visual experience when people play with the instrument and hear the sound, they might feel curious about where the sound comes from and what are the characteristics of the sound, therefore, I add that part to indicate the change of sound at different time. However, it might distract the attention of the audience from the picture so that I change the transparency of the picture. In order to improve its aesthetic pursue and be more like the ancient instrument, I use vertical lines to hang the bottles and hide the colorful captive sensor lines by the clothing.
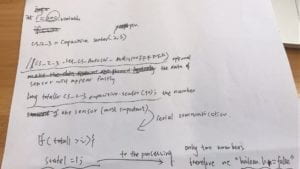
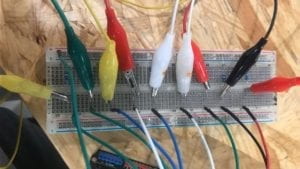
The most significant successful part of our project is to properly use serial communications and media manipulation. We better apply these techniques into our project and combine them cohesively. Another important and successful step is the construction of the physical installation, we spent a lot of time in improving and design its appearance because it is the most important part of our project. We start our project from making a demo of the captive sensor, when we built the circuit and tried the sensors, we found it can not receive data and then we think it might be the problem of the circuit, I observe the circuit and found that each resistor should in shunt connections way, so that the capacitive sensor can work efficiently. But then, we face another problem, the println(); data can ‘t show once we touch this and there is a long delay, we reviewed the code and the circuit also asked for help from Marcela. Marcela produced a simple demo for us, then, I realized why there some data is negative and why some sensor didn’t work. I put the clamp in a wrong way, and the code didn’t follow the shunt way of circuits. After dealing with that, we focus on serial communication part, how to send the right state from Arduino to the Processing. After solving the problem of Arduino, we found another concern, that is, different people touch it will have different data, if we want to send a signal to the processing, we need to int ” i “more accurately. We tested many users and set a number below the lowest one.
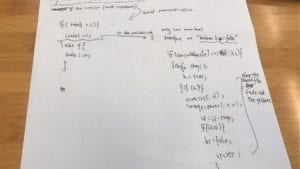
During the user testing, we receive many meaningful and useful suggestions. The picture on processing might can disappear when the sound is not keeping, if all the pictures stay on the computer, it is not very interesting. We used the tint function to make the picture fade out. Then we meet another problem, it will appear several pictures at the same time. We asked Young for help and he found that we made a mistake in logic, we should put if (h1) in the if(state). And we need to instruct each picture separately.
When Eric is playing the instrument, he asked me the concept behind it and why I want to use. garbage, I explained people now are in consumerism culture and ignore the traditional culture, at the same time, I want. people to be aware of. the environmental issues, and give people a concept that they can change very normal things in life into unexpected artwork. Eric suggested that there are too many different concepts and try to narrow down. Marcela also suggested that it is. important to find the connections why you choose these concepts, consumerism culture and traditional culture might be the most strongest part and your project can focus on these two concepts.
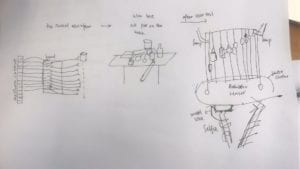
Then he also reflected that this instrument needs more space because he cannot play very comfortable if I put all of them on the table. Therefore, I decided to hang them.
Marcela suggested that you don’t have to use the trash, it will be a little messy. So I choose the bottle and box only, which seems more unified. She also suggested that you might use black vertical lines to make the project more harmonious.
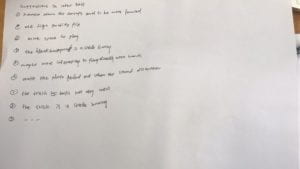
Some users reflected that the quality of the sound file is not very good and after playing several times, the sound will totally be ruined. Therefore, we transform the sound file into the style which more fits in the processing until it can keep the high qualities. In the user test, people also have different preference of playing the instrument, some like to play directly with hands, some think it is more interesting to use the selfie. This kind of phenomena also reflects the personal interaction way is diverse and beyond your assumption. Fortunately, the captive sensor can satisfy both groups. The project aims to give the audience an opportunity to reflect and appreciation, these suggestions, and improvements I made make the project be more focused on the sound itself, which should be the core part of our project. And the use of an instrument should not limit the user groups but satisfy more people without a professional musical background and encourage them to involve the interaction. The improvements are effective to create a more interactive experience for the audience. The final version of our project shows a great transformation from the version we used in the user test, we record the emotions and reactions of users in two periods. In the user test, people were more surprised and unexpected, but when interacting with the final versions, they are more immersive and initiative. It realizes my initial aim that gives the audience time to interact with the installation instead of simply playing with it.
Some people reflect the black background might be a little boring, you can add some sound visualization. Then, I think I might create something to show the manipulation of sound. Because the pictures will only appear for a moment, the left time, the screen will be black. I use the line function to show the butterfly-size change of the sound by calculation.
The goal of my project is to evoke audiences’ awareness and consciousness about the traditional music culture through the reflection of the modern consumerism culture. Because people in modern society focus more and more on material things and ignore the traditional culture which might be the value of our culture. People are forgetting about such a great musical instrument. Through interaction with the sound installation, the audience can not only play with it to receive unique musical experience but also have further thoughts about the relationships between ourselves and society. The project results are aligned with my definition of interaction, which involves people into the project and has dual feedback. For example, when people hit the bell, they can not only receive the sound of the bell but also see the picture on the bell faded out. Meanwhile, I expected the audience could have deeper feelings beyond the music and gain many reflections. However, one point that doesn’t align with my expectation is that most the users only are aware of the musical instrument but ignore the concept behind this. They feel interesting and amazing when they play with the musical instrument and they will ask why I use such materials. Then I explain the concept to them. It deviates a little from my initial assumption that people will know that meaning by themselves. I firmly believe that the hardest aspect of interaction is not simply creating something on a screen or building a circuit, or using very complicated technique and code, but having a person deeply interact with what is on that screen or in that installation what I made. Interaction is not simply playing or feeling, but a deeper level of emotional feedback. I also think that is where I can chase in the future. Moreover, if I have more time, I would consider how to hang different bottles in a big space, therefore, people can have more space to experience and the loudspeaker can be used to play the music. Then, people can have stronger feelings and interact with the installation for a long time, and really steep into the environment that the instrument creates. The characteristics of the instrument can be heard more clearly and create an immersive environment for the audience.
Arduino Part:
#include <CapacitiveSensor.h>
/*
CapitiveSense Library Demo Sketch
Paul Badger 2008
Uses a high-value resistor e.g. 10M between send pin and receive pin
Resistor effects sensitivity, experiment with values, 50K – 50M. Larger resistor values yield larger sensor values.
Receive pin is the sensor pin – try different amounts of foil/metal on this pin
*/
int state1 = 0;
int state2 = 0;
int state3 = 0;
int state4 = 0;
int state5 = 0;
int state6 = 0;
int state7 = 0;
int state8 = 0;
int state9 = 0;
//
int i = 150;
CapacitiveSensor cs_2_3 = CapacitiveSensor(2, 3); // 10M resistor between pins 4 & 2, pin 2 is sensor pin, add a wire and or foil if desired
CapacitiveSensor cs_2_4 = CapacitiveSensor(2, 4); // 10M resistor between pins 4 & 6, pin 6 is sensor pin, add a wire and or foil
CapacitiveSensor cs_2_5 = CapacitiveSensor(2, 5); // 10M resistor between pins 4 & 8, pin 8 is sensor pin, add a wire and or foil
CapacitiveSensor cs_2_6 = CapacitiveSensor(2, 6);
CapacitiveSensor cs_2_7 = CapacitiveSensor(2, 7);
CapacitiveSensor cs_2_8 = CapacitiveSensor(2, 8);
CapacitiveSensor cs_2_9 = CapacitiveSensor(2, 9);
CapacitiveSensor cs_2_10 = CapacitiveSensor(2, 10);
CapacitiveSensor cs_2_11 = CapacitiveSensor(2, 11);
void setup() {
cs_2_3.set_CS_AutocaL_Millis(0xFFFFFFFF); // turn off autocalibrate on channel 1 – just as an example
Serial.begin(9600);
}
void loop() {
long total1 = cs_2_3.capacitiveSensor(30);
long total2 = cs_2_4.capacitiveSensor(30);
long total3 = cs_2_5.capacitiveSensor(30);
long total4 = cs_2_6.capacitiveSensor(30);
long total5 = cs_2_7.capacitiveSensor(30);
long total6 = cs_2_8.capacitiveSensor(30);
long total7 = cs_2_9.capacitiveSensor(30);
long total8 = cs_2_10.capacitiveSensor(30);
long total9 = cs_2_11.capacitiveSensor(30);
if (total1 > i) {
state1 = 1;
} else {
state1 = 0;
}
if (total2 > i) {
state2 = 1;
} else {
state2 = 0;
}
if (total3 > i) {
state3 = 1;
} else {
state3 = 0;
}
if (total4 > i) {
state4 = 1;
} else {
state4 = 0;
}
if (total5 > i) {
state5 = 1;
} else {
state5 = 0;
}
if (total6 > i) {
state6 = 1;
} else {
state6 = 0;
}
if (total7 > i) {
state7 = 1;
} else {
state7 = 0;
}
if (total8 > i) {
state8 = 1;
} else {
state8 = 0;
}
if (total9 > i) {
state9 = 1;
} else {
state9 = 0;
}
//
// Serial.print(total1);
// Serial.print(“,”);
// Serial.print(total2);
// Serial.print(“,”);
// Serial.print(total3);
// Serial.print(“,”);
// Serial.print(total4);
// Serial.print(“,”);
// Serial.print(total5);
// Serial.print(“,”);
// Serial.print(total6);
// Serial.print(“,”);
// Serial.print(total7);
// Serial.print(“,”);
// Serial.print(total8);
// Serial.print(“,”);
// Serial.print(total9);
// Serial.println();
Serial.print(state1);
Serial.print(“,”);
Serial.print(state2);
Serial.print(“,”);
Serial.print(state3);
Serial.print(“,”);
Serial.print(state4);
Serial.print(“,”);
Serial.print(state5);
Serial.print(“,”);
Serial.print(state6);
Serial.print(“,”);
Serial.print(state7);
Serial.print(“,”);
Serial.print(state8);
Serial.print(“,”);
Serial.print(state9);
Serial.println( );
delay(10);
}
// Serial.print(total1);
// Serial.print(“\t”);
// Serial.print(total2);
// Serial.print(“\t”);
// Serial.print(total3);
// Serial.print(“\t”);
// Serial.print(total4);
// Serial.print(“\t”);
// Serial.print(total5);
// Serial.print(“\t”);
// Serial.print(total6);
// Serial.print(“\t”);
// Serial.print(total7);
// Serial.print(“\t”);
// Serial.print(total8);
// Serial.print(“\t”);
// Serial.print(total9);
// Serial.println();
// for (int i = 1; i < 10; i++) {
// if (total[i] > 60) {
// state[i] = 1;
// } else {
// state[i] = 0;
// }
//
// arbitrary delay to limit data to serial port
// // keep this format
// Serial.write(state1);
// Serial.write(“,”); // put comma between sensor values
// Serial.write(state2);
// Serial.write(“,”);
// Serial.write(state3);
// Serial.write(“,”);
// Serial.write(state4);
// Serial.write(“,”);
// Serial.write(state5);
// Serial.write(“,”);
// Serial.write(state6);
// Serial.write(“,”);
// Serial.write(state7);
// Serial.write(“,”);
// Serial.write(state8);
// Serial.write(“,”);
// Serial.write(state9);
// Serial.write(“\n”);
// Serial.write(“\n”); // add linefeed after sending the last sensor value
// too fast communication might cause some latency in Processing
// this delay resolves the issue.
//delay(1);
Processing Part:
import ddf.minim.*; //<>//
import ddf.minim.analysis.*;
import ddf.minim.effects.*;
import ddf.minim.signals.*;
import ddf.minim.spi.*;
import ddf.minim.ugens.*;
// IMA NYU Shanghai
// Interaction Lab
// For receiving multiple values from Arduino to Processing
/*
* Based on the readStringUntil() example by Tom Igoe
* https://processing.org/reference/libraries/serial/Serial_readStringUntil_.html
*/
Minim minim;
AudioInput in;
import processing.serial.*;
String myString = null;
Serial myPort;
int NUM_OF_VALUES = 9; /** YOU MUST CHANGE THIS ACCORDING TO YOUR PROJECT **/
int[] sensorValues; /** this array stores values from Arduino **/
PImage photo1;
PImage photo2;
PImage photo3;
PImage photo4;
PImage photo5;
PImage photo6;
PImage photo7;
PImage photo8;
PImage photo9;
import processing.sound.*;
SoundFile filef7;
SoundFile filera;
SoundFile filexi;
SoundFile fileso;
SoundFile filela;
SoundFile filef4;
SoundFile filef5;
int i1 = 255;
int i2 = 255;
int i3 = 255;
int i4 = 255;
int i5 = 255;
int i6 = 255;
int i7 = 255;
int i8 = 255;
int i9 = 255;
boolean h1 = false;
boolean h2 = false;
boolean h3 = false;
boolean h4 = false;
boolean h5 = false;
boolean h6 = false;
boolean h7 = false;
boolean h8 = false;
boolean h9 = false;
boolean once1, once2, once3, once4, once5, once6, once7, once8, once9;
int step = 2;
void setup() {
size(1200, 802, P2D);
//frameRate(5);//
stroke(1000);
minim = new Minim(this);
in = minim.getLineIn();
setupSerial();
photo1 = loadImage(“1_01.jpg”);
photo2 = loadImage(“2_02.jpg”);
photo3 = loadImage(“3_03.jpg”);
photo4 = loadImage(“4_04.jpg”);
photo5 = loadImage(“5_05.jpg”);
photo6 = loadImage(“6_06.jpg”);
photo7 = loadImage(“7_07.jpg”);
photo8 = loadImage(“8_08.jpg”);
photo9 = loadImage(“9_09.jpg”);
filef4 = new SoundFile(this, “f4.mp3”);
filera = new SoundFile(this, “ra.mp3”);
filexi = new SoundFile(this, “xi.mp3”);
filef5 = new SoundFile(this, “f5.mp3”);
fileso = new SoundFile(this, “so.mp3”);
filela = new SoundFile(this, “la.mp3”);
filef7 = new SoundFile(this, “f7.mp3”);
}
void draw() {
background(0);
updateSerial();
//printArray(sensorValues);
// state1
if (sensorValues[0] == 1 && !h1) {
filef4.play();
h1 = true;
}
if (h1) {
//if (filef4.isPlaying()==false) {
// filef4.play();
//}
tint(255, i1);
image(photo1, 0, 0);
i1 = i1-step;
if (i1 < 0) {
h1 = false;
i1 = 255;
}
}
if (sensorValues[1] == 1 && !h2) {
filera.play();
h2 = true;
}
if (h2) {
tint(255, i2);
image(photo2, 400, 0);
i2 = i2-step;
if (i2 < 0) {
h2 = false;
i2 = 255;
}
}
// state3
if (sensorValues[2]==1 && !h3) {
fileso.play();
h3 = true;
}
if (h3) {
tint(255, i3);
image(photo3, 800, 0);
i3 = i3-step;
if (i3 < 0) {
h3 = false;
i3 = 255;
}
}
if (sensorValues[3] == 1 && !h4) {
filexi.play();
h4 = true;
}
if (h4) {
tint(255, i4);
image(photo4, 0, 267.3333);
i4 = i4-step;
if (i4 < 0) {
h4 = false;
i4 = 255;
}
}
if (sensorValues[4] == 1 && !h5) {
filela.play();
h5 = true;
}
if (h5) {
tint(255, i5);
image(photo5, 400, 267.3333);
i5 = i5-step;
if (i5 < 0) {
h5 = false;
i5 = 255;
}
}
if (sensorValues[5] == 1 && !h6) {
fileso.play();
h6 = true;
}
if (h6) {
tint(255, i6);
image(photo6, 800, 267.3333);
i6 = i6-step;
if (i6 < 0) {
h6 = false;
i6 = 255;
}
}
if (sensorValues[6] == 1 && !h7) {
filef7.play();
h7 = true;
}
if (h7) {
tint(255, i7);
image(photo7, 0, 534.6666);
i7 = i7-step;
if (i7 < 0) {
h7 = false;
i7 = 255;
}
}
if (sensorValues[7] == 1 && !h8) {
filef7.play();
h8 = true;
}
if (h8) {
tint(255, i8);
image(photo8, 400, 534.6666);
i8 = i8-step;
if (i8 < 0) {
h8 = false;
i8 = 255;
}
}
if (sensorValues[8] == 1 && !h9) {
filef5.play();
h9 = true;
}
if (h9) {
tint(255, i9);
image(photo9, 800, 534.6666);
i9 = i9-step;
if (i9< 0) {
h9 = false;
i9= 255;
}
}
float hue = random(360);
//fill(hue, 200, 100, 100);
//noStroke();
//int dropNum = int(map(random(1), 0, 1, 700, 1000));
//for (int z = 0; z < dropNum; z++) {
// float diameter = pow(random(1), 20);
// float distance = sq((1.0 – pow(diameter, 2)) * random(1));
// float scaledDiameter = map(diameter, 0, 1, 1, 30);
// float scaledDistance = map(distance, 0, 1, 0, 300);
// float radian = random(TWO_PI);
// ellipse(random(width),random(height), scaledDiameter ,scaledDiameter);
// //ellipse(scaledDistance * cos(radian) + 100, scaledDistance * cos(radian) +100 , scaledDiameter ,scaledDiameter);
//}
float a = 0;
float angle = (2*PI) /100;
int step = in.bufferSize() / 100;
for (int i=0; i < in.bufferSize()-step; i+=step) {
float x1 = width/2 + cos(a) * (1000 * in.mix.get(i) + 150);
float y1 = height/2 + sin(a) * (1000 * in.mix.get(i) + 150);
float x2 = width/2 + cos(a + angle) * (1000 * in.mix.get(i+step) + 150);
float y2 = height/2 + sin(a + angle) * (1000 * in.mix.get(i+step) + 150);
stroke(hue, 200, 100, 100);
strokeWeight(5);
line(x1, y1, x2, y2);
a += angle;
}
}
void setupSerial() {
printArray(Serial.list());
myPort = new Serial(this, Serial.list()[ 4 ], 9600);
// WARNING!
// You will definitely get an error here.
// Change the PORT_INDEX to 0 and try running it again.
// And then, check the list of the ports,
// find the port “/dev/cu.usbmodem—-” or “/dev/tty.usbmodem—-”
// and replace PORT_INDEX above with the index number of the port.
myPort.clear();
// Throw out the first reading,
// in case we started reading in the middle of a string from the sender.
myString = myPort.readStringUntil( 10 ); // 10 = ‘\n’ Linefeed in ASCII
myString = null;
sensorValues = new int[NUM_OF_VALUES];
}
//void img1(){
//}
//void img2(){
//}
//void img3(){
//}
//void img4(){
//}
//void img5(){
//}
void updateSerial() {
while (myPort.available() > 0) {
myString = myPort.readStringUntil( 10 ); // 10 = ‘\n’ Linefeed in ASCII
if (myString != null) {
String[] serialInArray = split(trim(myString), “,”);
if (serialInArray.length == NUM_OF_VALUES) {
for (int i=0; i<serialInArray.length; i++) {
sensorValues[i] = int(serialInArray[i]);
}
}
}
}
}
Our poster :