CONTEXT AND SIGNIFICANCE
My first experience working with groups in this class was with the skit presentation where we had the idea of a beanie that could record dreams. I was slightly inspired by this idea with the development of a device that could somehow record our emotions and reveal something about our internal world through technological outputs. Throughout the previous developments in this class, I have learned that interaction is the process of communication and response between two participants, that continuously goes back and forth. My partner, Eva, and I wanted to use this definition of interaction along with the idea of expressing emotions to develop a project inspired by the premise of mood rings. We wanted to use the idea that the temperature of your skin is linked to your current mood and by using the Arduino to measure that temperature, and to then output it as a comprehensive value, we could allow a level of interactivity that promoted the interactor to interact with the Arduino and then gain a deeper level of comprehension from the Arduino’s direct output. We further developed upon the mood ring idea by creating a relationship compatibility tester, in which two different people allow their temperature to be read, and these values are then inputted into RGB LEDs, and then from the color of the LEDs, they can determine their compatibility based on how similar the colors are. We decided that by including two users in the interactivity process, there is the encouragement of interactivity not only between human and machine but also human and human. This project is intended for anyone who is interested in the psychology behind body temperature as well as anyone who seeks the entertainment factor of finding their possible compatibility with another person.
CONCEPTION AND DESIGN
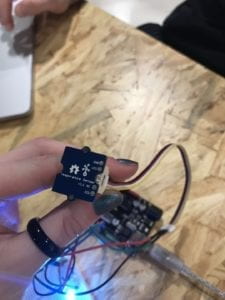
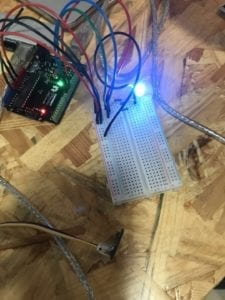
Our project was a laser cut box containing all of the electrical components. There is one hole in the side of the box that allows for the USB cord to go to the laptop. There is also a laser etched title on the front of the box with our project name, “Mood Mind Match”. On the top cover of the box, we included two holes on opposite sides for the temperature sensors. On top of each sensor is a picture of a fingerprint. We also included three holes in the center: two for each LED, and one for our 3d printed heart reset button. On top of each LED, and covered in hot glue in order to give a unique appearance, are two ping pong balls cut in half. In the designing of all of these elements, we wanted to place the temperature sensors on opposite ends of the box in order to encourage the participants to face each other during the process of finding out their compatibility. This not only facilitates communication during the very exciting process of finding out compatibility, but it also assists in the placement of our LEDs We decided to place the LEDs parallel to each temperature sensor in order that each person could determine which LED lined up with each sensor. Most of our design elements were placed not only to make the use of this project as easy to understand as possible but also to follow a simple, clean, aesthetic that attracts people to our project. The placement of the half ping pong ball on top of each LED is the most apparent example of this strive towards a clean aesthetic. We could have chosen to leave the LEDs out in the open, but the design choice of covering them up conceals more of the mechanical components and allows for a more cohesive appearance of our project. We had a couple of original ideas in the design of our box that included slightly different placements of the temperature sensors and LEDs, but we decided the best placement was having the sensors face each other, with the LEDs parallel and in the middle of the box.
FABRICATION AND PRODUCTION


It was directly after the User Testing Session that we decided to start with the 3d fabrication process. We had already designed our laser cut box, but it was a team decision to leave the actual fabrication process until after user testing so we don’t waste any materials remaking our project in case we had run into any major problems during the testing session. One change after user testing is we decided to include instructional text on our box that alerts the user that the closer the color of the LEDs, the greater the compatibility. It was during the testing session that we realized there was no direct information about the meaning of the color of the LEDs unless told to the users, however we wanted our project to be able to function without explanation so this text gave the users the information they needed in order to understand the context of the LED’s output. After testing, another alteration that we wanted to add to the design was the addition of a picture of a fingerprint on top of each sensor. We also added this for a similar reason of having more obvious directions for how to interact with the project. With these pictures placed on top of the sensor, there is no question as to what the participants should do. I believe both of these adaptations were highly effective because they facilitated the audience’s comprehension of the project’s meaning as well as the functionality of its interactive components.
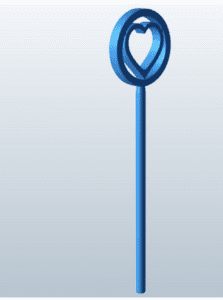
In order to incorporate the fabrication processes in our project, we decided to laser cut a box in order to contain all of the electrical components. We ran into an issue here, however. We decided to wait until the day before the project was due to laser cut this box and right before we attempted to cut it, the machine stopped working. Although the laser cutter soon was functioning again, this entire experience made both my partner and I extremely nervous and definitely taught us a lesson about procrastination. Especially working with technology, which has the ability to break down, or be finicky, it is always helpful to be ahead of schedule in order to avoid situations such as this. We had another issue in the fabrication process in our project. We had wanted to 3d print a heart on a stick. The heart would sit atop the box while the stick would go through a hole and connect to a reset button for our circuit. However, even after scheduling a 3d printing appointment, the heart just would not print correctly. Still not sure about why this didn’t work as it was tried multiple times, but from my own perspective, I have definitely learned, when working with fabrication processes, to do them all very early on as these machines are not as reliable than I had thought. The fact that the heart would not print meant that we could no longer use the reset button and we had to manually reset the project every time a user wanted to interact with it, which was not ideal, but we had to make do with the resources we had.
CONCLUSIONS
To recap, the goal of this project was to create an electrical circuit with the Arduino that encourages interaction following my own personal interpretation of what interaction truly is. Another goal of the project was to use some form of digital modeling in order to design the circuit. I believe that our project really aligned with a lot of aspects of my personal definition of interaction. It involves multiple lines of communication and the transferring of information between both of the compatibility test participants. It also involves the transfer of information through the temperature sensor, and then the transfer of values from the temperature sensor to the LEDs. The color of the LEDs then encourages a reaction to the participants as well as between the participants based on their level of compatibility. This entire process encourages the audience to feel inclined to put their fingers on the temperature sensor, and then react excitedly when they receive the news of their compatibility. In reality, all of the audience figured out how to interact with the project, however, the reactions varied intensely. Some were extremely excited with the project, and some didn’t react very much when the LEDs turned on. I’m not sure if this is just their personality, or if there are ways to invite more interactivity. However, even though I believe there is a healthy level of interactivity, I believe that we could have incorporated a few more components, given fewer time constraints, such as a buzzer that would beep if the temperature values were close enough. This would allow a fine line to be drawn on what level of compatibility is present between the testers in order to release any confusion about the meanings of the LEDs’ color. I was also thinking we could use the same buzzer, and have it play a certain tune based on the degree of compatibility. Such as three beeps for lovers, two beeps for friends, and one beep for strangers. I believe the incorporation of both a visual and audio output would invite even more of an emotional response from our audience so if revisited in the future, I would love to incorporate such. Going back to the setbacks involved in the laser cutting and 3d printing process. I am a bit disappointed we couldn’t 3d print the heart reset button, however, I’m also glad that my partner and I were able to experience the challenge of technical difficulties in order to encourage us to approach such technologically heavy processes with greater leniency. From our various issues with technology, I definitely feel more prepared for dealing with these machines in the future. From our accomplishments, I definitely have greater confidence in my ability to code and work through different programs. I also feel much more comfortable in a group project setting, as my partner and I worked together very well. In all, I’m glad that our project turned out the way it is. We were able to take a simple idea and execute it neatly in order to construct an effortless symbol of interaction. There are always improvements that could be made with more time, but for all of our effort in coding, modeling, and circuit building, I am content with the result.