Serial Communication
For this recitation, I practiced how to transfer values from processing to Arduino or from Arduino to processing. I feel it is of vital importance to achieve interaction because interactive designing involves both physical outcome and programming.
Exercise 1: Make a Processing Etch A Sketch

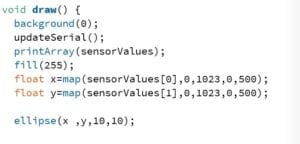
I used the file I downloaded to transfer multiple values from Arduino to processing and made some changes to the code in processing. One thing I paid attention to was that since the screen size is 500*500 while the maximum number a potentiometer can reach was 1023, “map()” function was needed. Another thing was that if I ran the code in Arduino directly, the two values from different potentiometers were not separated. To distinguish the two values, instead of a comma, I set “Serial.println();” just as shown below.
![]()
Exercise 2: Make a musical instrument with Arduino
By modifying the code for transferring values from processing to Arduino, I managed to connect processing and Arduino. I used “tone()” function in Arduino to control the buzzer and two parameters of “mouseX” and “mouseY” to adjust the tone of the buzzer. However, to be honest, the sound of the buzzer was still a little ear-piercing.
Still, I found what I could achieve through transferring values would be really helpful for my project. I might need to find a better way to generate music.