Recitation 4: Drawing Machines
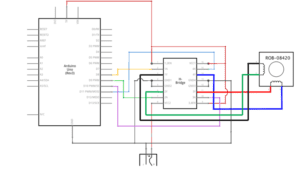
Below are lists of the materials used for each step of the recitation, as well as a diagram of the H-Bridge circuit and the code used for controlling the potentiometer and the stepper motor for each arduino.
Materials for Steps 1 and 2:
- 1 * 42STH33-0404AC stepper motor
- 1 * SN754410NE ic chip
- 1 * power jack
- 1 * 12 VDC power supply
- 1 * Arduino kit and its contents
H-Bridge Circuit Diagram

Materials for Step 3 (with partner)
- 2 * 42STH33-0404AC stepper motor
- 2 * SN754410NE ic chip
- 2 * power jack
- 2 * 12 VDC power supply
- 2 * Arduino kit and its contents
- 2 * Laser-cut short arms
- 2 * Laser-cut long arms
- 1* Laser-cut motor holder
- 2 * 3D printed motor coupling
- 5 * Paper Fasteners
- 1 * Pen that fits the laser-cut mechanisms
- Paper
Steps 1-2 Controlling Potentiometers Code (for each partner)
/*
* MotorKnob
*
* A stepper motor follows the turns of a potentiometer
* (or other sensor) on analog input 0.
*
* http://www.arduino.cc/en/Reference/Stepper
* This example code is in the public domain.
*/
#include <Stepper.h>
// change this to the number of steps on your motor
#define STEPS 200
// create an instance of the stepper class, specifying
// the number of steps of the motor and the pins it’s
// attached to
Stepper stepper(STEPS, 8, 9, 10, 11);
// the previous reading from the analog input
int previous = 0;
void setup() {
// set the speed of the motor to 30 RPMs
stepper.setSpeed(30);
}
void loop() {
// get the sensor value
int val = map(analogRead(0), 0, 1023, 0, 200);
// move a number of steps equal to the change in the
// sensor reading
stepper.step(val – previous);
// remember the previous value of the sensor
previous = val;
}
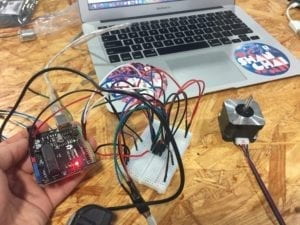
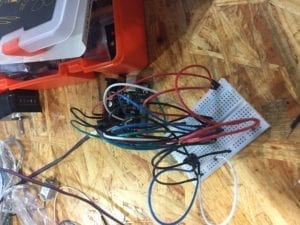
To begin this recitation, we were provided with an H-Bridge and were tasked with putting together a circuit with our Arduino where there was a stepper motor and an analog switch (potentiometer). We first had to individually build the circuit with the stepper motor and see if it would run properly. It took a while and I ran out of ground wires (black) and power wires (red) to use, but the circuit ended up running well.

Our next step was to individually incorporate the potentiometer into the circuit, as well as add the potentiometer into the code. In my coding, I used a link that showed a template for a stepper and then included the potentiometer code in order to have an analog control the stepper. The difficulty here was using the map () function in my code to the point where I felt that I had sufficient control of the stepper motor.

Link to video below.
https://drive.google.com/open?id=1PwG2yqWbviiHsRsoziD2xR5-xNHA0fYD
Our last step for this recitation was to create a drawing machine that used 3D printed mechanical arms and screws provided to us. In order to do so, we had I had to attach my analog-controlled step motor to one arm, while my partner had to do the same. Then, where the arms come together, we used a pen that was sufficient enough to draw images on paper. We each would turn our potentiometers while the pen would make different movements and draw abstract images on paper. If we were to figure out better how the arms were calibrated, we could have probably drawn some basic images on paper.
Link to video below.
https://drive.google.com/open?id=1iapAnaxLHQOk_c2L6GehbvL4iT30_jLT
Recitation Questions
Question 1
I am figuring out that I am most interested in building analog connections with either stepper motors or servos in order to manipulate art and specific movements of objects. I enjoy creating arms that would move or lift things either for the purposes of drawing or satisfying other simple tasks. I am indifferent towards whether I am creating digital or analog connections. It is the fact that the creative process allows me to think of a problem that I would like to solve or or an object with a specific purpose that is entertaining and I can gradually work to create that project, from the prototype stages to constructing to the final product, and create something that can digitally manipulate the world around it which never ceases to amaze me. The use of actuators to push, grab, or reshape objects around them is something that I am particularly fascinated in.
Question 2
The most interesting art installation in Steven Wilson’s “Kinetics” chapter was the Gastarbyter created by London Fieldworks in collaboration with Dugal McKinnon. I find this installation to be most interesting because it allows its subjects to experience multiple senses while interacting with it. Subjects hear different audios, which correspond with different colored neon lights, which correspond with vibrations coming from a chair. Each actuator corresponds with touch and together portray what Wilson determines as a “mixed reality”. I think the artist selected his actuators based off of which senses he wanted people to feel when interacting with his art. It is clear that neon lights were used to provide different visual sensations and the speakers in the headphones were working with audio. The cylinders attached to the chair are interesting as well because they provide different vibrations to include touch as one of the senses experienced. Artists message was to show people how we tend to filter what we experience and all of these different sensations being experienced at once prevent the audience from filter certain things. I believe the circuits we created and actuators we used in this recitation, though are not as complex, provide people with a mixed reality as well. People have an idea of what drawing is, but the actuators (motors) we worked with provided them with a different sense of how to draw by making them use potentiometers to control the direction of the pen on a piece of paper. In the end, it was a meaningful experience for everyone involved, which is what Wilson believes interaction is all about.