Overview
For this recitation I used an image of my dog and ovelayed two different tinted images at different X coordinates to create a paneled image. The opacity of the tints is controlled by a potentiometer, which I mapped to the tint. I also tried to map a blurring effect using a second potentiometer which worked but created a lot of lags and glitches so I ended up commenting it out for the final documentation of the recitation. The first try at mapping the potentiometer I only included one image tint and the mapping was a bit jumpy because there was a loose connection between the potentiometer and the breadboard.
Reading Connection
In contrast to the examples of computer vision from Computer Vision for Artist and Designers that spanned abstract, funny, and sociopolitical themes, my use of computer vision is quite basic comparatively only manipulating the opacity and tint of three different panels in a processing image of my dog. The technology I used did not capture a live image like many of the expamples like Suicide Box or Cheese that were both able to reckognize and record certain movements and actions like veriticle falling or smiling. Instead my project combined the physical interaction of turning a potentiometer to control the value and opacity of the different panels tint on my image. First technology was used in the physical circuit wiring, and it was also used in the display of the image and the connection between the potentiometer and the opacity of each color. I did not use any detection elements like tracking movement as I was not using live capture, but instead applied these concepts to a still image, manipulating the opacity and at some points blurring it too (but the blur created to much glitching and lagging in the program to have smooth transitions). Although I did not include a full body participation in the interaction by using a potentiometer, by reading Levin’s writing, I can appreciate the incorporation of full body participation in computer vision and in the interaction expanding the concept of interaction and making the interaction more engaging for the audience.
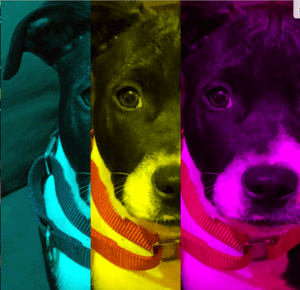
The image at greatest opacity for color tints. (The picture is my dog, so there is no image citation.)
Working potentiometer mapped to the tint of a dog image.
First try at mapping the potentiometer to the tint of an image.
Code
Processing:
import processing.serial.*;

String myString = null;
Serial myPort;


int NUM_OF_VALUES = 1;   /** YOU MUST CHANGE THIS ACCORDING TO YOUR PROJECT **/
int[] sensorValues;      /** this array stores values from Arduino **/

PImage photo;
PImage photo2;
 float tint;
 // float blur;


void setup() {
size(1000, 1000);
  background(255);

  setupSerial();
photo = loadImage("dog.jpeg");
 photo2 = loadImage("dog2.jpeg");
}


void draw() {
     float tint =map(sensorValues[0],0,1023,0,255);
     //float blur =map(sensorValues[0],0,1023,0,10);

  updateSerial();

  printArray(sensorValues);

tint(0, 255, 255, 20);
image(photo, 0, 0);
//filter(BLUR);
//filter(BLUR, 0);
tint(255, 255, 0, tint);
image(photo2, 300, 0);
tint(255, 0, 255, tint);
image(photo2, 600, 0);
//filter(BLUR);
//filter(BLUR, blur);


  // use the values like this!
  // sensorValues[0]

  // add your code

  //
}


void setupSerial() {
  printArray(Serial.list());
  myPort = new Serial(this, Serial.list()[ 1 ], 9600);
  // WARNING!
  // You will definitely get an error here.
  // Change the PORT_INDEX to 0 and try running it again.
  // And then, check the list of the ports,
  // find the port "/dev/cu.usbmodem----" or "/dev/tty.usbmodem----"
  // and replace PORT_INDEX above with the index number of the port.

  myPort.clear();
  // Throw out the first reading,
  // in case we started reading in the middle of a string from the sender.
  myString = myPort.readStringUntil( 10 );  // 10 = '\n'  Linefeed in ASCII
  myString = null;

  sensorValues = new int[NUM_OF_VALUES];

}


void updateSerial() {
  while (myPort.available() > 0) {
    myString = myPort.readStringUntil( 10 ); // 10 = '\n'  Linefeed in ASCII
    if (myString != null) {
      String[] serialInArray = split(trim(myString), ",");
      if (serialInArray.length == NUM_OF_VALUES) {
        for (int i=0; i<serialInArray.length; i++) {
          sensorValues[i] = int(serialInArray[i]);
        }
      }
    }
  }
}
Arduino:
void setup() {
Serial.begin(9600);
}
void loop() {
int sensor1 = analogRead(A0);
//int sensor2 = analogRead(A1);
//int sensor3 = analogRead(A2);
//int theMappedValue = map(sensor1, 0, 1023, 0, 255);
//int theMappedValue2 = map(sensor2, 0, 1023, 0, 255);
// keep this format
Serial.print(sensor1);
//Serial.print(“,”); // put comma between sensor values
//Serial.print(sensor2);
// Serial.print(“,”);
// Serial.print(sensor3);
Serial.println(); // add linefeed after sending the last sensor value
// too fast communication might cause some latency in Processing
// this delay resolves the issue.
delay(100);
}