Midterm Reflection
For my Interaction lab midterm project, me and my partner Henry decided to create a “Treasure Chest” that can only be unlocked through certain interactions by the user. We came up with this original idea ourselfs, but during presentation we were told that the users have seen similar styles of projects in real life room escape games, which is used for entertainment. I can also see it being mass produced as a toy targeted at children or a part of a bigger project such as room escape games, as it has a lot of interactions and lights that can amuse the user. What makes this project different from others is that it is in the form of a puzzle, so it requires the user to explore its functionalities rather have someone explain it. Which makes it challenging to design, as it is hard to have both a challenging puzzle and a self explanatory user interaction at the same time.
The final product was heavily influenced by the things I have learned during the group research project, where I looked into the pom pom mirror and I really liked how it gives the user a instant visual feedback which in turn hints the user of its function and leads them on to the right track of further interactions with the project. This shaped my understanding to interaction, which is the process of performing an action and getting some form of feedback in response. I also believe that a good interaction would be something that feels natural to the human body and mind.
With this definition of good interaction in mind, we started to design our first prototype. The first idea of the project came from Henry, where he wanted a box that will play rhythms with a buzzer and have the user clap the same rhythm in order for it to open. I wanted to include more interactions and led lights for the project to be more visually appealing to the user, so I took the fundamental idea of having special interactions to unlock a box instead of a traditional combinations lock and I changed the interaction to hand positions. We prototyped the first version on a breadboard and then rewired into a cardboard box to see what size would be suitable for our project.
We decided to use two infrared to trigger the lock while the correct combination of hand height was achieved, we used led as a indication that the user is making progress, when all four leds light up, the chest is then unlocked with the control of a simple servo lock.
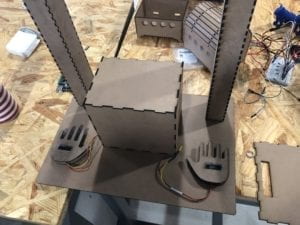
Once everything was working we started fabricating the final shell for our project. We downloaded open source stl files and made some models of our own using 3d modeling softwares like blender and tinkercad, and was planning on 3d printing everything. We then learned that 3d printing big parts was very inefficient and would take up to days to print along with the risk of the print failing, so we changed plans and only printed small parts, while everything big such as the chest and the small towers behind it was laser cut with wood.
During user testing we learned a lot of valuable things, and started implementing more features that makes the project easier for the user to understand, yet keeping it a somewhat challenging puzzle. Originally we used a number system to identify the height of the hand as it resembles the number system of a combination lock, but after user testing we decided to make it more user friendly by color coding everything inside the project, and visualize the colors through the use of neopixels, and match it with the movement of the hand. We also laser cut hand shaped containers for the infrared so that the user knows that the interaction has to do with hands without explicitly writing instructions.
Another improvement after user testing was adding sounds to the project. Some testers missed the indication of progress of LED lighting up as they are too focused on the position of their hands, so we moved the position of LEDs higher and also made a buzzer beep at the same time to make it more obvious. I also coded a intro for the project so that the first time it powers up, it will light up the LEDs in sequence to hint the user that they could be lit up, as they are hidden behind transparent acrylic.
I also did a lot of improvements coding wise, such as making the process of achieving progress longer, so that someone have to hold their hands in place for a couple seconds as opposed to unlocking by randomly flapping their hands. I also wrote the code so that your progress to unlocking does not completely reset if you accidentally move your hands slightly below or above the designated color, you will now decrease the variable count to unlocking instead. This made the project easy to unlock if you figured out the password, yet impossible to unlock for someone who do not know the password.
The creation of the project was pretty difficult, the infrared behaves strangely at certain distances and numbers messes up the code, but I was able to debug with the help of printing everything out in serial. One major mistake that we made though was using the 5v from the Arduino to power up everything, which was not enough for power hungry components such as the neopixels and the servo, and we had to use a second Arduino. But it did not work, I spent a large chunk of my time trying to debug my code and later found out that circuits have to go to common ground, which is a basic concept for engineering but new to me as a programmer.
Overall I think the project was fairly successful. I created something that aligns with my definition of interaction, something that gives clear feedback to the user through natural interactions, in this case hand gestures and the feedback of neopixels following the hand. Though it is still slightly challenging for the user to figure out how to unlock the box, but most people was able to figure out the puzzle on themselves, and the challenging aspect just adds to the joy of being able to unlock the box. Which is my initial goal of the project, to entertain the user. If I had more time for the project, I will probably paint the project to fit the Egyptian theme we gave it, and hide the servo so that it opens up the chest while it is not visible to the user. I think this project demonstrates my understanding to interaction, and it shows that through the process of testing and innovating over and over, the design of a interactive entity can then be polished into something friendly to the user even if its purpose was to lock things up, and prevent the user from opening it.
Code and citation:
#include <Adafruit_NeoPixel.h>
#include <Servo.h>
//Servo servo1;
Servo servo2;
int progress;
int counter;
int right;
int left;
int yellow = 7;
int red = 8;
int green = 9;
//int neo = 13;
int blue = 10;
int reset = 6;
int buzzer = 3;
#define PIN 13
#define PIN2 2
Adafruit_NeoPixel strip2 = Adafruit_NeoPixel(20, PIN2);
Adafruit_NeoPixel strip = Adafruit_NeoPixel(20, PIN);
void setup() {
// put your setup code here, to run once:
strip.begin();
strip.show();
strip2.begin();
strip2.show();
//servo1.attach(11);
pinMode(reset, INPUT);
//servo2.attach(11);
//servo2.write(36);
//delay(1000);
//servo2.write(120);
//delay(1000);
//servo2.write(120);
//delay(200);
//servo2.write(36);
//servo1.write(120);
Serial.begin(9600);
progress = 0;
counter = 0;
pinMode(buzzer, OUTPUT);
pinMode(yellow, OUTPUT);
pinMode(green, OUTPUT);
pinMode(red, OUTPUT);
pinMode(blue, OUTPUT);
digitalWrite(yellow, HIGH);
tone(buzzer, 200, 200);
delay(1000);
digitalWrite(red, HIGH);
tone(buzzer, 350, 200);
delay(1000);
digitalWrite(green, HIGH);
tone(buzzer, 600, 200);
delay(1000);
digitalWrite(blue, HIGH);
tone(buzzer, 800, 200);
delay(1000);
//error sound
tone(buzzer, 200, 100);
delay(100);
tone(buzzer, 100, 100);
}
void loop() {
//Serial.println(digitalRead(reset));
int ln = map(left, 150, 700, 20, -2) ;
int rn = map(right, 150, 700, 20, -2);
//clear color
for (int i = 0; i < 30; i++) {
strip.setPixelColor(i, 0, 0, 0);
strip2.setPixelColor(i, 0, 0, 0);
}
//color left neopixels
for (int i = 0; i < ln; i++) {
if (ln > 19) {
strip2.setPixelColor(i, 0, 0, 0);
}
else if (ln > 15) {
strip2.setPixelColor(i, 255, 0, 0);
}
else if (ln > 10) {
strip2.setPixelColor(i, 0, 255, 0);
}
else if (ln > 5) {
strip2.setPixelColor(i, 0, 0, 255);
}
else {
strip2.setPixelColor(i, 255, 255, 0);
}
}
//color right neopixels
for (int i = 0; i < rn; i++) {
if (rn > 19) {
strip.setPixelColor(i, 0, 0, 0);
}
else if (rn > 15) {
strip.setPixelColor(i, 255, 0, 0);
}
else if (rn > 10) {
strip.setPixelColor(i, 0, 255, 0);
}
else if (rn > 5) {
strip.setPixelColor(i, 0, 0, 255);
}
else {
strip.setPixelColor(i, 255, 255, 0);
}
}
strip.show();
strip2.show();
if (digitalRead(reset) == HIGH) {
digitalWrite(yellow, HIGH);
digitalWrite(red, HIGH);
digitalWrite(green, HIGH);
digitalWrite(blue, HIGH);
delay(50);
digitalWrite(yellow, LOW);
digitalWrite(red, LOW);
digitalWrite(green, LOW);
digitalWrite(blue, LOW);
progress = 0;
}
//Serial.println(rn);
//Serial.println(right);
//Serial.println(left);
//Serial.println(progress);
right = analogRead(A0);
left = analogRead(A1);
// put your main code here, to run repeatedly:
if (progress == 4) {
digitalWrite(blue, HIGH);
delay(100);
digitalWrite(yellow, LOW);
digitalWrite(red, LOW);
digitalWrite(green, LOW);
digitalWrite(blue, LOW);
delay(50);
digitalWrite(yellow, HIGH);
digitalWrite(red, HIGH);
digitalWrite(green, HIGH);
digitalWrite(blue, HIGH);
delay(50);
digitalWrite(yellow, LOW);
digitalWrite(red, LOW);
digitalWrite(green, LOW);
digitalWrite(blue, LOW);
progress = 0;
delay(1000);
tone(buzzer, 800, 200);
delay(200);
tone(buzzer, 800, 200);
delay(200);
tone(buzzer, 800, 200);
delay(200);
tone(buzzer, 1200, 600);
delay(500);
//servo1.write(0);
//open box
digitalWrite(11,HIGH);
delay(500);
digitalWrite(11,LOW);
//servo2.write(120);
//delay(200);
//servo2.write(36);
}
else if (progress == 0) {
digitalWrite(yellow, LOW);
digitalWrite(red, LOW);
digitalWrite(green, LOW);
digitalWrite(blue, LOW);
if (rn > 15 and rn < 19 and ln > 10 and ln < 15) {
//red and green
counter += 2;
}
else if (counter > 0) {
counter -= 2;
}
if (counter >= 400) {
tone(buzzer, 200, 200);
progress = 1;
counter = 0;
}
}
else if (progress == 1) {
//light led and buzz once
digitalWrite(yellow, HIGH);
//servo1.write(0);
//Serial.println(counter);
if (rn < 15) {
//checks for wrong direction movement
//progress = 0;
}
if (rn > 10 and rn < 15 and ln > 5 and ln < 10) {
// green and blue
counter += 2;
}
else if (counter > 0) {
counter -= 3;
}
if (counter >= 500) {
tone(buzzer, 350, 200);
progress = 2;
counter = 0;
}
}
else if (progress == 2) {
digitalWrite(red, HIGH);
//light more led and buzz higher once
if (right > 900 or left < 200) {
//checks for wrong direction movement
//progress = 0;
}
if (rn > 10 and rn < 15 and ln > 15 and ln < 19) {
counter += 2;
}
else if (counter > 0) {
counter -= 3;
}
if (counter >= 500) {
tone(buzzer, 600, 200);
progress = 3;
counter = 0;
}
}
else if (progress == 3) {
digitalWrite(green, HIGH);
//light more led and buzz higher once
if (right > 500 or left > 500) {
//checks for wrong direction movement
//progress = 0;
}
if (rn < 5 and ln < 5) {
counter += 2;
}
else if (counter > 0) {
counter -= 4;
}
if (counter >= 500) {
tone(buzzer, 800, 200);
delay(50);
progress = 4;
counter = 0;
}
}
}
3D models and laser cut files used:
Guard dogs
Treasure Chest