Materials:
- 1 * Breadboard
- 1 * LM7805 Voltage Regulator
- 1 * Buzzer
- 1 * Push-Button Switch
- 1 * Arcade Button
- 1 * 220 ohm Resistor
- 1 * 10K ohm Resistor
- 1 * 10K ohm Variable Resistor (Potentiometer)
- 1 * LED
- 1 * 100 nF (0.1uF) Capacitor
- 1 * 12 volt power supply
- 1 * Barrel Jack
- 1 * Multimeter
- Several Jumper Cables (Hook-up Wires)
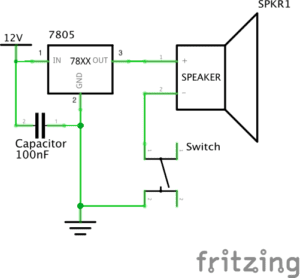
Circuit 1: Door Bell
Parts:
- Breadboard: Provides a base for the connections in a circuit
- LM7805 Voltage regulator: Controls voltage, allowing for consistent output
- Switch: When pressed, connects the circuit to allow power to reach the speaker
- Speaker: Vibrates, creating a sound, with the introduction of electric current
- Jumper cables: Provide connections for the circuit
- Barrel jack: Connects power supply to outlet
- 100 nF (0.1uF) Capacitor: Stores (and helps regulate) electric energy
- 12 Volt Power Supply: Provides power source
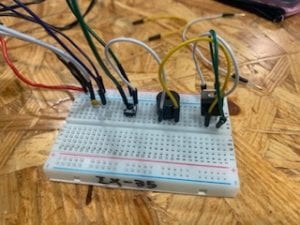
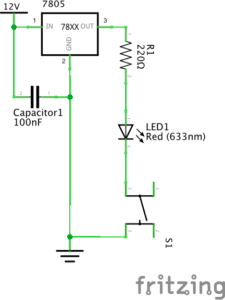
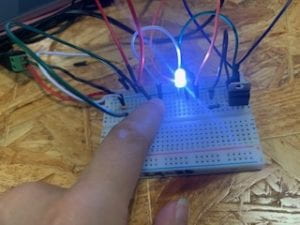
Circuit 2: Lamp
Parts:
- 20 ohm Resistor: Reduces current flow
- LED: Emits light with electric current
- Multimeter: Used to measure resistance
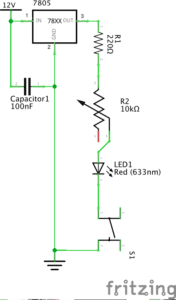
Circuit 3: Dimmable Lamp
Parts:
- 10K ohm Variable Resistor (Potentiometer): Allows for interaction, with a turn of the dial adjusting the strength of the electric current
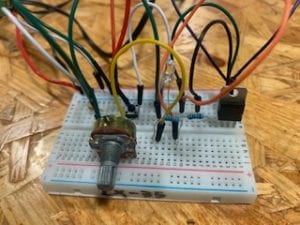
Reflection:
For my first lab assignment, my partner Megan and I were exploring this concept of interactivity, for which we completed two tasks that were assigned. The first one, consisted in building three circuits that enabled a door bell, LED lamp, and LED dimmable lamp. Along with it, the second one had to do with switching the circuits’ push button with an arcade button that we recently soldered.
The first task we actually completed, was the soldering workshop, in which we didn’t have many problems, even though it was the first time both Megan and me had done it. However, we did experience hardship knowing if we had put enough iron in the metal for it to be soldered completely or correctly, and for that we just checked in with the professor.
Regarding electric circuit building, we first read all the material in the recitation instructions, to familiarize ourselves with the components and its diagrams, however regardless of mildly understanding the graph on its own, we struggled figuring out how it related to the breadboard, and where we should even start assembling it. Nevertheless, to solve this issue we asked for help from one of the Learning Assistant’s, and were able to understand a lot better what we had to do, as well as managed to successfully complete the doorbell and lamp circuits.
For the final step, we were actually waiting to finish the dimmable lamp circuit in order to switch the press button with the arcade button we had recently soldered. However, we had much more complications with that last circuit; as even though we were able to build the circuit in the breadboard, it became difficult to actually get the dimmable lamp to work in the time provided.
QUESTION 1
As described in the reading, “The Art of Interactivity”, the term ‘interactivity’ itself could be defined as “the cyclic process in which two actors alternately listen, think, and speak”. Nevertheless, the extent to which this procedure occurs, is given in different “degrees” of interactivity produced between the subjects and their actions.
QUESTION 2
As an Art admirer, I would consider that Interaction Design and Physical Computing are greatly intertwined and could be used to create many different types of Interactive Art, not only just for artists, but also for viewers. Such as the case of Zack Lieberman, who created the EyeWriter, a machine that allows graffiti artists to draw with their eyes, other objects could be created to enable inclusion for people of disabilities not only just to create art, but also to view art through different eyes. For example, something regarding hearing or touch could be included in interactive art exhibitions, so that sight impurity does not prevent a person from admiring an artwork.