Materials:
From Arduino Kit:
1 * Arduino Uno
1 * USB A to B cable
1 * breadboard
1 * buzzer
2 * LEDs
2 * 220 ohm resistors
2 * 10K ohm resistors
2 * pushbuttons
A handful of jumper cables
From cart:
2 * arcade buttons
1 * Multimeter (optional)
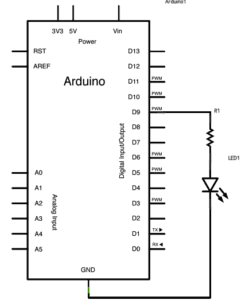
Circuit 1: Fade

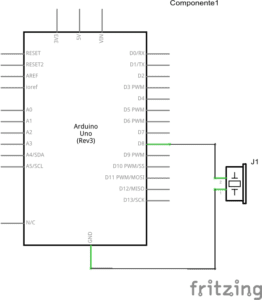
Circuit 2: Tone Melody

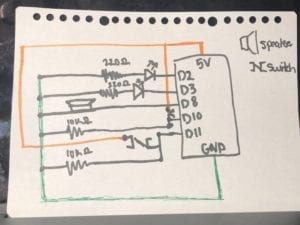
Circuit 3: Speed Game

we used the following code:
int buzzerPin = 8;
int button1 = 11;
int button2 = 10;
int led1 = 3;
int led2 = 2;

int goal = 10;
int buttonState1 = LOW;
int previousState1 = LOW;
int buttonState2 = LOW;
int previousState2 = LOW;

int counter1 = 0;
int counter2 = 0;
boolean winner1 = false;
boolean winner2 = false;

// the follow variables are long's because the time, measured in miliseconds,
// will quickly become a bigger number than can be stored in an int.
long time = 0; // the last time the output pin was toggled
long debounce = 200; // the debounce time, increase if the output flickers

void setup() {
  // put your setup code here, to run once:
  Serial.begin(9600);
  pinMode(buzzerPin, OUTPUT);
  pinMode(button1, INPUT);
  pinMode(button2, INPUT);
  pinMode(led1, OUTPUT);
  pinMode(led2, OUTPUT);
  Serial.println("******************* RACE THE LED *******************");
  delay(1000);
  Serial.println("READY");
  delay(1000);
  Serial.println("SET");
  delay(1500);
  Serial.println("GO!!!!!!!!!!!!!!!!");
}

void loop() {
  // put your main code here, to run repeatedly:
  buttonState1 = digitalRead(button1);
  buttonState2 = digitalRead(button2);
  //Serial.println(buttonState1);

  //this checks the times player 01 has pressed the button
  if (counter1 < goal && winner2 == false) {
  if (buttonState1 != previousState1 && millis() - time > debounce) {
  if (buttonState1 == HIGH) {
  counter1++;
  Serial.print("player 01: ");
  Serial.println(counter1);
  time = millis();
  }
  }
  previousState1 = buttonState1;
  if (counter1 == goal && winner2 == false) {
  winner1 = true;
  digitalWrite(led1, HIGH);
  Serial.println("PLAYER 01 WINS");
  playMelody();
  }
  }

  //this checks the times player 02 has pressed the button

  if (counter2 < goal && winner1 == false) {
    if (buttonState2 != previousState2 && millis() - time > debounce) {
    if (buttonState2 == HIGH) {
      counter2++;
      Serial.print("player 02: ");
      Serial.println(counter2);
      time = millis();
    }
  }
  previousState2 = buttonState2;
    if (counter2 == goal && winner2 == false) {
      winner2 = true;
      digitalWrite(led2, HIGH);
      Serial.println("PLAYER 02 WINS");
      playMelody();
     }
   }
}

void playFreq(double freqHz, int durationMs) {
  //Calculate the period in microseconds
  int periodMicro = int((1 / freqHz) * 1000000);
  int halfPeriod = periodMicro / 2;

  //store start time
  int startTime = millis();

  //(millis() - startTime) is elapsed play time
  while ((millis() - startTime) < durationMs) {
  digitalWrite(buzzerPin, HIGH);
  delayMicroseconds(halfPeriod);
  digitalWrite(buzzerPin, LOW);
  delayMicroseconds(halfPeriod);
  }
}

void playMelody() {
  playFreq(262, 100);
  playFreq(294, 100);
  playFreq(349, 100);
  playFreq(294, 100);
  playFreq(440, 200);
  delay(100);
  playFreq(440, 400);
  playFreq(392, 400);
  delay(300);
  playFreq(262, 100);
  playFreq(294, 100);
  playFreq(349, 100);
  playFreq(294, 100);
  playFreq(392, 200);
  delay(100);
  playFreq(392, 400);
  playFreq(349, 400);
}
Question 1: Reflect how you use technology in your daily life and on the circuits you just built. Use the text Physical Computing and your own observations to define interaction.
I define interaction as a continual conversation between two or more elements. Crawfords definition of interaction, “an iterative process of listening, thinking, and speaking between two or more actors” is helpful in thinking of interaction and I definitely agree with it. I think the terms “process” and “thinking” are key because interaction is not simply a call and response, but rather an action that involves understanding and intention. For example, swiping a metro card that triggers a door to open at the subway station is a very low level of interaction whereas a VR boxing simulation has a deeper level of “listening,’ “thinking,” and “speaking.”
Question 2: Why did we use the 10K resistor with the push button?
We needed 10K to regulate the flow of the current through the circuit.
Question 3: If you have 100,000 LEDs of any brightness and color at your disposal, what would you make and where would you put it?
I would create a flashing “open” sign for the front door of my apartment.
Regarding to the question about the 10K resistor, we use it because if we don’t use it we would have a shortcut every time we push the button, without the resistor we would be connecting 5V directly to Ground.
check out this video: https://www.youtube.com/watch?v=RqI9MqVRB5A
Please check out the slides of the documentation workshop to keep in mind these guidelines for your future posts:
https://docs.google.com/presentation/d/1r0o_ea88rsBVr86b7o7ugYpbml1uUsZLAJ3VPO0uC8E/edit?usp=sharing