Questions
- The image of the computer has changed drastically throughout the decades. Back then, computers were these hulking machines that only spoke in text, but that was when Steve Jobs and Bill Gates revolutionized what a computer was. They made it something anyone could use, regardless if you knew how to code or not. This class is really awesome because it lets me glimpse into the olden days. I am not clicking an icon to make my LED blink or my buzzer beep. I am using code and building the circuit required to make all these things interact-able. In a tiny way, I am rediscovering what all these great minds before me have.
- If I had 100,000 LEDs I would make the roads of our dorms just a bit nicer. I know students like to go out during nighttime for street food, and the long driveway can get pretty dark at night. Therefore if I was able to light up the entire road leading to our dorm’s back gate it would be amazing. I could even fidget with the colors depending on the day. Maybe there could be some green and red on Christmas, or even pink on Valentine’s Day.
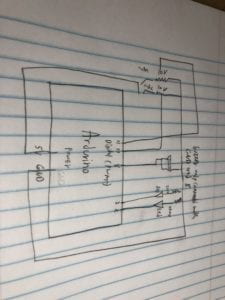
Materials/Diagram of Circuit 3
1 * Arduino Uno
1 * USB A to B cable
1 * breadboard
1 * buzzer
2 * LEDs
2 * 220 ohm resistors
2 * 10K ohm resistors
2 * pushbuttons
2 * arcade buttons
A handful of jumper cables
1 * Multimeter (optional)

Tasks
In a groups of two, build circuit 1, circuit 2, and circuit 3
Circuit 1: Fade (Success)
Thanks to the experience of last Recitation, my partner and I quickly sped through this first one with no problems. We quickly placed our 4 wires and then proceeded to find the code in examples. We uploaded it and the light faded as you see below.
Circuit 2: toneMelody (Success)
At first we thought this was going to be more complicated, but we quickly figured out we only actually needed two wires to connect to the speaker. After powering the speaker we found the code, uploaded it and we heard this amazing jingle!
Circuit 3: Speed Game (Success)
This one took a bit longer, but we figured it out by working slowly. We first analyzed the model, and then slowly but surely all the pieces came together. After finishing the circuit, we just copy and pasted the code given and it worked. We only had one misstep which was when my partner and I misplaced a resistor leg, but that issue was resolved relatively quick with the help of a fellow.