Link: http://imanas.shanghai.nyu.edu/~ds5665/project3/homepage.html
Description of the Project:
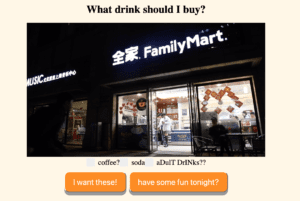
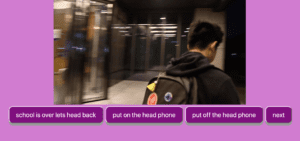
Originally, the plan was to create a very interactive website in which you could dictate what a person did (like Talking Tom). Although, this limited how creative we could be with our filming process, so we decided to instead do a day in the life of Steve. It was really fun filming this, as Steve has so many interesting talents we got to include in the project. Through an interactive website, you can chose how Steve’s day goes by picking various options throughout his day. For example, you can chose what time he wakes up at and that ends up leading to how the rest of his day goes. We really wanted the user to be able to interact and make their own decisions when using our project and make it relatable to every student here at NYUSH.
Process:
At the very start of the brainstorming process of this project, we struggled a lot to achieve an idea we were all really excited and confident about. We all wanted to be able to film from interesting angles and have lots of room to be creative. Our first idea restricted us from doing this, so when Steve came up with filming a day in his life, we decided this was a great idea to accomplish this with.
The first part of the project we did was the filming. By using the really cool stabilizer from the IMA Lab, we were able to get a bunch of smooth creative shots of Steve. We also used the tripod to get shots from higher angles above him to give a birds eye view. While we did divide up some parts of the project (Steve did lots of coding and was the actor, I did some coding and the filming, and Kat was the major editor), we actively participated in all aspects creating it so that it all blended together into a piece the three of us had envisioned.
Issues we ran into:
One of the issues I ran into was with the buttons on the page. I wanted them to become a different color when you hovered over to click it. Steve had figured this out before, yet we needed this to happen with multiple buttons on a page instead of just one. I ended up figuring this out by making a class called “button” and then did an “id” for each button under this class with “:active” for each. 
Another little issue we all ran into was actually using the camera. For some reason our first camera we borrowed had a full SD card and would turn off in the middle of filming. This further delayed our filming schedule and lead to us having to change cameras and SD cards. This camera worked perfectly and we were able to film the next day with the stabilizer and tripod.
Post-Mortem:
After completing this project, I was overall happy with the way it came out. Although, I do feel like we were too ambitious with it. There were some things we didn’t have time to finish.
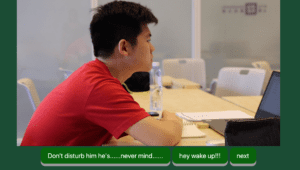
My favorite aspect of it was the shot of Steve doing his homework and the interactive aspect of being able to click the button multiple times to make him work slower or faster.
I think that if we had more time, I would’ve liked to change the layout of the pages to be more interesting instead of just centered for each video/button. We have viewed so many creative art media projects, and I think we could’ve made the layout way more interesting. This could’ve included making the video full screen with the buttons laid over the top of the video. Also, I wish we could’ve included being able to tap on something in the video to make it change. We originally were going to do this, but we thought the buttons were better for this idea.
Screenshots: