Project Description
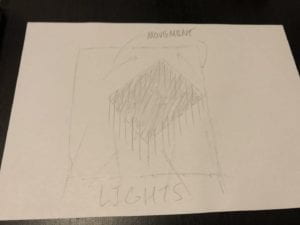
For this project, I really wanted to move away from what many of my classmates used, such as the LED strips, and work on a piece that uses light and shadows. From the beginning stages of my ideation, I wanted to work with the DMX lights to create interesting patterns of color, light, and shadows. Additionally, as we had to incorporate some form of movement into our projects, for example by using a servo motor, I really wanted to implement circular motion into my project, by either using a stepper motor or a DC motor.
To start I conducted a bit of research into past works by world renown modern and kinetic artists, and I found my original inspiration Olafur Eliasson’s and Willem Van Weegel’s usage of circular motion and how what the audience sees changes as the artwork moves, presenting ‘new’ pieces of art each time the artwork moves or shifts one way or another. Thus for my first proposal, I wanted to create a piece that had a rotating canvas in the middle, painted completely black, along with several black strips hanging loosely along the outer edge of the canvas free to rotate and move as the canvas rotates.
Perspective and Context
As I mentioned in the last section, I was heavily influenced by Eliasson and Van Weegel’s kinetic artworks. The circular rotation and the free moving strips were both inspired by some of their previous works, and as I was researching many different kinetic artists, what they had created was what really gave me my Eureka moment. Both Van Weegel and Eliasson’s usage of movement, and particularly Eliasson’s usage of light contributed a lot as well. These two artists inspired more of the tangible parts of my project, the rotating canvas and the free moving strips.
For the more intangible parts – the lights, shadows, and colors – I wanted to make use of the DMX lights and really use what we learned at the beginning of the semester about color theory. By having 3 different DMX lights shining at the canvas from different angles, and as each light’s brightness changes, there would be different sets of shadows and color shadows appearing either on the canvas itself or behind the canvas onto what the canvas would be set on (in earlier stages I was hoping for a wall, at the end we placed the canvas on a wood board). I was hoping this would create many different interesting patterns, especially in the background behind the canvas.
Development and Technical Implementation
Stage 1: At the beginning, I planned to have a canvas painted completely black with black strips along the outer edge. Thus I got to work on coding for the DMX lights and spent a few hours working on different patterns of light and colors and fading them in and out to see what kind of resulting color combinations I would get. I ended up with a few combinations such as yellow, blue, green, the classic red, green, blue, and a couple of others.
Stage 2: After receiving my canvas in the mail, the first one I received was broken, so I had to re-order a second one. However, I still made use of the first canvas and painted one half of the canvas black to see what it would look like when painted black. I did like this design at first, but upon seeing it multiple times, I thought that a completely black canvas would be a bit boring, almost as if there was something missing that could be there with a different design. So I asked the professor for his opinion on changing the design to something else, something similar to François Morellet’s artworks. I thought that this design would be much more interesting, particularly as different colors change the white areas of the painting, and the color shadows would show other colored lines on the canvas as well. I ended up deciding to use something similar to the far-left painting of Morellet’s, and changing it a bit to fit more with the kind of design that I would like to have. 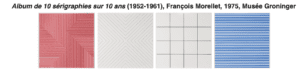
Stage 3: So I went into Adobe Illustrator and created a mock-up of what I would like to create, and this is what I came up with. 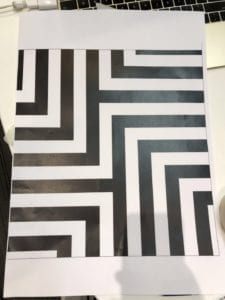 I thought that this fit perfectly with what I was trying to do and quickly got to work on painting the newly arrived, unbroken canvas. I used tape to cover up the areas that I would like to leave as white and left the areas to be black uncovered. I used regular black spray paint in the garden area outside the canvas and ended up with exactly what I imagined.
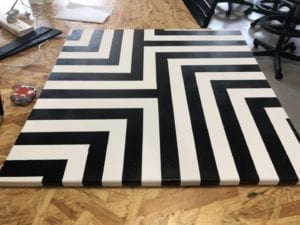
Stage 4: Then I got to work on implementing the strips that would be along the outside edge of the canvas. I decided that I would laser cut the strips using a 3mm MDF board, and then paint each of these with the same black spray paint to maintain the white and black aesthetic. After laser cutting, and painting, the strips looked like this on top of the canvas. 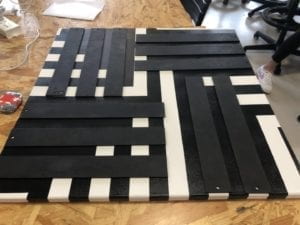 I used a screw to hold each of the strips in the place where you see them in the picture and kept it loose enough so the strips can move about on its own as the canvas rotates.
Stage 5: Afterwards, I got to work on connecting the canvas to the stepper motor itself, and how to keep the motor in place when setting the entire piece on the wall. For this, I also used 3mm MDF and laser cut multiple different pieces to put it all together.
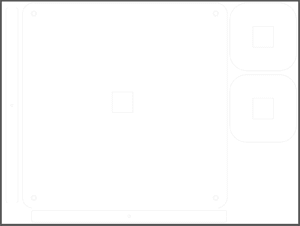 In this picture, though it is hard to see, the two strips on the far left and bottom of the picture are part of what the held the shaft of the stepper motor to the canvas. I drilled a hole into the center of the back of the canvas (the beam that runs along the middle of the frame of the canvas) and used the two strips with holes in the middle to provide additional support by hot gluing the strips onto the beam so the holes lined up perfectly to hold the shaft. The two square pieces on the right with a square hole in the middle, along with the identical pieces below were what I used to hold part of the stepper motor. Plus the large piece in the center of the picture above, which held part of the stepper motor and was to hold the entire piece on the wall. The smaller squares were hot glued together and onto the large piece and the stepper motor went into the smaller center square.
 After putting it all together and attaching the canvas onto the shaft, I moved onto implementing the artwork onto the wall with the help of my professor.
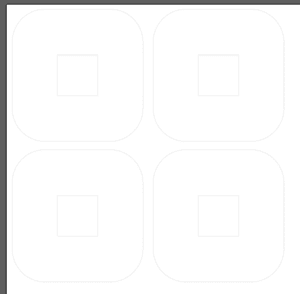
Stage 6: We learned that we couldn’t drill into the wall on campus, and since it would be hard to install it to the wall without screws, professor and I decided that we would use a large wooden board to install the piece, and then place the large board onto an easel, which would be much easier to move around and install for the final IMA show. However, since I needed the canvas to lean slightly forward to keep the outer strips from hitting one another too much, I had to fabricate something to hold the wooden board forward without letting it fall over. I decided to laser cut this:  From the right edge of the middle square in the left to the right edge is approximately 48 cm which allowed the large wooden board to lean forward enough to keep the strips from hitting one another. The small square on the left was installed onto the back beam of the easel and the right side of the laser cut ‘board holder’ was screwed into the top of the large wooden board. After placing it all together onto the canvas, and letting the motor run its code, it looked like this.
The stepper motor’s wire ran over the top of the large wooden board, as we weren’t allowed to drill through the board itself, and I had my breadboard and Arduino set up on the easel behind the board, out of sight.
At this point the set up was complete. The canvas was falling off of the stepper motor a bit, so I used some hot glue to attach it a bit better and left it for the night for the final presentation.
Github Link for DMX and Stepper Code: https://gist.github.com/veazeylt/ecfda6ce8b3290b7390e7130b95b312d
Presentation
For the classroom presentation, I used the same set up as in the previous picture and used the 3 DMX lights to project from different heights and angles towards the canvas. Unfortunately, I don’t have any photos or videos from the in-class presentation. The audience liked the spinning canvas and the strips along the outside – at one point one of the strips got caught on a screw and flung around violently and that got a reaction out of the audience. However, the different colored lights didn’t work out as well as I had hoped, and upon suggestion by the professor, for the IMA show I decided that I would use one light to illuminate the canvas, kind of like a spotlight, making even more use of the white and black aesthetic through single color shadows. The stepper motor’s wire was also a point of criticism, and the professor explained that since we can’t drill through the wooden board we can’t exactly hide it entirely, but one of the fellows suggested that I use tape to hide it as much as possible. One point that was really liked was that there was almost no wires or any kind of breadboard or technological piece visible to the audience and that was really pleasing to see.
So for the IMA show, I set it up to have one light shining onto the canvas and let the canvas rotate just as I had planned. The result was very beautiful and felt like a great culmination of my efforts. However, something went wrong, as they unfortunately always do for these kinds of projects. The hot glue didn’t hold the stepper motor’s shaft to the canvas well, and the canvas fell a bit multiple times throughout the show. After the first time, I changed the steppers code to just keep rotating one way, but the canvas still fell again, so I had to resort to just leaving the canvas hanging by itself without rotating. This was unfortunate, but the only way I can display it. 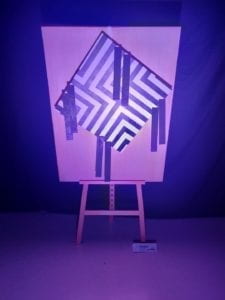
Other than that hiccup in the IMA presentation, the project went the way I had hoped, and I was very happy with the resulting piece of art that I had created.
Conclusion
Overall, I believe that my final creation was almost exactly how I had originally planned. Although I did make a change in the design choice for the canvas, and I had the error at the final showing of the artwork, all in all, I was satisfied with how I executed my original design. I hope that in the future I would be better prepared from this experience, and think of what possible errors could occur as things move around. I should have 3d printed or laser cut an additional piece to hold the canvas to the shaft, and I regret that I wasn’t able to just let the canvas rotate back and forth continuously like how I had intended.
This was one of the most fun projects that I had gotten to work with so far in my college career, and I hope I will have as much fun in further projects to come! I have always liked working with my hands and building and putting things together, so this project was practically a dream come true for me. To be able to piece together what I learn with what I like has inspired me to create more pieces like this, and this summer I plan to work with what I had learned this semester to create some side projects back home. Lastly, I would like to thank Professor Eric Parren, the IMA Fellows, and my classmates for helping me not only on this project but other projects and assignments throughout the semester. Thank you!