Week 3 – 3D Modeling in AR

For this week’s assignments, we were given the task to create 3 custom 3D models and put them into Reality Composer. Starting off, I had a really difficult time figuring my way around and creating models in Blender. There was just a lot going on everywhere and there were so many hot keys to remember, even after watching the introduction tutorial (multiple times).

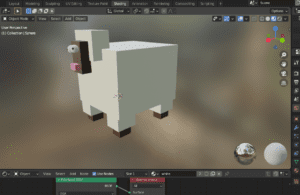
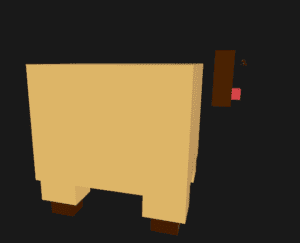
I decided to build off my idea from last week – starting off with creating a sheep! To get some inspiration, I literally just searched “beginners tutorial blender sheep” and found this one tutorial to follow. I’m giving credit to Grant here because I followed his model pretty closely. However, after modeling the sheep and adding color via the shading tab, I soon ran into a problem that only affected my sheep model. As I was exporting the model (to glb and fdx format) and putting it into Reality Converter, some parts of my model did not get exported! You can see this in my final AR experience – the main head part and eyes weren’t able to transfer over so the sheep just looks a bit scary. The first screenshot shows what my sheep is supposed to look like, but then when I put it into Reality converter to be converted into usdz format, it lost some key components. I even tried to delete the original eyes and head portion and replace it with a new duplicate, but for some reason it just wouldn’t hold. I’m not sure why this happened for my sheep because for my other farm animals, everything was fine! I was able to export the model as a glb file and convert it via Reality Converter to a usdz so that it could be read in Reality Composer.

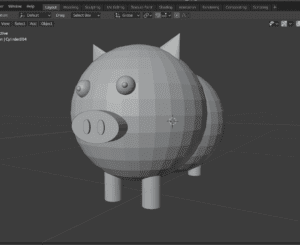
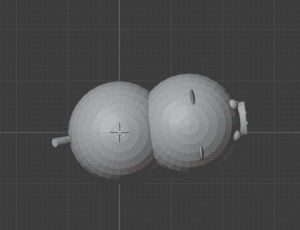
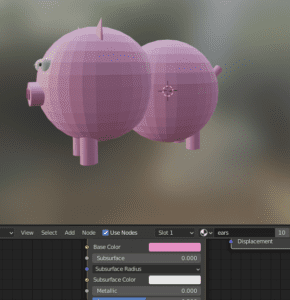
Now, onto my next two models. Recently, my brother has been raving about his Minecraft worlds and so I was inspired to create Minecraft-like models so I could brag to him about MY models. For my second model (pig), I ran into another inconvenience! I didn’t center the body portions of the pig nicely/parallel to the anchor, so I had to do extra alignment work so that the head portions and leg lined up nicely. You can see in the second screenshot below how the pig is slightly sideways. Other screenshots show the model and color. 

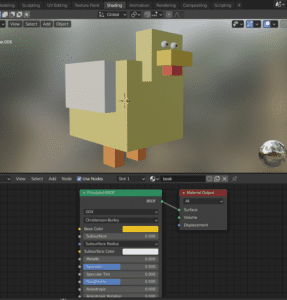
Finally, I made my chicken. However, the coloring in Blender turned out different when I converted it to usdz so I had to go back and redo the color shades multiple times before I was satisfied.

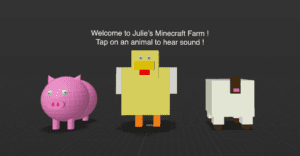
Now, it was time to put my models into Reality Composer. I wanted to create a farm animal experience so, whenever you tap on the animal, its associated sound would play. I chose a horizontal anchor. Below is a screenshot of what the experience looks like in RC. 

 Here is the link to the screen recording.

In the future, I would have loved to develop the models a bit further but I didn’t feel like I had gotten the hang of Blender quite enough yet. I would have loved to create a swirly pig tail for my pig and even looked online for ways to do it, but there wasn’t too much information on it and if there was, it was in the older Blender versions. It also would have been really cool to add some flappy wing animations for my chicken. Even though the process was a bit overwhelming at first, I’d say this was a good start and am looking forward to really getting to know the ins and outs of Blender for future models.

Week 2 – World Sensing with AR

This week, we were given the task to create 2 End-to-End AR experiences that improve/elevate some of our daily experiences. For my first experience, I wanted to improve upon something that I have struggled with my whole life: falling asleep. Traveling around and adjusting to different time zones have made the process of falling asleep simply unbearable. So, I wanted to create and AR experience that could make that process a bit more pleasing. Plus, everyone goes on their phone before sleeping!

Initially, I decided to use a vertical anchor to be able to mimic the position the user would be in. I’d imagine the user would be laying down in bed, holding their phone above their face, meaning their phone would be facing the ceiling in a vertical fashion. However, I quickly found out that RC has a difficult time examining the world of the ceiling because there is simply no texture to the wall, no matter how long I tried moving or even if I added some LED galaxy stars I have. So, I had to demonstrate the experience standing up, facing a wall with more texture. 

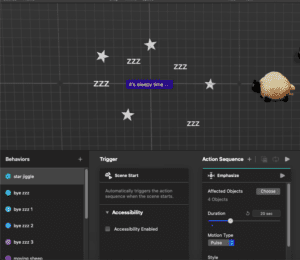
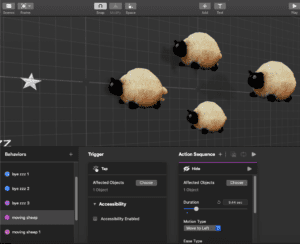
Now onto the fun stuff – the item components! I focused mainly on including components that I believed would help one feel more relaxed. I added some text (“zzz”) and stars surrounding the main introductory text (“it’s sleepy time…”). The “zzz” text will float away if you tap on it, mimicking the idea that you are slowly falling into a sleepy mood. When you tap on the stars, they all pulse a few times, as if you were outside watching the stars glisten. On scene start, a chill lofi beat begins playing, immediately entrancing you into a relaxation state. On the right, I included 3D sheep models that if you tap on them, they will “float” across the screen, like counting sheep jumping across a meadow (aka. one of the most typical things people say to do if you can’t fall asleep). Thank you polybuis for the model. 

Here is the link to my screen recording.

For my second AR experience. I wanted to enhance a visit to a friend’s new apartment – specifically focusing on elevating the art experience. My inspiration from this was drawn from housewarming gatherings. Having just arrived in NYC a few weeks ago and moving into a new place, often when people come over, they ask me about the tapestries and artwork I have on my walls, and vice versa. 

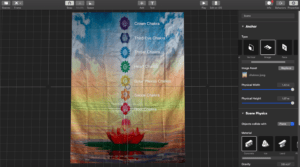
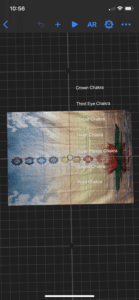
I decided to use an image anchor and imported a photo of a chakra tapestry I have in my room. Yoga and spirituality is a big part of my life and I really enjoy talking about the different chakras. At first, things were a bit disorientated because the image anchor was facing a different way, so when I went into AR mode on my phone, the chakra text was facing the wrong way. So, I just rotated the original image to fit RC’s orientation.

My view on computer

My view on phone

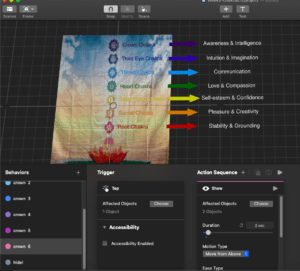
After solving this issue, I was able to add arrows and more text explaining what the chakras mean. When the phone recognized the image, the name of the chakras immediately showed, but in order to know what they mean, you could tap on the chakras and the meaning would appear. I kept the arrows and extra text hidden at scene start, so when the user clicked on the chakras, it would suddenly “appear”.


Here is the link to a screen recording.

Moving forward, I would love to make the first sleepy time AR experience compatible with the ceiling so that the user could really be immersed in the experience, laying in bed. But, I am not sure if RC would be able to recognize the surface if it had no texture. I would have also loved to know how to make the trajectory of movement of the sheep be circular (like a half moon route) rather than just straight across the screen. This way, it would better mimic the motion of a sheep jumping and frolicking across a field. For the second chakra AR experience, I would have loved to include some voice overs. So rather than tapping on the chakra and having more text appear, a voice memo of a very zen person speaking about the chakra would play from the phone. Kind of like those interactive art galleries! It was a lot of fun creating these experiences. I would love to learn more about creating my own 3D models and what RC has the capacity to do. 

Code of Music A22: Final Project – Alex Wang

Task:

Create a generative or interactive musical piece. It can be web-based, a physical device, or exist in space. In your presentation, discuss musical, design, and programmatic aspects of your project.

Video:

Inspiration and concept:

I am really inspired by the Chinese electronic music artist Howie Lee. In his music video titled “Tomorrow cannot be waited” there is a scene at around 1:30 – 2:05 where it seems like he is performing live, controlling the sounds we hear with the movement of his hands.

I thought this was interesting because one of the major downfalls of using a electronic based instrument is that it lacks real time control over timbre, making it less viable to be performed live. However, with more advanced human computer interaction interfaces, these live performances are starting to work.

I remembered one of my previous projects that I had been working on which I titled “ML Dance”, it is a rhythm game utilizing ML5 posenet pose recognition. I thought if I change this from a game to something more music oriented, this could be beneficial for musicians looking to do some real time audio visual performance. It did not require any extra hardware similar to the one seen in the video, no sensors, no depth sensing camera, etc. 

Combining the concept of real time timbre control with body movement along with machine learning powered pose recognition, I came up with a new project that I named “Expression”. The idea is that by adding tone JS I can not control the sounds of each individual musical element, such as changing volume or lowpass. I can also do musically synced animation that adds to the visual aspect of the project.

A description of your main music and design decisions:

The music is a song that I produced, the vocal and lyrics is from a classmate who is taking the same music tech class with me. I chose this song because I really like the simplicity of my arrangement choices, the song can be broken down to just a few different instruments: drums, vocals, plucks, and bass. Also it is more convenient to use my own track since I will not have access to all the stem files if I were to use a song from the internet, even if I did download the stem tracks to another song I needed the sounds unprocessed, because I need the raw audio signal to go into my program where tone JS applies the new effects.(if I feed an already low passed sound and try to remove the lowpass within tone JS it wouldn’t work)

As for my design decisions, most of the work was already done when I originally planned this project to be a rhythm game. I spent a lot of time filtering the machine learning model outputs for a smooth interaction, as well as a lot of pose interaction specific design decisions which can be found here

Aside from work already implemented from that project, I added a lot more when I am converting this project from a game to a more artistic project. First of all, I added visuals to the lyrics and synced them by calculating the time stamp. I also added ripple visuals that is taken from my rhythm project(Luminosus), I synced the ripples to the music and it also responds dynamically to how much the user is low passing the pluck sound. Finally, I added a layer of white rect to match the rising white noise during a typical EDM build up and created a series of animation styled images during the drop to keep the user interested.

An overview of how it works:

By sending posenet my camera capture, it returns me values that corresponds with its estimated pose position. I then use that value to not only update your virtual avatar, but also use that value to control low pass filters from tone JS. I import my tracks stems individually by grouping sounds in to 4 main tracks, three of which can be controlled by low pass and one where everything else plays in the background. I also ran a Tone.scheduleRepeat function at the same time to sync the triggering time of animations, such as having the ripples spawn at a 16th note pace or having the lyric subtitles appear and disappear at the right time.

Challenges:

I believe the most challenging parts are already sorted out when I was initially creating this as a game, problems such as posenet being inaccurate, how to sync gameplay with music, and how to design for a interface that is not controlled with the classic mouse+keyboard. However, when translating things from my old project into what I have now, I still encountered many annoying errors when trying to add tone JS and changing some of my original codes to match this new way of working with audio files. 

Future Work:

I originally envisioned this project to be a much more complex control over timbre, not just low pass. But as I worked more and more towards my goal, it just makes more sense to have simple lowpass controls over multiple different musical elements. Perhaps if I have the right music, where the main element of the song heavily relies on the change in timbre, I can change from controlling multiple elements to using all of your body to control one single sound. With a much more complicated way of calculating these changes, not just x y coordinates of your hand, but the distance between all your separate body parts and their relationships can all affect a slight change in timbre. I also plan on emphasizing on a more user controlled visual, similar to the ripple generated by the pluck sound, as opposed to pre made animations synced to the music. I want this project to be about the expression of who ever is using it, not the expression of me as the producer and programmer. Also incorporating more accurate means of tracking, with sensors or wearable technologies, could also greatly benefit this project and even make it a usable tool for musicians looking to add synthetic sounds.

Interaction Lab: Stupid pet project Skye (Spring 2018)

Skye Gao

Professor Rudi

Stupid pet trick project

February 23rd

PROJECT SUMMARY: For this project, we are required to use digital/analog sketch to build a simple interactive device. It must respond to a physical action or series of actions a person takes, and it must be amusing, surprising, or otherwise engaging. For my project, I decided to choose my equipment first then design a circumstance for my device.

MATERIALS:

  • 1* Arduino Kit and its contents, including:
  • 1 * Breadboard
  • 1 * Arduino Uno
  • 1 * Buzzer
  • 1 * 1m Resistor
  • 1 *  Vibration Sensor
  • 1 * USB A to B Cable
  • Jumper Cables (Hook-up Wires)

BUILDING PROJECT: I planned to use a sensor as my interactive equipment, and the sensor I wanted to apply is a vibrations sensor. I tired to build a circuit in which I use the vibration sensor to control a buzzer. The circuit I draw is like this:

There were two ideas I had for the circumstance in which the devices works:

The initial idea was that I would make a toy (I have a toy bunny) with which when people spank or shake or touch it gently, it will make different sounds. The idea emerges from my last recitation, as I also used the vibration sensor to control the buzzer, and when I knocked on the sensor, the buzzer made noises, which was quite funny.

The circuit is easy to built, while my problem is how to write the sketch properly so that the outcome will work as I expected. For the first trial I used the IF condition to modify the degree of vibration and its responding noice. professor helped me try two kinds of code and the code is like below:

/*using map –> it doesn’t change the frequency of the speaker but the delay */

// map it to the range of the analog out:
outputValue = map(sensorValue, 0, 1023, 0, 880);
// change the analog out value:
if (outputValue >= 20) {
analogWrite(analogOutPin, outputValue);
delay(outputValue);
} else {
noTone (9);
}

/*using tone / noTone with IF */

if (sensorValue >= 50) {
tone (9,440);
delay (100);
} else if (sensorValue >50 && sensorValue <= 150) {
tone (9,24.50);
} else {
noTone (9);
}

The outcome was not ideal, as when I tried to shake the bunny with different frequency, I could figure out the change in tone but I found the sound was not that constant and corresponding with my shaking frequency. The different sounds were mixed even when I shake it with quit different force. To figure out why, I check the serial monitor, as I saw, the actual sensor value that the sensor accept is not stable, a gentle shake has sensor value that over 100 while a quite strong shake can range from 20 to 150. In terms of such problem, professor suggested me to take the instability of vibration sensor Into consideration. Also, I need to take into consideration  that how to let my experiencers understand what I want them to do, like what level they are expected to touch the bunny and what responses they are supposed to get for their action.

Considering the unstable result, I found it hard to let my audiences understand my idea, and more seriously, I cannot make sure what the outcome will be like. so this idea is not discreet. I needed to come up with a better idea.

I did not want to demolish all my previous thoughts, so my second idea was based on my first one. At this step, my top mission was to find a stable way to use the vibration sensor, i.e. Let the sensor value read be stable with every acts. The solution was totally an inspiration  in my mind, as I was staring at the serial monitor, trying to think out a solution, I accidentally put the bunny lying on the desk and pushed his belly unconsciously. I suddenly found out that when I do nothing with the bunny, the statistics shows around 0, while when I push the his belly every time it shows like below:

The income stats seems to be more stable this time, which makes me really excited. This time I did not need to worry that the bunny will make noice by himself as the “mute” state and “unmet” state is clearly separated. So I continued to think about a suitable and vivid context for this device.

As I saw my bunny lying on the ground and I was pushing his belly,  I found my acton really like saving a person with CPR. So I thought it would be a great idea to name this project as “saving this bunny with CPR”. People can push on bunny’s bully trying to “save” him, and there will be response to their actions each time they push as well as in the end to indicate whether they have saved it successfully or not.

To achieve such effect, I did not change my circuit but modified my sketch based on my precious one. As can be seen in the photo above, the sensor value will reach over 100. so I still used the IF condition and modified the restriction as 80, when the sensor value is over 80 (i.e. your push it really hard), the buzzer will make a sound. That is the interaction o f each action. This part of code is as below:

if (sensorValue >80 && sensorValue <= 150) {
tone (9,1500);
count = count + 1;
} else {
noTone (9);
count=count;
}

And as a response for result of the whole procedure, I decided to use a count function to count people’s pushing time so that when people push to certain times, the buzzer will play a short melody by using the tone() function to indicate the result. By doing so people can feel interested in keeping dong so and fully experience the procedure of saving somebody (instead of just try one to two times and lose interest) and get a reward for that, which I found may be more real and inspirational.

This part of code as well as the whole coding is shown in the source code .

Initially I set the range of the sensor value as between 80 and 150, basing on the statistics shown in the serial monitor and my personal experience of pushing force (which is likely to be similar to the feeling of doing CPR). The stats I use as a reference is as below:

I met one problem when I tested the range. For some times at the first place it worked out well, which is really exciting. However, at one moment  the stats shown appeared to be unstable again. As when the device stayed static, the stats were around 10, while when I push it it just around 20 no matter what force I was using. Which loos like below:

Considering that it has worked for some times, the code should be no problem, so the problem may be the circuit. After checking the circuit again, I found the connection of sensor is loosen which may happened when I moved the whole device, and that is the cause of the problem.After reconnecting the circuits, the outcome becomes normal and world just as I expected!!

DECORATION: SO the following part is just to do my decoration (which is my favorite part). Since I have built a context for my device, which is “save the bunny with CPR”, I want people to know that they are supposed to pushing the bunny’s belly just as CPR when they look at my project. So I draw a display board on which there is big characters saying “SOMEBODY SAVE THE BUNNY with CPR!!!“, and I draw a doctor and a nurse to further indicate this bunny may have some medical incident. When people see this board, they can relate this to those emergence happen in daily life, and the words will tell them what to do.  To further inform my audience what specially they should do, I also draw a heart and attached it to the bunny’s belly, (which can also cover the sensor), so that people know where to put their hands. And just for entertaining, I put crosses on the bunny’s eye to indicate he is dying. The outcome decoration looks like below:

What’s more, I want to add more meaning to my project, not just an entertaining device. So I searched for the standard procedure of doing CPR and attached that to my show board, thus when people are experiencing my project, they can also learnt about how to use CPR to save people’s life in real life. I found this educational and practical.

(Learn how to do CPR!):

SHOW TIME: Till then, my project was completed, and what came next was the show time. My project as well as its decoration did appear to be attractive. Many people came to my table to give a try and asked me questions about my design. Here is my project on the show:

FEEDBACKS: I got several feedbacks from my peers as well as professors.

  1. People say the project is really cute and interesting !! 🙂
  2. In terms of the response melody, some people can understand that they successfully saved the bunny immediately, but some people conceived the melody as “fail”, (it may due to the melody and the crosses on the bunny’s eyes), so I have to tell them they had succeeded every time the melody plays. One suggestion I got is to change the melody and  play a more delightful one. That’s really reasonable.
  3. Some people started their push with a really soft touch because they are not sure what to do, I have to tell them to push harder, I think I may need to add this to my show board so that people can understand they need to push hard. (But I think that’s point that people need to learn about it through trials).  One relevant suggestion I got is to add a feedback to each pushing action, like adding a led which will be be on each time the bunny is pushed. (But there IS sound each time the sensor is vibrated to certain extent…maybe they did not hear that, maybe visual effect is better than sounds?)
  4. Some people asked me how do they know they succeed or not. That is also a concern for me during my design. It would be better if there can be another melody or some signal to indicate the failure besides success, but that will be much more complicated and I do not know how to do it at this time. But I think I will find a way to figure it out in the future.
  5. One professor found my project interesting and suggested me to put into practical use…(he said I can put it in the health centre). That will be really nice if I can do that, but I think I need to first improve those drawbacks that are brought up in feedbacks. Also, I think for practical use, the device should be more accurate and close to reality. It better brings to people an experience similar to the real CPR procedure as much as possible, so that it can be really educational and applicable.  (But being a toy like that is fine…I think…)

CONCLUSION:  This project is really interesting and inspiring. It is my first project and I really enjoy the precess of completing it. There still remains many problems for me to figure out and improve, and I think that is my goal for the next stage of studying IMA!

Source Code:

/*
Melody

Plays a melody

circuit:
– 8 ohm speaker on digital pin 8

created 21 Jan 2010
modified 30 Aug 2011
by Tom Igoe

This example code is in the public domain.

http://www.arduino.cc/en/Tutorial/Tone
*/

#include “pitches.h”

// notes in the melody:
int melody[] = {
NOTE_C4, NOTE_G3, NOTE_G3, NOTE_A3, NOTE_G3, 0, NOTE_B3, NOTE_C4
};

// note durations: 4 = quarter note, 8 = eighth note, etc.:
int noteDurations[] = {
4, 8, 8, 4, 4, 4, 4, 4
};
// These constants won’t change. They’re used to give names to the pins used:
const int analogInPin = A0; // Analog input pin that the potentiometer is attached to
const int analogOutPin = 9; // Analog output pin that the LED is attached to

int sensorValue = 0; // value read from the pot
int outputValue = 0; // value output to the PWM (analog out)
int count = 0;

void setup() {
// initialize serial communications at 9600 bps:
Serial.begin(9600);
pinMode(9,OUTPUT);
}

void loop() {
// read the analog in value:
sensorValue = analogRead(analogInPin);
// map it to the range of the analog out:
//outputValue = map(sensorValue, 0, 1023, 0, 50);
// change the analog out value:
//analogWrite(analogOutPin, outputValue);

if (sensorValue >80 && sensorValue <= 150) {
tone (9,1500);
count = count + 1;
} else {
noTone (9);
count=count;
}
if (count == 50){
// iterate over the notes of the melody:
for (int thisNote = 0; thisNote < 8; thisNote++) {

// to calculate the note duration, take one second divided by the note type.
//e.g. quarter note = 1000 / 4, eighth note = 1000/8, etc.
int noteDuration = 1000 / noteDurations[thisNote];
tone(9, melody[thisNote], noteDuration);

// to distinguish the notes, set a minimum time between them.
// the note’s duration + 30% seems to work well:
int pauseBetweenNotes = noteDuration * 1.30;
delay(pauseBetweenNotes);
// stop the tone playing:
noTone(9);
}// no need to repeat the melody.
count = 0;
delay(100);
}
// print the results to the Serial Monitor:
Serial.print(“sensor = “);
Serial.print(sensorValue);
Serial.print(“t output = “);
Serial.println(outputValue);

// wait 2 milliseconds before the next loop for the analog-to-digital
// converter to settle after the last reading:
delay(2);
}