Recitation 8: Serial Communication by Anica Yao

Exercise 1: Make a Processing Etch A Sketch

In this exercise, the values of the two potentiometers are transmitted from Arduino to Processing. Firstly, what I drew was continuous dots and each dot appears according to the assigned X, Y position. In this process, I found the processing can not give a quick response. So I adjusted the delay() function and it got better. Secondly, I tried to make lines just as shown in Etch a Sketch. The challenge was about how to locate the previous position. Later I defined them before the UpdateSerial(). It works well. It’s also quite fun. 

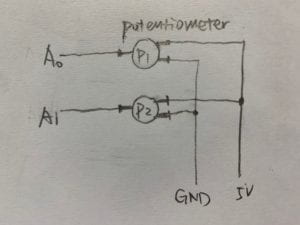
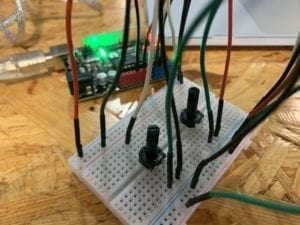
The schematic: 

The changes of codes:
– In Arduino:

  delay(100);        // delay in between reads for stability

– In Processing:

int NUM_OF_VALUES = 2;   /** important. YOU MUST CHANGE THIS ACCORDING TO YOUR PROJECT **/


float px;
float py;

void draw() {
  px = sensorValues[0];
  py = sensorValues[1];
  updateSerial(); ///important. Update the string you got
  printArray(sensorValues);
  
  strokeWeight(5);
  stroke(255);
  line(sensorValues[0]/2, sensorValues[1]/2, px, py);
}

What I notice is that I need to convert the range of sensorValues from 0-1023 to the actual value (eg. width, height) so that it won’t go out of the edge. 

Here’s the final creation:

Exercise 2: Make a musical instrument with Arduino

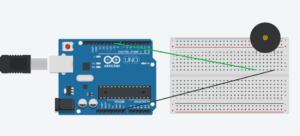
This is relatively easier compared to the first one. I didn’t use potentiometers in this circuit. Instead, I made value mouseX as the frequency of the buzzer and mouseY the duration. 

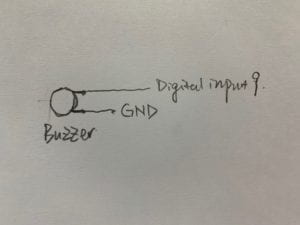
Here’s the schematic:

Here’re the changes I made in the codes:

In Processing:
  values[0] = mouseX;
  values[1] = mouseY;
In Arduino:
  tone(9, value[0],value[1]);

Final creation:

Recitation 7: Functions and Arrays by Ashley Zhu

For this week’s exercise, we worked with arrays and functions, which was a bit more challenging to grasp. Our task was to create 3 objects with 100 arrays and call them. But as I figured out the first one, the other ones became easier.

I used the smiley face code we did in class as a reference and used for loops on top of that. However, then I focused on calling one object, which was the ellipse and commented out the other ellipses and arcs that made the smiley face, which made my final ‘graphic design’ consisting of 3 objects: ellipse, triangle, and rectangle. I used the for loop referenced in the recitation guide and used the symbol n to define numberofInstances, which was 100 arrays. Then, I used the new [] function to move my objects according to speed and randomized their colors to make the exercise more fun. I also used the xloc and yloc functions to help me track the location of the xy axis of the object, which was easier to expand on as the number of objects multiplied.

Code:

int n = 100;

float x = 100;
float y = 50;

color[] c = new color [n];

float xspeed[] = new float[n];
float yspeed[] = new float[n];
float [] xloc = new float[n];
float [] yloc = new float[n];

void setup(){
size(600,600);
background(255);
for(int index = 0; index < n; index++) {
  xloc[index]=random(width);
  yloc[index]=random(height);
  c[index]=color(random(255), random(255), random(255));
  xspeed[index]=random(-10, 5);
  yspeed[index]=random(-10, 5);
  }
}


void draw() {
  fill (0);
  rect (0, 0, height, width);
  for(int index = 0; index < n; index++) { 
  display(100,100, 50, xloc[index], yloc[index], c[index]);
  xloc[index]=xloc[index]+xspeed[index];
  yloc[index]=yloc[index]+yspeed[index];
  if (xloc[index]>width || xloc[index]<0){
    xspeed[index]=-xspeed[index];
  }
   if (yloc[index]>width || yloc[index]<0){
    yspeed[index]=-yspeed[index];
  }
  } 
 }
void display(int size, float x, float y, float xloc, float yloc, color c){
  //ellipse
  noStroke();
  fill(c);
  ellipse(xloc,yloc,x,y);
  fill(0);
  //rectangle
  fill(c);
  rect(xloc-10,yloc+10,x,y);
  fill(255);
  //triangle
  fill (c);
  triangle(xloc+50, yloc-10, x-90, y-40,0,0);
  fill(255);
}

Video:

Question 1:

I noticed that when I put my loop () in setup, it played only once, whereas when I put my loop() in draw, it looped the objects and repeated on top of what was already drawn.

Question 2:

There are many benefits of using arrays such as collecting and organizing big data, arrays make it a lot easier to see and understand which values are in place. Arrays are also useful when making projects that draw on a lot of data and needs structure, this way, the code is a lot more concise and easy to understand. In a future project, arrays can be used to call on different randomization of animation, like what we did for this exercise. Or, it can be used for map projects, to call on different points of data to display certain points/places on a map.

Recitation 8: Serial Communication by Yiwen Hu

Exercise 1: Make a Processing Etch A Sketch

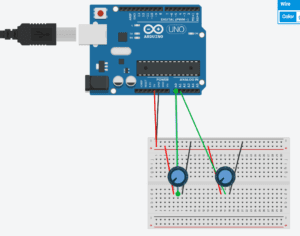
I first opened the example code called multi-value. Then I built the circuits by connecting the two potentiometers to the breadboard. Then in arduino code I changed the original number to 2 to match the two potentiometers. Then I run the arduino to check if the value change in potentiometers can be displayed in the arduino serial. After it worked, I opened the processing and created a circle in the draw()  with a black background line of code at the beginning to avoid trace of drawing. I also linked the position of the circle to arduino sensor value by creating x and y.

circles movement

Then I replaced the circle with line. To make it continuous, I delete the background at the beginning. The challenge is to avoid creating continuous straight lines. Inspired by what we’ve learned in class, I used the pMouseX and pMouseY to track the previous drawing. I also used a map function to ensure the lines moved inside the screen. The effect is shown as below. The potentiometers respectively control the movement along x and y axis. 

circles movement

Exercise 2: Make a musical instrument with Arduino

I built the circuits first by connecting the buzzer to the volt and the digital pin. Then like exercise 1 but in reverse order, I opened the processing first and changed the port and number of input to 2 because the variable is the frequency and duration of the buzzer. In processing I changed the input value to 2 too and also created a tone() function. tone (pinnumber, frequency, duration). Based on the principle, I linked the frequency and duration value to the value in two potentiometers. It worked like this!

The interaction is basically translating the analog value of the potentiometers to the values various different outputs. It enables interaction in various forms. 

Recitation 8 Serial communication

Recitation 8 Serial Communication 

Step 1 Make an ellipse with potentiometers: 

Using the multiple values in class example, here are the changes I made: 

(Arduino)

void loop() {
int sensor1 = analogRead(A0);
int sensor2 = analogRead(A1);

int mappedValue1 = map(sensor1, 0, 1023, 0,255);
int mappedValue2 = map(sensor2, 0, 1023, 0,255);

Serial.print(mappedValue1);
Serial.print(“,”); 
Serial.print(mappedValue2);
Serial.println()

(Processing)

int NUM_OF_VALUES = 2;

background(0);
ellipse(sensorValues[0], sensorValues[1],50,50);

Step 2 Make a line etch-a-sketch: 

Still using the in class example of multiple values: 

(processing)

float xoldvalue;
float yoldvalue;

stroke(255);
line(xoldvalue, yoldvalue, sensorValues[0], sensorValues[1] );
xoldvalue = sensorValues[0];
yoldvalue = sensorValues[1];

Make an instrument 

I used the one value file to do this

(processing)

if (mousePressed && mouseY>250 ) {

}

(Arduino: 

if (valueFromProcessing == ‘H’) {
digitalWrite(ledPin, HIGH);
tone(ledPin, 2000);

} else if (valueFromProcessing == ‘L’) {
digitalWrite(ledPin, LOW);
tone(ledPin, 8000);
} else {
digitalWrite(ledPin, LOW);
noTone(ledPin);

}

Result: this made the sound of the buzzer, and when the mouse went above 250 (half) of the canvas, then the tone of the buzzer was higher pitched (8000). 

Recitation 8: Ruben Mayorga

The video to show the program working was too large to post, but the idea behind the project was to learn how to use the processing with the arduino and make them interact with more than one value between each other.

import processing.serial.*;

String myString = null;
Serial myPort;

int NUM_OF_VALUES = 2; /** YOU MUST CHANGE THIS ACCORDING TO YOUR PROJECT **/
int[] sensorValues;
int preSensorValues;
int preSensorValues2;
/** this array stores values from Arduino **/

void setup() {
size(500, 500);
background(255);
setupSerial();
}

void draw() {

updateSerial();
printArray(sensorValues);
line(preSensorValues,preSensorValues2,sensorValues[0],sensorValues[1]);
preSensorValues=sensorValues[0];
preSensorValues2=sensorValues[1];

// use the values like this!
// sensorValues[0]

// add your code

//
}

void setupSerial() {
printArray(Serial.list());
myPort = new Serial(this, Serial.list()[0], 9600);
// WARNING!
// You will definitely get an error here.
// Change the PORT_INDEX to 0 and try running it again.
// And then, check the list of the ports,
// find the port “/dev/cu.usbmodem—-” or “/dev/tty.usbmodem—-”
// and replace PORT_INDEX above with the index number of the port.

myPort.clear();
// Throw out the first reading,
// in case we started reading in the middle of a string from the sender.
myString = myPort.readStringUntil( 10 ); // 10 = ‘\n’ Linefeed in ASCII
myString = null;

sensorValues = new int[NUM_OF_VALUES];
}

void updateSerial() {
while (myPort.available() > 0) {
myString = myPort.readStringUntil( 10 ); // 10 = ‘\n’ Linefeed in ASCII
if (myString != null) {
String[] serialInArray = split(trim(myString), “,”);
if (serialInArray.length == NUM_OF_VALUES) {
for (int i=0; i<serialInArray.length; i++) {
sensorValues[i] = int(serialInArray[i]);
}
}
}
}
}

After that the project required the arduino to interact from the information received from the processing, this was more complicated but in turn it helped to show how to send messages from processing to arduino.

// IMA NYU Shanghai
// Interaction Lab
// This code sends one value from Processing to Arduino

import processing.serial.*;

Serial myPort;
int valueFromArduino;

void setup() {
size(500, 500);
background(0);

printArray(Serial.list());
// this prints out the list of all available serial ports on your computer.

myPort = new Serial(this, Serial.list()[ 0], 9600);
// WARNING!
// You will definitely get an error here.
// Change the PORT_INDEX to 0 and try running it again.
// And then, check the list of the ports,
// find the port “/dev/cu.usbmodem—-” or “/dev/tty.usbmodem—-”
// and replace PORT_INDEX above with the index number of the port.
}

void draw() {
// to send a value to the Arduino
if (mouseX> 200) {
myPort.write(‘H’);
} else {
myPort.write(‘L’);
}
}

// IMA NYU Shanghai
// Interaction Lab
// This code receives one value from Processing to Arduino

char valueFromProcessing;
int ledPin = 13;

void setup() {
Serial.begin(9600);
pinMode(ledPin, OUTPUT);
}

void loop() {
// to receive a value from Processing
while (Serial.available()) {
valueFromProcessing = Serial.read();
}

if (valueFromProcessing == ‘H’) {
digitalWrite(ledPin, HIGH);
} else if (valueFromProcessing == ‘L’) {
digitalWrite(ledPin, LOW);
} else {
// something esle
}

// too fast communication might cause some latency in Processing
// this delay resolves the issue.
delay(10);
}