Recitation 8: Serial Communication by Ian (You Xu)

Exercise 1:

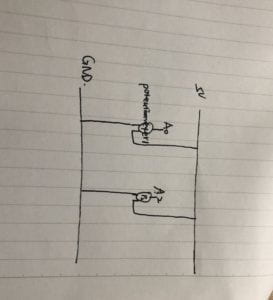
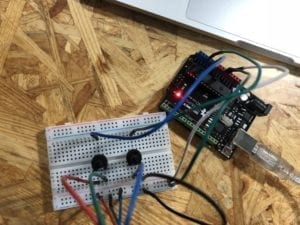
       The first task is very similar to our in-class exercise. Therefore, by applying the sample code provided, I build up the circuit and modified the code quickly to make it work. For the circle task, I transmit two values from the Arduino to Processing. Then, I use these two values as the x and y of the center of the ellipse. Background refresh is a little tricky here. I will explain later. For some reason, it seems that my analog read A0 pin does not work… it took me a while to find this problem.

       When it comes to drawing a line, it gives me the hint that “you will need to keep track of the previous x and y values.” Therefore, I recall the strategy that I often use when coding with Python. I try to declare two more variables to store the previous x and y value. Then, I can simply use the previous values and the new read values to draw a line. However, when I tried to run it, the canvas is completely blank. I soon realized that to make my previous drawing stay on the canvas, I should not reset the background every time. When I removed that line of code, it finally works.

During this exercise, the interaction happens between my “input” to adjust the potentiometer and the “output” graphs on the screen. This process enables me to CREATE a picture as I wish that it impact me to build constant communication between my thoughts and the drawing.

Exercise 2:

First, I read through the code in the file that enables me to transmit multiple values from Processing to Arduino. It is similar to the one that transmits values from Arduino to Processing.

Therefore, it is not difficult for me to understand the code. I decided to transmit three values in total: mouseX, mouseY, and whether the mouse is pressed. For the third one, I use “1” to indicate pressed, and “0” to indicate not pressed. I believe this would enable me to decode the information in Arduino easier.

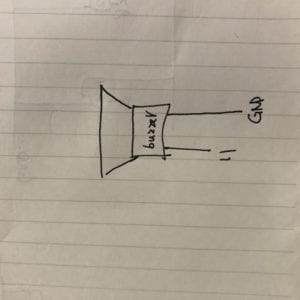
I applied if statement to make the buzzer sounding while I click the mouse on the screen. The only problem I encountered is that I am not familiar with the function tone(). I checked the reference and got the basic idea that the variable determines the frequency of the tone, which makes it sounds differently. Then how could both the mouseX and mouseY input impact the sound? I figured out one way to simply add two values together to decide the frequency of the sound. It has the potential to be more creative if I could be more expert on the basic musical fundaments in the future.

The interaction process in this exercise is similar to exercise 1. Both of the exercises enable the user to CREATE something in their mind to develop and express the limitless imagination. The difference is the form of input and output. For exercise 2, it inputs the position of the mouse and outputs a tone.

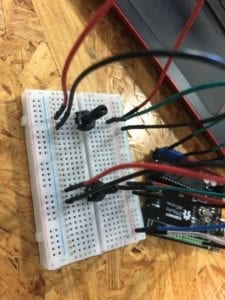
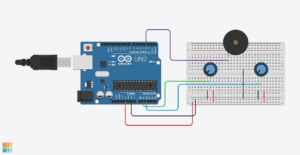
Circuit:

Circuit

Code

Recitation 7: Func & Array by ChangZhen from Inmi’s Session

Step 1

I drew a face which I’d call Flower Chicken. A random color is generated for the static face to be.

float h = random(365);

void setup() {
colorMode(HSB,359,99,99);
size(600,600);
background(359);
facebase((width+height)/3,width/2,height/2,color(h,50,90));
eyebrow((width+height)/3,width/2,height/2,color(h,20,99));
}

void draw() {
}

void facebase(float d, float x, float y, color c) {
noStroke();
fill(c);
circle(x,y,d);
// mouth
stroke(359);
strokeWeight(20);
noFill();
arc(x,y+0.1*d,0.5*d,0.5*d,0,PI,OPEN);
// eyewhite
arc(x-0.2*d,y-0.05*d,0.2*d,0.2*d,-0.9*PI,-0.1*PI,OPEN);
arc(x+0.2*d,y-0.05*d,0.2*d,0.2*d,-0.9*PI,-0.1*PI,OPEN);
// eyeball
noStroke();
fill(0);
circle(x-0.105*d,y-0.08*d,22);
circle(x+0.295*d,y-0.08*d,22);
}

void eyebrow(float d, float x, float y, color k) {
noFill();
stroke(k);
strokeWeight(10);
arc(x-0.2*d,y-0.2*d,0.15*d,0.15*d,-0.7*PI,0,OPEN);
arc(x+0.2*d,y-0.2*d,0.15*d,0.15*d,-PI,-0.2*PI,OPEN);
// halo
fill(k);
ellipse(x-0.3*d,y+0.02*d,0.2*d,0.1*d);
ellipse(x+0.3*d,y+0.02*d,0.2*d,0.1*d);
}

Step1

Step 2

Repeat drawing random static faces 100 times.

void setup() {
colorMode(HSB,359,99,99);
size(600,600);
background(359);
for(int i=0; i<100; i++) {
float d = random(15,150);
float x = random(600);
float y = random(600);
float h = random(365);
facebase(d,x,y,color(h,50,90));
eyebrow(d,x,y,color(h,20,99));
}
}

void draw() {
}

void facebase(float d, float x, float y, color c) {
noStroke();
fill(c);
circle(x,y,d);
// mouth
stroke(359);
strokeWeight(d/20);
noFill();
arc(x,y+0.1*d,0.5*d,0.5*d,0,PI,OPEN);
// eyewhite
arc(x-0.2*d,y-0.05*d,0.2*d,0.2*d,-0.9*PI,-0.1*PI,OPEN);
arc(x+0.2*d,y-0.05*d,0.2*d,0.2*d,-0.9*PI,-0.1*PI,OPEN);
// eyeball
noStroke();
fill(100);
circle(x-0.105*d,y-0.08*d,0.055*d);
circle(x+0.295*d,y-0.08*d,0.055*d);
}

void eyebrow(float d, float x, float y, color k) {
noFill();
stroke(k);
strokeWeight(d/40);
arc(x-0.2*d,y-0.2*d,0.15*d,0.15*d,-0.7*PI,0,OPEN);
arc(x+0.2*d,y-0.2*d,0.15*d,0.15*d,-PI,-0.2*PI,OPEN);
// halo
fill(k);
ellipse(x-0.3*d,y+0.02*d,0.2*d,0.1*d);
ellipse(x+0.3*d,y+0.02*d,0.2*d,0.1*d);
}

Step2

Step 3

Modify the code in step 2, using array to store the randomly generated values for each face.

void setup() {
colorMode(HSB,359,99,99);
size(600,600);
background(359);
// assign random num to array
int instanceNum = 100;
float[] dSet = new float[instanceNum];
for(int i=0; i<100; i++) {
float d = random(15,150);
dSet[i] = d;
}
float[] xSet = new float[instanceNum];
for(int i=0; i<100; i++) {
float x = random(600);
xSet[i] = x;
}
float[] ySet = new float[instanceNum];
for(int i=0; i<100; i++) {
float y = random(600);
ySet[i] = y;
}
float[] hSet = new float[instanceNum];
for(int i=0; i<100; i++) {
float h = random(359);
hSet[i] = h;
}
// utilize array num
for(int i=0; i<100; i++) {
facebase(dSet[i],xSet[i],ySet[i],color(hSet[i],50,90));
eyebrow(dSet[i],xSet[i],ySet[i],color(hSet[i],20,99));
}
}

void draw() {
}

void facebase(float d, float x, float y, color c) {
noStroke();
fill(c);
circle(x,y,d);
// mouth
stroke(359);
strokeWeight(d/20);
noFill();
arc(x,y+0.1*d,0.5*d,0.5*d,0,PI,OPEN);
// eyewhite
arc(x-0.2*d,y-0.05*d,0.2*d,0.2*d,-0.9*PI,-0.1*PI,OPEN);
arc(x+0.2*d,y-0.05*d,0.2*d,0.2*d,-0.9*PI,-0.1*PI,OPEN);
// eyeball
noStroke();
fill(100);
circle(x-0.105*d,y-0.08*d,0.055*d);
circle(x+0.295*d,y-0.08*d,0.055*d);
}

void eyebrow(float d, float x, float y, color k) {
noFill();
stroke(k);
strokeWeight(d/40);
arc(x-0.2*d,y-0.2*d,0.15*d,0.15*d,-0.7*PI,0,OPEN);
arc(x+0.2*d,y-0.2*d,0.15*d,0.15*d,-PI,-0.2*PI,OPEN);
// halo
fill(k);
ellipse(x-0.3*d,y+0.02*d,0.2*d,0.1*d);
ellipse(x+0.3*d,y+0.02*d,0.2*d,0.1*d);
}

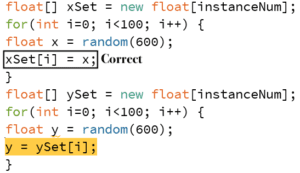
A pitfall made when I tried to assign value into the array. I should put the variable assigned value to on the left of the equation.
Step 4

The function valuate() randomly generates the initial position and size and respective velocity of each face.

int faceNum = 100;
float[] D = new float[faceNum]; // diam
float[] X = new float[faceNum]; // x coor
float[] Y = new float[faceNum]; // y coor
float[] H = new float[faceNum]; // hue
float[] Vx = new float[faceNum]; // x velocity
float[] Vy = new float[faceNum]; // y velocity

void valuate() {
for(int i=1; i<100; i++) {
D[i] = random(15,150);
X[i] = random(600);
Y[i] = random(600);
H[i] = random(359);
Vx[i] = (X[i]+Y[i])/1000;
Vy[i] = (X[i]-Y[i])/100;
}
}

void setup() {
colorMode(HSB,359,99,99);
size(600,600);
background(359);
valuate();
}

void draw() {
background(359);
for(int i=0; i<100; i++) {
facebase(D[i],X[i],Y[i],color(H[i],50,90));
eyebrow(D[i],X[i],Y[i],color(H[i],20,99));
X[i] += Vx[i];
Y[i] += Vy[i];
if(X[i] > width) {
X[i] = 0;
}
if(Y[i] > height) {
Y[i] = 0;
}
}
}

void facebase(float d, float x, float y, color c) {
noStroke();
fill(c);
circle(x,y,d);
// mouth
stroke(359);
strokeWeight(d/20);
noFill();
arc(x,y+0.1*d,0.5*d,0.5*d,0,PI,OPEN);
// eyewhite
arc(x-0.2*d,y-0.05*d,0.2*d,0.2*d,-0.9*PI,-0.1*PI,OPEN);
arc(x+0.2*d,y-0.05*d,0.2*d,0.2*d,-0.9*PI,-0.1*PI,OPEN);
// eyeball
noStroke();
fill(100);
circle(x-0.105*d,y-0.08*d,0.055*d);
circle(x+0.295*d,y-0.08*d,0.055*d);
}

void eyebrow(float d, float x, float y, color k) {
noFill();
stroke(k);
strokeWeight(d/40);
arc(x-0.2*d,y-0.2*d,0.15*d,0.15*d,-0.7*PI,0,OPEN);
arc(x+0.2*d,y-0.2*d,0.15*d,0.15*d,-PI,-0.2*PI,OPEN);
// halo
fill(k);
ellipse(x-0.3*d,y+0.02*d,0.2*d,0.1*d);
ellipse(x+0.3*d,y+0.02*d,0.2*d,0.1*d);
}

Step4

After that, I did extra work, trying to combine two 1D arrays to a 2D one.

void setup() {
int[] a = {1,2,3};
int[] b = {4,5,6};
int[][] c = new int[3][2]; // 3 and 2 means how many elements there are, not the order num
for(int i=0; i<3; i++) {
c[i][0] = a[i];
c[i][1] = b[i];
}
print(c[2][1]); // should be 6
}
Recitation 08: Serial Communication by Yifei Li

The first exercise was to make a Processing Etch A Scetch. The circuit was easy to build, only using two potentiometers. We first drew an ellipse in Processing and used the values from the potentiometers to control the “x” and “y” of the ellipse. Since we needed two values from Arduino, I used the sample code for multiple values and modified it. But when I tried to draw the line, all I got were dots. Luckily I later fixed it with the others’ help. I think the interaction is that people can use the potentiometers to change the values of “x” and “y” , and the line in processing is drawn accordingly.

code for Processing

// IMA NYU Shanghai
// Interaction Lab
// For receiving multiple values from Arduino to Processing

/*
 * Based on the readStringUntil() example by Tom Igoe
 * https://processing.org/reference/libraries/serial/Serial_readStringUntil_.html
 */

import processing.serial.*;
float pX;
float pY;

String myString = null;
Serial myPort;


int NUM_OF_VALUES = 2;   /** YOU MUST CHANGE THIS ACCORDING TO YOUR PROJECT **/
int[] sensorValues;      /** this array stores values from Arduino **/


void setup() {
  size(800, 800);
  setupSerial();
   background(0);
}


void draw() {
  updateSerial();
float x = map (sensorValues[0],0,1023,0,width);
float y = map (sensorValues[1],0,1023,0,height);
  strokeWeight(3);
  stroke(255);
  line(pX,pY,x,y);
 pX=x;
  pY=y;


  // use the values like this!
  // sensorValues[0] 

  // add your code

  //
}


void setupSerial() {
  printArray(Serial.list());
  myPort = new Serial(this, Serial.list()[ 9 ], 9600);
  // WARNING!
  // You will definitely get an error here.
  // Change the PORT_INDEX to 0 and try running it again.
  // And then, check the list of the ports,
  // find the port "/dev/cu.usbmodem----" or "/dev/tty.usbmodem----" 
  // and replace PORT_INDEX above with the index number of the port.

  myPort.clear();
  // Throw out the first reading,
  // in case we started reading in the middle of a string from the sender.
  myString = myPort.readStringUntil( 10 );  // 10 = '\n'  Linefeed in ASCII
  myString = null;

  sensorValues = new int[NUM_OF_VALUES];
}


void updateSerial() {
  while (myPort.available() > 0) {
    myString = myPort.readStringUntil( 10 ); // 10 = '\n'  Linefeed in ASCII
    if (myString != null) {
      String[] serialInArray = split(trim(myString), ",");
      if (serialInArray.length == NUM_OF_VALUES) {
        for (int i=0; i<serialInArray.length; i++) {
          sensorValues[i] = int(serialInArray[i]);
        }
      }
    }
  }
}

code for Arduino

// IMA NYU Shanghai
// Interaction Lab
// For sending multiple values from Arduino to Processing

void setup() {
Serial.begin(9600);
}

void loop() {
int sensor1 = analogRead(A0);
int sensor2 = analogRead(A2);

//int mappedsensor1 = map(sensor1,0,1023,0,255);
//int mappedsensor2 = map(sensor2,0,1023,0,255);

// keep this format
Serial.print(sensor1);
Serial.print(“,”); // put comma between sensor values
Serial.print(sensor2);

Serial.println(); // add linefeed after sending the last sensor value

// too fast communication might cause some latency in Processing
// this delay resolves the issue.
delay(100);
}

The second exercise was to make a music instrument with Arduino. For this one, I used the sample code for multiple values from P to A. I used the values of mouseX and mouseY to control the frequency and duration in Arduino. The interaction is that people can move the mouse around to change the pitch and length of the melody. As the mouse moves from left to right, the pitch changes from low to high accordingly. Moving the mouse up and down will change the length of the melody.

code for Processing

// IMA NYU Shanghai
// Interaction Lab


/**
 * This example is to send multiple values from Processing to Arduino.
 * You can find the arduino example file in the same folder which works with this Processing file.
 * Please note that the echoSerialData function asks Arduino to send the data saved in the values array
 * to check if it is receiving the correct bytes.
 **/


import processing.serial.*;

int NUM_OF_VALUES = 2;  /** YOU MUST CHANGE THIS ACCORDING TO YOUR PROJECT **/


Serial myPort;
String myString;

// This is the array of values you might want to send to Arduino.
int values[] = new int[NUM_OF_VALUES];

void setup() {
  size(500, 500);
  background(0);
 
  printArray(Serial.list());
  myPort = new Serial(this, Serial.list()[ 9], 9600);
  // check the list of the ports,
  // find the port "/dev/cu.usbmodem----" or "/dev/tty.usbmodem----" 
  // and replace PORT_INDEX above with the index of the port

  myPort.clear();
  // Throw out the first reading,
  // in case we started reading in the middle of a string from the sender.
  myString = myPort.readStringUntil( 10 );  // 10 = '\n'  Linefeed in ASCII
  myString = null;
}


void draw() {
  background(0);
    
  values[0]=mouseX;
  values[1]=mouseY;

  // changes the values
  // sends the values to Arduino.
  sendSerialData();

  // This causess the communication to become slow and unstable.
  // You might want to comment this out when everything is ready.
  // The parameter 200 is the frequency of echoing. 
  // The higher this number, the slower the program will be
  // but the higher this number, the more stable it will be.
  echoSerialData(200);
}

void sendSerialData() {
  String data = "";
  for (int i=0; i<values.length; i++) {
    data += values[i];
    //if i is less than the index number of the last element in the values array
    if (i < values.length-1) {
      data += ","; // add splitter character "," between each values element
    } 
    //if it is the last element in the values array
    else {
      data += "n"; // add the end of data character "n"
    }
  }
  //write to Arduino
  myPort.write(data);
}


void echoSerialData(int frequency) {
  //write character 'e' at the given frequency
  //to request Arduino to send back the values array
  if (frameCount % frequency == 0) myPort.write('e');

  String incomingBytes = "";
  while (myPort.available() > 0) {
    //add on all the characters received from the Arduino to the incomingBytes string
    incomingBytes += char(myPort.read());
  }
  //print what Arduino sent back to Processing
  print( incomingBytes );
}

code for Arduino

// IMA NYU Shanghai
// Interaction Lab

/**
This example is to send multiple values from Processing to Arduino.
You can find the Processing example file in the same folder which works with this Arduino file.
Please note that the echo case (when char c is ‘e’ in the getSerialData function below)
checks if Arduino is receiving the correct bytes from the Processing sketch
by sending the values array back to the Processing sketch.
**/

#define NUM_OF_VALUES 2 /** YOU MUST CHANGE THIS ACCORDING TO YOUR PROJECT **/

/** DO NOT REMOVE THESE **/
int tempValue = 0;
int valueIndex = 0;

/* This is the array of values storing the data from Processing. */
int values[NUM_OF_VALUES];

void setup() {
Serial.begin(9600);
pinMode(11, OUTPUT);

}

void loop() {
getSerialData();

tone(11, values[0],values[1]*10);

// add your code here
// use elements in the values array
// values[0] // values[1] }

//recieve serial data from Processing
void getSerialData() {
if (Serial.available()) {
char c = Serial.read();
//switch – case checks the value of the variable in the switch function
//in this case, the char c, then runs one of the cases that fit the value of the variable
//for more information, visit the reference page: https://www.arduino.cc/en/Reference/SwitchCase
switch (c) {
//if the char c from Processing is a number between 0 and 9
case ‘0’…’9′:
//save the value of char c to tempValue
//but simultaneously rearrange the existing values saved in tempValue
//for the digits received through char c to remain coherent
//if this does not make sense and would like to know more, send an email to me!
tempValue = tempValue * 10 + c – ‘0’;
break;
//if the char c from Processing is a comma
//indicating that the following values of char c is for the next element in the values array
case ‘,’:
values[valueIndex] = tempValue;
//reset tempValue value
tempValue = 0;
//increment valuesIndex by 1
valueIndex++;
break;
//if the char c from Processing is character ‘n’
//which signals that it is the end of data
case ‘n’:
//save the tempValue
//this will b the last element in the values array
values[valueIndex] = tempValue;
//reset tempValue and valueIndex values
//to clear out the values array for the next round of readings from Processing
tempValue = 0;
valueIndex = 0;
break;
//if the char c from Processing is character ‘e’
//it is signalling for the Arduino to send Processing the elements saved in the values array
//this case is triggered and processed by the echoSerialData function in the Processing sketch
case ‘e’: // to echo
for (int i = 0; i < NUM_OF_VALUES; i++) {
Serial.print(values[i]);
if (i < NUM_OF_VALUES – 1) {
Serial.print(‘,’);
}
else {
Serial.println();
}
}
break;
}
}
}

Recitation 8: Serial Communication- Rodrigo Reyes

On Excercise 1 we had to do an “Etch a Sketch” on Processing. We had to use two potentiometers in Arduino to control the drawing. One potentiometer would be the “x”, and the potentiometer would be the “y”.  We were supposed to link Processing with Arduino so that moving the potentiometer would be shown on the screen using Processing.  On Arduino, I used a code that was already given to us in class and modified. I changed the analogRead and I mapped the two sensors. I also used a code from class for  Processing. Nevertheless,  I changed the number of values,  the void setup size,  defined x and y,  added ” void draw” with line and stroke, etc. I thought it was amazing to be able to replicate an Etch a Sketch using these programs. It made me think of the endless things these programs can be used for. However, I thought interaction would have been more efficient if one used the mouse to draw, or even better, used something like an apple pen. Bellow the code I used. 

On Arduino

void setup() {
Serial.begin(9600);
}

void loop() {
int sensor1 = analogRead(A0);
int sensor2 = analogRead(A5);

sensor1= map (sensor1, 0, 1023, 0, 800);
sensor2= map (sensor2, 0, 1023, 0, 800);

// keep this format
Serial.print(sensor1);
Serial.print(“,”); // put comma between sensor values
Serial.print(sensor2);
Serial.println();

// too fast communication might cause some latency in Processing
// this delay resolves the issue.
delay(100);
}

On Processing

import processing.serial.*;

String myString = null;
Serial myPort;

int NUM_OF_VALUES = 2; /** YOU MUST CHANGE THIS ACCORDING TO YOUR PROJECT **/
int[] sensorValues; /** this array stores values from Arduino **/

int prevX;
int prevY;

void setup() {
size(800,800);
background(0);
setupSerial();
}

void draw() {
updateSerial();

printArray(sensorValues);
stroke(250,250,250);
line(prevX, prevY,sensorValues[0],sensorValues[1]);
prevY = sensorValues[1];
prevX = sensorValues[0];
}

void setupSerial() {
printArray(Serial.list());
myPort = new Serial(this, Serial.list()[ 2 ], 9600);
// WARNING!
// You will definitely get an error here.
// Change the PORT_INDEX to 0 and try running it again.
// And then, check the list of the ports,
// find the port “/dev/cu.usbmodem—-” or “/dev/tty.usbmodem—-”
// and replace PORT_INDEX above with the index number of the port.

myPort.clear();
// Throw out the first reading,
// in case we started reading in the middle of a string from the sender.
myString = myPort.readStringUntil( 10 ); // 10 = ‘\n’ Linefeed in ASCII
myString = null;

sensorValues = new int[NUM_OF_VALUES];
}

void updateSerial() {
while (myPort.available() > 0) {
myString = myPort.readStringUntil( 10 ); // 10 = ‘\n’ Linefeed in ASCII
if (myString != null) {
String[] serialInArray = split(trim(myString), “,”);
if (serialInArray.length == NUM_OF_VALUES) {
for (int i=0; i<serialInArray.length; i++) {
sensorValues[i] = int(serialInArray[i]);
}
}
}
}
}

On Excercise number 2 we had to make a musical instruement that was going to be controled with the mouse. We would incorporate the arduino by linking arduino with a buzzer to what we came up with in Processing.  Likewise, I used a based code for both Arduino and Processing from the files that were given to us in class.  I did not really change anything on Arduino for this excercise, but I did add things on Processing. I added a conditional (Bollean) so that everytime my mouse is more than 100 (or half of the screen) there was going to be sound coming out of the buzzer. Although I was not able to fully turn my mouse into an instrument every time I clicked the mouse on a different area, I created sound using the mouse, and the buzzer.  I think this excerice is very interactive. You click on the mouse and there are melodies that come after as a response are created depending on  the position of the mouse. I think this creates a dialogue between you and the computer. Bellow the code I used.  

On Arduino

char valueFromProcessing;
int ledPin = 13;

void setup() {
Serial.begin(9600);
pinMode(ledPin, OUTPUT);
}

void loop() {
// to receive a value from Processing
while (Serial.available()) {
valueFromProcessing = Serial.read();
}

if (valueFromProcessing == ‘H’) {
digitalWrite(ledPin, HIGH);
} else if (valueFromProcessing == ‘L’) {
digitalWrite(ledPin, LOW);
} else {
// something esle
}

// too fast communication might cause some latency in Processing
// this delay resolves the issue.
delay(10);
}

On Processing 

import processing.serial.*;

Serial myPort;
int valueFromArduino;

void setup() {
size(500, 500);
background(0);

printArray(Serial.list());
// this prints out the list of all available serial ports on your computer.

myPort = new Serial(this, Serial.list()[ 2 ], 9600);
// WARNING!
// You will definitely get an error here.
// Change the PORT_INDEX to 0 and try running it again.
// And then, check the list of the ports,
// find the port “/dev/cu.usbmodem—-” or “/dev/tty.usbmodem—-”
// and replace PORT_INDEX above with the index number of the port.
}

void draw() {
// to send a value to the Arduino
if (mouseX>100) {
myPort.write(‘H’);
} else {
myPort.write(‘L’);
}
}

Recitation 7: Functions and Arrays (November 6, 2019) by Jackson McQueeney

In step 1 of this recitation, I drew a single object.

In step 2, I wrote a for loop to draw the same object 100 times. When that for loop was in the setup(), it did this:

When the same for loop was in the draw(), it did this:

In step 3, I stored the data for the locations of the objects and their color in arrays. I did not store the data for the size of the objects as arrays, because I wanted the objects to all be of the same size. 

In step 4, I made each object able to move independently of one another, and they “bounced” when they hit any side of the canvas. The following video shows the final product of the code:

And the final code: 

int NOI = 100;

float x = 100;
float y = 50;

color[] c = new color[NOI];

float xspeed[] = new float [NOI];
float yspeed[] = new float [NOI];
float[] xloc = new float[NOI];
float[] yloc = new float[NOI];

void setup(){
size(600, 600);
background(0);
for(int index = 0; index < NOI; index++) {
  xloc[index]=random(width);
  yloc[index]=random(height);
  c[index]=color(random(255), random(255), random(255));
  xspeed[index]=random(-3, 3);
  yspeed[index]=random(-3, 3);
 }
}

void draw() {
  fill (0);
  rect (0, 0, height, width);
  for(int index = 0; index < NOI; index++) { 
  display(100, 50, xloc[index], yloc[index], c[index]);
  xloc[index]=xloc[index]+xspeed[index];
  yloc[index]=yloc[index]+yspeed[index];
  if (xloc[index]>width || xloc[index]<0){
    xspeed[index]=-xspeed[index];
  }
   if (yloc[index]>width || yloc[index]<0){
    yspeed[index]=-yspeed[index];
  }
  } 
 }

void display(float x, float y, float xloc, float yloc, color c) {
  fill (255);
  ellipse (xloc, yloc, x, y);
  fill (c);
  ellipse (xloc, yloc, x-50, y);
  fill (0);
  ellipse (xloc, yloc, x-80, y-30);
  fill (255);
  ellipse (xloc+10, yloc-10, x-90, y-40);
}

Question 1:
Having the for loop in setup() made each object draw just once. Having the for loop in draw() made each object redraw constantly over previous objects, resulting in the attached video under step 2.

Question 2:
Arrays allow you to create and store a large number of objects in a code. A project that required a random selection among and the storage of many objects would benefit from the use of arrays, as in this project, where arrays were used to store color data as well as x and y location data.