Final Project Essay by Yifei Li

Project Title

Floating Keys

Project Statement of Purpose

We want to make something like a piano keyboard with sensors connected to the computer. There will be a game in processing that plays different songs and shows which key can make the correct sound. The player should follow the hints and put his hands above the right key to play the song correctly and win the game. With the sensors, he doesn’t need actually to touch it, which we think is more interesting. We got the inspiration from the instrument simulator kind of games and my partner’s personal experience of practicing piano. We hope it can make the process of practicing more effective and enjoyable for both people who have learned the piano before or have no experience with it. 

Project Plan

The project consists of two parts, the physical part of the keyboard with sensors and the part of code and images in Arduino and Processing. In Processing, we’ll need to create an interface for the game that changes according to different songs and the user’s movement. The sensors will be placed under the keyboard, detecting the hands’approach and returning the data to Arduino. Then Arduino will send relevant values to Processing, and the interface in Processing will change accordingly. For next week, we need to build a prototype and work on the necessary code of the game. In the second week, we’ll run tests to modify and improve the code, also continue to complete its exterior. During the last week, we’ll add more decorations to make it look better and add more details to the code to perfect the game experience. As it is a game, we’ll need to collect feedback from the players to improve it throughout the whole process.

Context and Significance

My previous research on ICEBERG reminds me that the interaction between the machine and the user might need to be more transparent and direct so that the user can get a sense of participation and satisfaction easier. Later the research on LATE SHIFT inspires me that we could make a game to create a combination of interaction and entertainment, where the user is actively engaged during the whole process. So we intend to do the project in the form of a game.

The process is that the computer shows above which sensor the user should place his hand, and the sensor will detect the hands, and the result will be returned and shown on the screen. The game can be restart, and the process can go on and on. What happens during the game aligns with my definition that interaction is a cyclical and mutual process that one responds to the action of another. Just like Crawford’s metaphor of conversation and the idea of “input, output, and processing” from Physical Computing, it is a conversation between the input of the user and computer’s processing and output in the form of music and image. 

Compared to games like Guitar Hero or Rock Band, the physical part (the keyboard) of our project can make the interaction more direct, and more like a real piano. And the fact people don’t need to touch the keyboard makes the game more futuristic and fun. This game helps people who want to get more familiar with the songs and notes, but find only practicing on the real piano for a long time could be a bit dull. For those who have never played the piano before, it can both provoke their interest and help them relax. It can be fun and educational at the same time.

Works Cited

Crawford, “What Exactly is Interactivity,” The Art of Interactive Design,  pp. 1-5.

Igoe and O’Sullivan, “Introduction,” Physical Computing, pp. 1-4 

Recitation 8 by Christina Bowllan

ETCH A SKETCH- Exercise 1 

[Processing code] FROM ARDUINO TO PROCESSING

ETCH A SKETCH 
// IMA NYU Shanghai
// Interaction Lab
// For receiving multiple values from Arduino to Processing

/*
 * Based on the readStringUntil() example by Tom Igoe
 * https://processing.org/reference/libraries/serial/Serial_readStringUntil_.html
 */

import processing.serial.*;

String myString = null;
Serial myPort;


int NUM_OF_VALUES = 2;   /** YOU MUST CHANGE THIS ACCORDING TO YOUR PROJECT **/
int[] sensorValues;      /** this array stores values from Arduino **/
float B;
float C;
void setup() {
  size(500, 500);
  background(100);
  setupSerial();
  
}


void draw() {
  updateSerial();
  printArray(sensorValues);
  float x = map(sensorValues[0],0,1023,0,width);//these are values that are being calculated, 0 to width part is making it compressed 
  float y = map(sensorValues[1],0,1023,0,height);// different scale
  line (x,y,B,C);//makes the line change the position based on the sensor values
   B=x;// where we start the next time will be where "x" was
   C=y;//where we start the next time will be where "y" was 
   
}

  // use the values like this!
  // sensorValues[0] 

  // add your code

  //


void setupSerial() {
  printArray(Serial.list());
  myPort = new Serial(this, Serial.list()[ 15 ], 9600);
  // WARNING!
  // You will definitely get an error here.
  // Change the PORT_INDEX to 0 and try running it again.
  // And then, check the list of the ports,
  // find the port "/dev/cu.usbmodem----" or "/dev/tty.usbmodem----" 
  // and replace PORT_INDEX above with the index number of the port.

  myPort.clear();
  // Throw out the first reading,
  // in case we started reading in the middle of a string from the sender.
  myString = myPort.readStringUntil( 10 );  // 10 = '\n'  Linefeed in ASCII //'n'=next line
  myString = null;//start fresh

  sensorValues = new int[NUM_OF_VALUES];
}


void updateSerial() {//reading information
  while (myPort.available() > 0) {
    myString = myPort.readStringUntil( 10 ); // 10 = '\n'  Linefeed in ASCII
    if (myString != null) {
      String[] serialInArray = split(trim(myString), ",");//seperating three values based on commma
      if (serialInArray.length == NUM_OF_VALUES) {//then your putting it into an array
        for (int i=0; i<serialInArray.length; i++) {
          sensorValues[i] = int(serialInArray[i]);
        }
      }
    }
  }
}

||

Arduino code [ARDUINO to PROCESSING]

// IMA NYU Shanghai
// Interaction Lab
// For sending multiple values from Arduino to Processing


void setup() {
  Serial.begin(9600);
}

void loop() {
  int sensor1 = analogRead(A0);
  int sensor2 = analogRead(A1);
  //int sensor3 = analogRead(A2);

  // keep this format
  Serial.print(sensor1);//whatever value from sensor 1 value and then put a comma next to it
  Serial.print(",");  // put comma between sensor values, this is separating the data with both sensors 
  Serial.print(sensor2);
  //Serial.print(",");
  //Serial.print(sensor3);
  Serial.println(); // add linefeed after sending the last sensor value, you NEED this break
  //

  // too fast communication might cause some latency in Processing
  // this delay resolves the issue.
  delay(10);
}

ETCH-A-SKETCH Write-Up Description

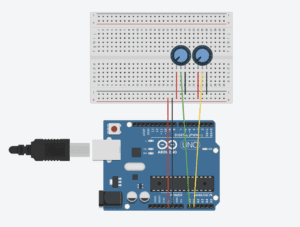
For this exercise, we were challenged with creating an Etch-A-Sketch Animation connecting both the arduino and processing platforms. These are the steps I took in order to do it:

Arduino Code

  1. First, I set up two potentiometers and called these “sensor 1” and “sensor 2” in void loop. I put this here because we want the values to repeat themselves. 
  2. Then, under this, I connected each of the sensors in Serial. print because we want the sensors to produce number values. These values not only tell us that the connection is working, but are also what processing will read in order to create the image. We also add a comma after each one to distinguish the sensor values from one another. 

Processing Code

  1. Before void setup: The first step was to establish that we have two sensor values coming in from arduino— “int NUM_OF_VALUES =2.” I also added float b and float c because these are the x and y coordinates that will be controlled by the potentiometers.
  2. void draw: Within void draw, I created float x and float y because these are the values that are being calculated on the x and y coordinates. I wrote them within the map function like this: “float x map(sensorValues[0],0,1023,0,width);” because we want to calculate all of the values that processing can from “0-1023” and then compress it within the size of our screen “0-width.” 
  3. Then, I wrote ” line (x,y,B,C)” because “x and y” are one point on the line and “B and C” are another point of the line. We want to establish this in void draw so processing knows that this is what we want to draw. 
  4. Lastly, in order to make the etch-a-sketch create various lines that are connected, we needed to tell processing that when the potentiometer sensor values change, we want the new B and C values to start where the x and y stopped. Therefore, these values should equal one another.

ETCH A SKETCH VIDEO

Exercise 2

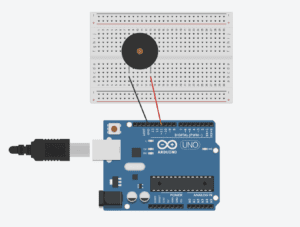
Within this exercise, we had to attach processing and arduino and make it so that when you press around the mousepad, a different frequency will play. 

PROCESSING TO ARDUINO [Arduino Code]

// IMA NYU Shanghai
// Interaction Lab


/**
  This example is to send multiple values from Processing to Arduino.
  You can find the Processing example file in the same folder which works with this Arduino file.
  Please note that the echo case (when char c is 'e' in the getSerialData function below)
  checks if Arduino is receiving the correct bytes from the Processing sketch
  by sending the values array back to the Processing sketch.
 **/

#define NUM_OF_VALUES 2    /** YOU MUST CHANGE THIS ACCORDING TO YOUR PROJECT **/


/** DO NOT REMOVE THESE **/
int tempValue = 0;
int valueIndex = 0;

/* This is the array of values storing the data from Processing. */
int values[NUM_OF_VALUES];


void setup() {
 Serial.begin(9600);
 pinMode(13, OUTPUT);
 pinMode(9, OUTPUT);
}

void loop() {
 getSerialData();

 if (values [1] == true) { //if mouse is pressed which is at position 1 (which is mouse press) then... 
   tone(11, values[0]); //at pin 11 play the mouse x values frequency 
 }
 else {
   noTone(11);
 }
}


//recieve serial data from Processing
void getSerialData() {
 if (Serial.available()) {
   char c = Serial.read();
   //switch - case checks the value of the variable in the switch function
   //in this case, the char c, then runs one of the cases that fit the value of the variable
   //for more information, visit the reference page: https://www.arduino.cc/en/Reference/SwitchCase
   switch (c) {
     //if the char c from Processing is a number between 0 and 9
     case '0'...'9':
       //save the value of char c to tempValue
       //but simultaneously rearrange the existing values saved in tempValue
       //for the digits received through char c to remain coherent
       //if this does not make sense and would like to know more, send an email to me!
       tempValue = tempValue * 10 + c - '0';
       break;
     //if the char c from Processing is a comma
     //indicating that the following values of char c is for the next element in the values array
     case ',':
       values[valueIndex] = tempValue;
       //reset tempValue value
       tempValue = 0;
       //increment valuesIndex by 1
       valueIndex++;
       break;
     //if the char c from Processing is character 'n'
     //which signals that it is the end of data
     case 'n':
       //save the tempValue
       //this will b the last element in the values array
       values[valueIndex] = tempValue;
       //reset tempValue and valueIndex values
       //to clear out the values array for the next round of readings from Processing
       tempValue = 0;
       valueIndex = 0;
       break;
     //if the char c from Processing is character 'e'
     //it is signalling for the Arduino to send Processing the elements saved in the values array
     //this case is triggered and processed by the echoSerialData function in the Processing sketch
     case 'e': // to echo
       for (int i = 0; i < NUM_OF_VALUES; i++) {
         Serial.print(values[i]);
         if (i < NUM_OF_VALUES - 1) {
           Serial.print(',');
         }
         else {
           Serial.println();
         }
       }
       break;
   }
 }
}

PROCESSING TO ARDUINO [Processing code]

// IMA NYU Shanghai
// Interaction Lab


/**
 * This example is to send multiple values from Processing to Arduino.
 * You can find the arduino example file in the same folder which works with this Processing file.
 * Please note that the echoSerialData function asks Arduino to send the data saved in the values array
 * to check if it is receiving the correct bytes.
 **/


import processing.serial.*;

int NUM_OF_VALUES = 2;  /** YOU MUST CHANGE THIS ACCORDING TO YOUR PROJECT **/


Serial myPort;
String myString;

// This is the array of values you might want to send to Arduino.
int values[] = new int[NUM_OF_VALUES];

void setup() {
  size(500, 500);
  background(0);

  printArray(Serial.list());
  myPort = new Serial(this, Serial.list()[ 31 ], 9600);
  // check the list of the ports,
  // find the port "/dev/cu.usbmodem----" or "/dev/tty.usbmodem----" 
  // and replace PORT_INDEX above with the index of the port

  myPort.clear();
  // Throw out the first reading,
  // in case we started reading in the middle of a string from the sender.
  myString = myPort.readStringUntil( 10 );  // 10 = '\n'  Linefeed in ASCII
  myString = null;
}


void draw() {
  background(0);
values [0]= mouseX;//frequency is changing based on moving the mouse around, sends to arduino
values [1]=int(mousePressed);// turn true or false (boolean) into an integer that can be sent 

  // sends the values to Arduino.
  sendSerialData();

  // This causess the communication to become slow and unstable.
  // You might want to comment this out when everything is ready.
  // The parameter 200 is the frequency of echoing. 
  // The higher this number, the slower the program will be
  // but the higher this number, the more stable it will be.
  echoSerialData(200);
}

void sendSerialData() {
  String data = "";
  for (int i=0; i<values.length; i++) {
    data += values[i];
    //if i is less than the index number of the last element in the values array
    if (i < values.length-1) {
      data += ","; // add splitter character "," between each values element
    } 
    //if it is the last element in the values array
    else {
      data += "n"; // add the end of data character "n"
    }
  }
  //write to Arduino
  myPort.write(data);
}


void echoSerialData(int frequency) {
  //write character 'e' at the given frequency
  //to request Arduino to send back the values array
  if (frameCount % frequency == 0) myPort.write('e');

  String incomingBytes = "";
  while (myPort.available() > 0) {
    //add on all the characters received from the Arduino to the incomingBytes string
    incomingBytes += char(myPort.read());
  }
  //print what Arduino sent back to Processing
  print( incomingBytes );
}

Exercise 2 Explanation

Processing

1). Before void setup: I established that we will be working with two values: mouse pressed and mouse x. 

2. In void draw:

values [0]= mouseX;

values [1]=int(mousePressed);

In order to send the information about the frequency of the buzzer or where the mouse is pressed to arduino, we needed to place “mouse x” and “mouse pressed” within  the values functions so that the numbers can be translated for arduino. 

Arduino

  1. Before void setup- #define NUM_OF_VALUES 2 — We had to tell arduino here that it should be expecting two values from processing
  2. Within void setup- {  Serial.begin(9600);  pinMode(11, OUTPUT);  pinMode(9, OUTPUT); } In this section, we needed to tell arduino at which pin value is the buzzer connected to 
  3. Within void loop: { getSerialData();  if (values [1] == true) { tone(11, values[0]);   }  else {    noTone(11);  } } — Here we are saying, if the mouse is pressed (which is at position 1), then play the frequency which is at pin 11. However, if the mouse is not pressed, then don’t play the tone.  

Exercise 2 Video

Recitation 8: Serial Communication by Lifan Yu

Recitation 8: Serial Communication

By Lifan Yu (ly1164)

       Exercise 1: Make a Processing Etch A Sketch

This one is my FAVOURITE WORK! Drawing the letters “NYU” using my potentiometers:

At first, my ellipse could only move up and down. It could not move to left and right. Then I found out that one of my potentiometers wasn’t connected well enough to the breadboard. I pressed on my potentiometers. Then the ellipse can move to every direction.

Then, when I wrote the code for the next step—drawing lines and ran my code, I saw dots, mot lines, like this:
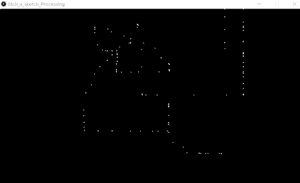
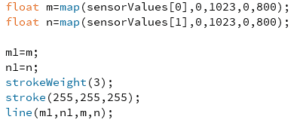
(As is shown in the screenshot below) This is because I put “float m=map(sensorValues[0],0,1023,0,800);float n=map(sensorValues[1],0,1023,0,800);” and “m1=m; n1=n;” all in front of “line(m1,n1,m,n);”.

This is the same thing as sending the values of sensorValue[0]and [1] directly to m1 and n1. When these code are put together, m has the same value as m1, so do n and n1. However, to make a line, the values of m1 and n1 should be given values a step after m and n received their values. This ensures that point (m1, n1) and (m, n) are different points. (m1, n1) is a previous point, (m, n) is a new point.
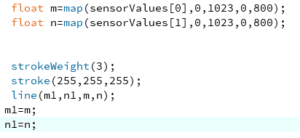
However, when I put “m1=m, n1=n” after “line” function, I added “float” in front of “m1” and “n1”.

My lines then looked like this:

After I deleted “float”, I finally got this right. (As is shown below)
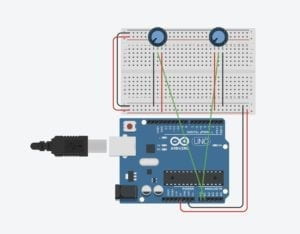
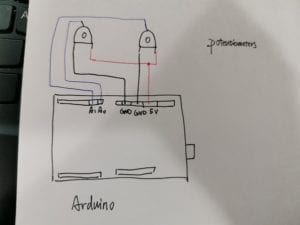
Schematic of my circuit:
Reflection on Interaction:

For the circuit, the input is the potentiometers’ rotation controlled by me. The “processing” process is how the motion was uploaded to my computer, collected in “sensorValues[0]” and “sensorValues[1]” and then sent to processing through serial communication. The output the ellipses and lines appeared on the canvas.

For the user: input: seeing lines on the canvas, seeing positions of the lines.

Thinking: according to what have been seen, deciding where to draw the next line.

Output: according to decisions, rotate the potentiometers to draw lines.

My code:

For Arduino

// IMA NYU Shanghai
// Interaction Lab
// For sending multiple values from Arduino to Processing

void setup() {
Serial.begin(9600);
pinMode (11, OUTPUT);
}

void loop() {
int sensor1 = analogRead(A0);
int sensor2 = analogRead(A1);
//int sensor3 = analogRead(A2);

// keep this format
Serial.print(sensor1);
Serial.print(“,”); // put comma between sensor values
Serial.print(sensor2);
//Serial.print(“,”);
//Serial.print(sensor3);
Serial.println(); // add linefeed after sending the last sensor value

// too fast communication might cause some latency in Processing
// this delay resolves the issue.
delay(100);
}

For Processing 

// IMA NYU Shanghai
// Interaction Lab
// For receiving multiple values from Arduino to Processing

/*
 * Based on the readStringUntil() example by Tom Igoe
 * https://processing.org/reference/libraries/serial/Serial_readStringUntil_.html
 */

import processing.serial.*;

String myString = null;
Serial myPort;


int NUM_OF_VALUES = 2;   /** YOU MUST CHANGE THIS ACCORDING TO YOUR PROJECT **/
int[] sensorValues;      /** this array stores values from Arduino **/
float m=0;
float n=0;
float m1=0;
float n1=0;


void setup() {
  size(1000, 1000);
  background(0);
  setupSerial();
}


void draw() {
  updateSerial();
  printArray(sensorValues);

  // use the values like this!
  // sensorValues[0] 
  //fill(random(0,500), random(0,500),random(0,500));
  float m=map(sensorValues[0],0,1023,0,800);
  float n=map(sensorValues[1],0,1023,0,800);
   
 
  strokeWeight(3);
  stroke(255,255,255);
  line(m1,n1,m,n);
 m1=m;
 n1=n;
 
 
//ellipse(m,n,30, 30);
  // add your code

  //
}


void setupSerial() {
  printArray(Serial.list());
  myPort = new Serial(this, Serial.list()[ 0 ], 9600);
  // WARNING!
  // You will definitely get an error here.
  // Change the PORT_INDEX to 0 and try running it again.
  // And then, check the list of the ports,
  // find the port "/dev/cu.usbmodem----" or "/dev/tty.usbmodem----" 
  // and replace PORT_INDEX above with the index number of the port.

  myPort.clear();
  // Throw out the first reading,
  // in case we started reading in the middle of a string from the sender.
  myString = myPort.readStringUntil( 10 );  // 10 = '\n'  Linefeed in ASCII
  myString = null;

  sensorValues = new int[NUM_OF_VALUES];
}


void updateSerial() {
  while (myPort.available() > 0) {
    myString = myPort.readStringUntil( 10 ); // 10 = '\n'  Linefeed in ASCII
    if (myString != null) {
      String[] serialInArray = split(trim(myString), ",");
      if (serialInArray.length == NUM_OF_VALUES) {
        for (int i=0; i<serialInArray.length; i++) {
          sensorValues[i] = int(serialInArray[i]);
        }
      }
    }
  }
}

Exercise 2: Make a musical instrument with Arduino:

       I used an array whose values can be set to 1 or 0 to represent “mousePressed==true” and “mousePressed==false”. Like this:

       “mousePressed” can’t be used in Arduino, but this array can sent information of mouse interactions to Arduino through serial communication. Like this:
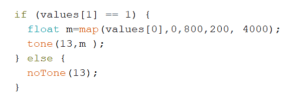
At first my code did not work. Tones could change according to my mouse’s X coordinate, but the buzzer kept working even when my mouse wasn’t pressed. Then I found out that I forgot to use double “=” in the if statement in Arduino. (As is shown below)
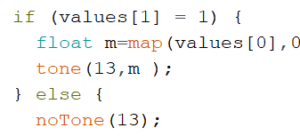
After adding another “=”, my circuit began to work properly.

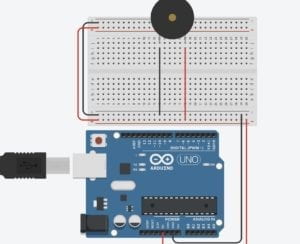
Schematic of my circuit:
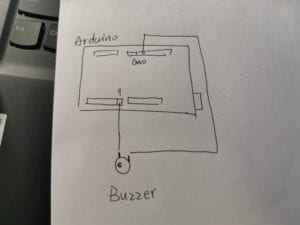
Reflection on Interaction:

For circuit: input: the X positions of the mouse and information of mouse interactions that are stored in arrays.

“thinking”: The process where values stored in arrays were sent to the circuit through serial communication.

Output: The buzzer works according to values sent to it.

For the user: input: hearing the buzzer’s sounds.

Thinking: according to the buzzer’s sounds, deciding on what tunes can be played next..

Output: according to decisions, move the mouse to different places on the canvas.

My code:

For Processing

// IMA NYU Shanghai
// Interaction Lab


/**
 * This example is to send multiple values from Processing to Arduino.
 * You can find the arduino example file in the same folder which works with this Processing file.
 * Please note that the echoSerialData function asks Arduino to send the data saved in the values array
 * to check if it is receiving the correct bytes.
 **/


import processing.serial.*;

int NUM_OF_VALUES = 2;  /** YOU MUST CHANGE THIS ACCORDING TO YOUR PROJECT **/


Serial myPort;
String myString;

// This is the array of values you might want to send to Arduino.
int values[] = new int[NUM_OF_VALUES];

void setup() {
  size(500, 500);
  background(0);

  printArray(Serial.list());
  myPort = new Serial(this, Serial.list()[ 0 ], 9600);
  // check the list of the ports,
  // find the port "/dev/cu.usbmodem----" or "/dev/tty.usbmodem----" 
  // and replace PORT_INDEX above with the index of the port

  myPort.clear();
  // Throw out the first reading,
  // in case we started reading in the middle of a string from the sender.
  myString = myPort.readStringUntil( 10 );  // 10 = '\n'  Linefeed in ASCII
  myString = null;
}


void draw() {
  background(0);
  
if (mousePressed){
  values[1]=1;
  println("pressed");
}else{
  values[1]=0;
  println("not pressed");
}
values[0]=mouseX;
  // changes the values
  //for (int i=0; i<values.length; i++) {
  //  values[i] = i;  /** Feel free to change this!! **/
  //}

  // sends the values to Arduino.
  sendSerialData();

  // This causess the communication to become slow and unstable.
  // You might want to comment this out when everything is ready.
  // The parameter 200 is the frequency of echoing. 
  // The higher this number, the slower the program will be
  // but the higher this number, the more stable it will be.
  echoSerialData(200);
}

void sendSerialData() {
  String data = "";
  for (int i=0; i<values.length; i++) {
    data += values[i];
    //if i is less than the index number of the last element in the values array
    if (i < values.length-1) {
      data += ","; // add splitter character "," between each values element
    } 
    //if it is the last element in the values array
    else {
      data += "n"; // add the end of data character "n"
    }
  }
  //write to Arduino
  myPort.write(data);
}


void echoSerialData(int frequency) {
  //write character 'e' at the given frequency
  //to request Arduino to send back the values array
  if (frameCount % frequency == 0) myPort.write('e');

  String incomingBytes = "";
  while (myPort.available() > 0) {
    //add on all the characters received from the Arduino to the incomingBytes string
    incomingBytes += char(myPort.read());
  }
  //print what Arduino sent back to Processing
  print( incomingBytes );
}

For Arduino

// IMA NYU Shanghai
// Interaction Lab

/**
This example is to send multiple values from Processing to Arduino.
You can find the Processing example file in the same folder which works with this Arduino file.
Please note that the echo case (when char c is ‘e’ in the getSerialData function below)
checks if Arduino is receiving the correct bytes from the Processing sketch
by sending the values array back to the Processing sketch.
**/

#define NUM_OF_VALUES 2 /** YOU MUST CHANGE THIS ACCORDING TO YOUR PROJECT **/

/** DO NOT REMOVE THESE **/
int tempValue = 0;
int valueIndex = 0;

/* This is the array of values storing the data from Processing. */
int values[2];

void setup() {
Serial.begin(9600);
pinMode(13, OUTPUT);

}

void loop() {
getSerialData();

// add your code here
// use elements in the values array
// values[0] // values[1]

if (values[1] == 1) {
float m=map(values[0],0,800,200, 4000);
tone(13,m );
} else {
noTone(13);
}

}

//recieve serial data from Processing
void getSerialData() {
if (Serial.available()) {
char c = Serial.read();
//switch – case checks the value of the variable in the switch function
//in this case, the char c, then runs one of the cases that fit the value of the variable
//for more information, visit the reference page: https://www.arduino.cc/en/Reference/SwitchCase
switch (c) {
//if the char c from Processing is a number between 0 and 9
case ‘0’…’9′:
//save the value of char c to tempValue
//but simultaneously rearrange the existing values saved in tempValue
//for the digits received through char c to remain coherent
//if this does not make sense and would like to know more, send an email to me!
tempValue = tempValue * 10 + c – ‘0’;
break;
//if the char c from Processing is a comma
//indicating that the following values of char c is for the next element in the values array
case ‘,’:
values[valueIndex] = tempValue;
//reset tempValue value
tempValue = 0;
//increment valuesIndex by 1
valueIndex++;
break;
//if the char c from Processing is character ‘n’
//which signals that it is the end of data
case ‘n’:
//save the tempValue
//this will b the last element in the values array
values[valueIndex] = tempValue;
//reset tempValue and valueIndex values
//to clear out the values array for the next round of readings from Processing
tempValue = 0;
valueIndex = 0;
break;
//if the char c from Processing is character ‘e’
//it is signalling for the Arduino to send Processing the elements saved in the values array
//this case is triggered and processed by the echoSerialData function in the Processing sketch
case ‘e’: // to echo
for (int i = 0; i < NUM_OF_VALUES; i++) {
Serial.print(values[i]);
if (i < NUM_OF_VALUES – 1) {
Serial.print(‘,’);
}
else {
Serial.println();
}
}
break;
}
}
}

Recitation 8: Serial Communication——Leah Bian

Exercise 1: Make a Processing Etch A Sketch

Step 1: For this exercise, I needed to send two analog values from Arduino to Processing via serial communication. In Processing, I drew an ellipse, and its location was defined by the values from Arduino. I built a circuit with two potentiometers, controlling the ellipse’s x-axis and y-axis movement respectively. I used the A to P (multipleValues) code example and made some modifications. For example, I changed the number of the analog values in Processing, and used map function to limit the range. The interaction here is clear but quite simple, but it can be a single part of a bigger interactive process. 

exercise 1
exercise 1

Code (Processing):

import processing.serial.*;
String myString = null;
Serial myPort;
int NUM_OF_VALUES = 2;   /** YOU MUST CHANGE THIS ACCORDING TO YOUR PROJECT **/
int[] sensorValues;      /** this array stores values from Arduino **/

void setup() {
  size(500, 500);
  setupSerial();
}

void draw() {
  background(0);
  updateSerial();
  float x = map(sensorValues[0],0,1023,0,500);
  float y = map(sensorValues[0],0,1023,0,500);
  printArray(sensorValues);
  fill(255);
  ellipse(x,y,100,100);
}

void setupSerial() {
  printArray(Serial.list());
  myPort = new Serial(this, Serial.list()[5], 9600);
  
  myPort.clear();
  // Throw out the first reading,
  // in case we started reading in the middle of a string from the sender.
  myString = myPort.readStringUntil( 10 );  // 10 = '\n'  Linefeed in ASCII
  myString = null;

  sensorValues = new int[NUM_OF_VALUES];
}

void updateSerial() {
  while (myPort.available() > 0) {
    myString = myPort.readStringUntil( 10 ); // 10 = '\n'  Linefeed in ASCII
    if (myString != null) {
      String[] serialInArray = split(trim(myString), ",");
      if (serialInArray.length == NUM_OF_VALUES) {
        for (int i=0; i<serialInArray.length; i++) {
          sensorValues[i] = int(serialInArray[i]);
        }
      }
    }
  }
}

Code (Arduino):

void setup() {
Serial.begin(9600);
}

void loop() {
int sensor1 = analogRead(A0);
int sensor2 = analogRead(A1);

// keep this format
Serial.print(sensor1);
Serial.print(“,”); // put comma between sensor values
Serial.print(sensor2);
Serial.println ();
// too fast communication might cause some latency in Processing
// this delay resolves the issue.
delay(100);
}

Step 2: For step 2, I modified the code to draw a line. I needed to keep track of the previous x and y values to draw a line from there to the new x and y positions. Therefore, I used float() function for four times to define the variables, and then drew the line.

Code (Processing):

import processing.serial.*;
String myString = null;
Serial myPort;
int NUM_OF_VALUES = 2;   /** YOU MUST CHANGE THIS ACCORDING TO YOUR PROJECT **/
int[] sensorValues;      /** this array stores values from Arduino **/

void setup() {
  size(500, 500);
  background(0);
  setupSerial();
}

void draw() {
  float pX = map(sensorValues[0], 0, 1023, 0, width);
  float pY = map(sensorValues[1], 0, 1023, 0, width);
  updateSerial();
  float x = map(sensorValues[0], 0, 1023, 0, width);
  float y = map(sensorValues[1], 0, 1023, 0, height);
  printArray(sensorValues);
  stroke(255);
  line(pX,pY,x,y);
}

void setupSerial() {
  printArray(Serial.list());
  myPort = new Serial(this, Serial.list()[5], 9600);
  
  myPort.clear();
  // Throw out the first reading,
  // in case we started reading in the middle of a string from the sender.
  myString = myPort.readStringUntil( 10 );  // 10 = '\n'  Linefeed in ASCII
  myString = null;

  sensorValues = new int[NUM_OF_VALUES];
}

void updateSerial() {
  while (myPort.available() > 0) {
    myString = myPort.readStringUntil( 10 ); // 10 = '\n'  Linefeed in ASCII
    if (myString != null) {
      String[] serialInArray = split(trim(myString), ",");
      if (serialInArray.length == NUM_OF_VALUES) {
        for (int i=0; i<serialInArray.length; i++) {
          sensorValues[i] = int(serialInArray[i]);
        }
      }
    }
  }
}

Code (Arduino):

void setup() {
Serial.begin(9600);
}

void loop() {
int sensor1 = analogRead(A0);
int sensor2 = analogRead(A1);

// keep this format
Serial.print(sensor1);
Serial.print(“,”); // put comma between sensor values
Serial.print(sensor2);
Serial.println ();
// too fast communication might cause some latency in Processing
// this delay resolves the issue.
delay(100);
}

Exercise 2:Make a musical instrument with Arduino

For this exercise, I wrote a Processing sketch that sends values to Arduino based on the mouse’s x and y positions. A hint was provided that we should use the tone() function, so I studied it first. The syntax of the function should be “tone(pin, frequency, duration)”, and the function can only be used with pin3 and pin11. Therefore, I put a buzzer on the breadboard and connected it to pin11 and the ground. The serial values from Processing are sent to Arduino and are translated into frequency and duration for a tone, which will be sounded by the buzzer. Besides, I drew an ellipse to make the location of the mouse’s x and y positions clearer. The interaction here is clear but simple, since only two variables are involved and what the user needs to do is just to move the mouse. However, this simple musical instrument could be a basis for further development and the idea can be an interesting inspiration.

0
exercise 2

Code (Processing):

import processing.serial.*;
int NUM_OF_VALUES = 2;  /** YOU MUST CHANGE THIS ACCORDING TO YOUR PROJECT **/
Serial myPort;
String myString;
int values[] = new int[NUM_OF_VALUES];

void setup() {
  size(500, 500);
  background(0);

  printArray(Serial.list());
  myPort = new Serial(this, Serial.list()[5], 9600);
 
  myPort.clear();
  myString = myPort.readStringUntil( 10 );  // 10 = '\n'  Linefeed in ASCII
  myString = null;
}

void draw() {
  background(0);
  values[0]=mouseX;
  values[1]=mouseY;
  circle(mouseX,mouseY,80);
  sendSerialData();
  echoSerialData(200);
}

void sendSerialData() {
  String data = "";
  for (int i=0; i<values.length; i++) {
    data += values[i];
    if (i < values.length-1) {
      data += ","; // add splitter character "," between each values element
    } 
    else {
      data += "n"; // add the end of data character "n"
    }
  }
  myPort.write(data);
}

void echoSerialData(int frequency) {
  if (frameCount % frequency == 0) myPort.write('e');

  String incomingBytes = "";
  while (myPort.available() > 0) {
    incomingBytes += char(myPort.read());
  }
  print( incomingBytes );
}

Code (Arduino):

#define NUM_OF_VALUES 2

int tempValue = 0;
int valueIndex = 0;
int values[NUM_OF_VALUES];

void setup() {
Serial.begin(9600);
pinMode(11, OUTPUT);
}

void loop() {
getSerialData();
tone(11,values[0],values[1]);

}

//recieve serial data from Processing
void getSerialData() {
if (Serial.available()) {
char c = Serial.read();
switch (c) {
case ‘0’…’9′:
tempValue = tempValue * 10 + c – ‘0’;
break;
case ‘,’:
values[valueIndex] = tempValue;
tempValue = 0;
valueIndex++;
break;
case ‘n’:
values[valueIndex] = tempValue;
tempValue = 0;
valueIndex = 0;
break;
case ‘e’: // to echo
for (int i = 0; i < NUM_OF_VALUES; i++) {
Serial.print(values[i]);
if (i < NUM_OF_VALUES – 1) {
Serial.print(‘,’);
}
else {
Serial.println();
}
}
break;
}
}
}

Recitation 8: Serial Communication by Isabel Brack

Exercise 1

etch a sketch circuit

The first exercise, the etch a sketch was fairly straight forward. First, I build the circuit as it was the same used in a class example and was very simple. Then, I modified the processing and arduino code that we downloaded. First, I changed the number of sensors to the correct number of potentiometers (2). After, I checked the port in processing to make sure my arduino connected properly. Next, I added to the code to create a line from the previous X and Y to the next X and Y based on the potentiometer. And I mapped the potentiometer to the size of my display. At first I had a bit of difficulty creating lines with the etch a sketch because I originally treated the code like I was moving an ellipse or point. But after I created a line function and began using previous X and Y coordinates, the etch a sketch began to work.

Exercise 2

circuit for buzzer

In the second exercise, I was a bit more confused on what are task was, but after seeking help from professors and a fellow, I altered the code we downloaded to create an If statement. When the If statement was true the buzzer would play the melody and when it was false it would stop. I made my if statement involve the position of mouseX and mouseY. When the mouse was on the display from 0-200 X and 0-200 Y the buzzer would create sound. When it was outside the dedicated range, it was silent.

Code for Etch A Sketch Processing

// IMA NYU Shanghai
// Interaction Lab
// For receiving multiple values from Arduino to Processing

/*
 * Based on the readStringUntil() example by Tom Igoe
 * https://processing.org/reference/libraries/serial/Serial_readStringUntil_.html
 */

import processing.serial.*;

String myString = null;
Serial myPort;


int NUM_OF_VALUES = 2;   /** YOU MUST CHANGE THIS ACCORDING TO YOUR PROJECT **/
int[] sensorValues;      /** this array stores values from Arduino **/

float preX;
float preY;


void setup() {
  size(1023, 1023);
  background(255);
  setupSerial();

  
}


void draw() {
  updateSerial();
  printArray(sensorValues);
  //float posx =map(sensorValues[1],0,1023,0,500);
 // float posy =map(sensorValues[0],0,1023,0,500);
  strokeWeight(4);
  line(preX,preY, sensorValues[1],sensorValues[0]);
    preX=sensorValues[1];
preY=sensorValues[0];

  // use the values like this!
  // sensorValues[0] 

  // add your code

  //
}


void setupSerial() {
  printArray(Serial.list());
  myPort = new Serial(this, Serial.list()[ 1 ], 9600);
  // WARNING!
  // You will definitely get an error here.
  // Change the PORT_INDEX to 0 and try running it again.
  // And then, check the list of the ports,
  // find the port "/dev/cu.usbmodem----" or "/dev/tty.usbmodem----" 
  // and replace PORT_INDEX above with the index number of the port.

  myPort.clear();
  // Throw out the first reading,
  // in case we started reading in the middle of a string from the sender.
  myString = myPort.readStringUntil( 10 );  // 10 = '\n'  Linefeed in ASCII
  myString = null;

  sensorValues = new int[NUM_OF_VALUES];
  
}


void updateSerial() {
  while (myPort.available() > 0) {
    myString = myPort.readStringUntil( 10 ); // 10 = '\n'  Linefeed in ASCII
    if (myString != null) {
      String[] serialInArray = split(trim(myString), ",");
      if (serialInArray.length == NUM_OF_VALUES) {
        for (int i=0; i<serialInArray.length; i++) {
          sensorValues[i] = int(serialInArray[i]);
        }
      }
    }
  }
}

Code for Etch A Sketch Arduino

// For sending multiple values from Arduino to Processing

void setup() {
Serial.begin(9600);
}

void loop() {
int sensor1 = analogRead(A0);
int sensor2 = analogRead(A1);
//int sensor3 = analogRead(A2);
//int theMappedValue = map(sensor1, 0, 1023, 0, 255);
//int theMappedValue2 = map(sensor2, 0, 1023, 0, 255);
// keep this format
Serial.print(sensor1);
Serial.print(“,”); // put comma between sensor values
Serial.print(sensor2);
// Serial.print(“,”);
// Serial.print(sensor3);
Serial.println(); // add linefeed after sending the last sensor value

// too fast communication might cause some latency in Processing
// this delay resolves the issue.
delay(100);
}

Buzzer Processing

// IMA NYU Shanghai
// Interaction Lab


/**
 * This example is to send multiple values from Processing to Arduino.
 * You can find the arduino example file in the same folder which works with this Processing file.
 * Please note that the echoSerialData function asks Arduino to send the data saved in the values array
 * to check if it is receiving the correct bytes.
 **/


import processing.serial.*;

int NUM_OF_VALUES = 2;  /** YOU MUST CHANGE THIS ACCORDING TO YOUR PROJECT **/


Serial myPort;
String myString;

// This is the array of values you might want to send to Arduino.
int values[] = new int[NUM_OF_VALUES];

void setup() {
  size(500, 500);
  background(0);

  printArray(Serial.list());
  myPort = new Serial(this, Serial.list()[ 1 ], 9600);
  // check the list of the ports,
  // find the port "/dev/cu.usbmodem----" or "/dev/tty.usbmodem----" 
  // and replace PORT_INDEX above with the index of the port

  myPort.clear();
  // Throw out the first reading,
  // in case we started reading in the middle of a string from the sender.
  myString = myPort.readStringUntil( 10 );  // 10 = '\n'  Linefeed in ASCII
  myString = null;
}


void draw() {
  background(0);

  // changes the values
//  for (int i=0; i<values.length; i++) {
//values[i] = i;  /** Feel free to change this!! **/
 // }
if (mouseX>0&& mouseX <200){
values[0]=1;}
else {
  values[0]=0;
}
if (mouseY>0&& mouseY<200){
values[0]=1;}
else {
  values[0]=0;
}
  // sends the values to Arduino.
  sendSerialData();

  // This causess the communication to become slow and unstable.
  // You might want to comment this out when everything is ready.
  // The parameter 200 is the frequency of echoing. 
  // The higher this number, the slower the program will be
  // but the higher this number, the more stable it will be.
  echoSerialData(200);
}

void sendSerialData() {
  String data = "";
  for (int i=0; i<values.length; i++) {
    data += values[i];
    //if i is less than the index number of the last element in the values array
    if (i < values.length-1) {
      data += ","; // add splitter character "," between each values element
    } 
    //if it is the last element in the values array
    else {
      data += "n"; // add the end of data character "n"
    }
  }
  //write to Arduino
  myPort.write(data);
}


void echoSerialData(int frequency) {
  //write character 'e' at the given frequency
  //to request Arduino to send back the values array
  if (frameCount % frequency == 0) myPort.write('e');

  String incomingBytes = "";
  while (myPort.available() > 0) {
    //add on all the characters received from the Arduino to the incomingBytes string
    incomingBytes += char(myPort.read());
  }
  //print what Arduino sent back to Processing
  print( incomingBytes );
}

Buzzer Arduino

// IMA NYU Shanghai
// Interaction Lab

#include “pitches.h”
/**
This example is to send multiple values from Processing to Arduino.
You can find the Processing example file in the same folder which works with this Arduino file.
Please note that the echo case (when char c is ‘e’ in the getSerialData function below)
checks if Arduino is receiving the correct bytes from the Processing sketch
by sending the values array back to the Processing sketch.
**/

#define NUM_OF_VALUES 2 /** YOU MUST CHANGE THIS ACCORDING TO YOUR PROJECT **/

int melody[] = {
NOTE_C4, NOTE_G3, NOTE_G3, NOTE_A3, NOTE_G3, 0, NOTE_B3, NOTE_C4
};

// note durations: 4 = quarter note, 8 = eighth note, etc.:
int noteDurations[] = {
4, 8, 8, 4, 4, 4, 4, 4
};
/** DO NOT REMOVE THESE **/
int tempValue = 0;
int valueIndex = 0;

/* This is the array of values storing the data from Processing. */
int values[NUM_OF_VALUES];

void setup() {
Serial.begin(9600);
pinMode(13, OUTPUT);
pinMode(9, OUTPUT);
}

void loop() {
getSerialData();

// add your code here
// use elements in the values array
// values[0] // values[1] // if (values[0] == 1) {
// digitalWrite(13, HIGH);
// } else {
// digitalWrite(13, LOW);
// }

if (values[0] == 1) {
tone (9, value[1]);
}

} else {
noTone(9);
}

}

//recieve serial data from Processing
void getSerialData() {
if (Serial.available()) {
char c = Serial.read();
//switch – case checks the value of the variable in the switch function
//in this case, the char c, then runs one of the cases that fit the value of the variable
//for more information, visit the reference page: https://www.arduino.cc/en/Reference/SwitchCase
switch (c) {
//if the char c from Processing is a number between 0 and 9
case ‘0’…’9′:
//save the value of char c to tempValue
//but simultaneously rearrange the existing values saved in tempValue
//for the digits received through char c to remain coherent
//if this does not make sense and would like to know more, send an email to me!
tempValue = tempValue * 10 + c – ‘0’;
break;
//if the char c from Processing is a comma
//indicating that the following values of char c is for the next element in the values array
case ‘,’:
values[valueIndex] = tempValue;
//reset tempValue value
tempValue = 0;
//increment valuesIndex by 1
valueIndex++;
break;
//if the char c from Processing is character ‘n’
//which signals that it is the end of data
case ‘n’:
//save the tempValue
//this will b the last element in the values array
values[valueIndex] = tempValue;
//reset tempValue and valueIndex values
//to clear out the values array for the next round of readings from Processing
tempValue = 0;
valueIndex = 0;
break;
//if the char c from Processing is character ‘e’
//it is signalling for the Arduino to send Processing the elements saved in the values array
//this case is triggered and processed by the echoSerialData function in the Processing sketch
case ‘e’: // to echo
for (int i = 0; i < NUM_OF_VALUES; i++) {
Serial.print(values[i]);
if (i < NUM_OF_VALUES – 1) {
Serial.print(‘,’);
}
else {
Serial.println();
}
}
break;
}
}
}