Recitation 08: Serial Communication by Jiayi Liang(Mary)

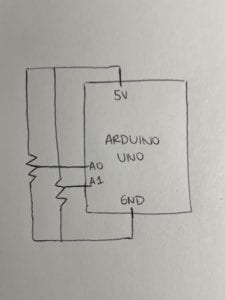
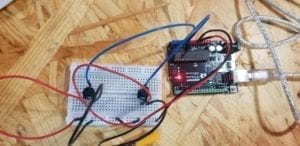
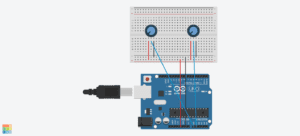
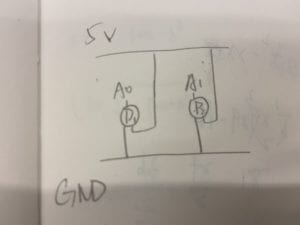
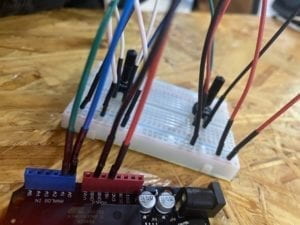
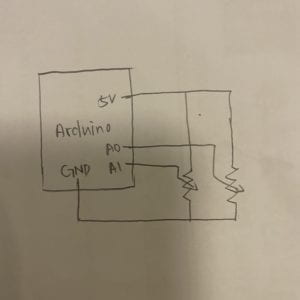
During this recitation, we are told to make a processing Etch A Sketch and a musical instrument with arduino. The circuit is quite simple.  What we should do is only connecting two potentiometers. However, for me, writing the code is very challenging. Using the examples given, we try to send messages from arduino to processing and from processing to arduino.
Exercise 1

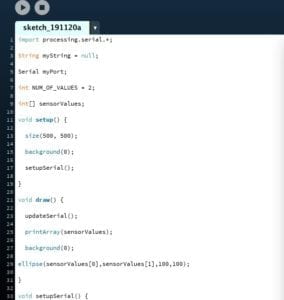
The first step is to use the potentiometers to control the position of a circle.  I succeeded at once, however, there is one problem that the circle will sometimes be out of the canvas.

Arduino:

void setup() {
Serial.begin(9600);
}

void loop() {
int sensor1 = analogRead(A0);
int sensor2 = analogRead(A2);

//int mappedsensor1 = map(sensor1,0,1023,0,255);
//int mappedsensor2 = map(sensor2,0,1023,0,255);

// keep this format
Serial.print(sensor1);
Serial.print(β€œ,”); // put comma between sensor values
Serial.print(sensor2);

Serial.println(); // add linefeed after sending the last sensor value

// too fast communication might cause some latency in Processing
// this delay resolves the issue.
delay(100);
}

Processing:
 

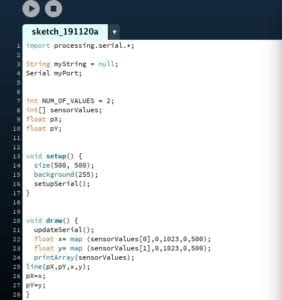
So in the second step, the fellow tell me that maybe I can use the map() to adjust the position of the image. At the beginning I am stuck in “how to draw a line”, but soon after that I realize I just have to let the beginning point to be the previous sensorValue and the endpoint to be the current sensorValue.

Processing:
 

Exercise 2

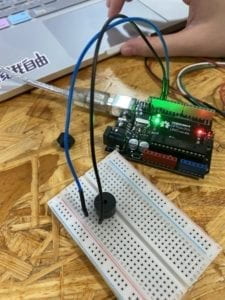
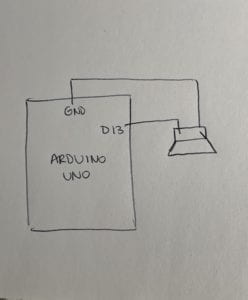
In this exercise, we use mouse to control the sound of a buzzer. We use the sample code for multiple values from processing to arduino. The mouseX is the frequency of the tune and the mouseY is the duration.
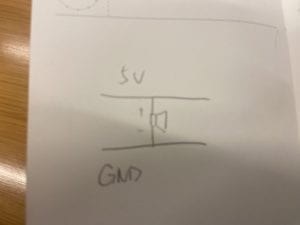
Processing:

// IMA NYU Shanghai
// Interaction Lab


/**
 * This example is to send multiple values from Processing to Arduino.
 * You can find the arduino example file in the same folder which works with this Processing file.
 * Please note that the echoSerialData function asks Arduino to send the data saved in the values array
 * to check if it is receiving the correct bytes.
 **/


import processing.serial.*;

int NUM_OF_VALUES = 2;  /** YOU MUST CHANGE THIS ACCORDING TO YOUR PROJECT **/


Serial myPort;
String myString;

// This is the array of values you might want to send to Arduino.
int values[] = new int[NUM_OF_VALUES];

void setup() {
  size(500, 500);
  background(0);
 
  printArray(Serial.list());
  myPort = new Serial(this, Serial.list()[ 9], 9600);
  // check the list of the ports,
  // find the port "/dev/cu.usbmodem----" or "/dev/tty.usbmodem----" 
  // and replace PORT_INDEX above with the index of the port

  myPort.clear();
  // Throw out the first reading,
  // in case we started reading in the middle of a string from the sender.
  myString = myPort.readStringUntil( 10 );  // 10 = '\n'  Linefeed in ASCII
  myString = null;
}


void draw() {
  background(0);
    
  values[0]=mouseX;
  values[1]=mouseY;

  // changes the values
  // sends the values to Arduino.
  sendSerialData();

  // This causess the communication to become slow and unstable.
  // You might want to comment this out when everything is ready.
  // The parameter 200 is the frequency of echoing. 
  // The higher this number, the slower the program will be
  // but the higher this number, the more stable it will be.
  echoSerialData(200);
}

void sendSerialData() {
  String data = "";
  for (int i=0; i<values.length; i++) {
    data += values[i];
    //if i is less than the index number of the last element in the values array
    if (i < values.length-1) {
      data += ","; // add splitter character "," between each values element
    } 
    //if it is the last element in the values array
    else {
      data += "n"; // add the end of data character "n"
    }
  }
  //write to Arduino
  myPort.write(data);
}


void echoSerialData(int frequency) {
  //write character 'e' at the given frequency
  //to request Arduino to send back the values array
  if (frameCount % frequency == 0) myPort.write('e');

  String incomingBytes = "";
  while (myPort.available() > 0) {
    //add on all the characters received from the Arduino to the incomingBytes string
    incomingBytes += char(myPort.read());
  }
  //print what Arduino sent back to Processing
  print( incomingBytes );
}

Arduino:
int tempValue = 0;
int valueIndex = 0;

/* This is the array of values storing the data from Processing. */
int values[NUM_OF_VALUES];

void setup() {
Serial.begin(9600);
pinMode(11, OUTPUT);

}

void loop() {
getSerialData();

tone(11, values[0],values[1]*10);

// add your code here
// use elements in the values array
// values[0] // values[1] }

//recieve serial data from Processing
void getSerialData() {
if (Serial.available()) {
char c = Serial.read();
//switch – case checks the value of the variable in the switch function
//in this case, the char c, then runs one of the cases that fit the value of the variable
//for more information, visit the reference page: https://www.arduino.cc/en/Reference/SwitchCase
switch (c) {
//if the char c from Processing is a number between 0 and 9
case β€˜0’…’9β€²:
//save the value of char c to tempValue
//but simultaneously rearrange the existing values saved in tempValue
//for the digits received through char c to remain coherent
//if this does not make sense and would like to know more, send an email to me!
tempValue = tempValue * 10 + c – β€˜0’;
break;
//if the char c from Processing is a comma
//indicating that the following values of char c is for the next element in the values array
case β€˜,’:
values[valueIndex] = tempValue;
//reset tempValue value
tempValue = 0;
//increment valuesIndex by 1
valueIndex++;
break;
//if the char c from Processing is character β€˜n’
//which signals that it is the end of data
case β€˜n’:
//save the tempValue
//this will b the last element in the values array
values[valueIndex] = tempValue;
//reset tempValue and valueIndex values
//to clear out the values array for the next round of readings from Processing
tempValue = 0;
valueIndex = 0;
break;
//if the char c from Processing is character β€˜e’
//it is signalling for the Arduino to send Processing the elements saved in the values array
//this case is triggered and processed by the echoSerialData function in the Processing sketch
case β€˜e’: // to echo
for (int i = 0; i < NUM_OF_VALUES; i++) {
Serial.print(values[i]);
if (i < NUM_OF_VALUES – 1) {
Serial.print(β€˜,’);
}
else {
Serial.println();
}
}
break;
}
}
}

Reflect on the interaction involved for each step

  1. In exercise one, there is interaction because the position of the circle or the line is changing according to the changes on the potentiometers. The first potentiometer determines the x-axis and the second determines the y-axis.
  2. In exercise two, there is interaction because the sound made by the buzzer is changing according to the mouse position on the canvas. If the mouseX turns big, the frequency will be higher, which means the tone will be higher. If the mouseY turns big, the duration will be longer, which means the length of the time of the sound will be longer.
Recitation 8: Serial Communications Chloe Wang

In this recitation, we connected the Arduino and Processing that they can react to each other’s actions. My first test was to make a β€œEtch a Sketch” with Processing that could draw a line according to physically turning two potentiometers with Arduino. I used the sample code Arduino to processing with one value. 
First I changed the serial.List number to 2 as shown on my Arduino port, and NUM_OF_VALUES to 2 since we have two analog values coming from the two potentiometers. Then I setup the size and background. In draw, I put in an printArray and an ellipse. In the values for the ellipse, I put in sensorValues[0] and sensorValues[1] to use the array function I have created. Now the ellipse could move around on the screen according to the potentiometer on Arduino. 
Here are the codes for step 1 https://gist.github.com/Chloeolhc/a97e8376dd088dfb7f4de319f027ae21 
Here is a video for my first step.
Going into step 2, to make an actual Etch a Sketch, I need to change the ellipse into drawing a line. I changed the four values for the posy1 and 2 in a line into a=sensorValues[0];
b =sensorValues[1]; so the four points become line( a, b,sensorValues[0], sensorValues[1]);
a = sensorValues[0];
b =sensorValues[1];
a and b are defined. 
This way, my two potentiometer could control the x-axis and y-axis on the canvas. However, as I was testing, the line often goes out of the border and it was difficult to find its position. So I edited my canvas size from 600×600 to 1024×1024. After editing the size, I could clearly see the path that my line was going as I was turning the two potentiometers. 
Here is the video of the final result. 
Here is the circuit and a sketch of the circuit for Arduino:
Recitation 8 part 1 circuit
 
recitation 8 part 1 circuit
Here are the codes for the final result in the first part:
https://gist.github.com/Chloeolhc/010b0a7521164f8edbaac4e7e318ecb0 
 
 
For part two of this recitation, we needed to make a musical instrument with a buzzer on Arduino that changes pitches according to the movement of the mouse on the processing canvas. I used the One Value Processing to Arduino file to create this. The idea is that the buzzer reacts to different x and y positions on the canvas. For the tone() function, it has two syntax tone(pin, frequency). I did not change the ledPin to others because there is only one buzzer involved in this project. So I had tone(ledPin,valueFromProcessing); and an if statement following this to control the reaction of the buzzer from Processing. 
Here is my circuit.
Recitation 8 part 2
 
recitation 8 part 2
Here is a video of the final result.
Here are my codes. https://gist.github.com/Chloeolhc/0f8b0397c28866b4f7d7ef0bc6a6424d

Recitation 8: Serial Communication – Ariana Alvarez

For this weeks’ recitation, we were assigned to develop two exercises that sent data through serial communication from Arduino to Processing, in exercise 1, and from Processing to Arduino, in exercise 2.

Exercise 1: Making a Processing Etch A Sketch

For this first exercise, I used serial communication to send information from two analog values from the potentiometers in Arduino, to Processing; in order to be able to create a sketch through Arduino that was reflected in Processing.  I used the sample code for sending multiple values from Arduino to Processing, however adapting it to the exercises needs. For the Arduino code, I had to declare two sensors for both potentiometers that were connected to analog values in Arduino. However, we needed to make sure to map the values of the potentiometer accordingly to the size of the processing sketch, in order for them to work more efficiently. On the other hand, the Processing code was edited in such a way that the NUM_OF_VALUES had to be set according to the amount of sensors, which in this case was 2. In order for each potentiometer to control the x-axis movement, and another one the y-axis movement of the drawing, we first tried it out by drawing an ellipse. In this case, the process was rather simple as when drawing ellipse(x,y,100,100);  x was replaced by the value of the first potentiometer, and y with the value of the second potentiometer; leaving it accordingly as ellipse (sensorValues[0], sensorValues[1], 100,100). However, when modifying the code to draw a line, two new float variables had to be introduced in order for the line to have a starting point for each sensor to keep track of the previous x and y values and draw from there to new x and y positions; therefore, corresponding to line(startX,startY,sensorValues[0],sensorValues[1]).

Ellipse Drawing

Line Drawing 

Arduino Code:

// IMA NYU Shanghai
// Interaction Lab
// For sending multiple values from Arduino to Processing

void setup() {
Serial.begin(9600);
}

void loop() {
int sensor1 = analogRead(A0);
sensor1 = map(sensor1,0,1023,0,500);

int sensor2 = analogRead(A1);
sensor2 = map(sensor2,0,1023,0,500);

// keep this format
Serial.print(sensor1);
Serial.print(“,”); // put comma between sensor values
Serial.print(sensor2);
Serial.println(); // add linefeed after sending the last sensor value

// too fast communication might cause some latency in Processing
// this delay resolves the issue.
delay(100);
}

Processing Code:

// IMA NYU Shanghai
// Interaction Lab
// For receiving multiple values from Arduino to Processing

/*
 * Based on the readStringUntil() example by Tom Igoe
 * https://processing.org/reference/libraries/serial/Serial_readStringUntil_.html
 */

import processing.serial.*;

String myString = null;
Serial myPort;


int NUM_OF_VALUES = 2;   /** YOU MUST CHANGE THIS ACCORDING TO YOUR PROJECT **/
int[] sensorValues;      /** this array stores values from Arduino **/


float startX ;
float startY ;


void setup() {
  size(500, 500);
  background(255);
  setupSerial();
}


void draw() {
  updateSerial();
  printArray(sensorValues);

  //ellipse(sensorValues[0], sensorValues[1], 100,100);
 
  line(startX, startY,sensorValues[0],sensorValues[1]);
   
  startX = sensorValues[0];
  startY = sensorValues[1];
  
}


void setupSerial() {
  printArray(Serial.list());
  myPort = new Serial(this, Serial.list()[ 4 ], 9600);
  // WARNING!
  // You will definitely get an error here.
  // Change the PORT_INDEX to 0 and try running it again.
  // And then, check the list of the ports,
  // find the port "/dev/cu.usbmodem----" or "/dev/tty.usbmodem----" 
  // and replace PORT_INDEX above with the index number of the port.

  myPort.clear();
  // Throw out the first reading,
  // in case we started reading in the middle of a string from the sender.
  myString = myPort.readStringUntil( 10 );  // 10 = '\n'  Linefeed in ASCII
  myString = null;

  sensorValues = new int[NUM_OF_VALUES];
}


void updateSerial() {
  while (myPort.available() > 0) {
    myString = myPort.readStringUntil( 10 ); // 10 = '\n'  Linefeed in ASCII
    if (myString != null) {
      String[] serialInArray = split(trim(myString), ",");
      if (serialInArray.length == NUM_OF_VALUES) {
        for (int i=0; i<serialInArray.length; i++) {
          sensorValues[i] = int(serialInArray[i]);
        }
      }
    }
  }
}

Exercise 2: Making a musical instrument with Arduino

In this exercise I had to create a musical device on Processing and have its values play through Arduino. I used the sample code for sending multiple values from Processing to Arduino, however adapting it to the exercises needs. For the Processing code, I added variables through mouseX pressed and mouseY pressed functions, so that a sound would play depending on the x and y coordinates of the computers mouse position. For the Arduino code, I added a new tab based on the pitches example in order to arrange which tones would be played through the buzzer in Arduino when the mouse was pressed. 

Arduino Code:

int tempValue = 0;
int valueIndex = 0;

/* This is the array of values storing the data from Processing. */
int values[NUM_OF_VALUES];

void setup() {
Serial.begin(9600);
pinMode(13, OUTPUT);

}

void loop() {
getSerialData();

tone(13, values[0],values[1]*10);

// add your code here
// use elements in the values array
// values[0] // values[1] }

//recieve serial data from Processing
void getSerialData() {
if (Serial.available()) {
char c = Serial.read();
//switch – case checks the value of the variable in the switch function
//in this case, the char c, then runs one of the cases that fit the value of the variable
//for more information, visit the reference page: https://www.arduino.cc/en/Reference/SwitchCase
switch (c) {
//if the char c from Processing is a number between 0 and 9
case β€˜0’…’9β€²:
//save the value of char c to tempValue
//but simultaneously rearrange the existing values saved in tempValue
//for the digits received through char c to remain coherent
//if this does not make sense and would like to know more, send an email to me!
tempValue = tempValue * 10 + c – β€˜0’;
break;
//if the char c from Processing is a comma
//indicating that the following values of char c is for the next element in the values array
case β€˜,’:
values[valueIndex] = tempValue;
//reset tempValue value
tempValue = 0;
//increment valuesIndex by 1
valueIndex++;
break;
//if the char c from Processing is character β€˜n’
//which signals that it is the end of data
case β€˜n’:
//save the tempValue
//this will b the last element in the values array
values[valueIndex] = tempValue;
//reset tempValue and valueIndex values
//to clear out the values array for the next round of readings from Processing
tempValue = 0;
valueIndex = 0;
break;
//if the char c from Processing is character β€˜e’
//it is signalling for the Arduino to send Processing the elements saved in the values array
//this case is triggered and processed by the echoSerialData function in the Processing sketch
case β€˜e’: // to echo
for (int i = 0; i < NUM_OF_VALUES; i++) {
Serial.print(values[i]);
if (i < NUM_OF_VALUES – 1) {
Serial.print(β€˜,’);
}
else {
Serial.println();
}
}
break;
}
}
}

Processing Code:

// IMA NYU Shanghai
// Interaction Lab


/**
 * This example is to send multiple values from Processing to Arduino.
 * You can find the arduino example file in the same folder which works with this Processing file.
 * Please note that the echoSerialData function asks Arduino to send the data saved in the values array
 * to check if it is receiving the correct bytes.
 **/


import processing.serial.*;

int NUM_OF_VALUES = 2;  /** YOU MUST CHANGE THIS ACCORDING TO YOUR PROJECT **/


Serial myPort;
String myString;

// This is the array of values you might want to send to Arduino.
int values[] = new int[NUM_OF_VALUES];

void setup() {
  size(500, 500);
  background(0);
 
  printArray(Serial.list());
  myPort = new Serial(this, Serial.list()[4], 9600);
  // check the list of the ports,
  // find the port "/dev/cu.usbmodem----" or "/dev/tty.usbmodem----" 
  // and replace PORT_INDEX above with the index of the port

  myPort.clear();
  // Throw out the first reading,
  // in case we started reading in the middle of a string from the sender.
  myString = myPort.readStringUntil( 10 );  // 10 = '\n'  Linefeed in ASCII
  myString = null;
}


void draw() {
  background(0);
    
  values[0]=mouseX;
  values[1]=mouseY;

  // changes the values
  // sends the values to Arduino.
  sendSerialData();

  // This causess the communication to become slow and unstable.
  // You might want to comment this out when everything is ready.
  // The parameter 200 is the frequency of echoing. 
  // The higher this number, the slower the program will be
  // but the higher this number, the more stable it will be.
  echoSerialData(200);
}

void sendSerialData() {
  String data = "";
  for (int i=0; i<values.length; i++) {
    data += values[i];
    //if i is less than the index number of the last element in the values array
    if (i < values.length-1) {
      data += ","; // add splitter character "," between each values element
    } 
    //if it is the last element in the values array
    else {
      data += "n"; // add the end of data character "n"
    }
  }
  //write to Arduino
  myPort.write(data);
}


void echoSerialData(int frequency) {
  //write character 'e' at the given frequency
  //to request Arduino to send back the values array
  if (frameCount % frequency == 0) myPort.write('e');

  String incomingBytes = "";
  while (myPort.available() > 0) {
    //add on all the characters received from the Arduino to the incomingBytes string
    incomingBytes += char(myPort.read());
  }
  //print what Arduino sent back to Processing
  print( incomingBytes );
}

Recitation 8: Serial Communication (Katie)

Exercise 1: Make a Processing Etch A Sketch

circles:

lines:

The Arduino code for the ellipses and the lines are the same.

First change the input value to 2 because we have two potentiometers, commented out  //Serial.print(“,”); //Serial.print(sensor3);

[code] // IMA NYU Shanghai
// Interaction Lab
// For sending multiple values from Arduino to Processing

void setup() {
Serial.begin(9600);
}

void loop() {
int sensor1 = analogRead(A0);
int sensor2 = analogRead(A1);
//int sensor3 = analogRead(A2);

// keep this format
Serial.print(sensor1);
Serial.print(“,”); // put comma between sensor values
Serial.print(sensor2);
//Serial.print(“,”);
//Serial.print(sensor3);
Serial.println(); // add linefeed after sending the last sensor value

// too fast communication might cause some latency in Processing
// this delay resolves the issue.
delay(100);
}
[/code]

For the processing code, first step is to comment out the line and to figure out the port, the second step is to map the value of the potentiometer to the canvas size.

Processing code for the ellipse: 

// IMA NYU Shanghai
// Interaction Lab
// For receiving multiple values from Arduino to Processing

/*
 * Based on the readStringUntil() example by Tom Igoe
 * https://processing.org/reference/libraries/serial/Serial_readStringUntil_.html
 */

import processing.serial.*;

String myString = null;
Serial myPort;


int NUM_OF_VALUES = 2;   /** YOU MUST CHANGE THIS ACCORDING TO YOUR PROJECT **/
int[] sensorValues;      /** this array stores values from Arduino **/
float B;
float C;

void setup() {
  size(500, 500);
  //background(0);
  setupSerial();
}


void draw() {
  updateSerial();
  printArray(sensorValues);

float x = map(sensorValues[0],0,1023,0,500);
  float y = map(sensorValues[1],0,1023,0,500);
  printArray(sensorValues);
  fill(255);
  ellipse(x,y,100,100);

  // use the values like this!
  // sensorValues[0] 

  // add your code

  //
}


void setupSerial() {
  printArray(Serial.list());
  myPort = new Serial(this, Serial.list()[ 1 ], 9600);
  // WARNING!
  // You will definitely get an error here.
  // Change the PORT_INDEX to 0 and try running it again.
  // And then, check the list of the ports,
  // find the port "/dev/cu.usbmodem----" or "/dev/tty.usbmodem----" 
  // and replace PORT_INDEX above with the index number of the port.

  myPort.clear();
  // Throw out the first reading,
  // in case we started reading in the middle of a string from the sender.
  myString = myPort.readStringUntil( 10 );  // 10 = '\n'  Linefeed in ASCII
  myString = null;

  sensorValues = new int[NUM_OF_VALUES];
}


void updateSerial() {
  while (myPort.available() > 0) {
    myString = myPort.readStringUntil( 10 ); // 10 = '\n'  Linefeed in ASCII
    if (myString != null) {
      String[] serialInArray = split(trim(myString), ",");
      if (serialInArray.length == NUM_OF_VALUES) {
        for (int i=0; i<serialInArray.length; i++) {
          sensorValues[i] = int(serialInArray[i]);
        }
      }
    }
  }
}

Processing code:

// IMA NYU Shanghai
// Interaction Lab
// For receiving multiple values from Arduino to Processing

/*
 * Based on the readStringUntil() example by Tom Igoe
 * https://processing.org/reference/libraries/serial/Serial_readStringUntil_.html
 */

import processing.serial.*;

String myString = null;
Serial myPort;


int NUM_OF_VALUES = 2;   /** YOU MUST CHANGE THIS ACCORDING TO YOUR PROJECT **/
int[] sensorValues;      /** this array stores values from Arduino **/
float B;
float C;

void setup() {
  size(500, 500);
  //background(0);
  setupSerial();
}


void draw() {
  updateSerial();
  printArray(sensorValues);


  float x = map(sensorValues[0],0,1023,0,width);//these are values that are being calculated, 0 to width part is making it compressed 
  float y = map(sensorValues[1],0,1023,0,height);// different scale
  line (x,y,B,C);//makes the line change the position based on the sensor values
   B=x;// where we start the next time will be where "x" was
   C=y;//where we start the next time will be where "y" was 


  // use the values like this!
  // sensorValues[0] 

  // add your code

  //
}


void setupSerial() {
  printArray(Serial.list());
  myPort = new Serial(this, Serial.list()[ 1 ], 9600);
  // WARNING!
  // You will definitely get an error here.
  // Change the PORT_INDEX to 0 and try running it again.
  // And then, check the list of the ports,
  // find the port "/dev/cu.usbmodem----" or "/dev/tty.usbmodem----" 
  // and replace PORT_INDEX above with the index number of the port.

  myPort.clear();
  // Throw out the first reading,
  // in case we started reading in the middle of a string from the sender.
  myString = myPort.readStringUntil( 10 );  // 10 = '\n'  Linefeed in ASCII
  myString = null;

  sensorValues = new int[NUM_OF_VALUES];
}


void updateSerial() {
  while (myPort.available() > 0) {
    myString = myPort.readStringUntil( 10 ); // 10 = '\n'  Linefeed in ASCII
    if (myString != null) {
      String[] serialInArray = split(trim(myString), ",");
      if (serialInArray.length == NUM_OF_VALUES) {
        for (int i=0; i<serialInArray.length; i++) {
          sensorValues[i] = int(serialInArray[i]);
        }
      }
    }
  }
}

The difference between two codes is in the void draw, for the first one I use ellipse function and the second one I use the line function.

Exercise 2: Make a musical instrument with Arduino

the key to this is the number of values (2: duration and frequency) and the tone function tone (pin number, frequency, duration)

Arduino code:

[code] // IMA NYU Shanghai
// Interaction Lab

/**
This example is to send multiple values from Processing to Arduino.
You can find the Processing example file in the same folder which works with this Arduino file.
Please note that the echo case (when char c is ‘e’ in the getSerialData function below)
checks if Arduino is receiving the correct bytes from the Processing sketch
by sending the values array back to the Processing sketch.
**/

#define NUM_OF_VALUES 2 /** YOU MUST CHANGE THIS ACCORDING TO YOUR PROJECT **/

/** DO NOT REMOVE THESE **/
int tempValue = 0;
int valueIndex = 0;

/* This is the array of values storing the data from Processing. */
int values[NUM_OF_VALUES];

void setup() {
Serial.begin(9600);
pinMode(11, OUTPUT);
}

void loop() {
getSerialData();
tone(11,values[0],values[1]);

}

//recieve serial data from Processing
void getSerialData() {
if (Serial.available()) {
char c = Serial.read();
//switch – case checks the value of the variable in the switch function
//in this case, the char c, then runs one of the cases that fit the value of the variable
//for more information, visit the reference page: https://www.arduino.cc/en/Reference/SwitchCase
switch (c) {
//if the char c from Processing is a number between 0 and 9
case ‘0’…’9′:
//save the value of char c to tempValue
//but simultaneously rearrange the existing values saved in tempValue
//for the digits received through char c to remain coherent
//if this does not make sense and would like to know more, send an email to me!
tempValue = tempValue * 10 + c – ‘0’;
break;
//if the char c from Processing is a comma
//indicating that the following values of char c is for the next element in the values array
case ‘,’:
values[valueIndex] = tempValue;
//reset tempValue value
tempValue = 0;
//increment valuesIndex by 1
valueIndex++;
break;
//if the char c from Processing is character ‘n’
//which signals that it is the end of data
case ‘n’:
//save the tempValue
//this will b the last element in the values array
values[valueIndex] = tempValue;
//reset tempValue and valueIndex values
//to clear out the values array for the next round of readings from Processing
tempValue = 0;
valueIndex = 0;
break;
//if the char c from Processing is character ‘e’
//it is signalling for the Arduino to send Processing the elements saved in the values array
//this case is triggered and processed by the echoSerialData function in the Processing sketch
case ‘e’: // to echo
for (int i = 0; i < NUM_OF_VALUES; i++) {
Serial.print(values[i]);
if (i < NUM_OF_VALUES – 1) {
Serial.print(‘,’);
}
else {
Serial.println();
}
}
break;
}
}
}
[/code]

Processing code:

// IMA NYU Shanghai
// Interaction Lab


/**
 * This example is to send multiple values from Processing to Arduino.
 * You can find the arduino example file in the same folder which works with this Processing file.
 * Please note that the echoSerialData function asks Arduino to send the data saved in the values array
 * to check if it is receiving the correct bytes.
 **/


import processing.serial.*;

int NUM_OF_VALUES = 2;  /** YOU MUST CHANGE THIS ACCORDING TO YOUR PROJECT **/


Serial myPort;
String myString;

// This is the array of values you might want to send to Arduino.
int values[] = new int[NUM_OF_VALUES];

void setup() {
  size(500, 500);
  background(0);

  printArray(Serial.list());
  myPort = new Serial(this, Serial.list()[ 1], 9600);
  // check the list of the ports,
  // find the port "/dev/cu.usbmodem----" or "/dev/tty.usbmodem----" 
  // and replace PORT_INDEX above with the index of the port

  myPort.clear();
  // Throw out the first reading,
  // in case we started reading in the middle of a string from the sender.
  myString = myPort.readStringUntil( 10 );  // 10 = '\n'  Linefeed in ASCII
  myString = null;
}


void draw() {
  background(0);
values [0]= mouseX;//frequency is changing based on moving the mouse around, sends to arduino
values [1]=int(mousePressed);// turn true or false (boolean) into an integer that can be sent 
values[0]=mouseX;
  values[1]=mouseY;
  ellipse(mouseX,mouseY,20,20);
  // sends the values to Arduino.
  sendSerialData();

  // This causess the communication to become slow and unstable.
  // You might want to comment this out when everything is ready.
  // The parameter 200 is the frequency of echoing. 
  // The higher this number, the slower the program will be
  // but the higher this number, the more stable it will be.
  echoSerialData(200);
}

void sendSerialData() {
  String data = "";
  for (int i=0; i<values.length; i++) {
    data += values[i];
    //if i is less than the index number of the last element in the values array
    if (i < values.length-1) {
      data += ","; // add splitter character "," between each values element
    } 
    //if it is the last element in the values array
    else {
      data += "n"; // add the end of data character "n"
    }
  }
  //write to Arduino
  myPort.write(data);
}


void echoSerialData(int frequency) {
  //write character 'e' at the given frequency
  //to request Arduino to send back the values array
  if (frameCount % frequency == 0) myPort.write('e');

  String incomingBytes = "";
  while (myPort.available() > 0) {
    //add on all the characters received from the Arduino to the incomingBytes string
    incomingBytes += char(myPort.read());
  }
  //print what Arduino sent back to Processing
  print( incomingBytes );
}

reflect on the interactions: for exercise one, the physical interaction is to turn the knobs and resulted in drawing on the screen. For exercise two, the interaction is to move the mouse and produce different tones. I prefer the first one because we now are always typing on key broad and click the mouse. 

Recitation 8 – Jackson Pruitt

Image of the completed etch-a-sketch with drawing

Physical setup

Tinkercad schematic 

import processing.serial.*;

String myString = null;
Serial myPort;


int NUM_OF_VALUES = 2;   /** YOU MUST CHANGE THIS ACCORDING TO YOUR PROJECT **/
int[] sensorValues;      /** this array stores values from Arduino **/
float preX;
float preY;


void setup() {
  size(500, 500);
  background(200);
  setupSerial();
 
}


void draw() {
     //map(sensorValues,0,1023,0,255);
  updateSerial();
  printArray(sensorValues);
 // ellipse(sensorValues[0], sensorValues[1], 25, 25);
  
  //float posX = sensorValues[0];
 // float posY = sensorValues[1];
   
float posX =  map(sensorValues[0],0,1023,0,width);
float posY = map(sensorValues[1],0,1023,0,height);
 fill(0);
  line(preX,preY, posX, posY);

  preX = posX;
  preY = posY;
  // use the values like this!
  // sensorValues[0] 


  // add your code

  //
}


void setupSerial() {
  printArray(Serial.list());
  myPort = new Serial(this, Serial.list()[ 9 ], 9600);
  // WARNING!
  // You will definitely get an error here.
  // Change the PORT_INDEX to 0 and try running it again.
  // And then, check the list of the ports,
  // find the port "/dev/cu.usbmodem----" or "/dev/tty.usbmodem----" 
  // and replace PORT_INDEX above with the index number of the port.

  myPort.clear();
  // Throw out the first reading,
  // in case we started reading in the middle of a string from the sender.
  myString = myPort.readStringUntil( 10 );  // 10 = '\n'  Linefeed in ASCII
  myString = null;

  sensorValues = new int[NUM_OF_VALUES];
}


void updateSerial() {
  while (myPort.available() > 0) {
    myString = myPort.readStringUntil( 10 ); // 10 = '\n'  Linefeed in ASCII
    if (myString != null) {
      String[] serialInArray = split(trim(myString), ",");
      if (serialInArray.length == NUM_OF_VALUES) {
        for (int i=0; i<serialInArray.length; i++) {
          sensorValues[i] = int(serialInArray[i]);
        }
      }
    }
  }
}

void setup() {
  Serial.begin(9600);
}

void loop() {
  int sensor1 = analogRead(A0);
  int sensor2 = analogRead(A1);
 

  // keep this format
  Serial.print(sensor1);
  Serial.print(“,”);  // put comma between sensor values
  Serial.print(sensor2);
  //Serial.print(“,”);
 
  Serial.println(); // add linefeed after sending the last sensor value

  // too fast communication might cause some latency in Processing
  // this delay resolves the issue.
  delay(100);
}