Fragmented Faces- Final Project Proposal by Christina Bowllan

Fragmented Faces by Christina and Isabel

Project Statement of Purpose

For this project, Izzy and I want to create a dialogue based on identity and how this forms and changes based on the connections we make with people. My inspiration for this project comes from Zach Lieberman’s Play the World , because he shows using a piano that can play sounds from around the world that we are more connected than we think. From his project, I started to question why is it that people think we are divided in the first place and what can we do in order to change this. We believe that collaboration and mutual understanding of another person’s background will not only bring people together, but can also alter our identities. Within this project, we strive for students at our school to question the types of connections and relationships they are building with others in the community and how this immersion is changing the way they view themselves. 

Project Plan

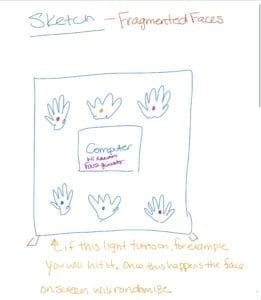
In order to make this project, we aim to create a game of sorts. When people come to our simulation, they will be faced with 5-6 hands on a board which each will have an LED light in them. Before they interact, they will see that on the screen that all parts of the randomized faces will be blurry and floating around. When the user presses the start button, different lights will begin to flash on the hands and the pace will become increasingly faster. The user’s job will be to high five each one, and every time they make this contact, the faces on processing will randomize. The idea is that, at first, it will be easy for the user to create these connections and look at the screen to watch the different parts of the face randomize, but once it becomes faster and they are giving high fives to so many hands, he/she will no longer be able to keep up with the effect and see the new faces form. There is no way of losing the game, but instead, once the user has had enough, the simulation will turn off. The hands in this project represent the people that you come across and the act of giving each one a high five represents you collaborating and understanding someone else. The processing simulation that follows the high fives will be created to represent these two things but can also take on a new meaning for the user : 1) the fact that different parts of different people’s faces come together to make one face shows that we are all working in unison with one another 2) The randomize faces will suggest that once you start collaborating with people, you start to take on new traits and learn ideas from others. 

The first step in creating the project will be to create a random face generator in processing and connect this with a button in arduino. Once we have figured out how to control the randomization with one button, we will then add multiple buttons for each hand and add more faces to the randomization. We should develop this within the next week so that we know it works. Next, because each hand needs to have an LED light, we will program the lights to turn on first, and then when the button is pressed, the processing simulation will start. Then, when we have this figured out, we will create a wall using the laser printer, and attach five (maybe) 3d printed hands to the wall all which will have a button behind them and a small hole for the LED button. This should be pretty simple for us to create because we 3d printed a heart using tinkercad for our midterm project which also needed a hole. Also, in the middle of the wall, we will have to create a big square hole for a computer to display the randomized face images. Assembling the wall with hands will be the most time consuming aspect, so we should begin working on this the week we get back from Thanksgiving Break. What we still need to figure out is, 1) how will we be able to hold the arduino boards and wires behind the wall , 2) how are we going to attach the hands to the wall, 3) what will we paint on the hands to add to the art piece? For this last question, I was thinking of maybe painting different flags in order to show that when you collaborate with people from around the world, these new identities forms. 
A successful interaction project is one that is engaging, thought-provoking and easy to use, and this is what we hope to create for the final project. During my research, I found a project called the Wishing Wall, and it has continued to inspire me. I like that they took an abstract idea such as dreams and created butterflies in order to evoke a hopeful feeling. We are similarly taking an abstract idea of connecting identities and people to people connections and crafting our own vision of what this looks like using the random face generator on processing. Our project is unique because we are taking the well-known concept of bridging cultures to the next level. A lot of times, our school will talk about how we need to “Make the World Our Major” and branch out to people from different parts of the world, and we are giving students a visual representation of what this looks like. 

Recitation 8: Serial Communication by Eric Shen

Exercise 1: Make a Processing Etch A Sketch

(1) In the first part of Exercise 1, we were tasked with building a circuit with two potentiometers and write an Arduino sketch that reads their values and sends them serially. Then write a Processing sketch that draws an ellipse and reads those two analog values from Arduino.

It’s not difficult to do the first part of Exercise 1, the only thing that we need to be careful with is to use the map() function in order to transform the serial value to analog value. And in this case, the map function is not like what it used to be in the class. For the purpose of making the ellipse moving inside the canvas, I think we need to transform the range from 0-1023 to 0-500. 

The code for the Arduino part: 

// IMA NYU Shanghai
// Interaction Lab
// For sending multiple values from Arduino to Processing

void setup() {
Serial.begin(9600);
}

void loop() {
int sensor1 = analogRead(A0);
int sensor2 = analogRead(A1);

// keep this format
Serial.print(sensor1);
Serial.print(“,”); // put comma between sensor values
Serial.print(sensor2);
Serial.println(); // add linefeed after sending the last sensor value

// too fast communication might cause some latency in Processing
// this delay resolves the issue.
delay(100);
}

The code for the Processing part: 

import processing.serial.*;

String myString = null;
Serial myPort;


int NUM_OF_VALUES = 2;   /** YOU MUST CHANGE THIS ACCORDING TO YOUR PROJECT **/
int[] sensorValues;      /** this array stores values from Arduino **/


void setup() {
  size(500, 500);
  background(0);
  setupSerial();
}


void draw() {
  background(0);
  
  updateSerial();
  float x = map(sensorValues[0], 0, 1023, 0, width);
   float y = map(sensorValues[1], 0, 1023, 0, height);
  printArray(sensorValues);
  ellipse(x,y,100,100);
  // use the values like this!
  // sensorValues[0] 

  // add your code

  //
}


void setupSerial() {
  printArray(Serial.list());
  myPort = new Serial(this, Serial.list()[5 ], 9600);
  // WARNING!
  // You will definitely get an error here.
  // Change the PORT_INDEX to 0 and try running it again.
  // And then, check the list of the ports,
  // find the port "/dev/cu.usbmodem----" or "/dev/tty.usbmodem----" 
  // and replace PORT_INDEX above with the index number of the port.

  myPort.clear();
  // Throw out the first reading,
  // in case we started reading in the middle of a string from the sender.
  myString = myPort.readStringUntil( 10 );  // 10 = '\n'  Linefeed in ASCII
  myString = null;

  sensorValues = new int[NUM_OF_VALUES];
}


void updateSerial() {
  while (myPort.available() > 0) {
    myString = myPort.readStringUntil( 10 ); // 10 = '\n'  Linefeed in ASCII
    if (myString != null) {
      String[] serialInArray = split(trim(myString), ",");
      if (serialInArray.length == NUM_OF_VALUES) {
        for (int i=0; i<serialInArray.length; i++) {
          sensorValues[i] = int(serialInArray[i]);
        }
      }
    }
  }
}

(2) In the second part of Exercise 1,  we need to replace the ellipse with a line, making some adjustment on the first part of Exercise 1. 

At first, I thought I came up with the solution to the second part which is to add another two variables as the previous x position and the previous y position before the line “updateSerial();” . Yet the line drew by Processing sometimes would disappear,  the line is not continuous. Then I found that the problem was that I drew the background in “void draw();”. 

The second problem that I met with was that it’s not a continuous line that I drew. It is some identical lines whose positions are constantly changing. Then, I asked a fellow for help, then we found out that I forgot to use the map function for the two new variables. 

The code for the Arduino part is the same as that of the first part of Exercise 1. 

The code for the Processing: 

import processing.serial.*;

String myString = null;
Serial myPort;


int NUM_OF_VALUES = 2;   /** YOU MUST CHANGE THIS ACCORDING TO YOUR PROJECT **/
int[] sensorValues;      /** this array stores values from Arduino **/


void setup() {
  size(500, 500);
  background(0);
  setupSerial();
}


void draw() {
 
  
  float pX = map(sensorValues[0], 0, 1023, 0, width);
  float pY = map(sensorValues[1], 0, 1023, 0, width);
  updateSerial();
  float x = map(sensorValues[0], 0, 1023, 0, width);
  float y = map(sensorValues[1], 0, 1023, 0, height);
  printArray(sensorValues);
  stroke(255);
  line(pX,pY,x,y);
 
  // use the values like this!
  // sensorValues[0] 

  // add your code

  //
}


void setupSerial() {
  printArray(Serial.list());
  myPort = new Serial(this, Serial.list()[5 ], 9600);
  // WARNING!
  // You will definitely get an error here.
  // Change the PORT_INDEX to 0 and try running it again.
  // And then, check the list of the ports,
  // find the port "/dev/cu.usbmodem----" or "/dev/tty.usbmodem----" 
  // and replace PORT_INDEX above with the index number of the port.

  myPort.clear();
  // Throw out the first reading,
  // in case we started reading in the middle of a string from the sender.
  myString = myPort.readStringUntil( 10 );  // 10 = '\n'  Linefeed in ASCII
  myString = null;

  sensorValues = new int[NUM_OF_VALUES];
}


void updateSerial() {
  while (myPort.available() > 0) {
    myString = myPort.readStringUntil( 10 ); // 10 = '\n'  Linefeed in ASCII
    if (myString != null) {
      String[] serialInArray = split(trim(myString), ",");
      if (serialInArray.length == NUM_OF_VALUES) {
        for (int i=0; i<serialInArray.length; i++) {
          sensorValues[i] = int(serialInArray[i]);
        }
      }
    }
  }
}

Exercise 2: Make a musical instrument with Arduino

The frequency of the tone is controlled by the x position of the mouse, and the  tone will be played only when the mouse is pressed

The code for Arduino

[code] #define NUM_OF_VALUES 2 /** YOU MUST CHANGE THIS ACCORDING TO YOUR PROJECT **/

/** DO NOT REMOVE THESE **/
int tempValue = 0;
int valueIndex = 0;

/* This is the array of values storing the data from Processing. */
int values[NUM_OF_VALUES];

void setup() {
Serial.begin(9600);
pinMode(13, OUTPUT);
pinMode(9, OUTPUT);
}

void loop() {
getSerialData();

// add your code here
// use elements in the values array
// values[0] // values[1]

if (values[2] == 1) {
tone(9, values[0]);
} else {
noTone(9);
}

}

//recieve serial data from Processing
void getSerialData() {
if (Serial.available()) {
char c = Serial.read();
//switch – case checks the value of the variable in the switch function
//in this case, the char c, then runs one of the cases that fit the value of the variable
//for more information, visit the reference page: https://www.arduino.cc/en/Reference/SwitchCase
switch (c) {
//if the char c from Processing is a number between 0 and 9
case ‘0’…’9′:
//save the value of char c to tempValue
//but simultaneously rearrange the existing values saved in tempValue
//for the digits received through char c to remain coherent
//if this does not make sense and would like to know more, send an email to me!
tempValue = tempValue * 10 + c – ‘0’;
break;
//if the char c from Processing is a comma
//indicating that the following values of char c is for the next element in the values array
case ‘,’:
values[valueIndex] = tempValue;
//reset tempValue value
tempValue = 0;
//increment valuesIndex by 1
valueIndex++;
break;
//if the char c from Processing is character ‘n’
//which signals that it is the end of data
case ‘n’:
//save the tempValue
//this will b the last element in the values array
values[valueIndex] = tempValue;
//reset tempValue and valueIndex values
//to clear out the values array for the next round of readings from Processing
tempValue = 0;
valueIndex = 0;
break;
//if the char c from Processing is character ‘e’
//it is signalling for the Arduino to send Processing the elements saved in the values array
//this case is triggered and processed by the echoSerialData function in the Processing sketch
case ‘e’: // to echo
for (int i = 0; i < NUM_OF_VALUES; i++) {
Serial.print(values[i]);
if (i < NUM_OF_VALUES – 1) {
Serial.print(‘,’);
}
else {
Serial.println();
}
}
break;
}
}
}
[/code]

Code for Processing: 

import processing.serial.*;

int NUM_OF_VALUES = 3;  /** YOU MUST CHANGE THIS ACCORDING TO YOUR PROJECT **/


Serial myPort;
String myString;

// This is the array of values you might want to send to Arduino.
int values[] = new int[NUM_OF_VALUES];

void setup() {
  size(500, 500);
  background(0);

  printArray(Serial.list());
  myPort = new Serial(this, Serial.list()[4 ], 9600);
  // check the list of the ports,
  // find the port "/dev/cu.usbmodem----" or "/dev/tty.usbmodem----" 
  // and replace PORT_INDEX above with the index of the port

  myPort.clear();
  // Throw out the first reading,
  // in case we started reading in the middle of a string from the sender.
  myString = myPort.readStringUntil( 10 );  // 10 = '\n'  Linefeed in ASCII
  myString = null;
}


void draw() {
  background(0);

  // changes the values
  for (int i=0; i<values.length; i++) {
    values[0] = mouseX; 

   /** Feel free to change this!! **/
  }
if(mousePressed) {
  values[2]= 1;
} else {
  values[2] = 0;
}
  // sends the values to Arduino.
  sendSerialData();

  // This causess the communication to become slow and unstable.
  // You might want to comment this out when everything is ready.
  // The parameter 200 is the frequency of echoing. 
  // The higher this number, the slower the program will be
  // but the higher this number, the more stable it will be.
  echoSerialData(200);
}

void sendSerialData() {
  String data = "";
  for (int i=0; i<values.length; i++) {
    data += values[i];
    //if i is less than the index number of the last element in the values array
    if (i < values.length-1) {
      data += ","; // add splitter character "," between each values element
    } 
    //if it is the last element in the values array
    else {
      data += "n"; // add the end of data character "n"
    }
  }
  //write to Arduino
  myPort.write(data);
}


void echoSerialData(int frequency) {
  //write character 'e' at the given frequency
  //to request Arduino to send back the values array
  if (frameCount % frequency == 0) myPort.write('e');

  String incomingBytes = "";
  while (myPort.available() > 0) {
    //add on all the characters received from the Arduino to the incomingBytes string
    incomingBytes += char(myPort.read());
  }
  //print what Arduino sent back to Processing
  print( incomingBytes );
}

Recitation 8: Serial Communication by ChangZhen from Inmi’s Session

What’s directly sent is always string. Copy and paste the example code, fill numbers of pin, port, and such in it, and add the task we want. Never try to understand what each line means.

Ex 1

Input from Arduino and output to Processing. Draw ellipse according to Arduino potential meter readings.

Arduino:

void setup() {
Serial.begin(9600);

}

void loop() {
int sensor1 = analogRead(A0);
int sensor2 = analogRead(A1);
Serial.print(sensor1);
Serial.print(“,”);
Serial.println(sensor2);
}

Processing:

import processing.serial.*;

String myString = null;
Serial myPort; // utilize the library onto myPort

int NUM_OF_VALUES = 2;
int[] sensorValues;

void setup() {
size(512, 512);
background(255);
setupSerial();
}

void draw() {
updateSerial();
printArray(sensorValues);
background(255);
ellipse(width/2,height/2,sensorValues[0]/2,sensorValues[1]/2);
}

void setupSerial() {
printArray(Serial.list());
myPort = new Serial(this, Serial.list()[3], 9600); // myPort is specified to be linked to port 3 USB, but what does “this” mean?
/*myPort.clear(); // mean?
myString = myPort.readStringUntil( 10 ); // 10 = ‘\n’ in ASCII meaning new line
myString = null;*/
sensorValues = new int[NUM_OF_VALUES]; // sensorValues[] contains two num
}

void updateSerial() {
while (myPort.available() > 0) { // mean by “available”?
myString = myPort.readStringUntil(10);
if (myString != null) { // why possibly null?
String[] serialInArray = split(trim(myString), “,”); // split string “trim(myString)” to element in array serialInArray[] when it meets “,”; trim(myString)removes whitespace characters from the beginning and end of a string
if (serialInArray.length == NUM_OF_VALUES) { // length is num of elements
for (int i=0; i<serialInArray.length; i++) {
sensorValues[i] = int(serialInArray[i]); // store value from string as int
}
}
}
}
}

Ex 2

Input from Arduino and output to Processing. Etch A Sketch.

Arduino: the same.

Processing:

import processing.serial.*;

String myString = null;
Serial myPort;

int NUM_OF_VALUES = 2;
int[] sensorValues;

void setup() {
size(512, 512);
background(255);
setupSerial();
updateSerial();
}

void draw() {
int pX = sensorValues[0]; // put before updateSerial to store previous 
int pY = sensorValues[1];
updateSerial();
printArray(sensorValues);
line(pX/2,pY/2,sensorValues[0]/2,sensorValues[1]/2);
if(mousePressed) {background(255);}
}

void setupSerial() {
printArray(Serial.list());
myPort = new Serial(this, Serial.list()[3], 9600);
myPort.clear();
myString = myPort.readStringUntil( 10 ); // 10 = ‘\n’ Linefeed in ASCII
myString = null;
sensorValues = new int[NUM_OF_VALUES];
}

void updateSerial() {
while (myPort.available() > 0) {
myString = myPort.readStringUntil(10); // ASCII 10 meaning new line
if (myString != null) {
String[] serialInArray = split(trim(myString), “,”);
if (serialInArray.length == NUM_OF_VALUES) {
for (int i=0; i<serialInArray.length; i++) {
sensorValues[i] = int(serialInArray[i]);
}
}
}
}
}

Ex 3

Input from Processing and output to Arduino. Arduino makes sound whose pitch depends on the coordinates in Processing. Only green texts are changed from the example code.

Arduino:

#define NUM_OF_VALUES 2 /** YOU MUST CHANGE THIS ACCORDING TO YOUR PROJECT **/

int tempValue = 0;
int valueIndex = 0;

/* This is the array of values storing the data from Processing. */
int values[NUM_OF_VALUES];

void setup() {
Serial.begin(9600);
pinMode(A2, OUTPUT);
}

void loop() {
getSerialData();
int pitch = values[0]+values[1];
tone(A2,pitch);
}

//recieve serial data from Processing
void getSerialData() {
if (Serial.available()) {
char c = Serial.read();
//switch – case checks the value of the variable in the switch function
//in this case, the char c, then runs one of the cases that fit the value of the variable
//for more information, visit the reference page: https://www.arduino.cc/en/Reference/SwitchCase
switch (c) {
//if the char c from Processing is a number between 0 and 9
case ‘0’…’9′:
//save the value of char c to tempValue
//but simultaneously rearrange the existing values saved in tempValue
//for the digits received through char c to remain coherent
//if this does not make sense and would like to know more, send an email to me!
tempValue = tempValue * 10 + c – ‘0’;
break;
//if the char c from Processing is a comma
//indicating that the following values of char c is for the next element in the values array
case ‘,’:
values[valueIndex] = tempValue;
//reset tempValue value
tempValue = 0;
//increment valuesIndex by 1
valueIndex++;
break;
//if the char c from Processing is character ‘n’
//which signals that it is the end of data
case ‘n’:
//save the tempValue
//this will b the last element in the values array
values[valueIndex] = tempValue;
//reset tempValue and valueIndex values
//to clear out the values array for the next round of readings from Processing
tempValue = 0;
valueIndex = 0;
break;
//if the char c from Processing is character ‘e’
//it is signalling for the Arduino to send Processing the elements saved in the values array
//this case is triggered and processed by the echoSerialData function in the Processing sketch
case ‘e’: // to echo
for (int i = 0; i < NUM_OF_VALUES; i++) {
Serial.print(values[i]);
if (i < NUM_OF_VALUES – 1) {
Serial.print(‘,’);
}
else {
Serial.println();
}
}
break;
}
}
}

Processing:

import processing.serial.*;

int NUM_OF_VALUES = 2;

Serial myPort;
String myString;

// This is the array of values you might want to send to Arduino.
int values[] = new int[NUM_OF_VALUES];

void setup() {
size(500, 500);
background(0);

printArray(Serial.list());
myPort = new Serial(this, Serial.list()[3], 9600);

myPort.clear(); // throw out the first reading, in case start reading in the middle of a string from the sender
myString = myPort.readStringUntil(10); // 10 = ‘\n’ Linefeed in ASCII
myString = null;
}

void draw() {
noStroke();
fill(0, 30);
rect(0, 0, 500, 500);

strokeWeight(5);
stroke(255);
line(pmouseX, pmouseY, mouseX, mouseY);

values[0] = mouseX;
values[1] = mouseY;

sendSerialData();
echoSerialData(200);
}

void sendSerialData() {
String data = “”;
for (int i=0; i<values.length; i++) {
data += values[i];
//if i is less than the index number of the last element in the values array
if (i < values.length-1) {
data += “,”; // add splitter character “,” between each values element
}
//if it is the last element in the values array
else {
data += “n”; // add the end of data character “n”
}
}
//write to Arduino
myPort.write(data);
}

void echoSerialData(int frequency) {
//write character ‘e’ at the given frequency
//to request Arduino to send back the values array
if (frameCount % frequency == 0) myPort.write(‘e’);

String incomingBytes = “”;
while (myPort.available() > 0) {
//add on all the characters received from the Arduino to the incomingBytes string
incomingBytes += char(myPort.read());
}
//print what Arduino sent back to Processing
print(incomingBytes);
}

3

Final Project: Step 3 – Essay – Lillie Yao

Motion Painting

This idea was influenced by my interest in interactive art exhibits. We found this interactive art exhibit called Leap Motion in Tampa, Florida. This piece was especially interesting because it showed people interacting with the piece just by moving their hands/body and the output on the screen was just random shapes in random colors moving symmetrically to them. This reminded me of the activities we did in recitation, just without the motion. This project inspired my idea for the final because I thought it was really neat how a piece of art could be controlled by a users movements. At the same time, I really liked the output and how there were different outputs that randomly showed up according to the different users who tested it.

This project aligns with my definition of interaction because there is an input given by the user and an output from the exhibit. Similarly, the project will also run on its own if there is not a user there and it’s just an ongoing cycle of input/output.

For Motion Painting, we wanted to implement a motion sensor so that it could sense the different movements a user would make. Then using Processing, we would display different shapes and colors according to whatever motions the user made. We were also thinking about making certain strokes that could correspond with the users movement. Of course, we would need to put the motion sensor somewhere so that the user would know where to move, so we were thinking about having a “controller” that would be covered by some sort of dome that we would 3D print or fabricate.

To start out, we need to figure out how to link Arduino with the motion sensor,  and Processing together to make our project. Since motion sensors are fairly sensitive, we wanted to get all of the code done early so we have enough time to play with different sensors and test their sensitivity before fabricating the controller. After figuring out and prototyping the controller, we will start the 3D printing process. Then after that, we will put some finishing touches and our project will be done!

Our timeline:

11/22 Start coding and test motion sensors

11/26 Continue coding and testing our project

12/3 Finish the code for Arduino and Processing and test the circuit

12/4 Fabricate the controller

12/6 Finish the project

12/9 Finishing touches by 9th

Since we are re-creating something that already exists, our take has a different approach to it. We wanted the display on the screen to be different colors and shapes but for it to easily be customized if the user wanted to do so. Our contribution to this piece is for there to be more pieces of work that can do similar things so that more and more people are able to experience it. We wanted to create this so that it could potentially be displayed in exhibits for the public to appreciate.

We wanted to make this project for everyone to be able to use and have fun with. At the same time, we wanted to make this project for people that are especially interested in interactive media art and would come just to see this art piece. The meaning we wanted to interpret into this project was that you don’t need a pen/pencil and paper in order to create art. Art comes in many different forms and “motions.” We wanted to break the barriers between the standards of art, that it doesn’t necessarily have to be physical to be considered art. I think this project will hold a lot of value for people who truly appreciate art and understand that there are many ways to create meaningful pieces or work.

“Sometimes when people learning about physical computing hear that a particular idea has been done before, they give up on it, because they think it’s not original. What’s great about the themes that follow here is that they allow a lot of room for originality. Despite their perennial recurrence, they offer surprises each time they come up. So if you’re new to physical computing and thinking to yourself “I don’t want do to that, it’s already done,” stop thinking that way! There’s a lot you can add to these themes through your variation on them.” (Igoe)

This quote from Physical Computing’s Greatest Hits (and misses) by Tom Igoe really stuck out to me because my partner and I were thinking the same exact things. We were planning on re-creating a project and worried about the fact that our project may not be as original as others. But, we thought about the different ways we could implement and personalize it so that we could call it our own and overcame that obstacle just by talking about it. 

Project Essay

“Step Into the Newsroom”

The aim of this project is to promote the knowledge of current events in schools. My inspiration for this project came from a family member telling me that they do not often discuss current events in school. From this, I was inspired to create a project that would make learning current events simple, but reliable for children in school. This is where the idea to make an interactive carpet came about. In “A Brief Rant on the Future of Interactive Design”, Bret Victor highlights the the importance of keeping tactile interactions alive in the technology age. Creating a project where students have to step on certain parts to hear the news, despite being able to Google it, allows for a more dynamic interaction. 

I hope to create a sense of fun with this project as well. From the act of stepping on the carpet, I want to create a more fun experience that just reading the news on your phone. The look of the carpet will be a world map with large button over each continent and largely populated country. This makes is so the user can easily choose where they would like to hear news from around the world. When the button is pressed, an LED will light up, and then on the laptop screen a tweet that includes the name of the country will randomly be found. Because this project is intended to be in schools, we will have to take precautionary steps to make sure that the tweets are appropriate. By Nov 25-26, my partner and I have to create the carpet itself and begin figuring out how to generate tweets in our code. After the carpet is done and looks like a world map, we can create the buttons for the user to press and attach them to the carpet. This should be done by Dec 2. The code should be finished in time with the carpet. This leaves us with just over a week to add the finishing touches. I would like to see if it is possible to have the tweets read out, but this is what the extra time is left for. 

As I said above, my major inspiration for this project was my family members lack of current events in school. I was loosely inspired by another project as well. This project was “Moon” by Ai Weiwei and Olafur Eliasson. Their vision was to create a space where people from all around the world impact how users interact with the project. I wanted the same, but I am doing it with tweets. Using tweets aligns with my definition of interaction perfectly. The project will have to “read, think, and speak” in order to display relevant tweets. It will read which button has been pressed, locate a tweet that has to do with the selection region, and display it on the screen. I think my project has significance in that it is an educational tool. It is intended for the use of students in school, but it could be simplified or advanced to fit different audiences. For example, instead of reading tweets, elementary schoolers could press the buttons and the carpet would read the name of each country. This project could be easily built upon to teach different things, but the overarching meaning is that it educates.