Final Essay: The Epic of Us by Tya Wang (rw2399)

The Epic of Us

The idea of this project is to make a digital board game that takes the area of around 1.5 square meters. On the cardboard, we will raster a road that winds through, and along the road, there will be 2D scenery drew with laser cutter. Every several inches along the road there will be an LED implying one step, and by interacting with the computer program hooked onto the cardboard, two players will be virtually going down the road and experience a series of events.

The game goes like this:

Two players each represents a country, and they will be told that the goal of this game is to destroy the other player’s country with weapons they obtain during the game to be the winner. On the computer program, there will be an animation of a dice and the two player’s HP values. A button is connected to the program for the user to interact.

When it comes to the first player’s turn, she first presses the button and the dice will randomly display one side among the six, and the player will march forward the number of steps displayed on the dice. The LED will blink on the place where she arrives. There will be an event preset for every step such as “people in your country just invented stone swords” or “there is an earthquake happened in your country, go back 2 steps”. Whenever a player arrives at a step after she tosses the dice, a message box will tell the user about the event.

After that, if the event is about the player going forward or back several steps, the according LED will blink again but no event will happen the second time she moves in a round. But if the event is about a weapon invented, the program will let the user decide how much HP she wants the other user to drop. The process of determining the amount of points goes like this: a bar will appear on the screen, and the fill of the bar is constantly moving back and forth between 0% to 100%. The user presses the button to stop the moving and the place where the fill stops represents how much percent of the weapon’s power she wants to use against her opponent.

(For example, if the weapons “stone sword” has the power of 200, and the user stops the bar at 40%, then her opponent’s HP value will drop by 40%*200, which is 80 points.)

This way, the user can choose whether to be friendly with her opponent or destroy her opponent’s country.

There is an indication in this game that along the road, pictures printed beside it is different. At the be beginning of it, there are natural and primary things there such as mountains and trees representing a backward society. But as the users continues to play and reaches the later steps, the pictures printed along the road would become houses, castles, and finally high-rises to indicate the technological development of the society. Of course, as the game goes into later stages and the technology develops, the weapons they get will become increasingly powerful. At the beginning of the game, a player can only cut the other player’s HP by 10 or 20 points. But as they approach the end of the road, the weapon they get will be so powerful that if they hit near 100% in the bar, they can cut as much as thousands of the other user’s health points. If any player’s HP goes to 0, the game ends. Else if one user reaches the end of the road, the game also ends.

However, if one player’s country reduces the other’s HP to zero, the program would not notify that she wins. Instead, it will say that the weapon this country uses is so powerful that both countries fell into ruins during the war, and no one wins. We designed the game to actually warn the players that it is no good for the countries in our real life to compete against each other, and this endless arms race on the international stage is only going to waste money in vain and bring sorrow and fear to the people, just like what happened during the cold war. It is obvious that if crisis such as the Iran’s nuclear issue and Cuba missile crisis keep happening then no one will be the winning on earth. Just like our game, in the end the competition will only put the entire human race in a vulnerable place of diminishing together.

But in our game, there is another ending. If the players choose not to attack the other country by stopping the movement of the bar at very small percentage and both countries survive with a lot of HP remaining (exactly how much is still under discussion) when one of the player reaches the final step, the program is going to notify that both players have won this game. This is a metaphor that collaboration between countries will bring prosperity to all nations around the world. Although our game does not offer a concrete solution to the negotiation between countries in the real world, we do want to increase awareness among common people. It will tell a cautious tale in a fun but educative way to adults and kids alike.

While I feel that the concept is pretty finalized, the details of the game design is still a large challenge for us. Since there are stories and events going on during the game, we want to make the game balanced and playable. Also, programming is going to be hard because everything about the content should be embedded in the processing codes. How to link the many LEDs to Arduino boards is also a huge problem. (I am currently thinking about using a tiny car that has a trail tracking sensor on it to go along the road as a substitute for LEDs.)

Next week, we want to figure out how we want to represent the users taking steps or going forward: whether we want to use LEDs or using other methods. We also want to go to the ARC to talk about how we are going to realize our programming with processing. During the week of 12/1-7, we want to focus on programming and designing the look of the board. During the last week before due, we will put everything together and run user tests.

Throughout this semester, I defined interaction as “the process in which two parties involved repeatedly send information through media such as words, sound, image, physical movements, etc., while receiving the other’s information simultaneously.” And I set a criterion for interactive relationships that “the more types of information are involved, the more interactive this relationship is.” I think our project fits my definition of interaction because when playing this game, the computer will be telling users information, and the users will tell the computer back about their decisions. This is a continuous process which involves a lot of ways to transmit information such as the blink of LEDs, virtual and real patterns and pictures, and words from message boxes. We want our users to really engage in this game, so we designed both the computer program where they can get all the information and the board on a table so that people can still be face-to-face when they play the game and enjoy the time with their friends.

While we have a lot of pre-written events and endings to show to the players, we want them to get the metaphor of this game by themselves. That’s why we designed the indications such as the development of arms technology. Just as Tom Igoe wrote in his blog, “if you’re thinking of an interactive artwork, don’t think of it like a finished painting or sculpture.  Think of it more as a performance. Your audience completes the work through what they do when they see what you’ve made.” Only by driving the users to think themselves can they have a deeper understanding of the issue. Since our project is more of a one-time thing (because once you understand the indication, the game wouldn’t be fun anymore), I think its future development may be in a mall or a public place where passers-by and come near and try it. The idea is quite similar to the project “dancing traffic light” I mentioned in my participatory research. When people come across them in a public place, interacting with them helps to solve a social problem.

Reference
“Dancing Traffic Light Entertains Pedestrians and Improves Safety.” New Atlas, 17 Sept. 2014, https://newatlas.com/smart-dancing-traffic-light/33849/.
 
Igoe, Tom. Making Interactive Art: Set the Stage, Then Shut Up and Listen – Hello. https://www.tigoe.com/blog/category/physicalcomputing/405/. Accessed 21 Nov. 2019.
 
Wang, Ruining. “Preparatory Research and Analysis by Tya Wang (Rw2399) – IMA Documentation.” IMA Documentation, 7 Nov. 2019, https://wp.nyu.edu/shanghai-ima-documentation/foundations/interaction-lab/rw2399/preparatory-research-and-analysis-by-tya-wang-rw2399/.

Final Project Essay-Kurt Xu

Project Name: “Echo”

The inspiration comes from the shouting’s decompression effect by natural, yet people are restrained from actually doing that by various reasons, usually the fear of disturbing others. So we try to provide the user a reason to justify their act of screaming, which is to say, providing a place for people to release their pressure. And following that thought, we consider that the use of technology to provide feedback may possibly help people understand how stressful the status they are in and thus help them to confirm the relieving effect.

The project “Echo” will mainly translate your audio input into the visual output on the computer screen and simutaneously, keep monitoring your heartrate to estimate your stage of nervousness. Considering the resources we have, the latter one may be much harder, so it may be the main problem we may face. What we are trying to solve is the lack of related knowledge and possible equipment. Besides, as the main aim is not to encourage people to keep screaming or make noise but to achieve the conforting effect through that mean.The key issue is that we focus on is the visualization of the signal, which should aim to render a relaxing atmosphere. About that points, according to the pervious research we’ve made about the existing decompression softwares’ methodologyies, they usually use gentle movement of simple objects like circles/rectangles/triangles accompanied with generally relaxing soft music. We are considering taking the similar ideology as guidance in designing the program for the patterns.

To expand our project futher, we wish to translate the movement of the users simutanously. With viberation sensor and pressure sensor, we may also take the physical movement of the tester as a mean of input, thus expanding its interactivity. We also want to persuade our audience to wear or experience our device, so we decided to design something more appealing with a more desginated visual guidance. To achieve that, we decide to adopt a the idea our classmate suggested in class that we can design a device to control the elevation of the helmet to enhance the ceremonial sense.

To me, the definition of interaction is similar to the communication between human beings, as we convey messages through not only words but gesture, facial expression and body language as well, and the process to improve the interactivity of a certain project is to expand the way it reads and expresses itself, in other words, to intercept and to output.

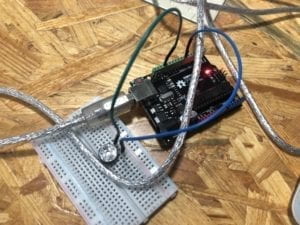
Recitation 8. Serial Communication By Feifan Li

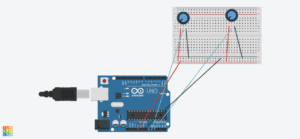
Exercise 1: Make a Processing Etch A Sketch

Working with an ellipse:

Arduino Code:

void setup() {
// initialize serial communication at 9600 bits per second:
Serial.begin(9600);
}

// the loop routine runs over and over again forever:
void loop() {
// read the input on analog pin 0:
int sensorValue1 = analogRead(A0);
int sensorValue2 = analogRead(A1);
// print out the value you read:
Serial.print(sensorValue1);
Serial.print(“,”);
Serial.print(sensorValue2);
Serial.println();
delay(1); // delay in between reads for stability
}

Processing Code:

import processing.serial.*;

String myString = null;
Serial myPort;


int NUM_OF_VALUES = 2;   /** YOU MUST CHANGE THIS ACCORDING TO YOUR PROJECT **/
int[] sensorValues;      /** this array stores values from Arduino **/


void setup() {
  size(500, 500);
  background(0);
  setupSerial();
}

void draw() {
  updateSerial();
  printArray(sensorValues);
ellipse(sensorValues[0],sensorValues[1], 80, 80);

}

void setupSerial() {
  printArray(Serial.list());
  myPort = new Serial(this, Serial.list()[ 2 ], 9600);

  myPort.clear();
  // Throw out the first reading,
  // in case we started reading in the middle of a string from the sender.
  myString = myPort.readStringUntil( 10 );  // 10 = '\n'  Linefeed in ASCII
  myString = null;

  sensorValues = new int[NUM_OF_VALUES];
}


void updateSerial() {
  while (myPort.available() > 0) {
    myString = myPort.readStringUntil( 10 ); // 10 = '\n'  Linefeed in ASCII
    if (myString != null) {
      String[] serialInArray = split(trim(myString), ",");
      if (serialInArray.length == NUM_OF_VALUES) {
        for (int i=0; i<serialInArray.length; i++) {
          sensorValues[i] = int(serialInArray[i]);
        }
      }
    }
  }
}

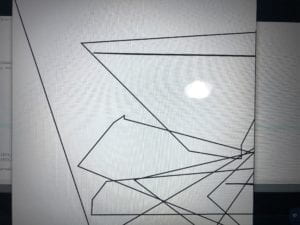
Working with a line:

I modified the Processing code a bit to change from drawing with ellipse to line.

import processing.serial.*;

String myString = null;
Serial myPort;


int NUM_OF_VALUES = 2;   /** YOU MUST CHANGE THIS ACCORDING TO YOUR PROJECT **/
int[] sensorValues;      /** this array stores values from Arduino **/

int a;
int b;

void setup() {
  size(800, 800);
  background(255);
  setupSerial();
}


void draw() {
  updateSerial();
  printArray(sensorValues);
  fill(0);
line(a, b, sensorValues[0],sensorValues[1]);
a=sensorValues[0];
b=sensorValues[1];

void setupSerial() {
  printArray(Serial.list());
  myPort = new Serial(this, Serial.list()[ 2 ], 9600);

  myPort.clear();
  // Throw out the first reading,
  // in case we started reading in the middle of a string from the sender.
  myString = myPort.readStringUntil( 10 );  // 10 = '\n'  Linefeed in ASCII
  myString = null;

  sensorValues = new int[NUM_OF_VALUES];
}


void updateSerial() {
  while (myPort.available() > 0) {
    myString = myPort.readStringUntil( 10 ); // 10 = '\n'  Linefeed in ASCII
    if (myString != null) {
      String[] serialInArray = split(trim(myString), ",");
      if (serialInArray.length == NUM_OF_VALUES) {
        for (int i=0; i<serialInArray.length; i++) {
          sensorValues[i] = int(serialInArray[i]);
        }
      }
    }
  }
}

The difficult part in this drawing experience is that the potentiometer is difficult to control. From the video you can see that the lines I draw change abruptly – a result of the instability of potentiometers. I wonder if it is a problem of precision with our potentiometers?

Exercise 2: Make a musical instrument with Arduino

Processing Code:

import processing.serial.*;

int NUM_OF_VALUES = 2;  /** YOU MUST CHANGE THIS ACCORDING TO YOUR PROJECT **/


Serial myPort;
String myString;

// This is the array of values you might want to send to Arduino.
int values[] = new int[NUM_OF_VALUES];

void setup() {
  size(500, 500);
  background(0);

  printArray(Serial.list());
  myPort = new Serial(this, Serial.list()[ 2 ], 9600);
 
  myPort.clear();
  // Throw out the first reading,
  // in case we started reading in the middle of a string from the sender.
  myString = myPort.readStringUntil( 10 );  // 10 = '\n'  Linefeed in ASCII
  myString = null;
}


void draw() {
  background(0);

  // changes the values
  for (int i=0; i<values.length; i++) {
    values[0] = mouseX; 
    values[1] = mouseY;
  
    /** Feel free to change this!! **/
  }

  // sends the values to Arduino.
  sendSerialData();

  // This causess the communication to become slow and unstable.
  // You might want to comment this out when everything is ready.
  // The parameter 200 is the frequency of echoing. 
  // The higher this number, the slower the program will be
  // but the higher this number, the more stable it will be.
  echoSerialData(200);
}

void sendSerialData() {
  String data = "";
  for (int i=0; i<values.length; i++) {
    data += values[i];
    //if i is less than the index number of the last element in the values array
    if (i < values.length-1) {
      data += ","; // add splitter character "," between each values element
    } 
    //if it is the last element in the values array
    else {
      data += "n"; // add the end of data character "n"
    }
  }
  //write to Arduino
  println(data);
  myPort.write(data);
}


void echoSerialData(int frequency) {
  //write character 'e' at the given frequency
  //to request Arduino to send back the values array
  if (frameCount % frequency == 0) myPort.write('e');

  String incomingBytes = "";
  while (myPort.available() > 0) {
    //add on all the characters received from the Arduino to the incomingBytes string
    incomingBytes += char(myPort.read());
  }
  //print what Arduino sent back to Processing
  print( incomingBytes );
}

Arduino code:

// IMA NYU Shanghai
// Interaction Lab

/**
This example is to send multiple values from Processing to Arduino.
You can find the Processing example file in the same folder which works with this Arduino file.
Please note that the echo case (when char c is ‘e’ in the getSerialData function below)
checks if Arduino is receiving the correct bytes from the Processing sketch
by sending the values array back to the Processing sketch.
**/

#define NUM_OF_VALUES 2 /** YOU MUST CHANGE THIS ACCORDING TO YOUR PROJECT **/

/** DO NOT REMOVE THESE **/
int tempValue = 0;
int valueIndex = 0;

/* This is the array of values storing the data from Processing. */
int values[NUM_OF_VALUES];

void setup() {
Serial.begin(9600);
pinMode(13, OUTPUT);
pinMode(9, OUTPUT);
}

void loop() {
getSerialData();

//Serial.println(values[0]);
// add your code here
// use elements in the values array
// values[0] // values[1] if (values[0] > 150) {

if (values[0] == 1) {
digitalWrite(13, HIGH);
} else {
digitalWrite(13, LOW);
}
if (values[1] == 1) {
tone(9, values[2]);
} else {
noTone(9);
}
}

//recieve serial data from Processing
void getSerialData() {
if (Serial.available()) {
char c = Serial.read();
//Serial.println(“gjkg”);
//switch – case checks the value of the variable in the switch function
//in this case, the char c, then runs one of the cases that fit the value of the variable
//for more information, visit the reference page: https://www.arduino.cc/en/Reference/SwitchCase
switch (c) {
//if the char c from Processing is a number between 0 and 9
case ‘0’…’9′:
//save the value of char c to tempValue
//but simultaneously rearrange the existing values saved in tempValue
//for the digits received through char c to remain coherent
//if this does not make sense and would like to know more, send an email to me!
tempValue = tempValue * 10 + c – ‘0’;
break;
//if the char c from Processing is a comma
//indicating that the following values of char c is for the next element in the values array
case ‘,’:
values[valueIndex] = tempValue;
//reset tempValue value
tempValue = 0;
//increment valuesIndex by 1
valueIndex++;
break;
//if the char c from Processing is character ‘n’
//which signals that it is the end of data
case ‘n’:
//save the tempValue
//this will b the last element in the values array
values[valueIndex] = tempValue;
//reset tempValue and valueIndex values
//to clear out the values array for the next round of readings from Processing
tempValue = 0;
valueIndex = 0;
break;
//if the char c from Processing is character ‘e’
//it is signalling for the Arduino to send Processing the elements saved in the values array
//this case is triggered and processed by the echoSerialData function in the Processing sketch
case ‘e’: // to echo
for (int i = 0; i < NUM_OF_VALUES; i++) {
Serial.print(values[i]);
if (i < NUM_OF_VALUES – 1) {
Serial.print(‘,’);
}
else {
Serial.println();
}
}
break;
}
}

Recitation 8: Serial Communication – Andrew Xie

Introduction

This time, we mainly use Arduino and processing to use the two software at the same time to achieve the interaction between electronic components and screen.

Exercise One

In this exercise, I encountered two difficulties. First, I wrote the code with the wrong version of quotation marks, which made the code unable to run. The second problem is that when drawing, the line can only move at the background edge.

001

At last, I found out that the wiring was reversed because of the X axis.

002

Code:

// IMA NYU Shanghai
// Interaction Lab
// For receiving multiple values from Arduino to Processing

/*
* Based on the readStringUntil() example by Tom Igoe
* https://processing.org/reference/libraries/serial/Serial_readStringUntil_.html
*/

import processing.serial.*;

String myString = null;
Serial myPort;


int NUM_OF_VALUES = 2; /** YOU MUST CHANGE THIS ACCORDING TO YOUR PROJECT **/
int[] sensorValues; /** this array stores values from Arduino **/

float preX;
float preY;


void setup() {
size(1023, 1023);
background(255);
setupSerial();


}


void draw() {
updateSerial();
printArray(sensorValues);
//float posx =map(sensorValues[1],0,1023,0,500);
// float posy =map(sensorValues[0],0,1023,0,500);
strokeWeight(4);
line(preX,preY, sensorValues[1],sensorValues[0]);
preX=sensorValues[1];
preY=sensorValues[0];

// use the values like this!
// sensorValues[0]

// add your code

//
}

void setupSerial() {
printArray(Serial.list());
myPort = new Serial(this, Serial.list()[ 4 ], 9600);
// WARNING!
// You will definitely get an error here.
// Change the PORT_INDEX to 0 and try running it again.
// And then, check the list of the ports,
// find the port "/dev/cu.usbmodem----" or "/dev/tty.usbmodem----" 
// and replace PORT_INDEX above with the index number of the port.

myPort.clear();
// Throw out the first reading,
// in case we started reading in the middle of a string from the sender.
myString = myPort.readStringUntil( 10 ); // 10 = '\n' Linefeed in ASCII
myString = null;

sensorValues = new int[NUM_OF_VALUES];

}

void updateSerial() {
while (myPort.available() > 0) {
myString = myPort.readStringUntil( 10 ); // 10 = '\n' Linefeed in ASCII
if (myString != null) {
String[] serialInArray = split(trim(myString), ",");
if (serialInArray.length == NUM_OF_VALUES) {
for (int i=0; i<serialInArray.length; i++) {
sensorValues[i] = int(serialInArray[i]);
}
}
}
}
}

Exercise Two

Because it took a long time to do exercise one, I finished it after class. With one experience, the second one is easy to do. But I didn’t do special effects on the mouse.

Code

For processing

// IMA NYU Shanghai
// Interaction Lab


/**
* This example is to send multiple values from Processing to Arduino.
* You can find the arduino example file in the same folder which works with this Processing file.
* Please note that the echoSerialData function asks Arduino to send the data saved in the values array
* to check if it is receiving the correct bytes.
**/


import processing.serial.*;

int NUM_OF_VALUES = 2; /** YOU MUST CHANGE THIS ACCORDING TO YOUR PROJECT **/


Serial myPort;
String myString;

// This is the array of values you might want to send to Arduino.
int values[] = new int[NUM_OF_VALUES];

void setup() {
size(500, 500);
background(0);

printArray(Serial.list());
myPort = new Serial(this, Serial.list()[ 4 ], 9600);
// check the list of the ports,
// find the port "/dev/cu.usbmodem----" or "/dev/tty.usbmodem----" 
// and replace PORT_INDEX above with the index of the port

myPort.clear();
// Throw out the first reading,
// in case we started reading in the middle of a string from the sender.
myString = myPort.readStringUntil( 10 ); // 10 = '\n' Linefeed in ASCII
myString = null;
}


void draw() {
background(0);

// changes the values
values[0] = mouseX;
values[1] = mouseY;/** Feel free to change this!! **/

// sends the values to Arduino.
sendSerialData();

// This causess the communication to become slow and unstable.
// You might want to comment this out when everything is ready.
// The parameter 200 is the frequency of echoing. 
// The higher this number, the slower the program will be
// but the higher this number, the more stable it will be.
echoSerialData(200);
}

void sendSerialData() {
String data = "";
for (int i=0; i<values.length; i++) {
data += values[i];
//if i is less than the index number of the last element in the values array
if (i < values.length-1) {
data += ","; // add splitter character "," between each values element
} 
//if it is the last element in the values array
else {
data += "n"; // add the end of data character "n"
}
}
//write to Arduino
myPort.write(data);
}


void echoSerialData(int frequency) {
//write character 'e' at the given frequency
//to request Arduino to send back the values array
if (frameCount % frequency == 0) myPort.write('e');

String incomingBytes = "";
while (myPort.available() > 0) {
//add on all the characters received from the Arduino to the incomingBytes string
incomingBytes += char(myPort.read());
}
//print what Arduino sent back to Processing
print( incomingBytes );
}

For Arduino

// IMA NYU Shanghai
// Interaction Lab


/**
This example is to send multiple values from Processing to Arduino.
You can find the Processing example file in the same folder which works with this Arduino file.
Please note that the echo case (when char c is 'e' in the getSerialData function below)
checks if Arduino is receiving the correct bytes from the Processing sketch
by sending the values array back to the Processing sketch.
**/

#define NUM_OF_VALUES 3 /** YOU MUST CHANGE THIS ACCORDING TO YOUR PROJECT **/


/** DO NOT REMOVE THESE **/
int tempValue = 0;
int valueIndex = 0;

/* This is the array of values storing the data from Processing. */
int values[NUM_OF_VALUES];


void setup() {
Serial.begin(9600);
pinMode(11, OUTPUT);
}

void loop() {
getSerialData();

// add your code here
// use elements in the values array
// values[0]
// values[1]

tone(11,values[0],values[1]);

}


//recieve serial data from Processing
void getSerialData() {
if (Serial.available()) {
char c = Serial.read();
//switch - case checks the value of the variable in the switch function
//in this case, the char c, then runs one of the cases that fit the value of the variable
//for more information, visit the reference page: https://www.arduino.cc/en/Reference/SwitchCase
switch (c) {
//if the char c from Processing is a number between 0 and 9
case '0'...'9':
//save the value of char c to tempValue
//but simultaneously rearrange the existing values saved in tempValue
//for the digits received through char c to remain coherent
//if this does not make sense and would like to know more, send an email to me!
tempValue = tempValue * 10 + c - '0';
break;
//if the char c from Processing is a comma
//indicating that the following values of char c is for the next element in the values array
case ',':
values[valueIndex] = tempValue;
//reset tempValue value
tempValue = 0;
//increment valuesIndex by 1
valueIndex++;
break;
//if the char c from Processing is character 'n'
//which signals that it is the end of data
case 'n':
//save the tempValue
//this will b the last element in the values array
values[valueIndex] = tempValue;
//reset tempValue and valueIndex values
//to clear out the values array for the next round of readings from Processing
tempValue = 0;
valueIndex = 0;
break;
//if the char c from Processing is character 'e'
//it is signalling for the Arduino to send Processing the elements saved in the values array
//this case is triggered and processed by the echoSerialData function in the Processing sketch
case 'e': // to echo
for (int i = 0; i < NUM_OF_VALUES; i++) {
Serial.print(values[i]);
if (i < NUM_OF_VALUES - 1) {
Serial.print(',');
}
else {
Serial.println();
}
}
break;
}
}
}

Recitation 8: Serial Communication

Intro

This week we were introduced to the ways that Processing and Arduino interact with each other.  From this recitation we saw how the two use serial communication with image and sound. 

Etch A Sketch

etch a sketch

The interaction of this circuit comes from the potentiometers giving Processing an x and y location. One gives the x and the other gives the y, just like an etch a sketch. The interactivity from computer to human requires the user to turn the potentiometer for an image to be drawn. 

The Processing Code

import processing.serial.*;

String myString = null;
Serial myPort;


int NUM_OF_VALUES = 2;   /** YOU MUST CHANGE THIS ACCORDING TO YOUR PROJECT **/
int[] sensorValues;      /** this array stores values from Arduino **/
float psensorValue0;
float psensorValue1;


void setup() {
  size(500, 500);
  background(255);
  setupSerial();
}


void draw() {
  updateSerial();
  printArray(sensorValues);
   float x = map(sensorValues[0], 0, 1023, 0, width);
   float y = map(sensorValues[1], 0, 1023, 0, height);
  stroke(0);
  strokeWeight(2);
  line( psensorValue0, psensorValue1, x, y);
  psensorValue0 = x;
  psensorValue1= y;


  // use the values like this!
  // sensorValues[0] 

  // add your code

  //
}


void setupSerial() {
  printArray(Serial.list());
  myPort = new Serial(this, Serial.list()[ 73 ], 9600);
  // WARNING!
  // You will definitely get an error here.
  // Change the PORT_INDEX to 0 and try running it again.
  // And then, check the list of the ports,
  // find the port "/dev/cu.usbmodem----" or "/dev/tty.usbmodem----" 
  // and replace PORT_INDEX above with the index number of the port.

  myPort.clear();
  // Throw out the first reading,
  // in case we started reading in the middle of a string from the sender.
  myString = myPort.readStringUntil( 10 );  // 10 = '\n'  Linefeed in ASCII
  myString = null;

  sensorValues = new int[2];
}


void updateSerial() {
  while (myPort.available() > 0) {
    myString = myPort.readStringUntil( 10 ); // 10 = '\n'  Linefeed in ASCII
    if (myString != null) {
      String[] serialInArray = split(trim(myString), ",");
      if (serialInArray.length == NUM_OF_VALUES) {
        for (int i=0; i<serialInArray.length; i++) {
          sensorValues[i] = int(serialInArray[i]);
        }
      }
    }
  }
}

Code from Arduino

void setup() {
Serial.begin(9600);
}

void loop() {
int sensor1 = analogRead(A0);
int sensor2 = analogRead(A1);
Serial.print(sensor1);
Serial.print(“,”); 
Serial.print(sensor2);
Serial.println(); 

delay(100);
}

Musical Instrument 

Buzzer Buzzing

This exercise showed serial communication between Arduino and Processing through sound. The interactivity came when the mouse was pressed and moved around the screen. The sound reacted in response to this. 

Arduino Code

#define NUM_OF_VALUES 2

int tempValue = 0;
int valueIndex = 0;

int values[2];

void setup() {
Serial.begin(9600);
pinMode(13, OUTPUT);
pinMode(9, OUTPUT);
}

void loop() {
getSerialData();

if (values [1] == true) { //if mouse is pressed which is at position 1 (which is mouse press) then…
tone(13, values[0]); //at pin 11 play the mouse x values frequency
}
else {
noTone(13);
}
}

void getSerialData() {
if (Serial.available()) {
char c = Serial.read();

switch (c) {

tempValue = tempValue * 10 + c – ‘0’;
break;

values[valueIndex] = tempValue;

tempValue = 0;

valueIndex++;
break;

case ‘n’:

values[valueIndex] = tempValue;

tempValue = 0;
valueIndex = 0;
break;
/
for (int i = 0; i < NUM_OF_VALUES; i++) {
Serial.print(values[i]);
if (i < NUM_OF_VALUES – 1) {
Serial.print(‘,’);
}
else {
Serial.println();
}
}
break;
}
}
}

Processing Code

import processing.serial.*;

int NUM_OF_VALUES = 2;  

Serial myPort;
String myString;

int values[] = new int[NUM_OF_VALUES];

void setup() {
  size(500, 500);
  background(0);

  printArray(Serial.list());
  myPort = new Serial(this, Serial.list()[ 73 ], 9600);
 

  myPort.clear();
  
  myString = myPort.readStringUntil( 10 );  // 10 = '\n'  Linefeed in ASCII
  myString = null;
}


void draw() {
  background(0);
values [0]= mouseX;//frequency is changing based on moving the mouse around, sends to arduino
values [1]=int(mousePressed);// turn true or false (boolean) into an integer that can be sent 

  
  sendSerialData();

    echoSerialData(200);
}

void sendSerialData() {
  String data = "";
  for (int i=0; i<values.length; i++) {
    data += values[i];
   
    if (i < values.length-1) {
      data += ","; // add splitter character "," between each values element
    } 
   
    else {
      data += "n"; // add the end of data character "n"
    }
  }
  //write to Arduino
  myPort.write(data);
}


void echoSerialData(int frequency) {
  
  if (frameCount % frequency == 0) myPort.write('e');

  String incomingBytes = "";
  while (myPort.available() > 0) {
   
    incomingBytes += char(myPort.read());
  }
 
  print( incomingBytes );
}