Fnl Prjct: Essay by ChangZhen from Inmi’s Session

Won Color el Stage

1. Project Description

It’s both a video game and a three-player strategic game. Each player acts as a supporting fan respectively of one of the three anime girl idols. Each player inputs his representative primary color and tries to summon his own idol.

2. Project Details

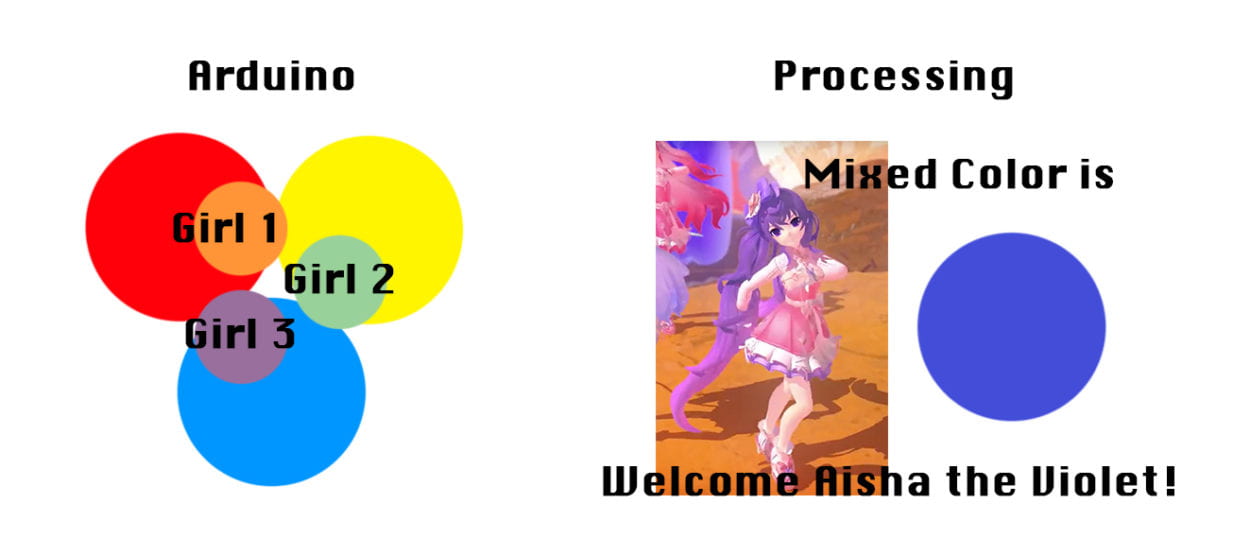
Player 1 inputs red trying to summon the tangerine girl.

Player 2 inputs yellow trying to summon the emerald girl.

Player 3 inputs blue trying to summon the violet girl.

How does a player inputs his color? A distance sensor from Arduino measures the distance of his hand from it. The closer, the higher the input.

How are the girls summoned? Taking those primary color inputs and computing through some lousy maths, three players get a mixed color. Then the new color is judged onto hue, to turn out to be closest to the color tangerine, emerald, or violet, and the corresponding girl switches the girl previously on stage, if there’s been, to appear on the stage to sing and dance. In practice, the animation is the girl’s video played on Processing. 

Why these specific colors, and why not RGB? One idea is that I was taught by art teachers from primary school the primary colors were red, yellow, and blue. Now, I’ve acknowledged that RGB are the correct three primary colors, and CMY aren’t equal to blue, red, and yellow. Even so, I try to recover the good old memories of mixing colors in art classes. Another idea is that RGB is just to saturated, and their invert colors, CMY feels like sex and hormone, therefore, there’re not proper to represent the girl idols. By contrast, my RYB and their mixed colors are more moderate:

R+Y = orange (tangerine)

Y+B = green (emerald)

B+R = purple (violet)

How to judge victory of the game? Over the time of an idol pop song being played on the stage on Processing, the total on-stage reign of each idol is counted. Here’s a penalizing mechanism if three players are inputing so harsh that the mixed color is too dark, all girl idols black out for a moment since “there’s too much dark energy”, and each player’s time account gets reduced by the color’s darkness times the proportion of his contribution to the color. Who has the longest time wins.

How strategic can this game be? Highly. Because to earn a high score, the players have to not only explore the theoretic rules for color mixing, but also balance with the other two players to output the color of his idol, which is never easy, plus the penalizing mechanism restriction.
3. Context & Significance

It’s a supreme gift for ACG (anime, comic, and game) lovers. They can watch the cute anime girls perform as they compete, and how they input the color is intended to be like intimately touching the girl since the sensor will be decorated with the girl’s portrait. Plus, the strategic game is highly interactive.

Inspirations from midterm suggests that a multi-player game satisfies a high-ordered interaction. And players are also interacting with the virtual characters. The color idea was triggered by Click Canvas on creative applications.

4. Explanation for the Project Title

“Won” means “to win” in English and “primary” in Korean. “El” means “from” as an affix and is short for “Elsword” an ACG action RPG made by KOG Korea where the three girl idols are from. It basically means winning a game from selecting primary colors to control stage performances.

Media Controller – Stephanie Anderson 003

The Process

For this week’s recitation, I was starting ambitious and was originally going to create a program that would allow me to adjust the tint of a picture using a light sensor. I was going to make boundaries using different ranges of the light and then try and adjust the tint on a smoother scale. The first problem that I ran into was that the light sensor I checkout required a special bread board which I was not familiar with. The next attempt at using a light sensor included using the one given to us in our kit. Unfortunately, I was not successful in this venture either. I ended up creating a program that allowed me to control the speed of a video with a potentiometer. In theory, this should have been pretty simple, but it took me a while to figure out how to write all the code that I needed. 

I ran into problems with being able to manipulate the speed of the video. I figured out that the issue was that I needed to switch two lines of code:  myMovie.loop() and myMovie.speed(). When I switched these lines in my setup() function then I was able to manually adjust the speed for the video. After this, I ran into another problem where I was unable to variablize the speed function. I originally made my own class, but then I realized that was ineffective. I was not able to call the class I created in the setup() function. I ended up creating a while loop that allowed me to have the sensorValue from the Ardunio potentiometer to manipulate the speed of the video. 

ARDUNIO CODE:

// IMA NYU Shanghai
// Interaction Lab
// This code sends one value from Arduino to Processing

void setup() {
Serial.begin(9600);
}

void loop() {
int sensorValue = analogRead(A0) / 4;
Serial.write(sensorValue);
map(sensorValue, 0, 255, 0, 10);
// too fast communication might cause some latency in Processing
// this delay resolves the issue.
Serial.print(sensorValue);
delay(10);
}

////////////////////////////////////////////////////

PROCESSING CODE:

import processing.video.*;
import processing.serial.*;
Serial myPort;
int sensorValue;

Movie myMovie;
void setup() {
size(700 , 1100);
frameRate(200);
myMovie = new Movie(this, “lilydumb.mp4”);
// myMovie.play();
myMovie.loop();

while(sensorValue> 0){
int x = sensorValue;

myMovie.speed(x);

}

printArray(Serial.list());

myPort = new Serial(this, Serial.list()[ 2 ], 9600);

}

void fastness(int x){
while(sensorValue > 0){
x = sensorValue;

}
}

void draw() {
if (myMovie.available()) {
myMovie.read();
}

image(myMovie, 0, 0);

while ( myPort.available() > 0) {
sensorValue = myPort.read();
}
println(sensorValue);//This prints out the values from Arduino
}

VIDEO:

https://drive.google.com/open?id=1kAzAEmWEq-JeKoO3K3kIbpL3thKqEagZ

After reading through the article, “Computer Vision for Artists and Designers,” by Levin, it made me think about some of the presentations from the past weekend from the “Machine Art” workshops. Simone spoke very passionately about his belief that  machines are only as smart as we make them. In the article, Levin articulates the power of the machine, but says how, in the past, the power of machines have been predominately used by the military and other government powers. Levin does mention, however, that the rise of modern technology has led to more open-sourcing and more community efforts on home-made projects.  I think this concept that he is referencing here is why I love working with Ardunio and Processing so much. They both have such diverse communities that include people of all backgrounds who are willing to anyone who presents a problem. Taking open-ended questions like our recitation and using our imagination to come up with projects that will be helpful is the magic of design and the benefit of engineering. 

Sources:

Levin, G. “Computer Vision for Artists and Designers: Pedagogic Tools and Techniques for Novice Programmers”. Journal of Artificial Intelligence and Society, Vol. 20.4. Springer Verlag, 2006. Reas, Casey and Fry, Ben. Processing: A Programming Handbook for Visual Designers and Artists. MIT Press, 9/2007. ISBN: 978­026218262. 

Recitation 9: Media Controller – Sagar Risal

Materials: 

Arduino Kit 

Processing

Media Controller: 

In this recitation we had to have Arduino control a certain aspect of an image from processing. I used a pentameter to control the pixels in my webcam so that the lower the pentameter was the less pixels there were and the higher it was the more complete the webcam image would look. I had to use specific dimensions for the webcam to work with the amount of pixels I wanted to use, since each pixel had to be a certain size to fill the screen perfectly. 

Documentation: 

After reading Computer Vision I understand how computers and humans can interact in ways that both the computer and person can understand what each other are doing. This can be done with the computer being able to understand ones motion or how certain facial features move, and a human can understand the computer because of the visual that it projects. For example, in my recitation I knew that if I move the pentameter my image would become more pixelated, what the computer understood was that the more I moved the pentameter the more pixels it would have to add to the image. Through the visual aid of what the computer projected I was able to understand how the computer would react to something I did, and in turn the computer would react to what I inputed, causing interaction between me and the computer.  

IMG_4462

Recitation 9 : Media Controller – Lillie Yao

Recitation Exercise:

For this recitation exercise, we were asked to display and image or use the webcam/camera and then use Processing and Arduino to manipulate the image with a physical controller.

I chose to use an image of my dog and then use Processing to manipulate the image so that when I turn the potentiometer, the image would change different tints according to the potentiometer value.

This recitation was fairly easy for me except I didn’t know that the image needed to be within the folder of my code in order for it to work. I also had some trouble with the if, then, else statements because I thought that was the only way I could control the tint changing. I figured out that I just need to use sensorValues and map the function and then the potentiometer would do the rest. I also found out that the code needed to be in a certain order for it to work, instead of having tint be the last function, I had it first and my code wouldn’t work.

Arduino Code:

void setup() {
Serial.begin(9600);
}

void loop() {
int sensorValue = analogRead(A0);
Serial.print(sensorValue);
Serial.println();

// int mapValue = (sensorValue, 0, 1023, 0, 255);
// Serial.write(mapValue);

// too fast communication might cause some latency in Processing
// this delay resolves the issue.
delay(10);
}

Processing Code:

PImage img1;
import processing.serial.*;

Serial myPort;
String myString = null;

int valueFromArduino;
int[] sensorValues = new int[1];

void setup() {
size(500, 500);
//background(0);
img1 = loadImage(“sparkie.jpeg”);
setupSerial();
}

void draw() {
// to read the value from the Arduino
updateSerial();
printArray(sensorValues);
image(img1,0,0);
float x = map(sensorValues[0], 0, 1023, 0, 255);
tint(x,200,200);
}

void setupSerial() {
printArray(Serial.list());
myPort = new Serial(this, Serial.list()[2], 9600);

myPort.clear();
// Throw out the first reading,
// in case we started reading in the middle of a string from the sender.
myString = myPort.readStringUntil( 10 ); // 10 = ‘\n’ Linefeed in ASCII
myString = null;

sensorValues = new int[1];
}

void updateSerial() {
while (myPort.available() > 0) {
myString = myPort.readStringUntil( 10 ); // 10 = ‘\n’ Linefeed in ASCII
if (myString != null) {
String[] serialInArray = split(trim(myString), “,”);
if (serialInArray.length == 1) {
for (int i=0; i<serialInArray.length; i++) {
sensorValues[i] = int(serialInArray[i]);
}
}
}
}
}

Video Documentation:

Reflection:

In this recitation, the use of technology was very prominent. I didn’t use technology as much as the people who decided to make their image a web cam instead, but I still made use of it. Without technology, I wouldn’t have been able to get images onto my computer and into Arduino and Processing. Technology plays a big role considering the fact that basically everything I did involved my computer: Arduino being connected to the USB port, images stored on the computer, Processing software on the computer. I found this also very similar to Rafael Lozano-Hemmer’s installation of Standards and Double Standards (2004). Where the project is basically functioning only because of the technology controlling it. Pretty much all interactive art revolves around technology, but I was specifically drawn to this piece because it was very abstract and different from anything I’ve ever seen

Connor S. – Research and Analysis 

The Chronos interactive art exhibition demonstrated how technology, art, and interaction could work together to produce pieces that are both entertaining and thought provoking. In my experience, art exhibitions are generally one dimensional, leaving the viewer with little opportunity to engage in the work beyond viewing, and reacting to the piece as such. Non-interactive, one dimensional art invites the viewer to engage with it internally, but the experience essentially ends there. The Chronos exhibition allows for a more intimate experience with the art because of the interactive qualities of many pieces. Interactive art not only invites one response of the viewer, but rather, at least two. 

The first interactive project that stuck in my mind, and that I think about at least once a month, is an M&M themed music making game, in which the user drags and drops different M&Ms figures to different, labeled spots in a window, each character adding an instrument to a musical ensemble. While, unfortunately the original website appears to have since been taken down, here→ https://www.youtube.com/watch?v=7xdvZMwV7DI is a Youtube link to someone playing the game. After some consideration, I probably continue thinking about this game so often because of how effortless it makes the act of making music. In a similar fashion to a game like Guitar Hero or Rock Band, this little M&M’s online game really makes you feel like a musical artist; you have access to different instruments, characters, beats, and melodies which creates a sense of personalization and accomplishment for having dragged and dropped these animated candies with human traits onto the stage. 

Another interactive project that tickled my fancy was a simulated soccer free kick simulator, in which the user approaches a physical ball on the ground in front of a projector screen. The user is then prompted to kick the ball at the screen, which is displaying a goal. After the ball hits the screen, a sensor detects the presumed trajectory of the ball, and determines whether the user would have scored or not depending on their kick. I found this concept particularly interesting because of its ability to bring something that would otherwise require a lot of space to essentially anywhere. Not only does this project compress the activity, but it also does not necessarily detract from the original experience; everything on an actual soccer field that a player directly interacts with is present in this virtual version, which is why I particularly admired the concept.

My initial definition of interaction relied fairly heavily on the idea of what makes an effective prompt, and the extent to which the user/project give and take experience feels organic or natural. For example, in the case of the soccer free kick game, while I have yet to actually play it myself, I would likely consider this interaction to be fairly good, in that it both invites the user to interact with it (by way of a soccer ball sitting on a grassy platform in front of an image of a goal), and directly responds to the users engagement with it by transposing and image of the kicked ball onto the screen, providing the user with an immediate and clear response to their action. My goal for my final project is generally on which transfers the experience one has with something bigger or that requires more resources to something smaller while retaining a high level of meaning as it relates to its original form. I think the soccer free kick example is much better at achieving this goal than the M&M’s music game because, while the M&M’s game makes more accessible to the user the means to create a personalized song, it does not give the user as direct a sense of the actual interactive experience of making music, whereas the soccer free kick example does. In an article in https://www.intechopen.com/, definitions of interaction are coupled with tips for successful interactive design. One of the more interesting words of advice from the article was the idea that the system in question should be effectively positioned to serve the physical needs of the person engaging with the project. For example, the soccer free kick project accomplishes this goal fairly well by including an actual sized ball, and a screen big enough for the user to have a relatively immersive experience taking a free kick. The M&M’s game, however, transposes the experience of making music, but does so in a fairly limiting way; for that project to have achieved a more immersive experience, a larger, more hands on setup may have served it well.