Recitation 9: Media Controller by Yu Yan (Sonny)

Introduction:

In this recitation, we were asked to build a connection between Arduino and Processing to control a media/image, which is similar to what we did for last recitation. 

Exercise:

For this exercise, I used two potentiometers to control two parameters in Processing, one is “tint”, another is the level of “BLUR” in “filter”. Also, by mapping them into a certain amount, the parameter can stay in a reasonable range and change the color and effect of my image. The final effect is that for the potentiometer that controls the filter, the bigger value it shows, the more blurry the image would be; for the potentiometer that controls the “tint”, I can change the color of the image by rotating the potentiometer to different value.

The process of setting the parameter for “tint” is quite smooth. However, when I coded for “filter”, I was thinking about creating an array to store a few different kinds of filters and when I press a button, it would randomly display a filter covered on the image. But after trying for several times, it seems that I cannot use the array in this way. So I gave up on this idea and change into using a potentiometer to control a parameter in one specific filter. 
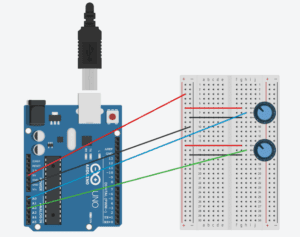
The code for Processing and Arduino is as follows.

Processing:

PImage photo;

import processing.serial.*;
String myString = null;
Serial myPort;

int NUM_OF_VALUES = 2;
int[] sensorValues = new int [NUM_OF_VALUES];
float x;
float y;

void setup(){
  size(1000,600);
  color(HSB);
  photo = loadImage("daniel touchin.jpg");
  setupSerial();
}

void draw(){
  updateSerial();
  printArray(sensorValues);
  x = map(sensorValues[0],0,1023,0,360);
  y = map(sensorValues[1],0,1023,0,10);
  tint(x,100,100);
  image(photo,0,0);
  filter(BLUR, y);
}


void setupSerial() {
  printArray(Serial.list());
  myPort = new Serial(this, Serial.list()[0], 9600);
  // WARNING!
  // You will definitely get an error here.
  // Change the PORT_INDEX to 0 and try running it again.
  // And then, check the list of the ports,
  // find the port "/dev/cu.usbmodem----" or "/dev/tty.usbmodem----" 
  // and replace PORT_INDEX above with the index number of the port.

  myPort.clear();
  // Throw out the first reading,
  // in case we started reading in the middle of a string from the sender.
  myString = myPort.readStringUntil( 10 );  // 10 = '\n'  Linefeed in ASCII
  myString = null;

  sensorValues = new int[NUM_OF_VALUES];
}

void updateSerial() {
  while (myPort.available() > 0) {
    myString = myPort.readStringUntil( 10 ); // 10 = '\n'  Linefeed in ASCII
    if (myString != null) {
      String[] serialInArray = split(trim(myString), ",");
      if (serialInArray.length == NUM_OF_VALUES) {
        for (int i=0; i<serialInArray.length; i++) {
          sensorValues[i] = int(serialInArray[i]);
        }
      }
    }
  }
}

Arduino:

void setup() {
Serial.begin(9600);
}

void loop() {
int sensor1 = analogRead(A0);
//int sensor2 = digitalRead(9);
int sensor3 = analogRead(A2);

// keep this format
Serial.print(sensor1);
Serial.print(","); // put comma between sensor values
// Serial.print(sensor2);
// Serial.print(",");
Serial.print(sensor3);
Serial.println(); // add linefeed after sending the last sensor value

// too fast communication might cause some latency in Processing
// this delay resolves the issue.
delay(100);
}

Reflection:

The reading Computer Vision for Artist and Designers really gives me some enlightenment for my final project. But first of all, it shows me the background of computer vision, which is what we’re using during the class. I learned many different aspects and types of computer vision techniques. The project mentioned in the reading that really intrigued me is Messa di Voce by Golan Levin and Zachary Lieberman, which “uses a set of vision algorithms to track the locations of the performers’ heads…… also analyses the audio signals coming from the performers’ microphones”. I like how this project interact with the audience because tracking people’s heads and turning the sound they make into the output displayed on the screen is very novel and interesting for me. This is a kind of interaction that I cannot think of with my shallow knowledge and creativity. But somehow it inspires me that there can always be an innovative way of interaction that I am able to come up with. For my final project, the computer vision technique that my partner and I want to apply is “Detecting Motion”, also mentioned in the reading. This is a very basic technique but also can be really attractive and intriguing. I would use the example project mentioned in the reading as a reference to improve my final project and try to apply more creative and interesting interaction in the project.

Recitation 9 by Christina Bowllan

Arduino Code

// For sending multiple values from Arduino to Processing

void setup() {
Serial.begin(9600);
}

void loop() {
int sensor1 = analogRead(A0);
int theMappedValue = map(sensor1, 0, 1023, 0, 255);

// keep this format
Serial.write(theMappedValue);
//Serial.println(); // add linefeed after sending the last sensor value

// too fast communication might cause some latency in Processing
// this delay resolves the issue.
delay(100);
}

Processing Code

// IMA NYU Shanghai
// Interaction Lab
// This code receives one value from Arduino to Processing 

import processing.serial.*;


Serial myPort;
int valueFromArduino;
PImage photo;
float opacity; 


void setup() {
  size(500, 413);
  background(0);
 photo = loadImage ("bob.jpg");

  // this prints out the list of all available serial ports on your computer.

  myPort = new Serial(this, Serial.list()[ 15 ], 9600);
  // WARNING!
  // You will definitely get an error here.
  // Change the PORT_INDEX to 0 and try running it again.
  // And then, check the list of the ports,
  // find the port "/dev/cu.usbmodem----" or "/dev/tty.usbmodem----" 
  // and replace PORT_INDEX above with the index number of the port.
}


void draw() {
  // to read the value from the Arduino
   //float opacity = map (valueFromArduino,0,1023,0,255); //we need a float because we want processing to catch all the numbers from arduino 
  while ( myPort.available() > 0) {
    valueFromArduino = myPort.read();
  }
   printArray(Serial.list());
   println(valueFromArduino);
   //tint (0,0,255, opacity);
  image(photo, 0,0);
  
  if (valueFromArduino <150){
   tint(255,0,0); 
  } else if(valueFromArduino > 200) {
    tint (0,255,0);
  }

 
 //This prints out the values from Arduino
}

During this week’s recitation, I used a potentiometer to tint the image from red to green. The main challenge I faced was inserting an “if else” statement in processing. At first, when I did not have the “if else” statement, the Spongebob image would tint red but would not change after that. However, once I added the “if else” statement,  I told processing when the colors should change, so then the image tinted colors. 

In this week’s reading, the Suicide Box relates well to what we did in this task. Whenever the camera sensed a vertical motion, then it would record people falling and track information. This reminds me of the “if else” statement that we used in this task to control the color tint. In both projects, we are giving the computer parameters to know when they should perform tasks. 

Recitation 9–Media Controller–Ketong Chen

Processing

During the recitation, I used the potentiometer to control the speed of the video. Since I only need one value from the potentiometer, I use the one value sample code. During the process, I first have difficulty putting the video in my data folders, but later I found that I actually download the wrong format of the video. It should always be .mp4 or .mov. Here are the codes:

import processing.serial.*;
import processing.video.*;
Movie myMovie;

Serial myPort;
int valueFromArduino;


void setup() {
  size(240, 426);
  background(0);

  printArray(Serial.list());
  // this prints out the list of all available serial ports on your computer.

  myPort = new Serial(this, Serial.list()[ 3 ], 9600);
  // WARNING!
  // You will definitely get an error here.
  // Change the PORT_INDEX to 0 and try running it again.
  // And then, check the list of the ports,
  // find the port "/dev/cu.usbmodem----" or "/dev/tty.usbmodem----" 
  // and replace PORT_INDEX above with the index number of the port.


  myMovie = new Movie(this, "Lilly.mp4");
  myMovie.loop();
}
void movieEvent(Movie movie) {
  myMovie.read();  
}
void draw() {
  // to read the value from the Arduino
  while ( myPort.available() > 0) {
    valueFromArduino = myPort.read();
  }
  println(valueFromArduino);//This prints out the values from Arduino
  image(myMovie, 0, 0,240,426);   
  float newSpeed = map(valueFromArduino, 0, width, 0.1, 5);
  myMovie.speed(newSpeed);
}

Arduino

void setup() {
Serial.begin(9600);
}

void loop() {
int sensorValue = analogRead(A0) / 4;
Serial.write(sensorValue);

// too fast communication might cause some latency in Processing
// this delay resolves the issue.
delay(10);
}

video:

After reading the text Computer Vision for Artist and Designers 

I understand that the computer vision technology was once constrained in military and law enforcement purposes. But it can also be used by interactive media artists to build vision-based detection projects to benefit the society. I was amazed by the project Suicide Box by the Bureau of Inverse Technology (Natalie Jeremijenko and Kate Rich) mentioned in the reading. It is a motion­detection video system and track the vertical motion of the jumpers to record the data. It let me think about the moral problems and questions we created when we make a project and after we have created the project, what is the relation between the maker and the project as well as the people interact with it. The project should be meaningful which contains the thoughts of the artists or better to reveal or solve some real problems. I hope I can use processing and Arduino to make a meaningful final project.

Recitation 9: Media Controller Cathy Wang

// IMA NYU Shanghai
// Interaction Lab
// This code receives one value from Arduino to Processing 

import processing.serial.*;


Serial myPort;
int sensorValue;
PImage photo;
float b=1;
float px;


void setup() {
  size(360, 640);
  photo = loadImage("Liuwen.jpg");

  printArray(Serial.list());
  // this prints out the list of all available serial ports on your computer.

  myPort = new Serial(this, Serial.list()[0], 9600);
  // WARNING!
  // You will definitely get an error here.
  // Change the PORT_INDEX to 0 and try running it again.
  // And then, check the list of the ports,
  // find the port "/dev/cu.usbmodem----" or "/dev/tty.usbmodem----" 
  // and replace PORT_INDEX above with the index number of the port.
}


void draw() {
  image(photo, 0, 0);
 // px=sensorValue;
  printArray(sensorValue);
  // to read the value from the Arduino
  while ( myPort.available() > 0) {
    sensorValue = myPort.read();
  }
  // image(photo, 0, 0);
  //filter(BLUR, b);
  //b= b+0.1;
  if (sensorValue >= 0 && sensorValue< 60) {
    filter(INVERT);
  } else if (sensorValue >= 40 && sensorValue< 80) {
    filter(BLUR, 6);
  } else if (sensorValue >= 80 && sensorValue< 120) {
    filter(GRAY);
  } else if (sensorValue >= 120 && sensorValue< 160) {
    filter(THRESHOLD);
  } else if (sensorValue >= 160 && sensorValue< 200) {
    filter(POSTERIZE, 4);
  } else if (sensorValue >= 200 && sensorValue< 255) {
    filter(BLUR, b);
    b= b+0.1;
  }
}

Reflection:
The first thing I learned during the processing is that the processing page shows an error and we can not find any mistake of the content, we can check if the position of brace is correct. Another is that we can map in the Arduino. In the processing, sometimes we may come across some unknown problem with mapping. After reading Golan Levin’s essay, I gain a different perspective of the whole-body interaction. At first, we want to use a balance board and add sensors to that board to transfer input. While the example of “Interaction modules from Myron Krueger’s Videoplace, 1969-­1975″ inspires me that we can install sensors to our body to trace our movements and transfer them to the computer directly. If we add the sensors to the balance board, it may overreact because some of our movements are out of balance. If may hard to use the balance board to send instructions.

Recitation 9: Media Controller by Isabel Brack

Overview

For this recitation I used an image of my dog and ovelayed two different tinted images at different X coordinates to create a paneled image. The opacity of the tints is controlled by a potentiometer, which I mapped to the tint. I also tried to map a blurring effect using a second potentiometer which worked but created a lot of lags and glitches so I ended up commenting it out for the final documentation of the recitation. The first try at mapping the potentiometer I only included one image tint and the mapping was a bit jumpy because there was a loose connection between the potentiometer and the breadboard.

Reading Connection

In contrast to the examples of computer vision from Computer Vision for Artist and Designers that spanned abstract, funny, and sociopolitical themes, my use of computer vision is quite basic comparatively only manipulating the opacity and tint of three different panels in a processing image of my dog. The technology I used did not capture a live image like many of the expamples like Suicide Box  or Cheese  that were both able to reckognize and record certain movements and actions like veriticle falling or smiling. Instead my project combined the physical interaction of turning a potentiometer to control the value and opacity of the different panels tint on my image. First technology was used in the physical circuit wiring, and it was also used in the display of the image and the connection between the potentiometer and the opacity of each color. I did not use any detection elements like tracking movement as I was not using live capture, but instead applied these concepts to a still image, manipulating the opacity and at some points blurring it too (but the blur created to much glitching and lagging in the program to have smooth transitions). Although I did not include a full body participation in the interaction by using a potentiometer, by reading Levin’s writing, I can appreciate the incorporation of full body participation in computer vision and in the interaction expanding the concept of interaction and making the interaction more engaging for the audience.

dog full opacity tint

The image at greatest opacity for color tints. (The picture is my dog, so there is no image citation.)

Working potentiometer mapped to the tint of a dog image.

IMG_5187

First try at mapping the potentiometer to the tint of an image.

Code

Processing:

import processing.serial.*;

String myString = null;
Serial myPort;


int NUM_OF_VALUES = 1;   /** YOU MUST CHANGE THIS ACCORDING TO YOUR PROJECT **/
int[] sensorValues;      /** this array stores values from Arduino **/
  
PImage photo;
PImage photo2;
 float tint;
 // float blur;


void setup() {
size(1000, 1000);
  background(255);

  setupSerial();
photo = loadImage("dog.jpeg");
 photo2 = loadImage("dog2.jpeg");
}


void draw() {
     float tint =map(sensorValues[0],0,1023,0,255);
     //float blur =map(sensorValues[0],0,1023,0,10);

  updateSerial();
  
  printArray(sensorValues);

tint(0, 255, 255, 20); 
image(photo, 0, 0);
//filter(BLUR);
//filter(BLUR, 0);
tint(255, 255, 0, tint); 
image(photo2, 300, 0);
tint(255, 0, 255, tint); 
image(photo2, 600, 0);
//filter(BLUR);
//filter(BLUR, blur);


  // use the values like this!
  // sensorValues[0] 

  // add your code

  //
}


void setupSerial() {
  printArray(Serial.list());
  myPort = new Serial(this, Serial.list()[ 1 ], 9600);
  // WARNING!
  // You will definitely get an error here.
  // Change the PORT_INDEX to 0 and try running it again.
  // And then, check the list of the ports,
  // find the port "/dev/cu.usbmodem----" or "/dev/tty.usbmodem----" 
  // and replace PORT_INDEX above with the index number of the port.

  myPort.clear();
  // Throw out the first reading,
  // in case we started reading in the middle of a string from the sender.
  myString = myPort.readStringUntil( 10 );  // 10 = '\n'  Linefeed in ASCII
  myString = null;

  sensorValues = new int[NUM_OF_VALUES];
  
}


void updateSerial() {
  while (myPort.available() > 0) {
    myString = myPort.readStringUntil( 10 ); // 10 = '\n'  Linefeed in ASCII
    if (myString != null) {
      String[] serialInArray = split(trim(myString), ",");
      if (serialInArray.length == NUM_OF_VALUES) {
        for (int i=0; i<serialInArray.length; i++) {
          sensorValues[i] = int(serialInArray[i]);
        }
      }
    }
  }
}

Arduino:

void setup() {
Serial.begin(9600);
}

void loop() {
int sensor1 = analogRead(A0);
//int sensor2 = analogRead(A1);
//int sensor3 = analogRead(A2);
//int theMappedValue = map(sensor1, 0, 1023, 0, 255);
//int theMappedValue2 = map(sensor2, 0, 1023, 0, 255);
// keep this format
Serial.print(sensor1);
//Serial.print(“,”); // put comma between sensor values
//Serial.print(sensor2);
// Serial.print(“,”);
// Serial.print(sensor3);
Serial.println(); // add linefeed after sending the last sensor value

// too fast communication might cause some latency in Processing
// this delay resolves the issue.
delay(100);
}