Recitation 9: Media Controller——Leah Bian

For this week’s recitation, I created a Processing sketch to control the movement, size and color of an image. Data from Arduino are sent to Processing, which thus decides the image’s attributes. I used three potentiometers to adjust the analog values, and used the “serial communication” sample code as the basis for further modifications.

It was not hard to build the circuit, since we use potentiometers quite often. After finishing the circuit, I started to write the code. I adjusted the “Serial. print()” and “Serial. Println()” functions to send the data from Arduino to Processing smoothly. I chose an image from the famous cartoon “Rick and Morty” as my media. I decided to let the three potentiometers control the movement, size and color of the image respectively. I used the “map()” function to limit the analog values. It was not difficult to write the code for changing the image’s size and position, but changing colors was a bit complicated. I chose colorMode(RGB) to set the image with various colors, instead of only with white, grey and black. I used the “tint()” function to set the color. But since I only have one potentiometer controlling the color of the image, I can only set the image with analogous color schemes.
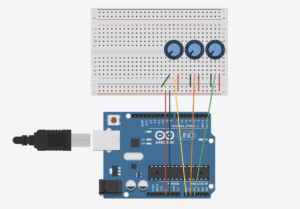
0
diagram

This is my code for Processing:

import processing.serial.*;

String myString = null;
Serial myPort;
PImage img;
int NUM_OF_VALUES = 3;   
int[] sensorValues;  

void setup() {
  size(800, 800);
  img = loadImage("rickk.png");
  setupSerial();
  colorMode(RGB);
}

void draw() {
  background(0);
  updateSerial();
  printArray(sensorValues);
  float a = map(sensorValues[0],0,1023,0,800);
  float b = map(sensorValues[1],0,1023,0,255);
  float c = map(sensorValues[2],0,1023,400,800);
  tint(b, 30, 255);
  image(img,a,200,c,c);
}

void setupSerial() {
  printArray(Serial.list());
  myPort = new Serial(this, Serial.list()[5], 9600);
  myPort.clear();
  myString = myPort.readStringUntil( 10 ); 
  myString = null;
  sensorValues = new int[NUM_OF_VALUES];
}

void updateSerial() {
  while (myPort.available() > 0) {
    myString = myPort.readStringUntil( 10 ); 
    if (myString != null) {
      String[] serialInArray = split(trim(myString), ",");
      if (serialInArray.length == NUM_OF_VALUES) {
        for (int i=0; i<serialInArray.length; i++) {
          sensorValues[i] = int(serialInArray[i]);
        }
      }
    }
  }
}

This is my code for Arduino:

void setup() {
Serial.begin(9600);
}

void loop() {
int sensor1 = analogRead(A0);
int sensor2 = analogRead(A1);
int sensor3 = analogRead(A2);
Serial.print(sensor1);
Serial.print(“,”);
Serial.print(sensor2);
Serial.print(“,”);
Serial.print(sensor3);
Serial.println ();
delay(100);
}

Reflection:

This week’s reading, Computer Vision for Artists and Designers, inspired me a lot. According to the article, Myron Krueger, the creator of Videoplace, firmly believed that the entire human body should have a role in people’s interactions with computers. In my previous definition of an interactive experience, I also mention this idea. Videoplace, an installation that captured the movement of the user, makes my hypothesis concrete and clear. In the project that I made for this recitation, the user can interact with the device only with the potentiometers, which makes the interactivity here quite low. Besides, the whole process is too simple and it does not convey any meaning implications, compared with the other art works mentioned in the reading, such as LimboTimeand Suicide Box. In conclusion, an interactive experience should let the user fully engaged, probably by physical interaction and building up a meaningful theme. The project that I made this time is not highly interactive due to various limitations, but I will try to create a satisfying interactive experience for the final project.

Reference:

Computer Vision for Artists and Designers: 

https://drive.google.com/file/d/1NpAO6atCGHfNgBcXrtkCrbLnzkg2aw48/view
Recitation 9: Media Controller

Intro

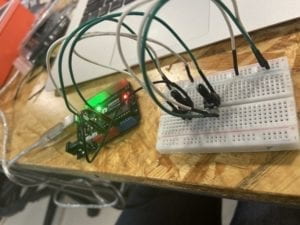
This purpose of this recitation was to further connect Processing and Arduino.  This time we used media as the bridge between them, in hopes that we can use this knowledge to help with our final projects. 

Processing Code

import processing.serial.*;

String myString = null;
Serial myPort;

int NUM_OF_VALUES = 3; /** YOU MUST CHANGE THIS ACCORDING TO YOUR PROJECT **/
int[] sensorValues; /** this array stores values from Arduino **/
PImage photo;

void setup() {
size(500, 500);
background(0);
setupSerial();
img = loadImage(“IMG_5849.JPG”)
rectMode(CENTER);
}

void draw() {
updateSerial();
printArray(sensorValues);

fill(sensorValue[0]);
rect(width/2, height/2, width/2, height/2);
 map(sensorValue[0], 0, 1023, 0, 255);
if (sensorValue[0]>= 0) {
tint(0, 0, 255, 150);
}

}

void setupSerial() {
printArray(Serial.list());
myPort = new Serial(this, Serial.list()[67], 9600);
myPort.clear();
myString = myPort.readStringUntil( 10 ); // 10 = ‘\n’ Linefeed in ASCII
myString = null;

sensorValues = new int[NUM_OF_VALUES];
}

void updateSerial() {
while (myPort.available() > 0) {
myString = myPort.readStringUntil( 10 ); // 10 = ‘\n’ Linefeed in ASCII
if (myString != null) {
String[] serialInArray = split(trim(myString), “,”);
if (serialInArray.length == NUM_OF_VALUES) {
for (int i=0; i<serialInArray.length; i++) {
sensorValues[i] = int(serialInArray[i]);
}
}
}
}
}

Recitation09-clover

The code for the Arduino:

void setup() {
Serial.begin(9600);
}

void loop() {
int sensorValue = analogRead(A0) / 4;
Serial.write(sensorValue);

delay(10);
}

The code for processing:

import processing.serial.*;
import processing.video.*;

Movie myMovie;
Serial myPort;
int valueFromArduino;
void setup() {
  size(480, 480);
  background(0);
  printArray(Serial.list());
  myPort = new Serial(this, Serial.list()[ 1 ], 9600);
  myMovie = new Movie(this, "dancing.mp4");
  myMovie.play();
}
void draw() {
  if(myMovie.available()){
  myMovie.read();
}
  image(myMovie, 0, 0);

  while (myPort.available()>0) {
    valueFromArduino = myPort.read();
  }
  if (valueFromArduino >= 0 && valueFromArduino< 100) {
    filter(INVERT);
  } else if (valueFromArduino >= 110 && valueFromArduino< 180) {
    filter(POSTERIZE, 6);
  }
  println(valueFromArduino);
 // tint(255, 0, 0); 
}

recitation9(the video)

What I learned:

  1. To show the movie I need to put image(myMovie, 0, 0);  in front the code for the filter to show the movie.
  2. By setting dividing the value from Arduino into different rages, and setting in the filter, the potentiometer can control the color of every pixel to change the movie into different color while playing.

Reading Response:

When reading the article, I feel that Computer vision algorithms can catch some very detail changes of the human movement which greatly strengthens the interaction of the project. I was really impressed by the the Contact interaction, it provide my a diverse way(catch the orientation of a person’s gaze and the facial impression) of how can this technology actually be used in a project to make good interaction. Also the LimboTime game show how greatly Computer vision algorithms can affect the users’ interaction which make me think that I should think more about in what way can I use the technology I learn to make good interaction, I should stand from a user perspective when working. Also another point this article really impress me is the technology is more like a tool to support a good interaction. Just like the writer said the Videoplace was developed before Douglas Englebart’s mouse became the ubiquitous desktop device, the widespread technology is not the most important part contributes to a successful project. The technology is to make the communication between people easier and sometimes create a new way for people to know each other more. It make me think that the technology I used may not achieve the goal which is to interact with the users because the response I gave back to the user doesn’t make the communication continuous. The user may feel boring and don’t want to participate more. Next time, I should consider technology as a tool to strengthen the interaction but not to create fancy effect which is not that interactive.

Source: Levin, Golan. “Computer Vision for Artists and Designers: Pedagogic Tools and Techniques for Novice Programmers.” AI & Society, vol. 20, no. 4, 2006, pp. 462-482.

Recitation 9: Media Controller by Xueping

The way technology was used in my project is kind of negotiating with the physical conditions presented by the world although because the input I used are potentiometers whose output is already legible for the computer, it does not need to be modified again (except for the “map” process) to become more easily legible to vision algorithms. The inputs are later used as control of speed and color tone (tint) of the video clip being played. I tend to view my project as a very basic use of computer vision algorithms. From the input side, my project is very direct so the response is somehow more reactive while the use of other motion detective device or sensors might create better interaction. From the output side, since the video is existed while the input only changes the speed and the color tone, it reduces the creativity and degrades interactive experience.

Code for Arduino

https://github.com/LilyWang1997/Recitation-9-Media-Controller/blob/master/serial_multipleValues_AtoP_arduino.ino

Code for Processing

import processing.serial.*;
String myString = null;
Serial myPort;
int NUM_OF_VALUES = 2;   
int[] sensorValues;

import processing.video.*;
Movie myMovie;

void setup() {
  size(360, 640);
  myMovie = new Movie(this, "Lilly.mp4");
  myMovie.loop();
  setupSerial();
}

void draw() {
  if (myMovie.available()) {
    myMovie.read();
  }
  updateSerial();
  printArray(sensorValues);
  tint(sensorValues[0]/5, sensorValues[0]/1.5, sensorValues[0]/2); 
  image(myMovie, 0, 0);
  float newSpeed = map(sensorValues[1], 0, 1023, 0.5, 5);
  myMovie.speed(newSpeed);
}

void setupSerial() {
  printArray(Serial.list());
  myPort = new Serial(this, Serial.list()[ 5 ], 9600);
  myPort.clear();
  myString = myPort.readStringUntil( 10 );  
  myString = null;

  sensorValues = new int[NUM_OF_VALUES];
}


void updateSerial() {
  while (myPort.available() > 0) {
    myString = myPort.readStringUntil( 10 ); // 10 = '\n'  Linefeed in ASCII
    if (myString != null) {
      String[] serialInArray = split(trim(myString), ",");
      if (serialInArray.length == NUM_OF_VALUES) {
        for (int i=0; i<serialInArray.length; i++) {
          sensorValues[i] = int(serialInArray[i]);
        }
      }
    }
  }
}

Recitation 9: Media Controller —— Jiayi Liang(Mary)

In this week’s recitation, I am asked to work individually to create a Processing sketch that controls media by  using a physical controller made with Arduino. I choose to use potentiometers to control an image. 

My Processing Code:

PImage img1;
import processing.serial.*;

String myString = null;
Serial myPort;

int NUM_OF_VALUES = 2; /** YOU MUST CHANGE THIS ACCORDING TO YOUR PROJECT **/
int[] sensorValues; /** this array stores values from Arduino **/

void setup() {
size(800, 800);
background(0);
setupSerial();
img1 = loadImage(“angel.png”);
imageMode(CENTER);
}

void draw() {
updateSerial();
printArray(sensorValues);
background(255);
image(img1,400,400,sensorValues[0],sensorValues[0]);
filter(BLUR, sensorValues[1]/100);
tint(255,sensorValues[0]/3);
}

void setupSerial() {
printArray(Serial.list());
myPort = new Serial(this, Serial.list()[ 3 ], 9600);

myPort.clear();
sensorValues = new int[NUM_OF_VALUES];
}

void updateSerial() {
while (myPort.available() > 0) {
myString = myPort.readStringUntil( 10 ); // 10 = ‘\n’ Linefeed in ASCII
if (myString != null) {
String[] serialInArray = split(trim(myString), “,”);
if (serialInArray.length == NUM_OF_VALUES) {
for (int i=0; i<serialInArray.length; i++) {
sensorValues[i] = int(serialInArray[i]);
}
}
}
}
}

I use the first potentiometer to change the size and the transparency, and the second potentiometer to change the blur length.

Since I have practiced how to use arduino to control Processing, this week’s recitation task is quite simple. All I need to do is to use the Pimage to load an image and use tint, blur etc. to edit the image. I think if I have more time, I will try to load more pictures to let the characters seem like interacting with each other by changing their positions and sizes.

Reflection:

After reading  Computer Vision for Artist and Designers , I got a lot of inspirations.  The article introduces various types of computer vision techniques. The project mentioned in this article I am interested in most is Messa di Voce’s interactive software. It visualizes the sound. If the user is speaking, the sound he or she made will be transformed into an image. This makes me think of one writing skill I learned in my high school —synaesthesia. It inspires me that different senses can be associated with each other. I can comment  a song as blue to show that it is sorrowful, and I can define a girl’s smile as sweet to show that she is so cute. In my project, I can also use this kind of skill to use people’s different senses to fertilize the interaction process.