Recitation 10: Workshops – Audrey Samuel

During this week’s recitation, we were required to attend two separate workshops, one on the map() function hosted by the learning assistants and another of our choice. I chose to attend the Media Manipulation workshop with Jingtian and Linda. I thought it would be helpful to learn more about video editing in Processing as my final project also incorporated videos/images/sounds in Processing. 

Media Manipulation

During the workshop, Jingtian went over how we can upload images and videos onto Processing and how we can manipulate these videos using the various in-built functions. After the presentation, we were asked to complete an exercise which required us to pick a tv show/video and recreate it, whiles also using the map() function. For this exercise, I decided to choose a clip from the Disney Pixar movie “Coco”. I made sure I imported the video library from Processing first and then typed in the code to import the video I had downloaded. Next I wanted to manipulate my video using the functions provided, so I first used the Pixels example code given to us in class. Using this code, I was able to create small  rectangles (size 6) for each Pixel in the movie frame. I had to use a for function for() this line of code and define my int variables as well. I then used the speed() function which sets the relative playback speed of a movie. I thought it would be good to incorporate the map() function here using mouse pressed. If the mouse went farther right within the screen the speed would increase but if it went left it would slow down. This controlled the speed at which the movie was playing, using my mouse. I finally decided to add one more line of code incorporating the jump() function. This function shifts the location of the playback head to a specific time within a movie, similar to the “fast forward” buttons on a t.v. remote. I used keyPressed for this function and so anytime I pressed a key on the keyboard the movie would fast forward. 

Video

Code

import processing.video.*;
Movie myMovie;

void setup() {
  size(640,360);
  frameRate(30);
  myMovie = new Movie(this, "coco1.mp4");
  myMovie.loop();
 
}

void draw() {
  if(myMovie.available()){
    myMovie.read();
  }
  tint(255,150,0);
  image(myMovie, 0,0);
  image(myMovie,width/4,0);
  noStroke();
  int rectSize = 3;
  int w = myMovie.width;
  int h = myMovie.height;
  myMovie.loadPixels();
  for (int y = 0; y<h; y=y+rectSize){
  for (int x = 0; x<w; x=x+rectSize){  
    int i = x + y*w;
    fill(myMovie.pixels[i]);
    rect(x,y,rectSize, rectSize);
  float newSpeed = map(mouseX, 0 , width, 0.1,5);
  myMovie.speed(newSpeed);
}
  }
  myMovie.updatePixels();
}
void keyPressed(){
  myMovie.jump(random(myMovie.duration()));
}
Recitation 10

Workshop

I attended the workshop on Object Oriented Programming organised by Tristan. This workshop went over the class category in Processing and when to use them. 

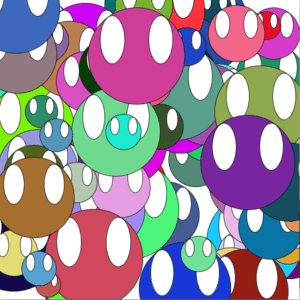
We made an example in order to create an emoji: 

float x;

ArrayList<Emoji> emojiList;

void setup() {
size(600,600);

emojiList = new ArrayList<Emoji>();
for(int i=0; i<100; i++) {
emojiList.add( new Emoji(random(width), random(height), color(random(255), random(255), random(255)) ));
}}

void draw() {
background(255);
for(int i=0; i<emojiList.size(); i++) {
Emoji temp= emojiList.get(i);
temp.display();
}}

void mousePressed() {
emojiList.add( new Emoji(mouseX, mouseY, color(random(255), random(255), random(255))) );
float x = map(mouseX,0,width,width/4,3*width/4);
}

And in another class file called Emoji: 

class Emoji {
float x,y;
float size;
color clr;

Emoji(float startingX, float startingY, color startingColor) {
x= startingX;
y= startingY;
size= random(50,200);
clr = startingColor;
}

void display() {
fill(clr);
ellipse(x,y, size,size);
fill(255);
ellipse(x-size/4, y-size/6, size/4, size/2);
ellipse(x+size/4, y-size/6, size/4, size/2); }
}

The void mouse pressed was added in order to display a new emoji each time I click on the Canva, a new emoji appears:

We made an in class example using the map () function, in order to display the emojis only in a limited space on the canvas, no matter where we pressed on the canvas. 

For the exercise, I made a project which I will use in my final project of a fuse, so a line which would decrease in size from one side under a time constraint of one minute. I added an ‘if’ statement in order to make the line stop shrinking once its reached the other point (the position 0): 

Fuse f;

void setup() {
size(1000,800);
background(0,0,50);
f = new Fuse(width-290, height-250); //new Fuse
}

void draw() {
background(0,0,50);
f.display();
f.shrink();
}

and the Fuse class: 

class Fuse {
float x, y, fuseWidth, speed;
long iLength, itime;

Fuse(float tempX, float tempY) {
x= tempX;
y= height-250;

iLength = 600;
itime = millis() ;
speed = – iLength/6000.0;}

void display () {
stroke(255);
strokeWeight(10);
line(x-fuseWidth, y, x, y);}

void shrink () {
fuseWidth = speed * (millis()- itime) +iLength ;
if(fuseWidth<0) {
fuseWidth=0;
}} }

The result is as follows: 

Recitation 10: Workshops – Zhao Yang

Code:

https://github.com/JooooosephY/Recitation-10/tree/master/animation

Introduction:

For recitation 10, we attended the workshop for map() function and we could choose another workshop based on our interest. Since my group decides to make a game for the final project, the way to organize the code is really important. Thus, I attended the Object-Oriented Programming workshop. In the workshop, Tristan taught us something about class. Basically, he showed us how to code as well as why we should do it in this way. In this sense, we can directly see the structure of the code so that we can understand OOP well. As for the exercise, we were required to use OOP to write an animation with some interaction at some level. Besides, we also need to use the map() function when we wrote the code. Here are the videos about how my exercise looks like. 

Basically, when you press the space on the keyboard, it will generate several crying faces with different colors and sizes from random positions. And the speed of each face depends on where the mouse is when you press the space. And I map the position of the mouse to the speed of the faces. Thus, when you interact with it, it seems all the new faces are moving towards the mouse. 

Recitation 10: Workshops

Intro

This week we had workshops to help us with our projects. I chose the media manipulation workshop. In my project we are going to have images pop up by the press of a button so I did the same in my video recreation. The video I chose to recreate is the first section of the BTS dance “Fake Love”. They walk in a line to the left, so I had images move toward the left by the press of buttons. 

Here is the original video

Here it is in Processing

fake love but make it processing

From this workshop I was able to practice integrating images into the keyPressed() function. This will be important to my project, so it was very helpful. I hope to play with the code further so I can make it as efficient as possible. 

Processing Code

PImage photo1;
PImage photo2;
PImage photo3;
PImage photo4;
PImage photo5;
PImage photo6;
PImage photo7;

 void setup() {
size(1500,600);
  background(0);
  photo1 = loadImage("hi tae.jpg");
  photo2 = loadImage("yoongles.jpg");
  photo3 = loadImage("hobi.jpg");
  photo4 = loadImage("kook.jpg");
  photo5 = loadImage("jin.jpg");
  photo6 = loadImage("jim.jpg");
  photo7 = loadImage("joon.jpg");
}
void draw() {

if(keyPressed) {
  photo7.resize(200,200);
  photo6.resize(200,200);
  photo5.resize(200,200);
  photo4.resize(200,200);
  photo3.resize(200,200);
  photo2.resize(200,200);
  photo1.resize(200,200);
}
}
void keyPressed() {
 
  println(key);
    if (key == 'a' || key == 'A') {
   image(photo1, 1200, 300);
    }
  if (key == 'q' || key == 'Q') {
   image(photo2, 1000, 300);
  }  
  if (key == 'w' || key == 'W') {
    image(photo3, 800, 300);
  }  
  if (key == 'e' || key == 'E') {
    image(photo4, 600, 300);
  }
    if (key == 'r' || key == 'R') {
    image(photo5, 450, 300);
    }
      if (key == 't' || key == 'T') {
    image(photo6, 250, 300);
      }
        if (key == 'y' || key == 'Y') {
    image(photo7, 100, 300);
        }

}

Recitatin 10-Elysia

For last week’s recitation, i attended the serial communication and map workshop. Both sessions was really helpful in helping me further understand how those functions work. In the map workshop, the instructor explained how the map function works. It has 5 items, the name of the value that you want to change, the bottom limit of the original value, the top limit of the original value, the bottom limit of the mapped value, and the top limit of the mapped value. They also provide examples of how to use it.

For serial communications, the instructor showed some examples of how to send values from processing to Arduino and vice versa. As an excercise, we made a circle in which the color of the circle is determined by the value that we got from arduino. The fill itself will be randomized. The position of the X coordinate will also be affected by the value from processing. The whole code looks like this:

// IMA NYU Shanghai
// Interaction Lab
// For receiving multiple values from Arduino to Processing

/*
* Based on the readStringUntil() example by Tom Igoe
* https://processing.org/reference/libraries/serial/Serial_readStringUntil_.html
*/

import processing.serial.*;

String myString = null;
Serial myPort;

int NUM_OF_VALUES = 2; /** YOU MUST CHANGE THIS ACCORDING TO YOUR PROJECT **/
int[] sensorValues; /** this array stores values from Arduino **/

void setup() {
size(500, 500);
background(0);
setupSerial();
}

void draw() {
  updateSerial();
printArray(sensorValues);
background(0);
float posx= map (sensorValues[0],0,1023,0,255);
ellipse(posx,mouseY,50,50);
if (sensorValues[1]==1){
fill(random(255));
}

// use the values like this!
// sensorValues[0]

// add your code

//
}

void setupSerial() {
printArray(Serial.list());
myPort = new Serial(this, Serial.list()[ 3], 9600);
// WARNING!
// You will definitely get an error here.
// Change the PORT_INDEX to 0 and try running it again.
// And then, check the list of the ports,
// find the port “/dev/cu.usbmodem—-” or “/dev/tty.usbmodem—-”
// and replace PORT_INDEX above with the index number of the port.

myPort.clear();
// Throw out the first reading,
// in case we started reading in the middle of a string from the sender.
myString = myPort.readStringUntil( 10 ); // 10 = ‘\n’ Linefeed in ASCII
myString = null;

sensorValues = new int[NUM_OF_VALUES];
}

void updateSerial() {
while (myPort.available() > 0) {
myString = myPort.readStringUntil( 10 ); // 10 = ‘\n’ Linefeed in ASCII
if (myString != null) {
String[] serialInArray = split(trim(myString), “,”);
if (serialInArray.length == NUM_OF_VALUES) {
for (int i=0; i<serialInArray.length; i++) {
sensorValues[i] = int(serialInArray[i]);
}
}
}
}
}