Recitation 10. Workshops By Feifan Li

Introduction

In this recitation I first attended the map() workshop and then chose to go to the media manipulation workshop. The exercise for the workshop is to pick a tv show/music video/entrance video and recreate it using images and videos from the web. I chose a black-and-white music video from Vimeo and decided to do something creative about it.

Processing Code to play the original video:

import processing.video.*;
//import video library
Movie myMovie;
void setup() {
  size(1000, 600);
  myMovie = new Movie(this, "music video.mp4");
  myMovie.play();
//define the state of the video
}
void draw() {
  if (myMovie.available()) {
//read my file when it can be read
    myMovie.read();
//read the current frame of the video
  }
  image(myMovie, 0, 0);
//draw the frame
}

original video:

my code for speed manipulation and pixels:

import processing.video.*;
//import video library
Movie myMovie;
void setup() {
  size(1000, 600);
  myMovie = new Movie(this, "music video.mp4");
  myMovie.play();
//define the state of the video
}
void draw() {
  if (myMovie.available()) {
//read my file when it can be read
    myMovie.read();
//read the current frame of the video
  }
  image(myMovie, 0, 0);
//draw the frame
float speed =map(mouseX,0,mouseY, 0,4);
myMovie.speed(speed);

if(keyPressed){
  int rectsize = 20;
  int w = myMovie.width;
  int h = myMovie.height;
  for (int x=0; x<w; x+=rectsize){
  for (int y=0; y<h; y+=rectsize){
    int a = x+y*w;
    fill(myMovie.pixels[a]);
    rect(x, y, rectsize, rectsize);
  }
  }
}
}

The effect I want to create is faster speed and pixels. I used keypressed() to create rectangles with size of 20 to pixelate the video, which makes the video seem more flat and two-dimensional. Also I used map() to speed the video up according to the location of my mouse. The faster speed makes the video more exciting and the change of objects in the video more dramatic. This works well most of the times, but when it speeds up there is no sound, and sometimes the video would stuck at a scene. But the pixels and speeding up can work at the same time. Below is my recorded videos of the special effects.
Recitation 10: Workshops by Xueping

Slide:

https://docs.google.com/presentation/d/1caNLRobmOTDkGvQKPCULgM2MbfE6JPNQP8-Zk-_fBnk/edit#slide=id.g5705e94f86_0_4

import processing.video.*;
Movie myMovie;
int previousX = 0;
int distance;

void setup() {
  background(0);
  size(640, 480);
  myMovie = new Movie(this, "music.mp4");
  myMovie.loop();
}
void movieEvent(Movie movie) {
  myMovie.read();  
}
void draw() { 
  if (myMovie.available()) {
//read my file when it can be read
    myMovie.read();
//read the current frame of the video
  }
  image(myMovie, 0, 0);   
  distance = mouseX - previousX;
  float newSpeed = map(distance, -width, width, 0.1, 5);
  myMovie.speed(newSpeed);
  previousX = mouseX;
}  

Recitation 10: Object Oriented Programming workshop – By Anica Yao

Reflection

 I wanted to enhance my skills then apply it to my final project, so I chose this OOP workshop. Firstly, we created a class called “Emoji” in another tab.  In this class, we defined the values,  Emoji ( later I learned that “Emoji” it’s the abbreviation of “Emoji Emoji” adjusted by the developer. ), display(), and move(). After that, in the first tab, we uploaded every new emoji in the setup() function and used them in the draw() function. To improve the codes, we added the mouse press interaction and put all the emojis in an array, which has a different format from the array I learned before. 
After class, I realized this works well when we need to draw things in a same pattern. So maybe we don’t need to do the same things to pictures in our final project. But still, I did some improvements to the codes. 

Processing Codes

ArrayList<Shape> shapeList;

void setup() {
  size(600, 600);
  background(255);
  shapeList = new ArrayList<Shape>();

  //draw the new shape
  for (int i=0; i<50; i++) {
    shapeList.add(new Shape(random(width), random(height), color(0, 0, random(255),200)));
  }
}

void draw() {
  //background(255);  
  for(int i=0; i<shapeList.size();i++){
    Shape temp = shapeList.get(i);
    temp.display(); //same as emojiList[i]
    temp.move(); 
  }
}

void mousePressed(){
  float x =map(mouseX, 0, width, width/4, 3*width/4);
  float y =map(mouseX, 0, height, height/4, 3*height/4);
  shapeList.add(new Shape(x, y, color(random(255), random(255), random(255))));
}
#TabName: Shape
class Shape {
  //only define them w/o value. The default values are all 0 here
  float x, y;
  float size;
  color clr;
  float spdX;

  Shape(float startingX, float startingY, color startingColor) { //without the para, it will be the same;
    //Not x,y, or it will not refer to the one defined at the beginning
    x = startingX;
    y = startingY;
    size = random(50, 200);
    clr = startingColor;
    spdX = random(-10, 10);
  }

  void display() {
    noStroke();
    fill(clr);
    square(x,y,size);
  }

  void move() {
    x += spdX;
    if (x<0 || x>width) {
      spdX = -spdX;
    } 
  }
}

Final Creation

Basically, there are all blue squares moving horizontally. When they touch the edges they will bounce back. When you press your mouse, a new square with random color will pop up and also begin to move.

Recitation 10: Object Oriented Programming workshop Cathy Wang

In our final project, we plan to create a moving object which will be controlled by the movement of the balance board. Therefore, we choose the object workshop to better know how to create an object in processing. We managed to control where objects appear and when to remove them by using “mousePressed” and “keyPressed”. Based on this, we will try to control the object with the sensor and a specific tool we make.

//float x;
//Emoji e;
//Emoji f;
ArrayList<Emoji> emojiList;

void setup() {
  size(1600, 900);
  emojiList=new ArrayList<Emoji>();
  //for (int i=0; i<10; i++) {
  //  emojiList.add(new Emoji(random(width/2), random(height/2), color(random(255), random(255), random(255))));
  //}
  //e= new Emoji(width/2,height/2,color(random(255),random(255),random(255)));
  //f=new Emoji(width/3,height/3,color(random(255),random(255),random(255)));
}

void draw() {
  background(255);
  fill(200);
  for (int i=0; i< emojiList.size(); i++) {
    Emoji e = emojiList.get(i);
    e.display();// same as emojiList[i]
    e.move();
  }
  //e.display();
  // f.display();
}


void mousePressed() {
  float x= map(mouseX, 0, width, width/8, width/2);
  float y= map(mouseX, 0, width, width/8, width/2);
  
  emojiList.add(new Emoji(x, y, color(random(255), random(255), random(255))));
}

void keyPressed() {

    emojiList.remove(emojiList.size()-1);
  
  
}

class Emoji {
  float x, y;
  float size;
  color clr;
  String type;
  float spdX;
  float spdY;
  //type="simley-face";
  //  if(type == "")//never give things value at the top.  
  Emoji(float startingX, float startingY, color startingColor) {
    x=startingX;
    y=startingY;
    size=random(50, 100);
    clr=startingColor;
    spdX= random(-5,5);
    spdY= random(-5,5);
}
  void display() {
    fill(clr);
    ellipse(x, y, size, size);
    fill(255);
    //size=random(50,100);
    ellipse(x-size/4, y-size/6, size/4, size/2);
    ellipse(x+size/4, y-size/6, size/4, size/2);
  }
  void move(){
    x= x+spdX;
    y= y+spdY;
  }
}

Recitation 9: Media Controller Documentation by Eleanor Wade

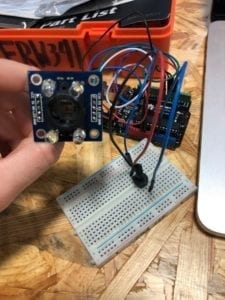
While in class we have used a potentiometer to control media we see on the screen, this recitation I tried to use a different sensor that will eventually be relevant to my final project.  

Working with a Color Sensor!

Because I have never worked with this sensor before and it is totally new to me, I pretty much entirely copied the code from this website and used the explanation of how to use this sensor from this site:

https://randomnerdtutorials.com/arduino-color-sensor-tcs230-tcs3200/

For the most part this link was helpful in both the coding and the putting together of the Arduino components, however I encountered several difficulties not mentioned on this site.  There are definitely challenges in reading different red, green, and blue values. It seems as if the blue colors are always very low, when compared with the others.  I will most likely need to take this into consideration when I am working with this sensor in the future.  Because I plan to use different colored tags, I will definitely need to plan to adjust the blue accordingly.  

Arduino Code: 

// TCS230 or TCS3200 pins wiring to Arduino
#define S0 4
#define S1 5
#define S2 6
#define S3 7
#define sensorOut 8

// Stores frequency read by the photodiodes
int redFrequency = 0;
int greenFrequency = 0;
int blueFrequency = 0;

void setup() {
// Setting the outputs
pinMode(S0, OUTPUT);
pinMode(S1, OUTPUT);
pinMode(S2, OUTPUT);
pinMode(S3, OUTPUT);

// Setting the sensorOut as an input
pinMode(sensorOut, INPUT);

// Setting frequency scaling to 20%
digitalWrite(S0,HIGH);
digitalWrite(S1,LOW);

// Begins serial communication
Serial.begin(9600);
}
void loop() {
// Setting RED (R) filtered photodiodes to be read
digitalWrite(S2,LOW);
digitalWrite(S3,LOW);

// Reading the output frequency
redFrequency = pulseIn(sensorOut, LOW);

// Printing the RED (R) value
//Serial.print(“R = “);
//Serial.print(redFrequency);
delay(100);

// Setting GREEN (G) filtered photodiodes to be read
digitalWrite(S2,HIGH);
digitalWrite(S3,HIGH);

// Reading the output frequency
greenFrequency = pulseIn(sensorOut, LOW);

// Printing the GREEN (G) value
//Serial.print(” G = “);
//Serial.print(greenFrequency);
delay(100);

// Setting BLUE (B) filtered photodiodes to be read
digitalWrite(S2,LOW);
digitalWrite(S3,HIGH);

// Reading the output frequency
blueFrequency = pulseIn(sensorOut, LOW);

// Printing the BLUE (B) value
//Serial.print(” B = “);
//Serial.println(blueFrequency);
delay(100);

Serial.print(redFrequency);
Serial.print(“,”); // put comma between sensor values
Serial.print(greenFrequency);
Serial.print(“,”);
Serial.print(blueFrequency);
Serial.println(); // add linefeed after sending the last sensor value

}

Processing:

In working on the processing code, I have selected photos that will most likely be relevant to my final project from this site:

https://unsplash.com/photos/amI09sbNZdE

And plan to switch between photos when the color sensor picks up on certain colored tags.