Vivien Hao–Documentation Blog post 2

Recitation 2: Vivien Hao

We have built three circuits during Recitation two. All of these circuits require inputs, processing, and outputs. In fact, most projects that need physical computing also require these three processes. In the passage “Physical Computing”, the author mentions that most physical computing projects can be broken down into these same three stages: listening, thinking, and speaking. Or he says that in computing terms they should be renamed as input, processing, and output (20). While we were building the circuits, we had to use the codes that were already provided, of course under circumstances that no codes are given then we would have to write our own codes. And then finish building the input part of the project. Building up the breadboard would also be counted towards the input part of the project. After we have finished building the board, we then could move on to the processing part, in which we do expect a wanted output. If the output does not meet our expectations, then we need to go back to the processing part and also check the input part for any possible errors. The reason why that we have to use a 10K resistor is that the pullup resistor can define the input pin at 5 volts. And then the button can connect the pin to ground and the pin goes to 0 volts.  If I had 100,000 LEDS, I would make a starry ceiling for kids. I want to make the LED lights to be movement sensitive. Kids could simply use hand gestures to turn the lights on and off. Moreover, they can also change colors of these lights by using different hand gestures. Ordinary starry ceilings can only be lighted up when the room is all dark, but this LED starry ceiling would solve this issue.

Recitation 2: Arduino Basics by Yiwen Hu

Overview

During this week I got to know Arduino and made my first attempt to connect Arduino to the computer and the breadboard. Practices in recitation increased my familiarity with Arduino as well as understanding the Arduino as a bridge between physical circuits and coding on computer. 

Materials

From Arduino Kit:

1 * Arduino Uno
1 * USB A to B cable
1 * breadboard
1 * buzzer

2 * LEDs
2 * 220 ohm resistors
2 * 10K ohm resistors
2 * pushbuttons
A handful of jumper cables

From cart:

2 * arcade buttons
1 * Multimeter (optional)

Circuit 1: Fading Light
Materials

  • Arduino board
  • LED
  • 220 ohm resistor
  • hook-up wires
  • breadboard

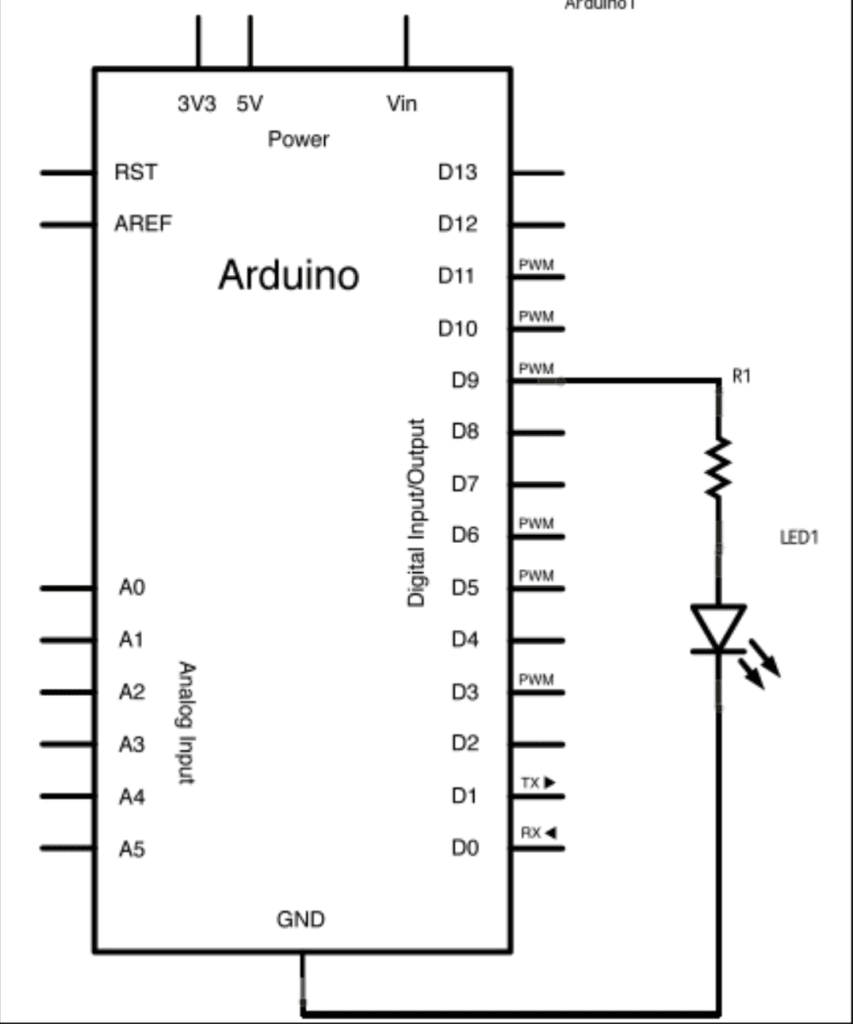
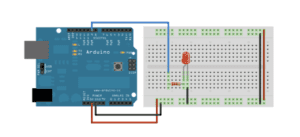
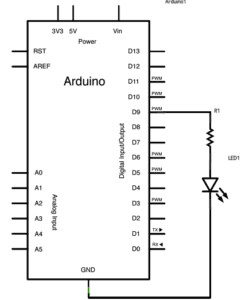
Schematic

Process

We started by connecting the Arduino to the breadboard such as connecting the voltage 5V to the positive side on breadboard. Then we connected resistor, LED and finally linked the LED to the ground on Arduino. The process is straightforward and simple so it didn’t take us much time. The coding part is interesting. From the example code I got to know more about the function of integer, loop, if statement and so on.

After plugging it to the computer, it works!

Circuit 2: toneMelody

Materials

  • Arduino or Genuino board
  • piezo buzzer or a speaker
  • hook-up wires

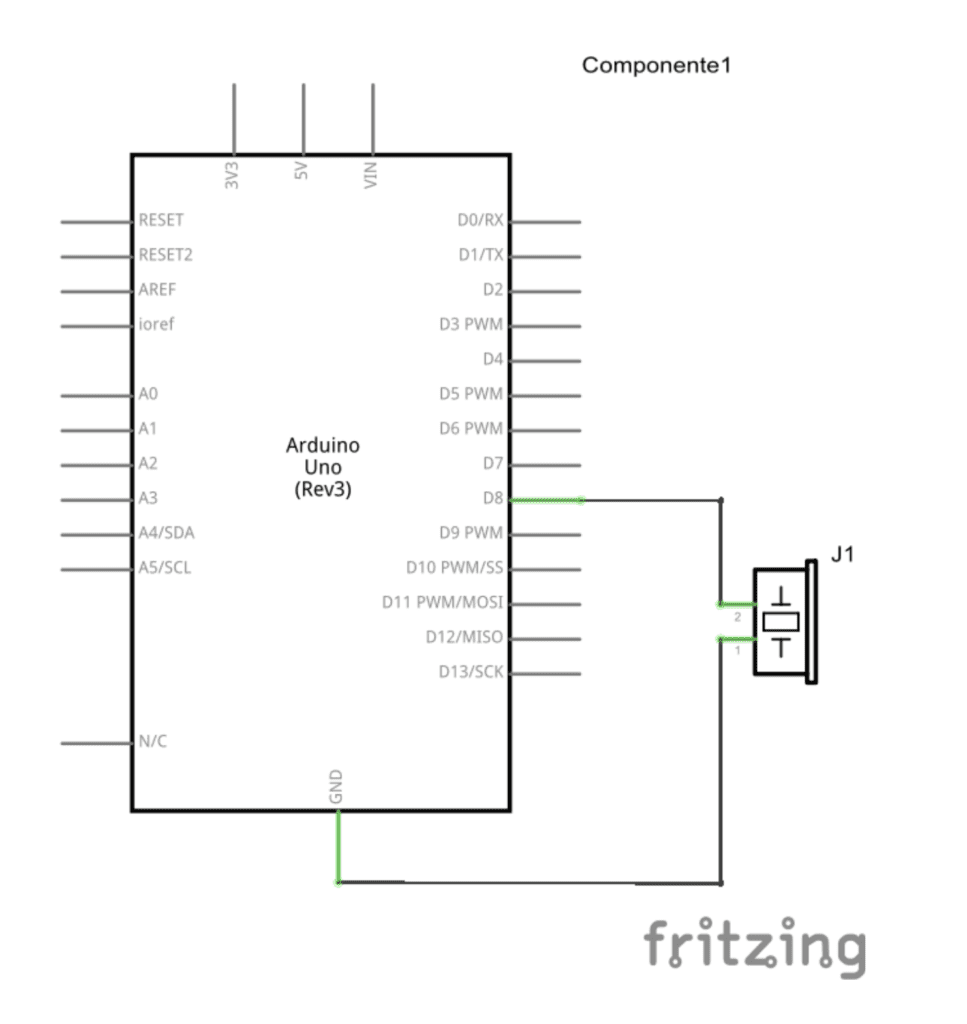
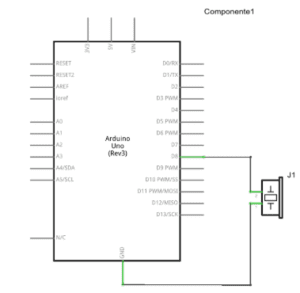
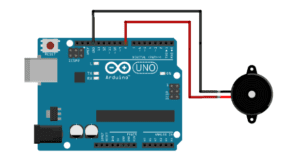
Schematic

Process

The circuit is quite simple so we spent little time finishing that. The interesting part is the coding.  It’s a little bit hard to understand, but the use of a series integrals in a category and the iteration for loop are interesting new concepts to learn. I also tried to move the code inside the void setup to void loop to see what would happen. The buzzer kept buzzing at regular intervals, which was interesting.

Circuit 3: Speed Game

Materials

  • Arduino board
  • 2 LEDs
  • two 220 ohm and two 10K resistors
  • hook-up wires
  • breadboard
  • two pushbuttons
  • buzzer

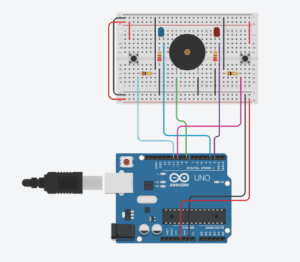
Schematic

Process

This one is more challenging and also more exciting. Since it’s an symmetric circuit, we divided the task of building circuits into two identical parts, with my group-mate Ruben and me respectively building half of the circuits.  

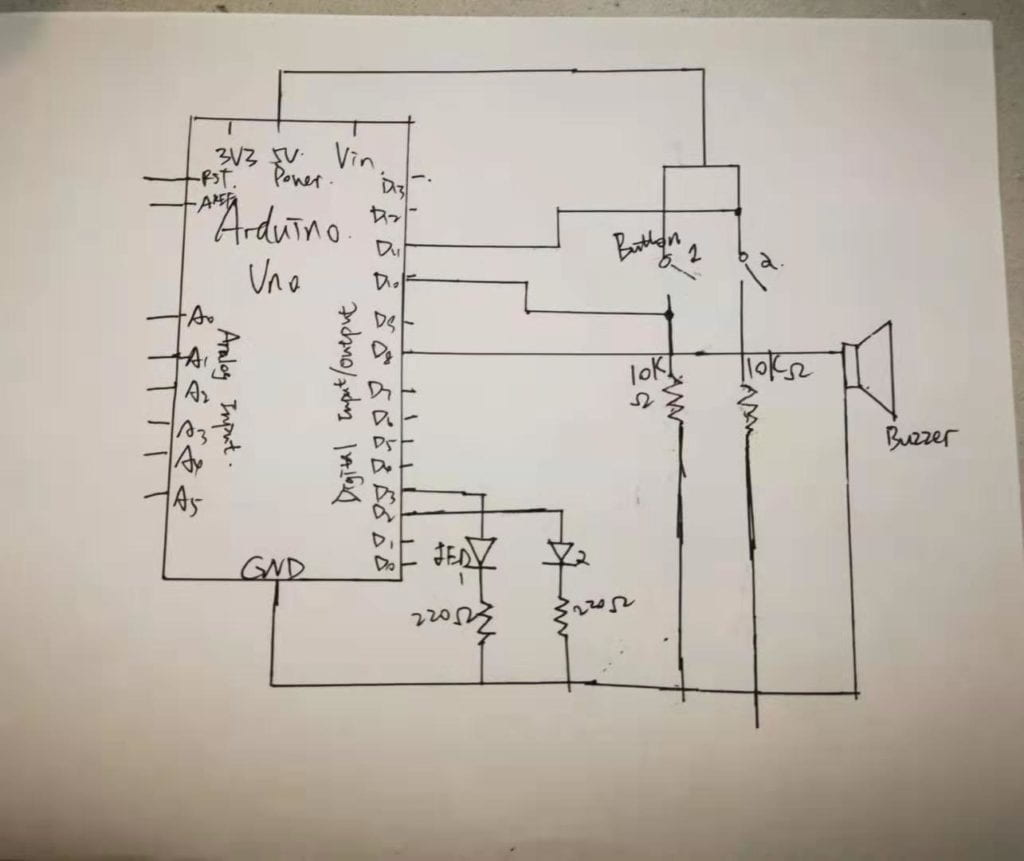
Though the schematics seem complicated, it actually can be broken down into several modules. One closed circuit is one module. I started by building one button on the side. The push button was first connected to the voltage power, then with a resistor that could control the flow of current and finally connected to the ground. Then I attached the digital pin to the button for the computer to recognize. 

One important thing I learned in building the circuit was that the pin could also provide power to the LED or buzzer. Before I thought that every electronic component need to be linked to the anode to be powered. 

The game is fun!

Responses to Questions:

  1. Reflect how you use technology in your daily life and on the circuits you just built. Use the text Physical Computing and your own observations to define interaction.

From the text Physical Computing and based on my observations,  interaction is a cyclic process of input, processing and output between two or more actors. Specifically, when interaction happens, there should be one actor who starts to give input. Then another actor would start processing the input and generating the corresponding output to the starting actor. Interaction can go on and on depending on the actors’ behavior. For example, when you go through an automatic door, the door sensor senses your behavior of entering, which is input, and the underlying programming, which does the processing part, will produce output that is to open the door for you. And when you pass the door the programming receives your message of leaving and then does processing to close the door, which is another kind of output. The process go on and on whenever there is someone passing through the door. 

2. Why did we use the 10K resistor with the push button?

Limit the voltage power to protect the circuit. 

3. If you have 100,000 LEDs of any brightness and color at your disposal, what would you make and where would you put it?

Recitation 2: Arduino Basics by Yu Yan (Sonny)

Introduction:

In this class, we learned to build three circuits including fade, toneMelody and speed game. The details are as followed.

Materials:

  • 1 * Arduino Uno
  • 1 * USB A to B cable
  • 1 * breadboard
  • 1 * buzzer
  • 2 * LEDs
  • 2 * 220 ohm resistors
  • 2 * 10k ohm resistors
  • 2 * pushbottons
  • A handful of jumper cables
  • 2 * arcade buttons
  • 1 * Multimeter

Circuit 1: Fade

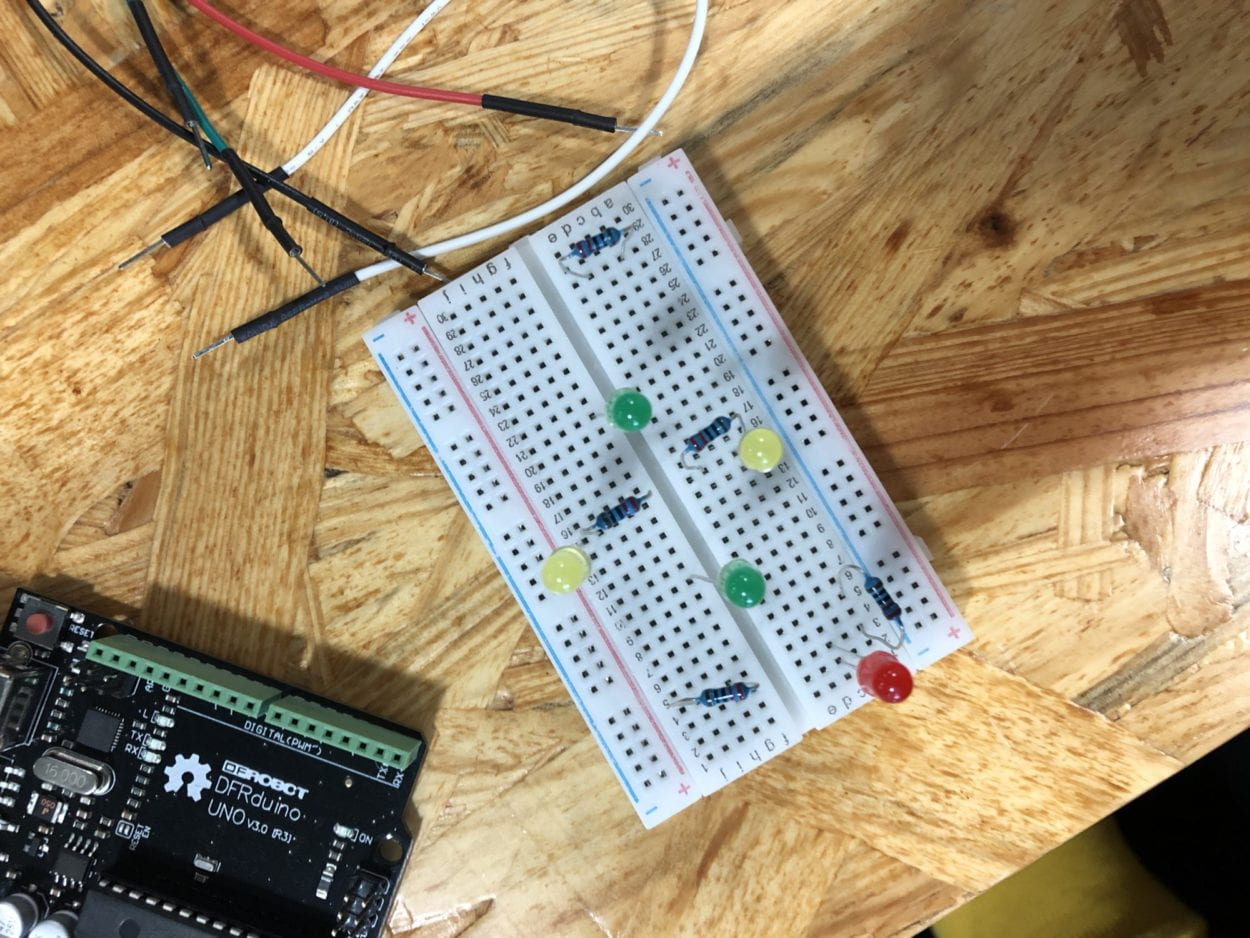
For this circuit, we followed the instruction from the website and built a circuit to fade an LED off and on. To build the circuit, we used three wires, an Arduino Uno, a breadboard, a resistor and an LED. By changing the number in “delay”, we also changed the speed of its fading.

Circuit 2: toneMelody

This circuit is also very simple. We used two wires, an Arduino Uno, a breadboard and a buzzer to build it. In this circuit, we used the code to let the buzzer make a melodic sound.

Circuit 3: Speed Game

This is a relatively complicated circuit compared to the previous two. We used a breadboard, an Arduino Uno, two push-buttons, two LEDs, a buzzer, four resistors and several wires. When the circuit is completed, two players can play together. If one player press the button fast enough for a few seconds, the LED on his/her side would be turned on showing that he/she has won the game.

Question 1:

Definition: Interaction is an iterative process which involves actions and feedbacks. The whole process are composed by input, process, and output, or more straightaway, “listening, thinking, and speaking”. Interaction needs constant response. It exists not only between humans but also between humans and machines/devices. I often use my computer and my phone in my daily lives for doing my homework, chatting with my friends, searching information, etc. I think the relationship between me and my devices can be counted as an interaction because they can respond to my action constantly. In other words, they process my input and provide output back to me. The circuits that I just built also did the same thing. They respond to my input — the code and pressing the button. 

Question 2:

We used the 10k resistor to protect the circuit. If we don’t use the resistor, the voltage would be too high and the circuit might be damaged.

Question 3:

If I have 100,000 LEDs of any brightness and color at my disposal, I would make it as a light curtain and put it on the wall in my living room. I think turning them into a light curtain would be so cool and I can also make them create any picture that I want to. 

Recitation 3: Sensors by Barry Wang

Recitation 3: Sensors

This week, we are getting our hands on different sensors. As two game manics, my partner Joseph and I chose joystick as the component we would like to work on. We correctedly wired the sensor to Arduino board, and improvised a small device that is controlled by this joystick.

Materials:

From Arduino Kit:

1 * Arduino Uno
1 * USB A to B cable
1 * breadboard
5* LEDs
5 * 220 ohm resistors
A handful of jumper cables

From cart:

1*Joystick
1 * Multimeter (optional)

Basics: Monitoring the joystick through serial port

We looked at the joystick, and discovered that it has two axis, x,y and a pushbutton z. Each of them has three pins, two for power and one for transimitting signal. So we used a breadboard to wire power them up, and plugged the signal pin into the analog in socket. When finished, we opened the serial monitor to check the status of che joystick.

Here is the video:

Playtime: A joystick position indicator

We used 5 LEDs in total, four for x and y axis, and one for the pushbutton.  We placed the four LEDs in a diamond shape, and the other pushbutton LED aside.  Accoding to the values being inputed through analog in pins, we developed conditional statements into the loop() function. We light up the different LED according to the different signals. In this way, we are able to see which direction the joystick is heading.

Here is the test video:

Question 1:

Our idea is to create a machine that can detect your activity in one day and generate a nice painting about your day. We are trying to use different sensors, like brainwave sensors, heartbeat sensors, mood sensors, body temp sensors… (Hopefully they will be functional in 2119.) Since our product does not require any specefic skills, it can be used by anyone who wants to try something new with a bit pursuit in art, or just fancies a nice picture of their day. People use this invention because comparing with dairy, pictures is a much interesting and aesthetic way of keeping track of one day. It is a cool stuff. Just wear our wearable devices, like watches or glasses, and you will end up with an enjoyment of art.

Question 2:

Code is the recipe and tutorial for computer. We write codes so that the computer what to execute.

Question 3:

Computer is now influencing our behaviour in a deep way. When contacting somebody, in the old days, we write and mail; in modern times, we send email or online messages. It is bring us great convenience. We also use computer to entertain, listening to music or playing games. It brings happiness to us. Computer has changed our life significantly, because it is wonderful, it is user-friendly, it interacts with you… Everyone around is using it. We have reached a point where we cannot get rid of it. The important thing is how to make good use of computer.

Recitation 2: Arduino Basics by Barry Wang

Recitation 2: Arduino Basics

In this week, we are getting hands on the basic principles and coding of Arduino.  My partner Joseph and I succeeded building up all the required three circuits. Besides, we built on the third model and created a 4 player verison of Speed Game.

Materials:

From Arduino Kit:

1 * Arduino Uno
1 * USB A to B cable
1 * breadboard
1 * buzzer
2 * LEDs
2 * 220 ohm resistors
2 * 10K ohm resistors
2 * pushbuttons
A handful of jumper cables

From cart:

2 * arcade buttons
1 * Multimeter (optional)

Circuit 1:

This is a straightforward circuit, which only needs to hook up the wire following the circuit diagram. In the code part, we use digitalWrite() function to switch the LED on and off at with different brightedness to create a fade effect.

Here is the test video of the circuit:

Circuit 2:

Also a pretty straightforward one. We put the notes we want to play in a list, and feed this list into the loop() function so that it plays one note every loop.

Here is the test video of this circuit:

Circuit 3:
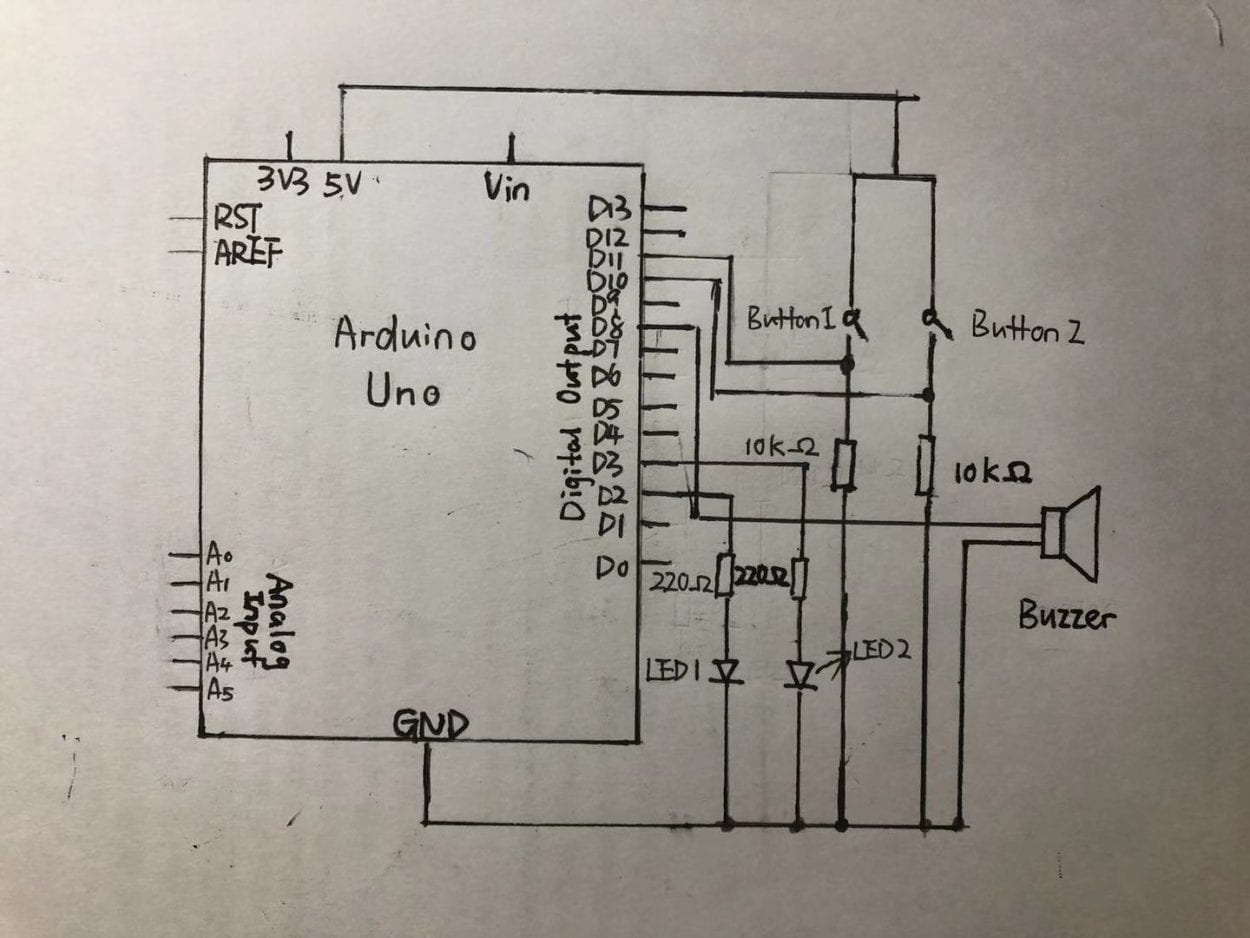
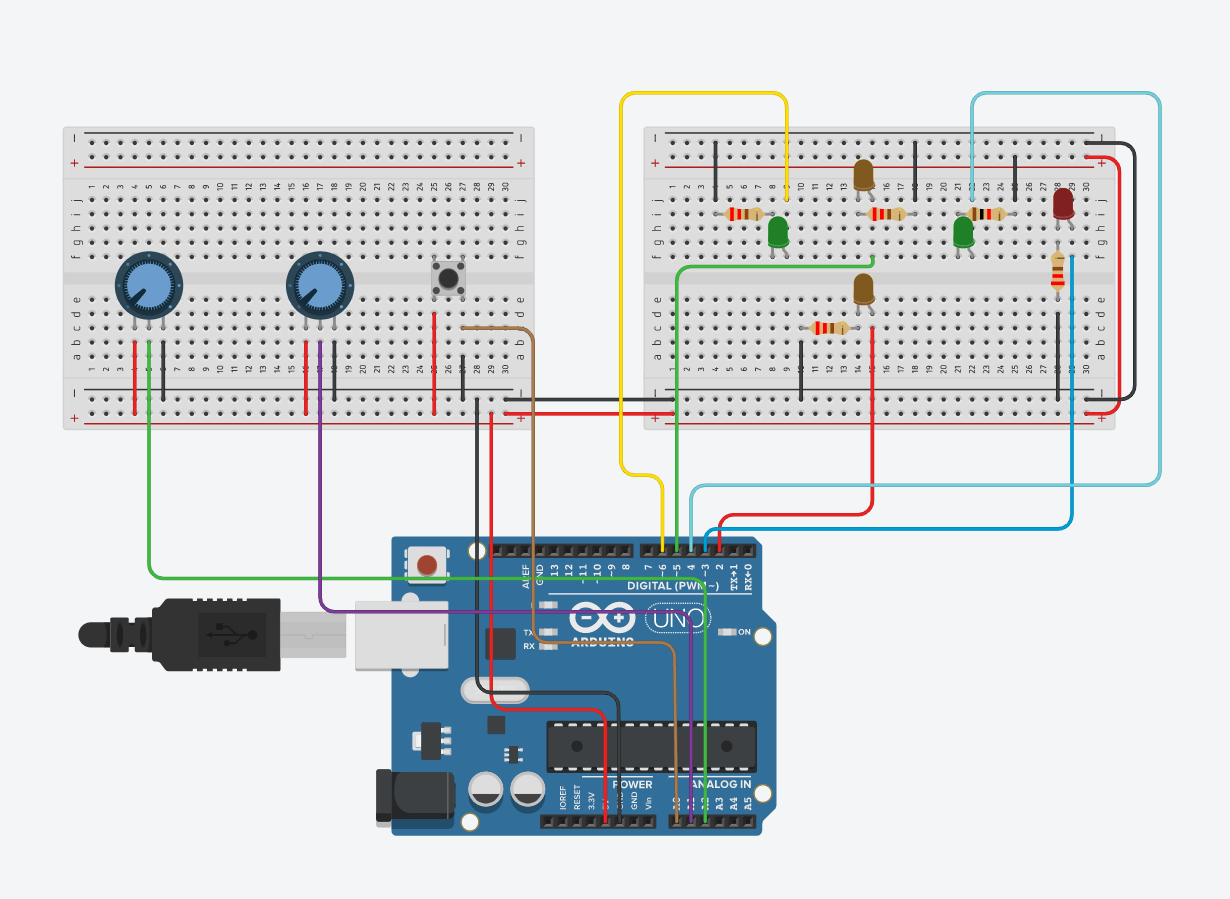
This circuit is a simple speed game, which has two buttons , two LEDs and one buzzer. Once the game begins, the two player clicks the button as fast as possible. Winner is the one who reaches 10 clicks first.

This is the most difficult one among these three circuits. There are a lot  required electric components, and the wiring on the breadboard is quite complicated. To simplify, I draw this schematic to make the whole process clear. 

For this circuit, we have two main parts, one part is the button circuit, and the other one is the LED and buzzer part. For the first part, we have two buttons wired with a 10kΩ resistor and another wire to a digital pin. We use the digital pin, with digitalRead() function to detect the current as a symbol of button click. Once a digital pin has detected 10 clicks, it sends siginal to another digital pin to light up the corresponding LED light and to turn on the buzzer.

Here is the test video of this circuit:

Playtime: Four Players Speed Game

As an improvement of circuit 3, we added two more plays into the game. The schematic would be a bit messy, so I called TINKERCAD to help.
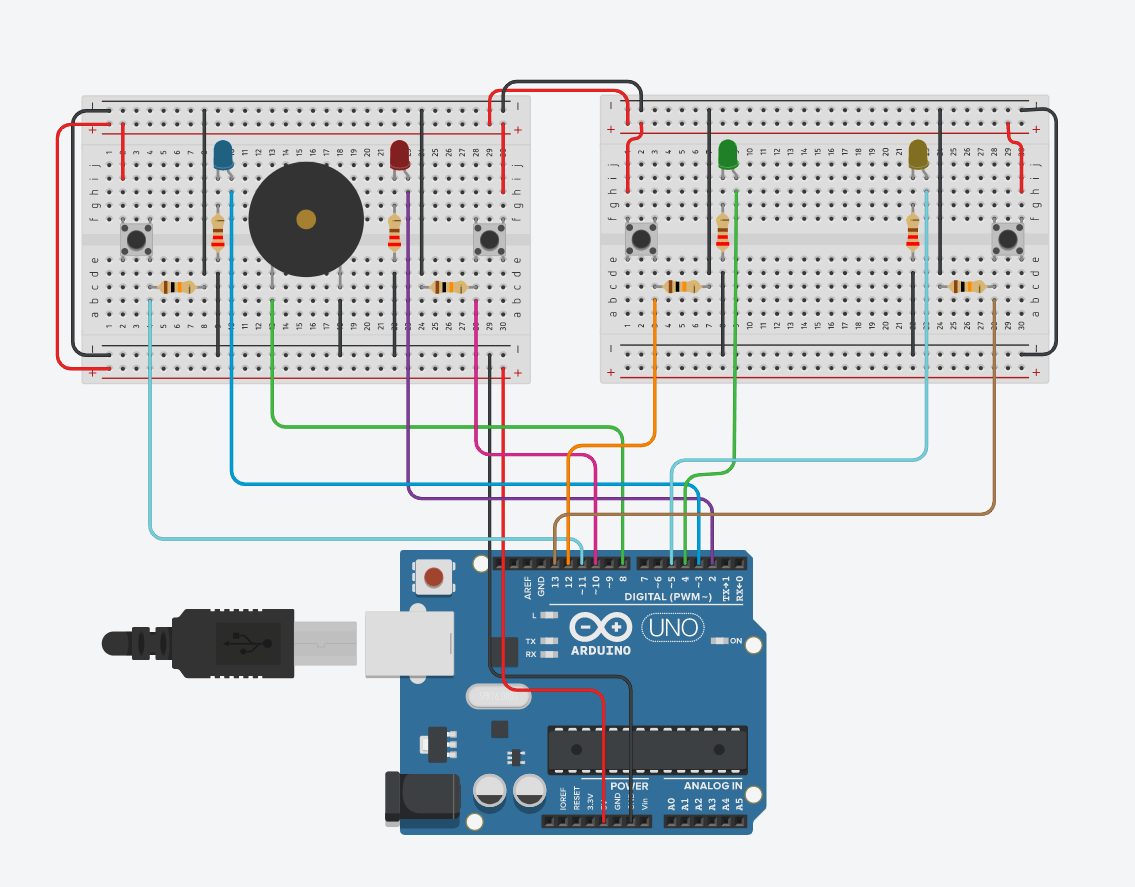
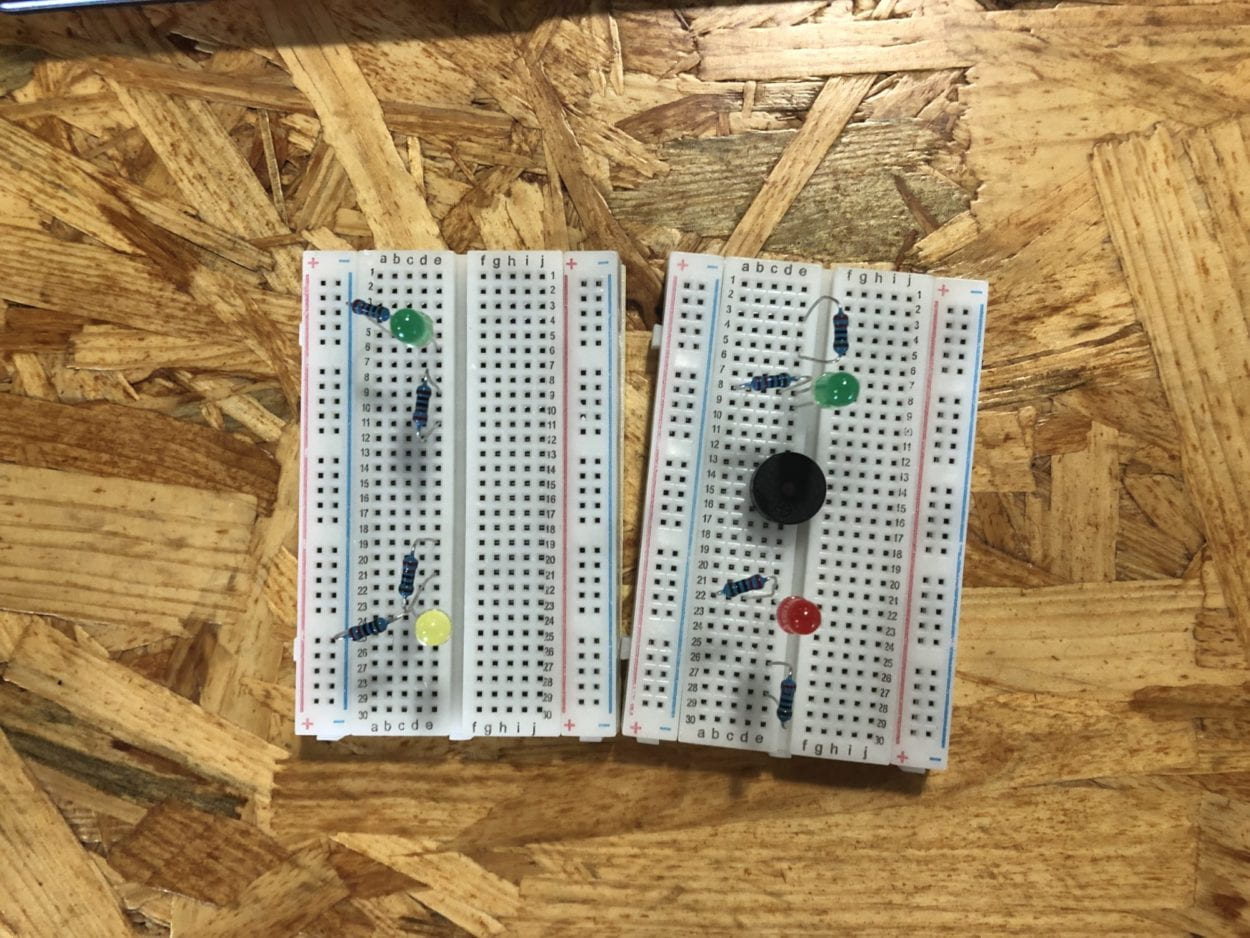
The principle is the same as circuit 3, what we are doing is basically power up another breadboard, and connect two more buttons and LEDs.

But in the coding part, there comes a bug of this program. In the detection of click part, the code has a sequence that it detects from button1 to button4. That means that, if button1 and button2 are simutaneously clicked, the click of button2 will not be counted. This could be improved in the future development. But overall, this is a joyful product since we can interact with more players.

Here is the test video of this circuit:

Question1:

In text Physical Computing, it defines a interaction as the flow of input-processing-output. My personal definition is basically same as this. Interatction is a process of act and react, input and output. Processing is not necessary in a interaction, for example, when I turn on a switch, the lights come on. There isn’t any processing part involved.  However, when I type a key on the keyboard, the screen shows the character on the screen. From these examples, we can see that, though processing is not necessary, but input and output are always needed.

Question2:

The 10KΩ resistor is used to protect the circuit. If it’s not there, when we push the button, there will be a short circuit which might damage Aduino and other electronical components.

Question3:

I will probably make a huge “light ball”, a bit similar as those one used in club, but much bigger. It can be put in the center of a fountain in the city square or someplace. I can make the LEDs flash according to the background music. That will definitely add a lot of joy.