Recitation 3: Sensors – Lillie Yao

Materials:

  • Ultrasonic Ranger
  • Breadboard
  • Jumper Wires
  • USB Cable

Introduction:

In this recitation, my partner and I had to choose a sensor to code and link up to Arduino with. We chose the Ultrasonic Ranger (Ultrasonic Sensor OR  HC-SR04) This sensor is supposed to detect motion from 2cm to about 3m in length.  During this activity, we linked the Ultrasonic Ranger to Arduino through the breadboard. In this video, you can see that we got the sensor to work and I was walking back and forth to test out the distance/motion

Question 1:

In this activity, my partner and I intended to assemble a motion sensor. If this were to be used for pragmatic purposes, it could be used for security purposes. For example, if there is a precious piece of artwork, the government could use motion sensors to secure that if anyone tried to steal it, motion sensors could detect any movement around it and sound an alarm.

Question 2:

I think that code is often referred to as a recipe or tutorial because it breaks down what one should to and/or how to do it. Code is easily understood when you are trying to figure something out and is the basic foundation, just like a recipe or tutorial, to help guide someone to do something.

Question 3:

I think computers influences us in many different ways. It can influence us to easily communicate with one another in a fast and efficient way. At the same time, it can cause us to become more lazy since we have technology to do things for us in a manner of time.

Recitation 3: Sensors by Tya Wang (rw2399)

In this section, we tried out several sensors to see which information from real life could be translated into electrical signals using circuits. The codes were basically all the same except some tiny revision. However, although I thought building these circuits only involve changing the sensor part, some problems still occurred during this recitation. This led me to reflect on how well I actually understand the whole idea behind the pre-made diagrams.

Circuits

Materials:

1 * Arduino Uno
1 * USB A to B cable
1 * breadboard
1 * buzzer
1 * LEDs
1* Moisture sensor
1* Ultrasonic sensor
1* Vibration sensor
A handful of jumper cables

Sensor 1: Moisture sensor

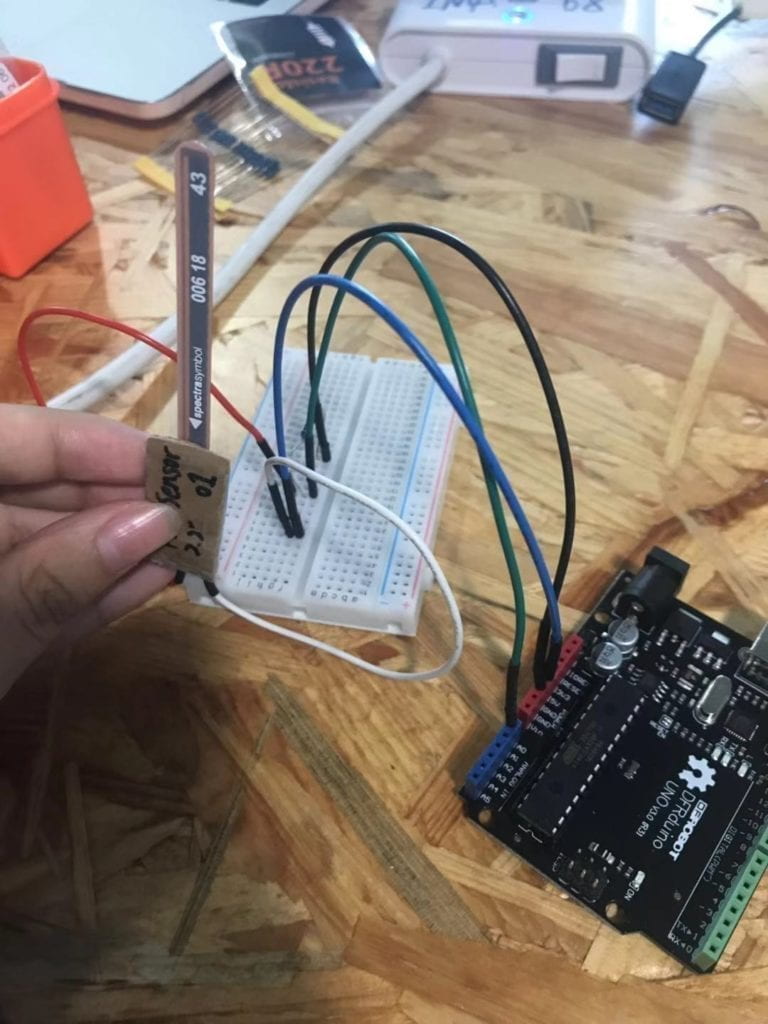
The moisture sensor is a small device that has three ports, each goes to one in GND, power, and pin. It works by returning a value that represents how moisture it is on the device. When it is not at all moisture, it returns 0 and the value increases when in touch with more water (it has a max value though).  We uploaded the AnalogRead code to read the value returned by the sensor. This device can be used in settings that involve controlling how wet something is such as auto watering when the soil is dry. However, the device is not very sensitive because when we breathe to it, it didn’t change a large value,  although there was vapor in my breathe.

Here is how we are changing values returned by the moisture sensor in a lab:

Sensor 2: Vibration sensor

This sensor returns how strong the vibration is on it. We used the special “knock” code so that the string “knock!” is printed on the serial panel. The code is pretty simple, however building the circuit is kind of tricky. Because we built a circuit with a sensor that had three ports before this one, we couldn’t really take that sensor down and plug the vibration sensor in directly. Moreover, we needed to add an additional resistor as well as another output device into the circuit. We chose the LED, and successfully fried it because we had it in parallel with the resistor and sensor. When breaking it gave a soft but horrifying blast sound and an unpleasant smile. Lesson learned. 

This is the sad scene of a broken LED:
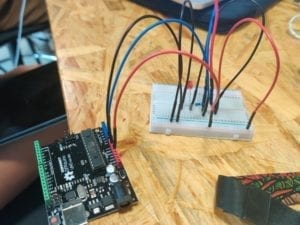
The broken LED

After consulting an instructor, I learned that to adjust the brightness of the LED using values returned by the sensor, we don’t really need to connect them in one single circuit. We can actually code it and give it an output value mapped from the input analog value. This is the part of this section that actually deepened my understanding of how Arduino worked in real life.

Following is the video of a working vibration sensor:

Sensor 3: Ultrasonic sensor

We would like to get a joystick yet all three of them are on lease. So we got our second choice. This is quite easy to put together because there are no other electronic parts related and the codes are already done. Since it calculates distance based on ultrasonic, it should be more accurate than the infrared one. It is indeed quite smooth, just sometimes it is quite hard for a user to keep track of the changes of a value when information is displayed on the serial panel in the form of horse race lamps. I wish there were a user’s interface or something that I could just read the values from one box without unnecessary information. This is one part of coding that I want to learn in the future using C.

Reflections

What did you intend to assemble in the recitation exercise? If your sensor/actuator combination were to be used for pragmatic purposes, who would use it, why would they use it, and how could it be used?

We intended to assemble a circuit that takes the input from the sensors and gives this input back to the computer. Then the computer or the circuit makes an output in a certain way using the input value.

The vibration sensor could be used to detect whether people has walked through it. So we can use it to build a floor light that automatically turns on when people pass by. It can be assembled in a family to build switchless light systems.

The moisture sensor can be used in a sauna house to track if the sauna room is too wet. When visitors hate it wet in the room, the room can automatically turn on its dehumidification device.

Code is often compared to following a recipe or tutorial.  Why do you think that is?

Because when we cook following a recipe, we do the instructions step by step from bottom to top. And when the computer is executing the codes, it runs from the first line to the last unless specified.

In Language of New Media, Manovich describes the influence of computers on new media. In what ways do you believe the computer influences our human behaviors?

Sometimes computers detect and give feedback to help us better track our own status and behavior. Using computers, human can have a better insight into what they are doing and check continuously whether their behavior meets their expectation of themselves.

Recitation 3: Sensors by Yiwen Hu

Overview

After building some foundation for circuit construction and Arduino basics, we learned some concepts of sensors and put into practice during recitation. With my partner Rannan, we practiced two circuits in total, integrating sensor into the circuit and run the code to see amazing things happening. 

Materials

From Arduino Kit:

1 * Arduino Uno
1 * USB A to B cable
1 * breadboard
2 * LEDs
2 * 220 ohm resistors
A handful of jumper cables

From cart:

1 * Force Sensitive Resistor
1 * Photoresistor

Circuit 1: Force Sensitive Resistor

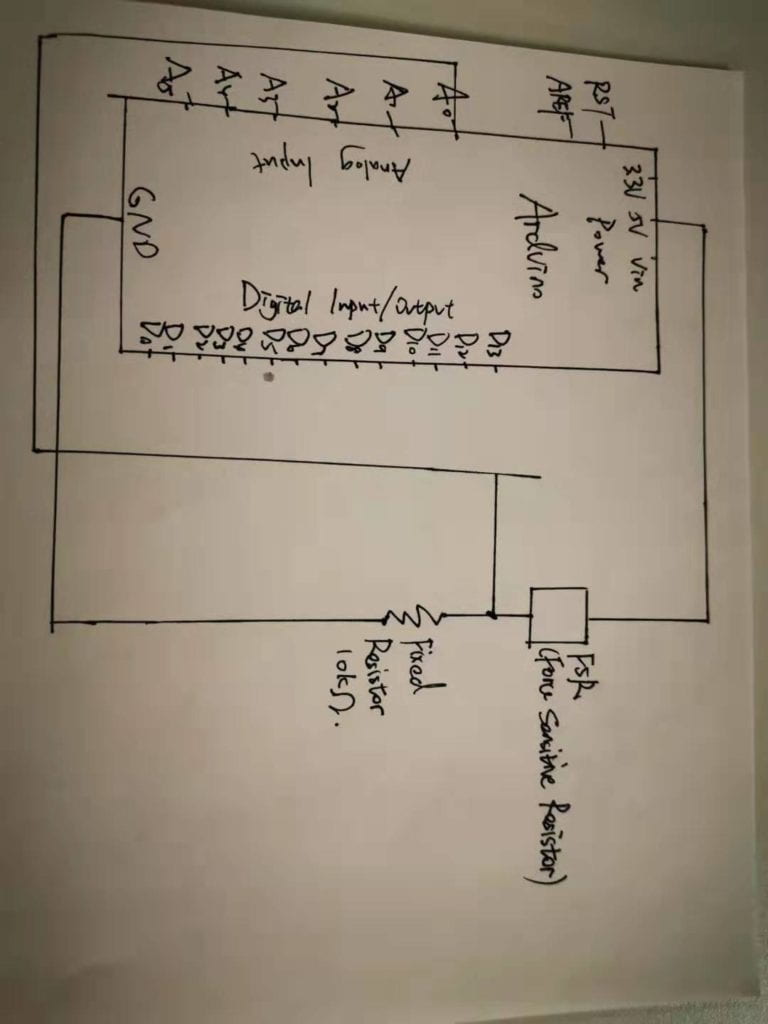
Schematic


Process

We first attached the two legs of the sensor to the ground and the pin. Since it’s an analog input, we linked it to the A0 analog input. In order to control the flow of current we add a 10K ohm resistor. The circuit building is quite easy. 

We used the AnalogInOutSerial example code to run the circuit. In void setup, we entered “Serial begin (9600)” to determine the speed of running. The in the void loop the map function was applied. There were also a list of integrals. To understand the code, I first identified the input and output. The input was the Force Sensitive Resistor, but the computer need to recognize the value of it. And thats when the analogRead() function came in. Since the pin was attached to the sensor, so the computer could recognize by entering the pin number in analogRead() function. Here an int (integral) was introduced to make the code legible. The output was the value represented in the serial. The purpose was to generate output based on changes in input, so the map() function served as the processing part. But the map() function need to set an initial value and that’s when the int sensorValue had its role to play. After the processing, the output value was reported in the serial with corresponding input value generated by the sensor. 

However, the circuit didn’t work. We together with one fellow checked the wire connections and the coding and nothing turned out. Then we checked the sensor and found that it was broken. Since we didn’t have much time left, so we were told to swap out this sensor with a different type of sensor.  Though it didn’t work out, the learning process is rewarding.

Circuit 2: Photoresistor

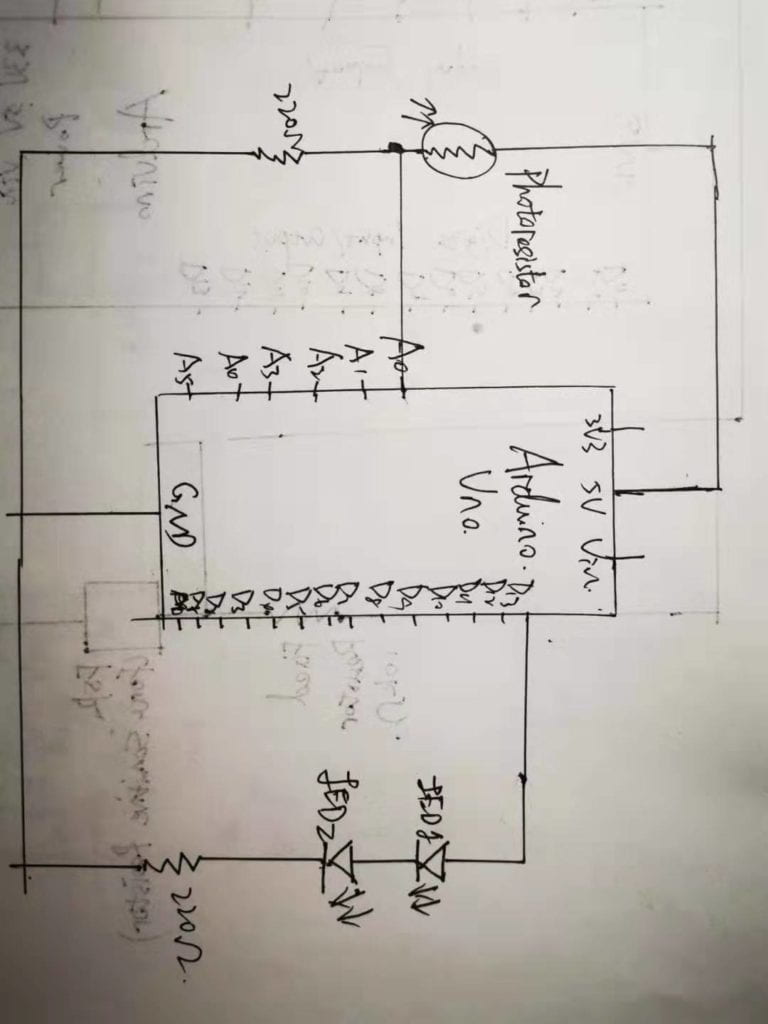
Schematic

Process

We swapped the broken FSR with photoresistor, a light sensor. To add more obvious effects, we added two LEDs by connecting them to the digital pin 13. We also added a 220 ohm resistor to control the flow of the current. The basic structure of schematics and coding was similar to the one above. But we added “if statement” to control the brightness of the light. As shown below, we first used map() function to generate output value of the LEDs. However, the value itself didn’t give rise to anything, which was something we got to know from the learning assistant (thank you Jessica!). So we added the “if statement” to set conditionals. According to what we had learned before, we set the digital output in which the Led lit up when the value reached a level and shut off when below that value. Since it was a light sensor, we used the torch from the phone to increase brightness.

Here’s the result!

Responses to Questions:

  1. What did you intend to assemble in the recitation exercise? If your sensor/actuator combination were to be used for pragmatic purposes, who would use it, why would they use it, and how could it be used?

I intended to assemble the photoresistor. As a light sensor, it can take brightness as input and can be used widely. For example, in my exercise, the input and output are both brightness. This could be applied to the early evening when everything became darker. The photoresistor inside the house could sense the darkening of outside and correspondingly turned on the light in the house. It could be even better if the digital output could be changed to analog so that the adjustment of brightness would be smoother. It could be used by anyone who were in a building. The people could get rid of the trouble of turning light on and off regularly and complaining about the brightness of the light.

2. Code is often compared to following a recipe or tutorial.  Why do you think that is?

The core features of code are specification and clarity, or logic. Every line of code has its own unique and important functions, and they depend on each other and therefore are inseparable. This also applies to a recipe or tutorial, in which every step as well as things needed are clearly stated and arranged in a logical order. 

3. In Language of New Media, Manovich describes the influence of computers on new media. In what ways do you believe the computer influences our human behaviors?

Just as Manovich describes, that the computer is turning media into something modular and open to revision and creation and automation arises as a result. In that sense, our human creativity and intention actually have been decreased to some degree. For example, some vector images don’t allow for flexible curves. In this regard, the computer automation actually could shape our behavior just like media has always been shaping our ways of communication. Computer is a modern media that is deeply shaping our lives. Workplace is impossible without computers. Everyone need a phone to live, study and literally do anything. The emergence of computers is also driving the traditional way of reading books to online reading, which in turn intensifies modern trend of fast consumption and less concentration.

Recitation 3: Sensors – Zhao Yang

Overview

In this recitation class, we were required to try to use at least one sensor and understand how it worked. Since my partner, Barry, and I are both game fanatics, we chose the joystick as the sensor we used in this recitation class. 

Materials:

From Arduino Kit:

1 * Arduino Uno
1 * USB A to B cable
1 * breadboard
5* LEDs
5 * 220 ohm resistors
A handful of jumper cables

From cart:

1*Joystick
1 * Multimeter (optional)

Basic Circuit:

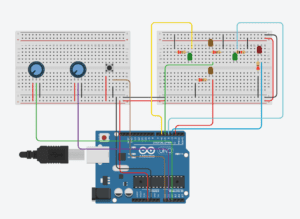
Since the joystick has two potentiometers, x and y axis, which are both analog input, and a pushbutton for the z axis, which is either analog input or digital input, we plugged the signal pins of two potentiometers into analog sockets and we also plugged the signal pin for z axis into the analog socket. After finishing building the circuit, we copied the example code and checked the status of the joystick by seeing the serial monitor. And here is the video about testing. 

Further endeavor:

After checking the status of the joystick, we make some changes to the original circuits that we added five LEDs to directly show the output of the joystick. In this diagram, two potentiometers represent x and y axis, and the button represents the pushbutton z axis. In reality, the four LEDs would turn on depending on the status of the joystick, while another LED would turn on depending on whether the pushbutton is pushed. Anyway, this circuit is just the simplest way to embody the output of the joystick. Maybe later we will have some further experiments based on the circuit. For example, the LEDs may turn on sequentially if you push the joystick to right for particular times. And here is the video about our further endeavor. 

Questions:

  1. If our sensor combination were to be used for pragmatic purposes, I think those who love playing games would use it since the joystick is an important part of a game controller. Furthermore, if we can combine the joystick with some other sensors to create a game controller, it would be more interesting for a player to use it. For instance, if we can combine it with a vibration sensor, the player can use the joystick to control the movement of the character in the game and the player can shake the controller to finish some particular task in the game, which can integrate the player more into the game. 
  2. From my perspective, computers are executed by following the logic of the code. The whole process is like cooking a dish that you just cook step by step as what the recipe tells you to do. Similarly, a computer executes by following the code step by step. 
  3. Nowadays, as the computer becomes more and more functional, it influences our life deeper and deeper. In the past, we almost had to do everything on our own. But now, we can use the computer to deal with most of the issues. For example, students must write down all the notes on their notebooks in the past, while students can take notes on their laptop and the software on the computer can automatically edit the note in a logical way in the present. In other words, I think computer is making our life easier. Meanwhile, people are also becoming lazier due to the computer. For instance, in the past, if we wanted to find some resources to finish our essay, we needed to go to the library and read a lot of books. On the contrary, we just need to move our fingers to type several keywords on the computer and we can find tons of information related to what we want. Anyway, our life is still getting better due to the computer. 

Recitation 3: Sensors by Yu Yan (Sonny)

Introduction:

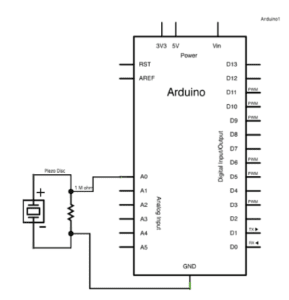
In this recitation, my partner and I built a vibration sensor which can detect vibration and provide output. Despite the original circuit, we also added a buzzer and an LED as the output.

Materials:

  • Arduino Board
  • Piezo electric disc
  • 1 Megohm resistor
  • 1 Breadboard
  • 1 LED
  • 1 Buzzer
  • Several wires

The Original Circuit:

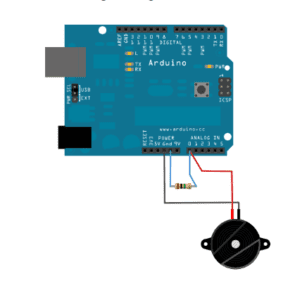
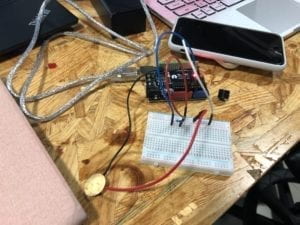
In the original circuit, we used an Arduino board, a breadboard, a resistor and a Piezo electric disc. When the circuit is working, we opened the serial monitor to check the output. We also changed the threshold value to change the sensor’s overall sensitivity.

Adding Different Outputs

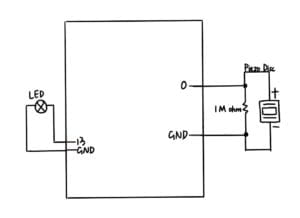
We tried to add an LED as the new output first. The basic circuit stayed the same. The only thing we need to do is to connect an LED with digital pin. When we knocked the Piezo disc, the LED would be turned on and another knock would turn it off.

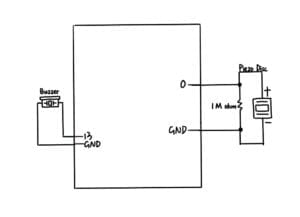
The second output we tried is a buzzer. The circuit for the buzzer is nearly the same as the LED’s. When we knocked the disc, the buzzer made a sound. 

(Reference: https://www.arduino.cc/en/Tutorial/Knock)

Question 1:

We intended to assemble a touch board. This circuit can be used as a lamp with a touch board as its switch. Students would use it because there is no noise when you turn it on or turn it off, which could avoid interrupting their roommates. Whenever you use it, you just have to touch the board, and the lamp would be turned on.

Question 2:

A recipe or tutorial provides detailed steps and the materials that you need to make something. If you follow the recipe, you can make a good dish.  But if you make a mistake or forget some ingredients, the taste would change and you cannot make the same dish that you want to. The code is quite similar.  By following the code, the process can run successfully and eventually you can get what you want. However, if you didn’t follow it correctly, you cannot get your desired output.

Question 3:

Computers have provided a lot of convenience to our daily lives. After using the computer, we don’t have to do any calculations, we can get all kinds of information from the Internet, and we can type our ideas or homework down so that pen is not needed anymore. Computers have changed our lives a lot. Without computers, life would be so inconvenient. That’s why I believe the computer influences our human behaviors.