Walking in the Forest-Yiwen Hu- Inmi

CONCEPTION AND DESIGN:

We originally want to create a VR experience where the user can feel like they are physically interacting with the virtual world.  My definition of interaction is a continuous conversation between several actors.  The VR experience will encourage the user to explore their way of interaction with the virtual forest. Since our goal is to encourage the user’s way of interaction with the virtual world, we borrowed multiple sensors, ranging from pressure sensor to distance sensor.  We decide to test all those sensors first before selecting the specific ones to use because from the midterm experience I’ve learned that the functionality of sensors determine to a large part the outcome. So it’s better to ensure that the sensors work (the sensor can clearly identify a pattern so that I can monitor its value to serve my purpose).  In addition, we also think about the context of interaction. For example, we later abandon the sound sensor because it’s hard to think of the context in which human sound can generate effects on the environment.

FABRICATION AND PRODUCTION:

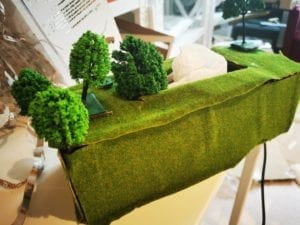
We finally choose distance and color sensor as our main sensors. The idea is that as people with different intentions approach the forest, there will be different effects shown on the screen. We aim to make people aware of the effects of their interaction with the forest. We decide to create 3 kinds of costume, each representing a symbol of human’s intention. For example, the white clothes with plastic attached represent human-induced plastic pollution. We cut down cardboards into several squares and paint them with different colors, like green, red and white. Fortunately the color sensor could differentiate between these colors. The user wearing the suit will be encouraged to approach the forest. During user test section, we were told that the interaction was not obvious and the user will not know that they have to run towards it to trigger the following effects. This is a tricky question for us. We ponder through it for some time. And later professor Inmi told us that the box had better be more relevant to what’s happening on the screen. A thought suddenly hit me: make the box a physical representation of the forest. Since our box also have a hole on top, I think of another way of interaction: instead of they wearing the suit and approach, the user could put elements into the box and see the corresponding elements. This completely changed our way of interaction of running towards the box.Our sensors are now reduced to only the color sensor. 

CONCLUSIONS:

I think our project, though deviating much from our initial plan, realizes the VR effect in some way. Through interaction with the physical forest, they’ll be able to see effects on the screen, which serves as a connection between virtual and real world. However, I think the interaction is not very engaging and a little bit confusing. From the feedback we get to know that the user find the throwing act confusing as they feel like they are compelled to throw and then receive an educational video. It’s not out of their intuition and therefore not engaging.  The ideal version in my mind goes like this: the user is put inside an immersive “forest” that has tangible existence, where they are encouraged to interact with the forest in any way they can imagine. For example, when they step on the grass,  the grass may generate some sounds to inform the user about their existence. Or when they are trying to approach a tree and touch it softly, the tree will slightly vibrate and generate a welcoming sound, but when the user tries to do too much like they are touching the tree in an less respectful and aggressive way the tree would be unhappy. In this way the user will realize that the nature also has their own feelings and are equal beings like us that need to be treated carefully. 

Our physical forest:
Recitation 10 Workshops by Barry Wang

Recitation 10 Workshops

In this week’s recitation, I attended two workshops, which are map() function workshop and OOP workshop

For the map() function, it is pretty straightforward.

map(Variable name, lower bound of domain, upper bound of domain, lower bound of codomain, upper bound of codomain), which accept a variable name and 4 float data as range.

For the OOP part, a definition of class starts with

class (class name){

}

Then we define local variables within the class, and write an initialize funtion within the class, whose name is same as the class itself. It goes like:

class (test){

float x = 0;

float y = 0;

test(parameters){

    ……        

}

}

When creating a new instance of class, we use 

test instance = new test(parameters);

In my final project, I wrote a class of bullets in my game since all the bullets are similar objects and can be put together.

class Balls {
  float x_pos;
  float y_pos;
  float vy = 10;
  PImage bullet;
  Balls (int n,int m,int p,float x,float y){
	x_pos = (x-50*width/height) + ((m+1)*100*width/height)/(n+1);
    y_pos = y;
	switch (n){
		case 1:
			switch(p){
			case 1:
			bullet = loadImage("bullet1.png");
			break;
			case 2:
			bullet = loadImage("bullet3.png");
			break;
			}
			break;
		case 2:
			switch(p){
			case 1:
			bullet = loadImage("bullet2.png");
			break;
			case 2:
			bullet = loadImage("bullet4.png");
			break;
			}
			break;
		case 3:
			switch(p){
			case 1:
			bullet = loadImage("bullet2.png");
			break;
			case 2:
			bullet = loadImage("bullet4.png");
			break;
			};			
		default:
			bullet = loadImage("bullet4.png");
			break;			
	}
  }
  void update(){
    //fill(255);
    //ellipse(x_pos,y_pos,8*width/1000,8*width/1000);	
	image(bullet,x_pos,y_pos,25*width/1000,25*width/1000);
    y_pos -= vy * 0.9;
  }
}
        

Recitation 10 media manipulation workshop (Katie)

In this recitation, I chose to attend the media manipulation workshop.  The thing I want to work out in this workshop is how to switch scenes. For example, to switch from the webcam to the video. I want to add a keypress function to achieve but the problem is that the scene only changes when I press the key. After I release the key, it turns back to the webcam. To solve this problem, I add a boolean to trigger the video.

Recitation 10–Vivien Hao

For this recitation, I chose to do the media one. I have a lot of videos from different concerts. I have chosen one video and then insert it in this code. I want to use the videos that I have taken in the past. And by using potentiometer, I could control the speed of the video. The following codes are for Arduino and Processing. 

Arduino:

// IMA NYU Shanghai
// Interaction Lab
// For sending multiple values from Arduino to Processing
void setup() {
Serial.begin(9600);
}

void loop() {
int sensor1 = analogRead(A0);
Serial.print(sensor1);
Serial.println();
delay(100);
}

Processing:

import processing.video.*;
Movie myMovie;
import processing.serial.*;
Serial myPort;
int valueFromArduino;

void setup() {
  size(400, 400);
  myMovie = new Movie(this, "ljj.mp4");
  myMovie.play();
   printArray(Serial.list());
  // this prints out the list of all available serial ports on your computer.

  myPort = new Serial(this, Serial.list()[ 2 ], 9600);
  //define the state of the video
}
void draw() {
  while ( myPort.available() > 0) {
    valueFromArduino = myPort.read();
  }
  println(valueFromArduino);
  float x = map(valueFromArduino,0,1023,0,93);
  if (myMovie.available()) {
    //read my file when it can be read
    myMovie.read();
    //read the current frame of the video
  }
  //draw the frame
  if (mousePressed){
   if (mouseX<width/2){
     myMovie.jump(myMovie.time()-x);
     myMovie.read();
   }else{
     myMovie.jump(myMovie.time()+x);
     myMovie.read();
   }
  }
  image(myMovie, 0, 0);
}

Recitation 10: Serial Communication by Isabel Brack

Overview:

In this recitation we went to a workshop on mapping and then using serial communication to connect Arduino with Processing. The serial communication workshop leader had no major requirements for our recitation other performing serial communication, while using a mapping function. So following the instructor’s lead I mapped a potentiometer to the Y coordinate of a moving ellipse and the X coordinate was mouse X. Also, I used a button serial communication to change the color of the ellipse. I then used this serial communication in my final project code like the instructor suggested using buttons to switch the image faces.

This recitation mainly follows exactly what our instructor was doing. First we connected the circuit with the potentiometer and the button. Next we looked at the serial communication code for A to P and altered it to use one digital sensor and one analog. Finally we altered the processing code to map the potentiometer and to use a bullion to control the color of the ellipse which was most helpful as we want to use a button to control Processing in our final project.

Code for moving ellipse:

// IMA NYU Shanghai
// Interaction Lab
// For receiving multiple values from Arduino to Processing

/*
 * Based on the readStringUntil() example by Tom Igoe
 * https://processing.org/reference/libraries/serial/Serial_readStringUntil_.html
 */

import processing.serial.*;

String myString = null;
Serial myPort;


int NUM_OF_VALUES = 2;   /** YOU MUST CHANGE THIS ACCORDING TO YOUR PROJECT **/
int[] sensorValues;      /** this array stores values from Arduino **/


void setup() {
  size(500, 500);
  background(0);
  setupSerial();
}


void draw() {
  updateSerial();
  printArray(sensorValues);
   background(0);
  float posx= map (sensorValues[0],0,1023,0,255);
   ellipse(posx,mouseY,50,50);
   if (sensorValues[1]==1){
     fill(random(255));
   }

  // use the values like this!
  // sensorValues[0] 

  // add your code

  //
}


void setupSerial() {
  printArray(Serial.list());
  myPort = new Serial(this, Serial.list()[ 1 ], 9600);
  // WARNING!
  // You will definitely get an error here.
  // Change the PORT_INDEX to 0 and try running it again.
  // And then, check the list of the ports,
  // find the port "/dev/cu.usbmodem----" or "/dev/tty.usbmodem----" 
  // and replace PORT_INDEX above with the index number of the port.

  myPort.clear();
  // Throw out the first reading,
  // in case we started reading in the middle of a string from the sender.
  myString = myPort.readStringUntil( 10 );  // 10 = '\n'  Linefeed in ASCII
  myString = null;

  sensorValues = new int[NUM_OF_VALUES];
}


void updateSerial() {
  while (myPort.available() > 0) {
    myString = myPort.readStringUntil( 10 ); // 10 = '\n'  Linefeed in ASCII
    if (myString != null) {
      String[] serialInArray = split(trim(myString), ",");
      if (serialInArray.length == NUM_OF_VALUES) {
        for (int i=0; i<serialInArray.length; i++) {
          sensorValues[i] = int(serialInArray[i]);
        }
      }
    }
  }
}

Code for Final:

This is a work in progress code for the final project.

Arduino:

// IMA NYU Shanghai
// Interaction Lab
// For sending multiple values from Arduino to Processing

void setup() {
Serial.begin(9600);
pinMode(9,INPUT);
}

void loop() {
int sensor1 = digitalRead(9);
int sensor2 = digitalRead(8);
int sensor3 = digitalRead(10);
int sensor4 = digitalRead(6);
int sensor5 = digitalRead(7);

// keep this format
Serial.print(sensor1);
Serial.print(“,”); // put comma between sensor values
Serial.print(sensor2);
Serial.print(“,”);
Serial.print(sensor3);
Serial.print(“,”);
Serial.print(sensor4);
Serial.print(“,”);
Serial.print(sensor5);
Serial.println(); // add linefeed after sending the last sensor value

// too fast communication might cause some latency in Processing
// this delay resolves the issue.
delay(100);
}

Processing:

// IMA NYU Shanghai
// Interaction Lab
// For receiving multiple values from Arduino to Processing

/*
 * Based on the readStringUntil() example by Tom Igoe
 * https://processing.org/reference/libraries/serial/Serial_readStringUntil_.html
 */

import processing.serial.*;

String myString = null;
Serial myPort;


int NUM_OF_VALUES = 5;   /** YOU MUST CHANGE THIS ACCORDING TO YOUR PROJECT **/
int[] sensorValues;      /** this array stores values from Arduino **/

int maxImages = 2; // Total # of images
int imageIndex = 0; // Initial image to be displayed

 
// Declaring three arrays of images.
PImage[] a = new PImage[maxImages]; 
PImage[] b = new PImage[maxImages]; 
PImage[] c = new PImage[maxImages]; 
void setup() {

  setupSerial();
   size(240,150);
 
  // Puts  images into eacu array
  // add all images to data folder
  for (int i = 0; i < a.length; i ++ ) {
    a[i] = loadImage( "eyes" + i + ".jpeg" ); 
  }
  for (int i = 0; i < b.length; i ++ ) {
    b[i] = loadImage( "Unknown-15.jpeg"); 
  }
  for (int i = 0; i < c.length; i ++ ) {
    c[i] = loadImage( "Unknown-14.jpeg" ); 
  }

}


void draw() {
  updateSerial();
  printArray(sensorValues);
image(a[imageIndex],0,0);
image(b[imageIndex],0,height/3*1);
image(c[imageIndex],0,height/3*2);


imageIndex = constrain (imageIndex, 0,0);
imageIndex = constrain (imageIndex, 0, height/3*1);
imageIndex = constrain (imageIndex, 0, height/3*2);  

  // use the values like this!
  // sensorValues[0] 

  // add your code
if (sensorValues[0] == 1 || sensorValues[1]== 1 || sensorValues[2] ==1|| sensorValues[3] ==1|| sensorValues[4] ==1){
 //imageIndex += 1;
  imageIndex = int(random(a.length));
  imageIndex = int(random(b.length));
  imageIndex = int(random(c.length));
  sensorValues[0] = 0;
 sensorValues[1]= 0;
 sensorValues[2] =0; 
 sensorValues[3] = 0;
 sensorValues[4] = 0;
}


  // use the values like this!
  // sensorValues[0] 

  // add your code

  //
}


void setupSerial() {
  printArray(Serial.list());
  myPort = new Serial(this, Serial.list()[ 1 ], 9600);
  // WARNING!
  // You will definitely get an error here.
  // Change the PORT_INDEX to 0 and try running it again.
  // And then, check the list of the ports,
  // find the port "/dev/cu.usbmodem----" or "/dev/tty.usbmodem----" 
  // and replace PORT_INDEX above with the index number of the port.

  myPort.clear();
  // Throw out the first reading,
  // in case we started reading in the middle of a string from the sender.
  myString = myPort.readStringUntil( 10 );  // 10 = '\n'  Linefeed in ASCII
  myString = null;

  sensorValues = new int[NUM_OF_VALUES];
}


void updateSerial() {
  while (myPort.available() > 0) {
    myString = myPort.readStringUntil( 10 ); // 10 = '\n'  Linefeed in ASCII
    if (myString != null) {
      String[] serialInArray = split(trim(myString), ",");
      if (serialInArray.length == NUM_OF_VALUES) {
        for (int i=0; i<serialInArray.length; i++) {
          sensorValues[i] = int(serialInArray[i]);
        }
      }
    }
  }
}