Recitation 5: Processing Basics by Tya Wang (rw2399)

Then, discuss what you wanted to draw in Processing and your method of achieving that goal. Consider how your final creation is linked to the motif, and in what ways it is similar and different. Do you think that drawing in Processing was a good means of realizing your design?
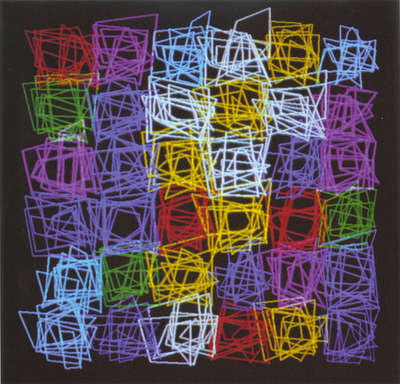
Dialog Between Emotion and Method, 1986.

This is a piece of artwork I saw online by Vera Molnar. I browsed through all the suggested website and I picked this one because it looks least like what I previously imagined a computer can draw. Every other digital artwork is symmetric and futuristic, just like the designs and patterns one would see in a fiction movie. For anyone who doesn’t have any knowledge of what computers are really capable of will expect such a pattern to be generated by a computer.  However, in this piece of work, through all the cluttered lines laying out in squares but these squares are aligned neatly at the center of the canvas, I can actually feel the emotions in such arrangement as if two feelings are tangling together. One explanation could be that messy lines represent one’s struggling while the aligned squares represent the choices he/she has to make. Therefore, I chose to recreate such a feeling through my own code.

To create such mixed feelings, I decided that I don’t want the lines in the squares to be pre-coded because it would ruin the strong twist the picture contained. They have to be randomized so that they can be in contrast with the well-organized squares. Since I did not know a lot about programming in java, I asked one of the learning assistants. However, she told me a random function can never be called outside of draw() and it has to be called inside another function. According to her, if I ever want to draw a static picture, I never am going to generate anything randomly. However, I don’t really believe so because I thought I was only about a number. So I continued searching and tried assigning the value Math.random() returns to a variable I defined and it worked! I told her that even in a static mode, a random function can be called only once. She realized I was right and called me resilient 🙂 After all, I had to find a way because this is all that matters in this art piece. 

Making sure that a line can be generated randomly, I first need to decide how I can color each square with different colors. After noticing that in a single square, all the lines are linked end-to-end, I came up with a program that iterates multiple times. First, the program is going to iterate over the six squares horizontally and vertically, so that all the squares in the pattern will have a go when it comes to generating lines in them. Finally, in every square,  it will loop 10 times to select a point and link the last point to it–of course, it will start with selecting 2 points

After coloring, it looked like this:

Now the colors are also randomly generated by the computer, and the whole work looks somewhat like Molnar’s original work. Here is code 1.1:

size(1400, 950);


background(200);

for(int i=400;i<=900;i = i + 100){  
  for (int k=175;k<=675;k = k + 100){
    int red = (int)(Math.random()*255);
    int gr = (int)(Math.random()*255);
    int bl = (int)(Math.random()*255);    
    stroke(red, gr, bl);
    strokeWeight(2);

    int a = (int)(Math.random()*150) + i - 25;
    int b = (int)(Math.random()*150) + k - 25;
    int c = (int)(Math.random()*150) + i - 25;
    int d = (int)(Math.random()*150) + k - 25;
    line(a, b, c, d);  
    for (int j=1;j<=10;j = j + 1){
    a = (int)(Math.random()*150) + i - 25;
    b = (int)(Math.random()*150) + k - 25;
    line(c, d, a, b);  
    c = (int)(Math.random()*150) + i - 25;
    d = (int)(Math.random()*150) + k - 25;
    line(a, b, c, d); 
    }}}

As a reader can see, although I let every square to occupy 100*100 pixels, I am allowing the points to pop out in the 150*150-pixel area around the area of the square because I want the lines of different squares to intersect a bit, or the whole thing would look segmented and boring.

However, when comparing the mine and the original piece, I can see that every square in her work is obviously more “angular” because even if the lines are messy, they are still following the pattern of going around the square in the same direction, while mine is just random lines going around everywhere. So I thought of a way to refine my code.

To make all the lines go in one direction to form a closed square, I figured I could let the computer choose random points on the four sides clockwise:

Following is code 2.0 that includes this feature:

size(1400, 950);


background(200);

for(int i=400;i<=900;i = i + 100){  
  for (int k=175;k<=675;k = k + 100){
    int red = (int)(Math.random()*255);
    int gr = (int)(Math.random()*255);
    int bl = (int)(Math.random()*255);    
    stroke(red, gr, bl);
    int a = (int)(Math.random()*150) + i - 25;
    int b = (int)(Math.random()*20) + k - 25;
    int c = (int)(Math.random()*20) + i + 105;
    int d = (int)(Math.random()*150) + k - 25;
    strokeWeight(2);
    line(a, b, c, d);    
    for (int j=1;j<=10;j = j + 1){
    a = (int)(Math.random()*150) + i - 25;
    b = (int)(Math.random()*20) + k + 105;
    line(c, d, a, b);
    c = (int)(Math.random()*20) + i - 25;
    d = (int)(Math.random()*150) + k - 25;
    line(a, b, c, d);
    a = (int)(Math.random()*150) + i - 25;
    b = (int)(Math.random()*20) + k - 25;
    line(c, d, a, b);    
    c = (int)(Math.random()*20) + i + 105;
    d = (int)(Math.random()*150) + k - 25;
    line(a, b, c, d);  


}}}

Now if you run the code, the lines will be organized in a shape that look very much like squares, although not every line will necessarily go clockwise.

However, after everything is properly organized, I feel the pattern is too dull. When I look at my “copycat”, I can’t feel the contrary two feelings in Molnar’s work. I think it is because that I overdid the organizing and the lines are not systematically random now. Therefore, I came up with an idea that adds some “rebels” in code 2.1:

size(1400, 950);


background(200);

for(int i=400;i<=900;i = i + 100){  
  for (int k=175;k<=675;k = k + 100){
    int red = (int)(Math.random()*255);
    int gr = (int)(Math.random()*255);
    int bl = (int)(Math.random()*255);    
    stroke(red, gr, bl);
    strokeWeight(2);
    int a = (int)(Math.random()*150) + i - 25;
    int b = (int)(Math.random()*20) + k - 25;
    int c = (int)(Math.random()*20) + i + 105;
    int d = (int)(Math.random()*150) + k - 25;
    line(a, b, c, d);    
    for (int j=1;j<=12;j = j + 1){
      if (j==5 || j==10){
      a = (int)(Math.random()*250) + i - 75;
      b = (int)(Math.random()*70) + k + 105;
      line(c, d, a, b);
      c = (int)(Math.random()*70) + i - 75;
      d = (int)(Math.random()*250) + k - 75;
      line(a, b, c, d);
      a = (int)(Math.random()*250) + i - 75;
      b = (int)(Math.random()*70) + k - 75;
      line(c, d, a, b);    
      c = (int)(Math.random()*70) + i + 105;
      d = (int)(Math.random()*250) + k - 75;
      line(a, b, c, d);  
      }else{
      a = (int)(Math.random()*150) + i - 25;
      b = (int)(Math.random()*20) + k + 105;
      line(c, d, a, b);
      c = (int)(Math.random()*20) + i - 25;
      d = (int)(Math.random()*150) + k - 25;
      line(a, b, c, d);
      a = (int)(Math.random()*150) + i - 25;
      b = (int)(Math.random()*20) + k - 25;
      line(c, d, a, b);    
      c = (int)(Math.random()*20) + i + 105;
      d = (int)(Math.random()*150) + k - 25;
      line(a, b, c, d);  


}}}}

When you run the code, it looks like this:

Now the squares can look a bit messier than before.

Now, instead of every point has to stay perfectly in the 20*150-pixel box to let the square look recognizable and angular, I am allowing the 5th and the 10th point to get loose a little bit so that the patterns will look a bit wilder. So it makes my final version of the code. I think the final work reflects the emotion I want to express. The messy lines represent the troubling thoughts and the squares imply that while one is experiencing some negative emotions, he/she is also trapped in the social framework or others’ opinions on him/her. One thing that makes this work particularly fun is that when you use the random function in Java, every time you press the run button you’ll get a different result.
TONY STAR – Yu Yan (Sonny) – Inmi Lee

  • Context and Significance

In the previous Group Project, the definition of “interaction” that my group came up with is one of my inspirations of this midterm project.  We came up with the idea that “interaction is a continuous conversation between two or more corresponding elements”. In order to realize this “continuous conversation”, the output of the design should change as soon as the input varies. Therefore, there should be multiple outputs corresponding to different inputs. The project that aligned with this definition during my research for Group Project is a ruler with transparent display to supplement physical drawing. In this project, the input is different physical drawings from the user, and the output is different dynamic / static feedbacks shown on the screen which based on the input. In addition, there are over one type of outputs such as playing ballgames, measuring length, and calculating area. It makes me realize that interaction should contain various kinds of outputs according to different inputs. For our project, what is significant is that we set up two inputs to control three different outputs. We used two ultrasonic sensors to detect the distance of controlling hands. One sensor controls the speed of the lights flashing and the melody that is playing, another one controls the brightness of surrounding lights. Our initial idea for the project originated from the Launchpad which many artists, DJs, and people who are interested in playing music would use it to make their own music. So we plan to make a musical instrument as well. Since in the Launchpad, there are multiple buttons that control different melody, drumbeat, and also the variation of lights on the board, we borrowed the idea of different buttons controlling different outputs. However, we designed our project in a different way. Instead of using multiple buttons, we changed the input to two ultrasonic sensors. We also simplified the output to change only one piece of melody and two kinds of lights. To accommodate the theme of our melody (Twinkle Twinkle Little Star), we designed a star-shape container for the instrument. Our intended users are children and people who enjoy making their own music. For children, this is a very interesting toy that can not only teach them how to sing a nursery rhyme but also cultivate their intelligence on how to control things. For music lovers, it gives them a chance to create their own music that doesn’t require any musical background. 

  • Conception and Design

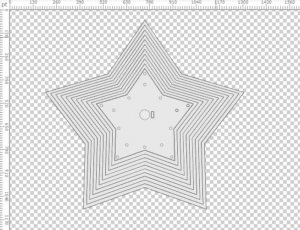
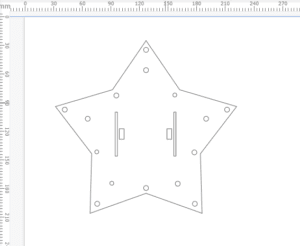
When we designed the product, we wanted to apply multiple inputs and outputs so that it would not be too boring. According to my definition of interaction, our product should constantly give feedbacks, especially different feedbacks, corresponding to the user’s different input. During the first phase of our designing, we tried to use buttons as the input. However, as buttons are too normal and tedious for users, we changed the input to a pressure sensor. But when we tested it, we found that the sensor is not sensitive enough and that we could not write the code to make the output change as soon as the input changes. So we changed the input again to ultrasonic sensors. This time the sensor is more sensitive, and we made a few adjustments to our code so that the device can work as we want. In terms of the output, we planned to add different kinds to the device. So we chose the output on both vision and hearing – LED lights and a buzzer. In this way, users can change two types of outputs when they change the input. For the appearance of the instrument, we used several plastic boards with laser-cut. When choosing the materials, what we were looking for is something light and stable enough, and doesn’t take too much time to assemble. At first, we thought about using 3D printer to print the container. However, considering the time limitation and the difficulty of modeling, we decided to use laser-cut to cut the shape and then use melt adhesive to stick each part together. Since plastic is light, stable, and easy to assemble, we think it’s the best material for our project.

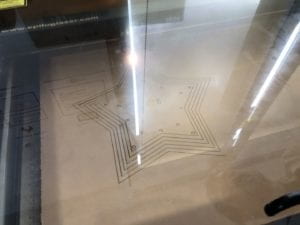
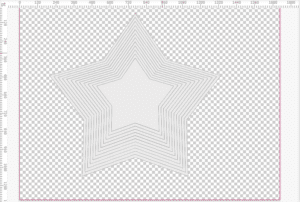
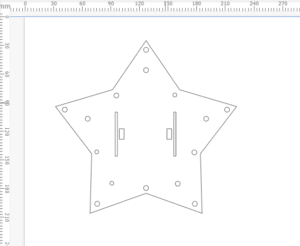
(This is our designing graph for the laser-cur.)

(When the laser-cut machine is cutting the plastic board.)

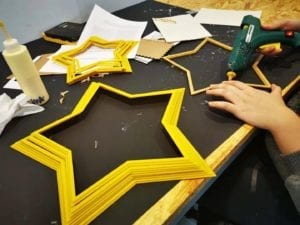
(We are using the melt adhesive to stick each part together.)

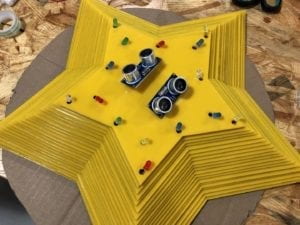
(The final look of our TONY STAR!!!)

  • Fabrication and Production

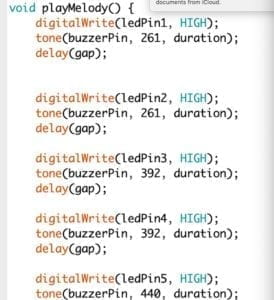
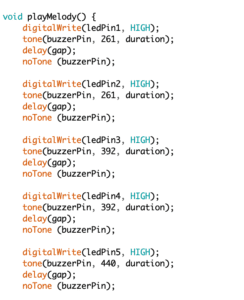
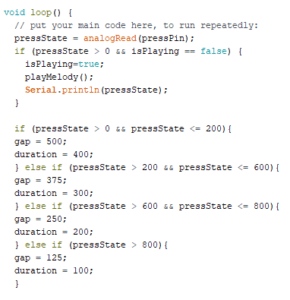
The hardest and the most significant part of our production process would be writing the code. At first, things went well as there was not a serious problem occurred. We drew a “void” function called “playMelody()” that stores all the notes and the sequence of lights into the code. We also added a few “if statements so that outputs can vary based on the value of users’ pressure. By changing the gap and the duration, we changed the speed of the melody. The harder users press, the faster the melody would get. However, at the night before the user testing session, as we were working on making the lights turn on one by one following each note of the melody, somehow we got stuck on the situation that all the lights turned on at the same time and we cannot find the flaws in our code. After we turned to our professors for help, they worked with us to see where the problem is. Finally, one of our professors found a solution for us: by adding a “boolean” statement in a new “if” statement, we created a condition-based function to control the circuit. Also, the key to fix our problem is to add a “noTone (buzzerPin)” at the end of each note. After we added these crucial parts into our code, the circuit worked as the way we want, eventually. 

By contrast, the process of making the appearance of the instrument has been much smoother. Since we’ve already had a basic idea for the appearance, the only thing we need to do is to turn our ideas into a physical form. Our idea is to make a star-shape box with lights and input devices on the top of its surface. We were attempting to use 3D printer to print this box, so we tried to model it on our computer. However, due to the complexity of the shape, we found it too hard to model and it could cost us too much time. After taking one of my friends’ advice, we decided to use laser-cut to build the box. We also received help from other fellows that are very useful and essential to our final version of the star-shape box. In this process, we learned a lot of skills that we don’t get the chance to practise during the class such as building a 3D model for 3D printer, drawing a cutting graph for laser-cut, and making the most use of Arduino’s functions. The process also taught me that I should ask for help as soon as I get stuck at some point. Searching help from other people is very useful and helpful to make the project progress continue.

During the user testing session, we received many useful feedbacks that can help us improve our project. We were still using the pressure sensor as the input device at that time. When other classmates came to interact with our project, they didn’t know exactly what to do to the device working. The interaction was supposed to be that users press once, leave their fingers off the sensor, and wait until the melody stop to begin another round. However, many users kept their fingers on the sensor until the melody stopped, and due to the lack of sensitivity of the sensor, they cannot change the speed of the melody. So we had to explain to them how our project works and how they should interact with it. Some classmates pointed out that our project is not obvious enough and they didn’t know what to do at first when they see it. They also mentioned that using the pressure sensor may not be the best input since it’s not sensitive enough. They suggested us to change another sensor and make the output change as soon as the input has changed. After the user testing session, we took their advice to change our input to ultrasonic sensors which are more sensitive than the pressure sensor. We also modified the code so that the output can change immediately when users change their input. This change helps us make the project more align with our definition of interaction. 

(This is the former sketch of the appearance when we still used the pressure sensor.)

(This is the final sketch after we changed the input to ultrasonic sensors.)

  • Conclusions

The goals of our project are to make an interactive device that is interesting and entertaining, and to help people explore their potential possibilities. Our definition of interaction is “a continuous conversation between multiple units, which involves variation of inputs and outputs”. The final product of our project aligned with our definition since users can change the output continuously when they interact with it. It meets our standard of having a “continuous conversation” between the device and the users. We expected to see audiences make sense of it as soon as they see it. During the final presentation session, many classmates interacted with our product before we made an explanation. However, it took them some time to figure out that one sensor controls the speed of flashing lights and the melody, another one controls the brightness of other lights. They viewed it as an interesting musical instrument that they can use to be a DJ to create their own music or remix. As our professor pointed out, users who are not from our class may not understand what the sensors are and it’s possible that they don’t know how to interact with it. This is a useful comment for us because we didn’t think about this aspect when we designed our project. If I had more time, I would probably print a sign on the box’s surface to make it more obvious to users. I also considered changing the input to a more obvious one that everyone can make sense of it without any background knowledge, and adding more harmonious melodies as well as drumbeats to the output. From the setbacks we met during the coding phase, the first thing I learned is to seek help promptly. The process of solving the problems also cultivate my patience and calmness to face all the challenges I meet. What I learned from my accomplishments is teamwork and cooperation. Without my partner, I cannot come up with so many good ideas and build such as amazing product by myself. The key element of our success is the teamwork with my partner. The experience of completing this project enlightens me that building something that aligns with your definition is never an easy thing, but with your own constant efforts and the help of others, you will accomplish your goal, eventually. The most important thing about the assignment is never the result, but the lessons you learn from the process.

  • References

Glassified – Ruler with transparent display to supplement physical drawing

https://www.youtube.com/channel/UCBLijWZ1jr_6VrIlhp3fFtw

Ian (You Xu) – Inmi – Midterm Reflection

Before we started our midterm project, we discussed the difference between “responsive” and “interactive” during the class. Therefore, I think my previous definition of “interaction” needs revising. Our group project – “doglar” – has a lot of functions that fulfill and respond to the dog’s needs. However, I reflect that it does not emphasize the continuous communication between the machine and the user or uses themselves – dog and the dog owner. Besides taking input, processing the information, and giving corresponding responses by the output that does something useful or entertaining, now I believe there is another key to making a project “interactive.” Therefore, every participant in the project equally stands to each other. An interactive project should also build a constant communication environment with the user or between users and learn new information from it. I think the concept of “interaction” to me is very relative to “Artificial Intelligence.”

Thinking from this point, my partner and I put our focus on making a continuous communication environment between users. An idea occurred to us that during Recitation 2 Assignment, we found it was fun and exciting to compete with another on who reaches the number 10 first by clicking buttons. However, we assess that it is not interactive enough since it lacks providing constant feedback for each other to continue the communication process when one user gives a response. Therefore, deriving from this basic framework, we planned to visualize the competing process by building a concrete user interface with fabrications and connect the two uses closely to each other throughout the playing process.

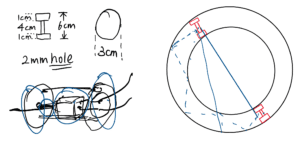
To achieve the goal of communication, we tried to align a few abstract variables to sensory information. Therefore, we designed a car race game. The place of the car in track represents Scores (times of clicking the button); the distance between the two cars and the melody represents the ranking; the sound and car crash position represents the result. With both sound and vision, the game is also accessible to certain disables. Keeping this goal in mind, we sketched a sample diagram. We initially built a straight track. Then we realize it would be better to design a circular track so that two users can face each other with constant focusing on the relative position of the two cars.

Abstract Blueprint

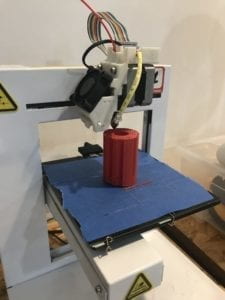
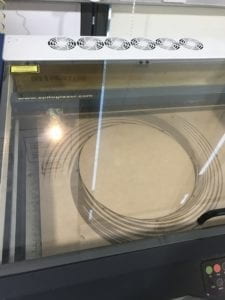
We referred to the sample circuit of the DC motor to drive the car. We laser cut the track, and 3D printed out the model of the car, where we insert the DC motor.

3D Print Car Laser Cut Track
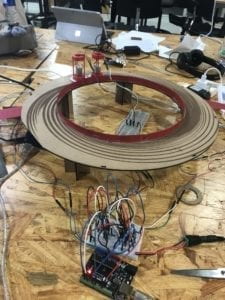
In the process of making the product, we encountered many obstacles, and we solved most of them accordingly. They include but not limited to: wired get messed with each other solved by setting up the track and adding another breadboard; cars do not go on the right direction solved by repositioning the car; cars do not go forward solved by stick crystal glue to the inner baffle; the surface of the wooden track is too smooth solved by adding a piece of cardboard to the car. During the user test session, since we had not had the sound working, we received a lot of helpful feedback that the user may felt a little lost after starting to play since they do not understand the ultimate ending of the game. This reflects that our consideration of the communication function is essential to the user’s experience of interacting with this project. We then get out of the unnecessary components, add sound to notify users about the process and made some necessary decorations: adding cardboard to support the button, setting the “start line” and so on so that the user may feel more friendly. Based on the final presentation, these improvements are successful since it arouses not only the users but also the audience’s intention to empathy on the game process.

Final Product Process
The goal of the project is to bring two users into communication by linking them together with an interactive game. I believe the process of improving our project reflects my new definition of “interaction” that addresses the constant communication between the two users. From visualize the ranking, making track circulate, and adding notification sound, users gradually feel the connection and tension between another player while playing the game. If it is only a game that tells me the final result, like the recitation assignment, the user may not feel the existence of another user in the process of the game. This is significant since the visualization and multisensory give constant feedbacks that link the two players together. Otherwise, if the user does not feel the sense of authentic communication, instead of calling it interactive, it could only be responsive.

Link to the Arduino code (Google Drive: NYU Access only): Changzhen devoted much to it!  

Performance video:

Recitation 5: Processing Basics-Lifan Yu

Recitation 5: Processing Basics

By Lifan Yu (ly1164)

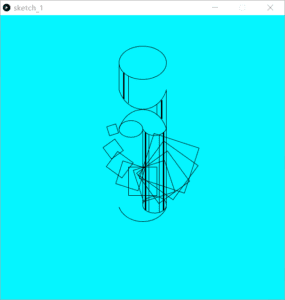
What I created:

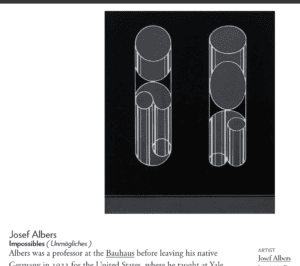
The artworks I referred to:

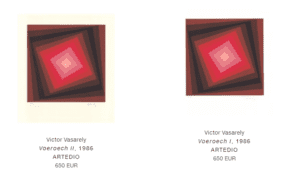
       I chose this image because it is a combination of lines, ellipses and curves. This combination is artistic and beautiful. Moreover, it includes multiple kinds of strokes. I am able to practice creating the codes of different kinds of strokes. When I looked at the artwork, I was fascinated by the shape that appears to be both three-dimensional and not at all three dimensional at the same time. When my eyes traced the vertical lines, I felt like they are leading from a Three-dimensional to a two-dimensional part (or the other way around). I can endlessly wonder about the existing or non-existing 3-D space created by these strokes.

       When I finished drawing the first image, I chose a second image. I chose this one because it has a certain kind of pattern that makes it appear simple and neat but also include the sense of infinity. The change in angle can loop endlessly. The size of the rectangles can decrease at a certain rate until it’s tiny and invisible.

       In my artwork I would like to convey the sense of endlessness I felt when looking at these example artworks. I hope to stretch a viewers’ thoughts toward an unlimited direction. It would be great if they can find a pattern that can be looped endlessly or something that keeps them wonder whether it’s like this or like that.

       The size and slant angle of rectangles in my creation has a clear pattern. My incomplete cylinder creates an incomplete space. This is linked to my motif.

       The difference is I didn’t fully displayed endlessness in my artwork. I only used patterns and strokes to imply.

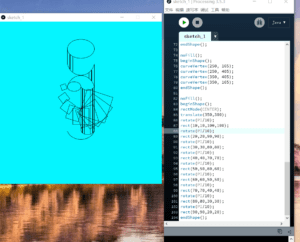
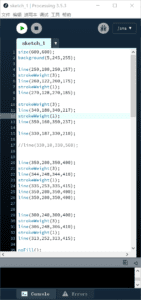
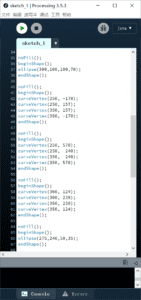
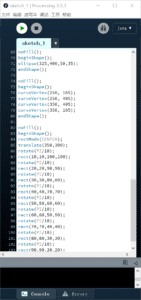
My code:

  I think that drawing in Processing was a good means of realizing my design. It’s neat, accurate and can be more easily made than artworks on paper. Endlessness can be easily created by lines of code that can run in loops nonstop.

Midterm Project “Plantalks”-Lifan Yu-Inmi Lee

Midterm Project Individual Reflection

“Plantalks”

By Lifan  Yu (ly1164)

Instructor: Inmi Lee


  1. CONTEXT AND SIGNIFICANCE :

What is our “Plantalks”

       We got our idea from my partner Xinran’s plants. She sometimes forgets to water her plants in her dorms. So we thought of creating a device that helps remind her to water her plants.

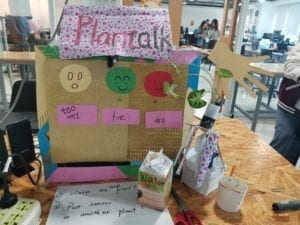
       Our “Plantalks” is a device that facilitates the communication between humans and plants. It reminds people of when to water plants and indicate how much water those plants need. It helps plants to express themselves by detecting the wetness of their soil and making movements and sounds to help them “express” themselves (when they are in need of watering, when the amount of water is enough and when the soil is too wet.

When people stand within a distance to the device, it will start working. When soil is too dry, the device will carry plants to move up and down as if it was anxiously waiting for someone to water it. Meanwhile, it will play a piece of audio saying “I’m so dry, I need help, I need water, help!” and blink a red light. When wetness is just fine, the device will play a song saying “It’s unbelievable, this is as good as it gets.” And blink a green light. When the soil is too wet, it will play a piece of audio saying “I’m drowning, no more water please!” and blink a yellow light. A piece of hand-shaped colored paper will start waving as if saying “No”.

This way, the device helps plants communicate effectively with people. People can know when to water the plant and when to stop watering. This device makes possible a long-term interaction possible.

How my group project inspired me

       My previous group project was Heal-o-matic 5000, a medical device that can diagnose people’s illnesses. People put their hands on a specially designed sensor screen and their faces are scanned for their ID. The device will then diagnose people’s illnesses by analyzing the data collected by the sensors and the diagnosis will be appeared on the screen. Meanwhile the relevant medicine will be dispensed.

       This device mainly responds to the environment. The interaction level is relatively low. The person isn’t continuously interacting with the device. The person only sends out information for a small interval of time before the machine responds and this round of communication ends.
       I wondered if I could build a device that can constantly communicate with the other “actor”. That is, it can detect the information of the other “actor” constantly. The other actor can also respond to the device’s movements, sounds etc. I also hope that this type of communication can last for a long time.

The project I have researched & what inspired us

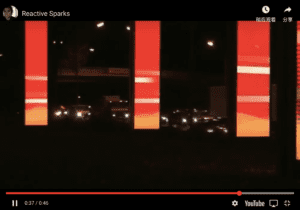
       Reactive Sparks by Markus Lerner. This is an installation of seven double-sided vertical screens that is currently in front of the OSRAM main office in Munich, Germany. When cars pass the road in front of the screens, light-colored lines will appear on the screen. Meanwhile, the orange-color waves on the screen rise when the numbers of passing cars increase.

       This device displays the movements, speed and numbers of the passing cars. Through the changing lights people can see from a distance the traffic conditions on the road. It collected massive analog information and converted them into a simplified, more visualized and artistic form.

       When I saw this project, I wondered if I could create something like that. But I didn’t immediately draw inspirations from this when designing the midterm project. Xinran Fan and I initially thought of creating a device that automatically waters plants according to the wetness of their soil. After consulting with instructors (instructors Inmi Lee and Marcela), we learned that as plants don’t talk, we can create a device that makes movements and sounds to help plants “express” itself so as to remind people of watering them.

       This project we researched is actually a reactive device. However, this type of reaction fits well in our new idea. Showing something that can’t be easily noticed or attached importance on in an exaggerated or artistic style is actually what we need in helping plants to “talk”.

What is unique and/or significant about our project

       Our project involves not only humans but also plants. It facilitate the communications between humans and plants. It presents the conditions of plants in an artistic and attractive way. People are not only interacting with the fun device itself because more importantly, the device made possible the interaction between people and their plants. Combining plants with and interactive device is the most unique aspect of our project.

special value to its targeted audience

       While it helps people remember watering their plants in order to keep the plants alive, it also enriches people’s experience of watering their plants-make this a fun thing.

  1. FABRICATION AND PRODUCTION:

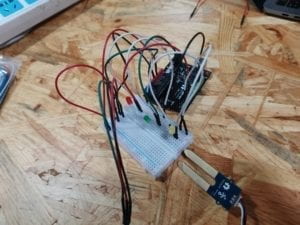
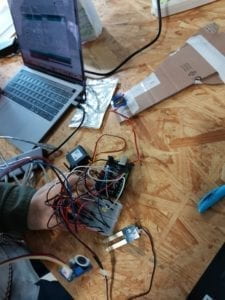
What our first circuit looked like: 

Significant steps

3D printing

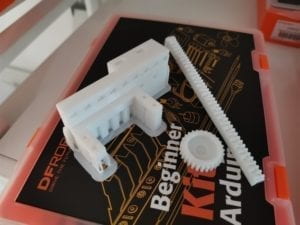
       Servo motors are only able to turn from 0° to 180°. We need the part of our device that carries plants to move up and down. To convert the form of motion we need a wheel gear attached to our servo motor and a part that can be moved up and down when attached to the wheel gear.

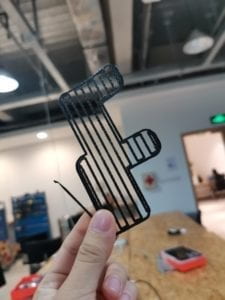
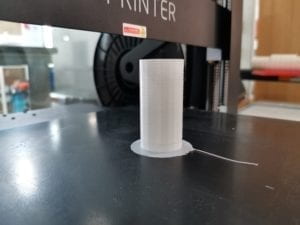
       The parts seem simple but we failed several times when printing. The first time the printer stopped generating heated plastic material:

The second time the printing process went wrong when printing the support parts. We finally succeeded the third time.

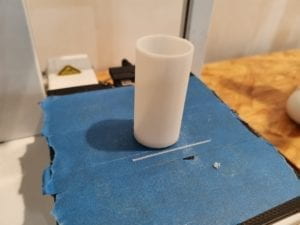
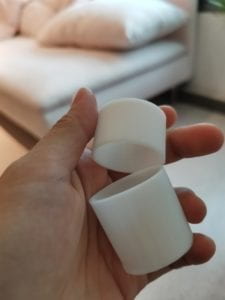
       The original flower pot was too heavy for our device to carry. My partner Xinran Fan made a 3D model of a smaller flower pot. The first flower pot we printed broke soon after we took it off the printer. It seems the layers of material don’t stick with each other quite well.

We printed again setting the refill to 99%. However, soon after the printing began, the model couldn’t stick to the platform and started to move. We used another printer instead. This time I added raft. Out model was finally printed successfully.

Coding

       We used If, Then, Else, Else if to blink the lights. However, the red light indicating “too dry” didn’t stop blinking when the green light turn on. After testing repeatedly we finally figured out that in our code, we should also tell the other lights to stop blinking when one light is shining.


       When adding the audio pieces, we found that a longer audio piece can’t be played until the end. It always stops playing after a few seconds. It took us a lot of effort to recall the function of “delay” and change the value of “delay”.

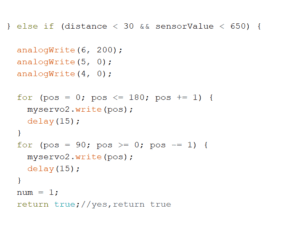
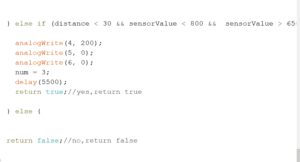
       We thought of including the “If Then Else” statements of the lighting and motioning part in another “If Then Else” structure based on distance statistics collected by the distance sensor. But instructors advised us to use && to combine two conditions. Such as “if (distance < 30 && sensorValue > 800)”.

       It was so hard to choose the intervals for “too dry”, “just fine” and “too wet”. We tested countless times to determine the suitable numbers. When the interval for “just fine” was too small, the device will go from shining a red light to shining a yellow light when we gradually pour water into the soil. After an arduous process we finally found the relatively suitable intervals.

Adding audio files

       We added three recorded audio files into our project. These audio files will be played while the LEDs blink. We learned to convert mp3. format to wav. format. (In the end, however, we still used mp3. format) We tried several types of speakers before finding ones that are easy to work with and figuring out the code with the help of instructors.


User testing

       At user testing we haven’t added the infrared distance sensor. An instructor advised us to add an infrared sensor so that when people are far away from the plant, the device will not be working. That is, the plants wouldn’t be calling for people “in vain”.

       We didn’t put descriptions near our LED lights to describe what the blinking of each light means. Several people suggested us to add attractive descriptions, so we added a sad face, a smiley face and a surprised face with descriptions “too dry”, “just fine” and “too much water”.

       These adaptions were effective because they helped users make sense of what exactly the plant is “conveying”.

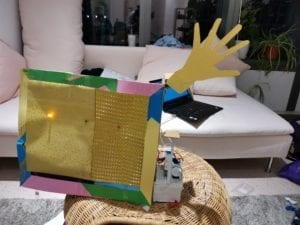
What our device looked like without description:

  1. CONCLUSIONS

My goal is creating an interactive device that facilitates the communication between humans and plants. This device is interacting with plants as well as people.

My definition of interaction: Interaction is the process in which two people, devices, or a people and a device communicating with one another. This type of communication should include receiving information, processing the received information and giving a feedback, response or creating a certain kind of action according to the analytical results made in the processing stage. This idea is shaped by Crawford’s words “interaction is a cyclic process in which two actors alternately listen, think, and speak” .

Also, to distinguish interaction from reaction, both of the two interacting units should go through these three processes mentioned. They are both actively engaged in a rather continuous communication. Two-way feedback is indispensable.

In my project, the device, combined with plants can constantly send out their own information to people. People will see the information and react by watering the plants. This kind of long-term, back and forth information exchanging align with my definition of interaction.

During presentation, my audience interacted with our device by stepping forward to the device, seeing its reactions and slowly pouring water into the plant on our device. The different states of the plant are shown in a visual and auditory way. My audiences also put the moisture sensor into other plants provided on our table and saw the different information different plants “wish to convey”.

Improvements we could make if we had more time

An instructor advised us to change the simple, removable moisture sensor into something more complexed and that constantly stays in the soil. If the plant is to be put inside a room, the infrared distance sensor can be put at some other place where people can definitely walk by because people may not always walk up to the plants.

What we’ve learned

We explored the possibilities of facilitating interaction between plants, device and people, which is quite an innovative thing.

We kept facing difficulties in coding and 3D printing. We learned to figure out solutions step by step. When things don’t work out, we just patiently restart. Reflecting on our failures and keep trying is a right approach to success.