KAMEHAMEHA – Zhao Yang(Joseph) – Inmi

  • CONTEXT AND SIGNIFICANCE

My previous Group Project was Heal-O-Metic 5000. It’s a machine that can give you the proper medicine by testing your body condition. But instead of being an interactive project, it’s more likely to be a responsive project. Since my definition of interaction is that it’s a cyclic process requiring at least two objects that have effects on each other, the group project seems hard to motivate the continuity of the interaction. Thus, I wanted to make a more interactive project for my midterm project. We decided to use the fans and the IR remote in our Arduino kit to make a remote control electric fan at first. However, we were impeded by physics because if the current in the circuit was too big, the IR remote couldn’t work properly. And our project seemed a little boring at that time because all the interaction parts were depending on the remote. And the user just needed to click the button on the remote.

Hence, we started to think of another idea. Professor gave us the suggestion that we should focus more on the user’s experience. So we searched for some interactive projects on the Internet to find some inspiration. I found that some of the projects are actually pretty simple, but their designs for user experience are interesting, which can attract the users to continuously use it. And I think it’s also a way to motivate people to interact with the project. Finally, we decided to focus on the user experience. As a result, even though our project seems a little simple, but the users can have different experiences depending on their interaction with our device instead of having the same output every time. I came up with this idea because I recalled a Japanese animation called Dragon Ball. Kamehameha is the way that the main character to use to attack others. I just imagined if I can experience it even once, that’ll be one of the unforgettable experiences that I’ve ever had. So we finally created a Kamehameha simulator. We still use two fans in our project. But this time, we were not limited by the form of a normal electronic fan. The whole project intended to be a project with entertaining purpose and interesting user experience. In my opinion, the targeted audience and user should be the fans of the animation Dragon Ball. They probably want to experience Kamehameha as well. Thus, our project can be a good chance for them. 

  • CONCEPTION AND DESIGN

First of all, we decided to make the speed of the fans as the output of our project. And we used a distance sensor to test the speed of how fast you can push your hands in front of the sensor. Then how fast the fans would rotate depends on the speed you push your hands. In the animation, Kamehameha is a very certain action. But we cannot ask the users to act as exactly the same as the character does in the animation.  Besides, we don’t have a machine or method to test whether your move is standard or not. At the same time, if we asked the users to do the same move every time, it won’t be user-friendly for those who never watch this animation. Thus, we decided to use a distance sensor. We first set a fixed time which is 1.3 seconds. And the sensor would test the distance once at the beginning of 1.3 seconds and test again at the end. Since the sensor could get the distance difference during 1.3 seconds, then we can calculate the speed of your hands and map it to the speed of the fans. And the device would work as long as it can test a distance difference. Thus, no matter what kind of move you pose, you can experience this device. In this sense, the device is not limited by the certain move of Kamehameha. Moreover, if we only had two fans to show the output, it won’t be intuitive. Thus, I decided to put a tower of paper cup in front of two fans. In this way, if you can push your hands fast enough, the fans would blow down the tower. Otherwise, this tower would only move a little but not be blown down. After adding the tower of the paper cup, the whole project became more interesting as well. 

In terms of the outlook of the device, we chose to use the cardboard to make the main body of the device, because there is enough space for us to put the Arduino board and the breadboard inside the cardboard box and it’s easy for us to cut it and adjust the shape. We cut two holes at the box to put the fans at first. But we found that if we put the fans without enough distance between the box, the wind would be too weak to blow down the tower of the paper cup. Therefore, we decided to use the 3D printer to print two pipelines to put the fans. In this case, we can place the wires inside the pipeline to make the outlook better and make the fans function properly. We could also laser cut one box. But we rejected it because if we didn’t measure the size of the fan correctly, it’s hard to adjust or cut by ourselves. 

  • FABRICATION AND PRODUCTION

The most significant step in our production process was to print two pipelines.  We met with a lot of difficulties when we print the pipelines. I first measured the size of the DC motor, such as the height, the width. And I used the Tinkercad to make the 3D model of the pipeline depending on the size of the motor. However, even though the size fitted the motor well on the computer, the real products were not suitable for the motor after we printed it because of the error. Then I had to make the model larger. At that time, in order to save some time, I printed endways. So the printer needed to print so many layers and it’s easy to mess up. Beyond what I expected, the printer got wrong before I was about to finish. The material was printed in the wrong position. So we must stop the printer and do it again.

This time we tried to print sideways with support. Although it took a longer time than printing endways, the printer functioned properly. In some sense, it also saved our time. 

During the user testing session, one feedback that we received most was that the instruction was not clear. The users felt confused when they first saw the device and didn’t know how to interact with it unless I told them what they could do. At that time, our instruction said that “Start button, 1,2,3…., Push!” So it gave the user a sense that they needed to push the button after 3 seconds but not push their hands. There are only a few times some people using the device correctly because they watched the animation before. Therefore, we tried to make clearer instructions after the user testing session. We write more instructions to inform the user about what they could do. Furthermore, we printed some pictures of Kamehameha and stuck them on the surface of the device to directly show the move. We even had a picture which is the images of every step of Kamehameha. However, when presenting our project, the instructions still seemed a little confusing. And the picture of the steps was not distinctive so that the user might overlook it. Maybe next time, we would make a board with instructions and put it beside the device to directly show the instructions instead of writing the instructions on the device. 

  • CONCLUSIONS

In conclusion, the goal of our project is to give the fans of the animation Dragon Ball a chance to experience Kamehameha. Basically, our goal is to make an entertaining project which is simple but interesting. Our project is pretty interesting and the user can have a good experience of using it. But the whole process of interacting with it is not cyclic. My definition of interaction is that it’s a cyclic way requiring two objects which have effects on each other. Our project requires one person to interact with it and give the person a direct output. It aligns that two objects have effects on each other. However, it doesn’t motivate people to interact with it continuously, which means that it doesn’t motivate the loop of interacting. A person may feel interested in our project when he first saw it. But after playing it several times, he would probably get bored with it. All the people who have interacted with our project give me a sense that they are interested in it. But they don’t give me the sense that they want to play it for one hour. It’s really different. People would get bored quickly. Thus, if I had more time, I would improve the interactive part more. For instance, I would make it a competing game that requires two players. And the output wouldn’t be as simple as what we have now. In this sense, it can not only involve more people to interact with it but also be more interesting so that people can interact with it for a long time. Moreover, I also learned from the setbacks that user experience is worth being taken into consideration when making a project. We should not only consider what can be interacted with but also consider how can others interact. From my perspective, only when we consider both of what the interactive parts are and how people would interact can we indeed make a good interactive project. 

Merry Christmas–Vivien Hao–Professor Inmi

Merry Christmas—Vivien Hao—Professor Inmi

Context and significance:

In my previous group project, we were mainly focused on solving an existing global issue. For this midterm project, my partner and I wanted to do something different. Our initial intention was to make the process of learning music to be more interesting to kids. Since both of us started learning the piano when we were young, so we understand the feelings to be bored by the black and white keyboard that lies in front of us. With that being said, it is obvious the targeted group of audiences for our project would be kids who have not started learning music but have the interest to do so. It can also be interesting for adults who do not have much musical knowledge. They might get a self-satisfied feeling when playing with the project. One of my friends came up to us and played the project for a couple of minute, and he told me that he felt like he was also a music while he was playing with it. He felt satisfied.

Before we started working on this project, we had done some research on how to make our project interactive. I went back to the projects that I have researched for the group research project. “The Evil Eye-Optical audio record by Indianen” was still something that stood out to me. In that project, the artists really required the participants to give inputs to the project constantly. For example, the participant was expected to put an audio record to the project in order to move on to the next step. Then it would ask the participant to do another task, etc. When I was introducing this project to some of my friends, they were questioning the purpose of this project. They were making a point by saying that music box is an object that has been existed for so long. So how is my project different from the existing music boxes in the market? I remember I have told them that our project does function like a music box, but it is not just an ordinary music box.  Our project requires more interaction between the project and the participant. The participant has to twist the potentiometer in order for the images on the motor to be moving along with the music. However, we did not have this part ready for the final presentation because our jump wires kept falling off. But it could have worked if the wires were working. For the future projects, if we could figure out a way to solve the wire issue, I think we would be able to build more.


Conception and design:

Throughout the entire process, we tried to think from the participants’ perspective and imagine how they would interact with this project. However, we did have some biases since we already have so much information about this project. We were not aware of some existing issues. For example, we were not aware of the issue that participants might move the plate in big circles and cannot figure out the music being played or might even be ended up breaking the project. And then she gave us the advice to make the plate into a larger piece that it would add difficulties for them to move the plate super quickly. We took that idea and made a bigger plate. And it did work out. Participants could not move the plate too quickly. We used 3D printing for our plates. For the first plate, we used wood. For the larger plate, we decided to use plastic material instead. We just thought that plastic might be stronger than wood.

Fabrication and production:

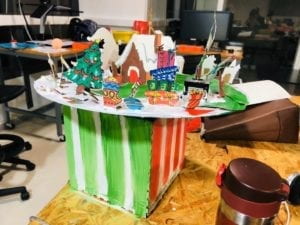
         From my perspective, I think the most significant step in my production process would be figuring out the codes and how to correctly build the breadboards. We were experiencing difficulties with the codes and the wires. I do not even know how many times that our project would not function in an expected way because we had a small issue in the codes, or one wire had been connected at the wrong spot. For future projects, I think I should be more thoughtful and careful when I am building a breadboard because sometimes one small error would prevent the project from functioning properly. In the User Testing Session, we did not have a box ready. There were no Christmas decorations on the table. All we had was the motors and the small plate that they could play with. I could tell that the participants were a bit confused about what they should do and how is the purpose of the project. We had realized this issue. After the session, we had decided to print the box immediately and create some Christmas decorations on the box that would give participants an obvious outcome to their inputs. After we added this to our project, I think the final presentation went better than the User Testing.

Conclusions:

         The major goal for our project was to encourage musical interests among children and adults who do not have much prior knowledge of music. The end results for the projects do align with our definition of interaction. The participant had to constantly interact with the project in order to have an outcome. The project itself would not give the participant many outcomes unless he chose to interact with it. However, one part of the project that hinders the definition of interaction. The stepper motor seemed to be a decoration. But in fact, it was also meant to require interaction. Like I have mentioned earlier, if we could solve the wire issue, then the project would fully meet our expectations of being interactive. If that issue was being solved, then the project would not give any outcomes to the participant if he chose not to interact with it. The audience, more or less, did interact with the project in expected ways. They were moving the plate and trying to figure out the music. Some of them started out at a fast pace ,and some started slower. They were adjusting their speed in order to figure out the music being played. If we had more time, I think we might add different scenes on the box and put different music with each scene. I think that would make the box more interesting. In addition, I would also like to make this box reusable. For example, I would like to make the scenes on the box to be replaceable. After this project, I think we definitely have learned some technical lessons. Moreover, I personally have also learned that for future projects, I should try to ask people for feedback and suggestions before the final decision. For this project, if we had asked the Professors and our friends for some advice, I think the project would be in a better format. Even though the project is far from being perfect, but I think it could be considered a small accomplishment for both of us. I personally think that for this project, we had done some good plannings. We were not procrastinating things to the last minute. I think overall, the project did meet up expectations, encouraging musical interests among kids and adults who do not have prior knowledge in music. But I think the project could be more interactive. And if we could master our technical skills, in the future we could really build something that could be used to deliver this idea better.

571419f9b354426c85180057515dcfcf

Food-focus Plate – Tya Wang – Inmi Lee

For the midterm project, I and my partner did not first come with up the device we wanted to make and then think about what use it may serve. Instead, we first met and discussed the problems we see in real life. Among all the other crazy ideas that solve trivial problems in life such as a machine that spares your hands and helps you take potato chips out from the Pringles tube when typing and all the other ideas of the same sort, we chose to focus on a social problem because it would make more difference. We both agreed that people nowadays care so much about their digital lives and images that they are starting to drift away from what really matters, which is their relationship and interaction with friends and relatives around them. I told my partner what I saw the other day in a restaurant. The young other is taking her little girls, who obviously just got off her ballet class because she is still in a yarn skirt and ballet shoes. They had a tableful of food, and the girl tried to talk to her mom for like a dozen times but every time she responded with a short sentence which consists of less than 10 words. The girl seemed so sad and I imagined her as a child whose parents are too busy for work on weekdays, and she is dumped to extra-curriculum and tutoring centers on weekends. No matter what the mother had to deal with on her phone, I just wished she could spend more time talking to her daughter, perhaps about how her ballet class has been. After telling this story, we decided we could work on the idea of shifting people’s focus from their phones to something else. We first gave the device a setting: in a restaurant having a meal with friends. Then, we came up with this idea of building a plate that takes away your food if you are looking at your phone. The best way for us to realize this idea is to let people put down their phones onto the device and then we detect whether the phone is there.

After deciding on the problem that we want to address, we started idealizing. We figured the plate should look like a lunchbox because we need to put in a whole set of electronic parts to make it movable to deliver food. There were three ideas that stood out and seemed feasible. The first is a drawer that automatically opens when detecting the phone is on it. The second one is a box with a flipping lid that serves food by opening up. And the third one is a car without a ceiling inside a “garage” that can move in and out. Following are three sketches of them. We chose to realize the third one because it is most relevant to the knowledge of rotating motors in both directions that we just learned in class.


The most significant step during the realization of our plan is making the sensor work. At first, I wanted a weight sensor because we can tell with it whether the weight on the box is in the range of the weight of a phone, or 150-220 grams. However, after we looked up online how a weight sensor works, we figured that for the weight sensor to work, we need to build a structure that nails the sensor in between two firm boards, which seemed too much for a lab. Therefore, we decided to opt into a more practical solution with a force-sensitive sensor. Although it is not as precise as a weight sensor, it is at least functional with the right amount of effort. However, although the sensor works by pressing, the value it returns does not change if we put a phone on it. I and my partner thought it is probably because the weight of the phone is not completely held by the sensor, making the pressure applied to it smaller than its detecting threshold. At last, we found that it works well when we attach a panel to a small sponge block and then fix the sponge on FSR to transfer all the force onto the sensor. Another hard step we took is making sure the wheel we laser cut could take the car out. Even though the four motors are all rotating crazily after we gave them 12V power, the car still won’t move. The wheels are spinning without taking the car forward. We tried changing everything from the structure of the circuit to the texture the car runs on but the car still remains where it was. Thanks to a study away senior who shares the same table with us that night (I don’t even know his name) and our instructor Inmi who kindly checked out on us at 7 o’clock in the evening, they thought the friction between the wheel and the table is probably too small to take the car forward. They gave us some precious suggestions. Such as putting some tape around the wheel and make the wheel thicker. Finally, we cut out more cardboard wheels and joined them together to make a four-times-thicker one. And we also explored better solutions for fixing motors onto the car to make sure the power they generated will be conducted entirely to take the car forward.

Since our project is more of a pragmatic one and less fun or artistic, we really want to present a user-centric, easy to use product. We spent much time discussing how we can make people realize the issue it is trying to solve and prompt them to try the device on seeing it. So, we rastered a phone on the detecting panel and wrote down a simple sentence to instruct them, “please place your phone here”. A lot of people walked through us and susceptibility put their phone on the box after reading the instruction. In this process, I think it is the pattern that drew their attention, and the instruction beside it told them exactly what to do. Without either of them, it would fail our intention of making it user-centric. In addition, people’s attitude indicated that they think their phone is something very private and cherished. Therefore, some will feel insecure if they are not well informed of what this device does and what it gets from their phone. In this case, assuring their security and privacy while timely informing them the idea of our product is critical, especially if we want to add more features such as phone charger that involves physically engaging their phones. There are also users suggesting that this design can be used in other settings such as a shoebox. Whenever the box detects someone is getting close, it opens. When that person walks away, it closes up. I think this is another great application of the device.

              Looking back to the problem we wanted to solve after we finished the whole device and made significant changes comparing to our original ideation, I think we tried to solve the problem in our own way. We received critiques saying that “forcing” people out of their phones is passive and it won’t encourage anything. I think this is a great angle of seeing things since we approached the design process from possible solutions to an existing problem, but she sees the problem from its root. I think this will be a great mindset for my future designs so that I won’t constrain myself in what is already problematic. Moreover, I realized in doing this project that there are tons of details even in the simplest electronic devices. We built a device that only does two things: get out and get in, but there are already hundreds of details to be tackled. The whole thing will break down even if one of them is working weirdly. But a designer can’t possibly know what will come up during the ideation stage, for example, we never thought that we couldn’t work with the weight sensor until we actually got one. One takeaway from developing this device is that when such problems occur, not only should I think about technical solutions but also open my eyes and explore other possibilities and alternatives because there is not a definite answer when developing a product. You always need to try one in order to tell whether it is compatible with the rest of the idea in realizing the original goal. Moreover, I think that interactive devices are not only about technology and edgy electronic components. Instead, it involves solving a problem creatively in the simplest way. And a designer should always think about what an audience/a user wants as well as the bigger problem he/she is trying to solve. While building the product, I can also reflect on the problem again to check whether my original view on it is comprehensive or not, just like this time I noticed that probably a better way to engage people with people around them is trying to facilitate a meaningful conversation instead of denying the existence of phones. Carrying out a solution to a problem gives us a deeper insight, and it is not only the users who benefit from a great device developed.

Consuming Life- Isabel Brack- Inmi

Midterm Project: Consuming Life by Isabel Brack and Christina Bowllan

Context and Significance

We first met to discuss or project concept the week before the testing day for recitation, that day we accumulated our own personal research and brainstormed project ideas. I presented the two main concepts we had discussed either an interactive game involving memory or whack-a-mole style games and in far contrast interactive art pieces mostly sourced from social art exhibits focusing around a comment on society like surveillance. I looked at probably 50+ examples of Arduino art to see different media mixing that artists used including looking at Arduino’s art page and many Arduino art Youtube videos like this. Although many projects were not the social statement we wanted to make, they gave us ideas on how to mix Arduino and art. The most inspirational art installation I found, personally, was a European installation of many plastic bags that would inflate and deflate based on a person’s movement, representing a creature’s movement and breath called “One Hundred and Eight.” This project had multifaceted interactions, including the physical interaction of the audience and the piece responding to each other’s movements, input, processing, and output. It also included an important interaction component for art pieces, an engagement with art where the audience engages with the art as a conceptual piece, interpreting its significance and meaning. I also took influence from my group project as we focused on a more practical, problem solving device, I wanted to expand my project’s conception to focus on an experience and interaction for the audience rather than just the object by itself. Our group project originally focused on the object itself and its components, sensors, and problem solving, rather than the larger goal of the experience our smart kitchen and alfa watch were creating. That project focused on a basic definition of interaction to only include the person and the machine/device. It had straight forward sensory inputs, processing, and then straight forward outputs of food/cooking the food. For me, art and a greater message seemed like a good way to create an overall experience that involved many aspects to the interaction. “Consuming  Life” as an art project involved the simple interaction of pressing a few buttons and observing their effects on the human system including lungs and heart, but the interaction also included an aspect of thinking and interpretation of the art, which I consider to be a vital piece of the interaction.  This is similar too the interactive art exhibit we visited this weekend. The audience needed to consider the physical interaction of the art piece and its greater meaning in the context of society and human life, which was part of the intended interaction and experience. With “Consuming Life,” the interaction initiated when the audience began thinking about how to interact with the piece, touching different elements, and the main interactions began when the audience touched the price tag and the “try me” button which represented the first steps of consumption. Our idea of interaction included interpreting and understanding of the entire piece even after the audience was done pressing each button. For the games we originally considered making, I found examples like a light memory game and wack-a-mole, personally after seeing these examples I preferred the art choice both because of the creativity and message that accompanies interactive art, and the fact that many of these games had been created many times and already had complete sample code. A personal goal of mine was to write the code basically from scratch to learn how to really use Arduino. So although throughout the project I looked at many sample codes to see different strategies and codes which would move DC motors and blink the lights in the fashion we wanted, most of the code I wrote without copying from any one source. The code was still influenced by many readings and other codes I read through regarding Bullion statements specifically, pullup resistors, and toggle. The circuit was also mostly based on the DC motor circuit we built in class with an H-bridge only adding a button and three red LEDS with their own button(see code at bottom of blog post).

Conception and Design
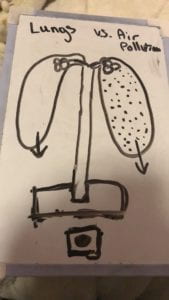
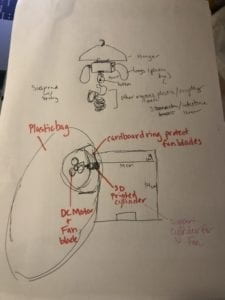
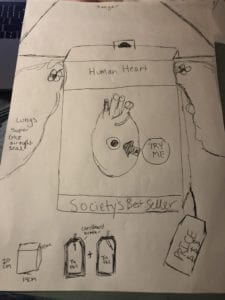
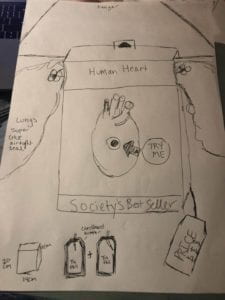
preliminary sketch of first idea. Air pollution lung model.sketch phase 2. entire organ system on hangerFinal sketch including price tag and try me buttons

           Sketch 1                                     Sketch 2                                      Sketch 3

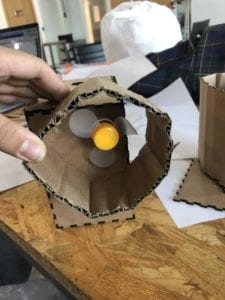
Our first idea for this art project was a lung model showing the effects of air pollution on the human lungs (sketch 1). Our original fully realized design for “Consuming Life” was an entire human organ system that used working lungs, a blinking heart, and light up organs like the stomach, all created from plastic waste(sketch 2). We were going to articulate our message of consumption taking over human life and action, through the waste products consumption created. We used 2D laser cutting for the box to hide the Arduino and breadboard and 3D printing to create the heart and some mechanical pieces like hooks to hold the box on the hanger, and two cylinders that fit into the holes of the 2D laser cut box to support the two DC motor fans, which controlled the lungs. The heart we sourced from an open source anatomical model and modified it to have a whole through it for the button and wiring, and the mechanical pieces we printed we designed ourselves with aid from Linda and Andy (Image 1). The 2D box we also designed ourselves. Besides the 2 and 3D materials we used recycling to make the lungs, price tag, and product box for the heart, which we chose as it fit our theme of consumption and the control it has on humans and the waste it creates. The box we used for the heart, actually used to be a tox product container, so we only made a few alterations to strengthen the structural integrity and cut holes for the wiring and “try me” button. We thought about many different buttons and sensors, but we ultimately choose the arcade buttons because we could integrate their use while connecting it to the meaning. We could articulate through the price tag button that the beginning of the consumption process, looking at the price tag case the human to rely and be fueled by consumption. We could not convey that same message with other sensors like ultrasonic or infrared, which would have been more interactive. Regarding our expected outcome of the audience interacting with our creation, the user testing session was extremely helpful to determine what was unclear about our how to us it, specifically making the buttons more understandable and connected to the concept, consumerism engulfing and consuming humans’ lives, controlling every aspect of their existence, demonstrated most fundamentally by the toy and consumption of it controlling the human’s lungs and heart. During the testing session, we observed and were told that they knew to press the button because they were familiar with buttons, not because their intuition was to touch the button. As a result, we altered our connection between the inputs and the rest of our art piece. We added a second button that was more intuitive made with cardboard, tinfoil, and two wires to create a price tag button that with minimal pressure will turn the lungs on. We also transformed the button inside the heart into a “try me” button like the ones often seen on kids toys to give the button purpose and reason. After user testing, I again tried a bunch of sensor out including a piezo disk, pressure pad, arcade button, and finally settled for our own price tag button (Video 1) because conceptually it fit our theme and intended interaction the best. 
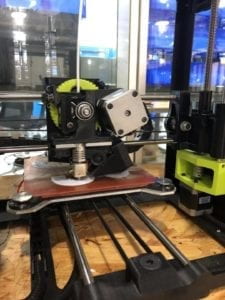
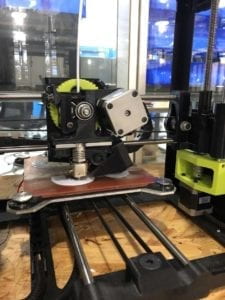
3D printing of the hooks and different parts to hold up the boxImage 1

Image 1: 3D printing of the different parts like hooks, washers, and cylinders to hold the fans in place and hang the box on the hanger.

paper prototype

Image 2

Image 2: The paper prototype that is the same detentions of our final 2D laser cut box.

Video 1: The construction and testing of the price tag button with sample code on a digital serial monitor.

Fabrication and Production

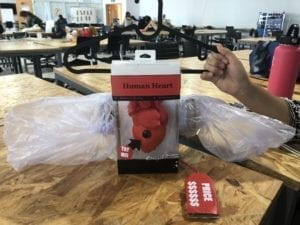
The design process, a paper prototype (Image 2), user testing prototype(video 2), and final art piece( video 3&4) all went through drastic changes from idea conception to the final product. Our first design was just a set of lungs that was controlled by a button to show the effect of air pollution on the human system, it acted more like a model than a piece of art. As we continued to create our prototype and discuss with the class our ideas, we learned that something hanging and eye level would be more effective in giving our project a human form, like the art exhibit we looked at commenting on surveillance, using belts to represent humans. Our instructor suggest using a hanger to demonstrate the human silhouette while keeping in as a more abstract art piece. Which we eventually suspended our project from a chair in the user testing and then from a string in the final presentation. This perspective gave it an art and human quality that was distinctive compared to sitting on a table which would hit it more of a model feel. We created a completely working project for the user testing, and from the participants we learned we needed to strengthen the message and purpose of our piece, specifically making our statement about consumerism more clear, and from a consultation with Marcela, she suggested we turn the heart into a physical product to represent consumerism. After the sessions, we took the entire project apart and created a new button, by making the price tag. We also turned the heart into a product by packaging it and adding a try me button and lights to eliminate the packaging. During the test session we got feedback mostly around the concept being confusing to understand as the lungs worked but much of the project was taped together and a lot of the mechanics of the box and hanging mechanism were exposed and confusing(Image 2). Based on this feedback we hid the mechanics and 2D laser cut box behind the toy heart box. We also eliminated the temporary adhesives like we initially planned to and glued the 2D box, the heart, and the toy heart box to each other to make the look more finalized, as you can see comparing image 2, the user tester version  to image 3, the final project. Our greatest setback was the morning of the user testing, while Christina and I set up the project to test it before we started, some of the wires in the box came undone without our knowledge (as the box covered all the arduino and wires). As a result of the loose wires, when we powered up the 12 V power source my Arduino board got fried. After noticing this we rewired the entire circuit to a new Arduino and checked the wires, with the help of Marcela. After the board was rewired and the connections were double checked, along with replacing the H-bridge, the project function how it was supposed to, but we had to disconnect the LEDs for the user testing because there was not enough time to rewire and check them before it began. The greatest changes in our project came after our class discussion of projects and after the user testing. Both times we altered the concept and the design of the project entirely. As a result our concept and project improved greatly from the design phase to the final project. While Christina focused on 3D printing and the physical construction of the lungs, I focused on the 2D laser cutting design, the code, and the circuit. And together we designed the piece conceptually and assembled the piece together. One other issue I ran into with the code for this project was I used two different bullion statements to control each button and its corresponding function, but in Arduino, the code is used sequentially so only one button could be pressed at a time, which could be confusing for the audience, in hindsight maybe two Arduino boards each controlling one function would have helped the interaction. For the code and circuit, although I wrote and made my own I took inspiration from DC motor circuit and code ,DC motors controlled by potentiometers, and two way DC motor  (our final code is pasted at the bottom of the blog post). Although in reality the circuit and code to inspiration from each combine into a new different code that included two bullion statements, input_pullup functions, and toggle which I learned in external research about how to use buttons to control different loads.

Video 2: The working prototype for the user testing session.

Video 3

Video 4

Video 3&4: The working Final Project breathing (3) and lights (4).
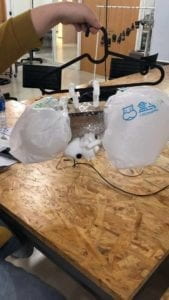
User testing version covered in tape

Image 2: User testing prototype

Final Project

Image 3: Final product “Consuming Life”

Conclusion

Goals

Our Arduino and circuit art piece, “Consuming Life” aligned with my abstract understanding of integration. The project had physical interaction between two actors, the audience was required to press a button as an input, processing and output occured on the form of breathing or red blinking lights, and the audience was also required to think about the experience, interpreting the art and meaning. The final aspect of our interaction is what I believe is the most significant. But, our project in some ways can lend itself more to a reactionary project, having the audience press some buttons and then observe the results rather than continue to physically interact with it. In reality, the audience had a difficult time thinking past the physical object and only after a few  students and instructors explained the concept did all the student understand the greater meaning and greater interaction. The interaction that took place between the project and the audience was similar to our expectations, they pressed the buttons and touched the lungs while they inflated to feel the breaths in and out. Some of the audience seemed to contemplate and engage with the project more than others as they closely observed the different details to the piece including our labels and the movements and connection between the price tag and the directions. If we had more time, I would have liked to have more aspects to the toy heart, like a heartbeat along with the red blinking to make the toy “try me” button more realistic. My main accomplishment and take away from this project was learning how to create my own code on Arduino based on learning the basic skills of bullion statements, blinking LEDs, and reversing motors. Also, I learned how to research many different codes, projects, and circuits, interpret them, and take inspiration to use on my own projects. In addition, I  think we fine tuned our creative process learning to value all of the resources the IMA program has in the fabrication lab and with the professors and fellows. I learned a lot about the process of these interactive projects, prototyping in paper and cardboard then creating a working version and trouble-shooting and debugging code, and the physical mechanics of the process. We especially had setbacks and learning moments while trying to get the lungs to breath noticeably. First we tried the fans in our arduino kits with plastic shopping bags, but the fans were not powerful enough and the bags were not as air tight and thick. Later, we settled on thing trash bags and super glue to ensure a tight fit, and thick plastic fans to increase the power of the fans. Once the lungs were air tight, I could better control the air movement and reverse the motors to create and inhale effect, making a more noticeable and realistic lung movement. In making this project there were two components that gave us, the creators, and the audience distinct value. First, discussing the social concern of consumption and the role consuming plays in every human’s life along with the control it exerts over our very existence. And, as creators of the project the district value I found was following a project through from the brainstorming and design, to testing, reworking, trouble shooting, and finalizing. As a process it was the definition of experiential learning, teaching yourself to trouble shoot multiple aspects like coding, circuits, and the physical mechanics of the project. I especially remember all the  trials and tribulations we faced to get the lungs air tight so that the motor could control both the exhale and inhale. Once we used the super glue and got the lungs to actually resemble human breath patterns, it felt like a real accomplishment, no matter how small a step it actually was, especially because we used trial and error for an hour or two to get our desired result. Between each design step we reworked our idea almost completely, to find the best final product we could based on our current skill level and time limit. From start to finish the project transformed resembling three conceptually and mechanically different designs each time. The process eventually lead us to our final result of “Consuming Life.”

Broader Conclusion

We created this project with a larger theme and goal in mind, not just the demonstration of lungs inhaling and exhaling and a toy turning on. Our goal was to make the audience think about humans’ relationship with consumption and plastic in their everyday life and possibly their own life. The initial consideration of a product’s price or function (the “try me”button) constitutes the first step of consumption, which in the modern era in inseparable from human life. As it is practically impossible to be self sufficient today, everyone is dependent on purchasing necessities, whether it be food and water or a toy anatomical heart. However, most of society does not think about their relationship with consumption and the environmental and societal effects it has let alone thinking of them self as a constant consumer. “Consuming Life” aims to demonstrate the inseparable bond between consumption and human life, suggesting a dependence on consumption to breathe and live. The greater meaning, experience, and interpretation, to me, is what I consider the “so what factor” to our project. Regarding the process of creating the process, this experience was helpful in improving my design process and execution, seeing the project through from research, brainstorming, sketching, designing, prototyping, building, testing, reworking, and finalizing.

Code:

int motor1pin = 6;
int motor2pin = 7;
// h bridge pin
int ButtonState = false;
int ButtonState2 = false;
int Button = 2;
int Button2= 4;
int red1= 8;
int red2= 9;
int red3= 10;
boolean toggle = true;
void setup() {

pinMode(motor1pin, OUTPUT);
pinMode (motor2pin, OUTPUT);
pinMode(red1, OUTPUT);
pinMode(red2, OUTPUT);
pinMode(red3, OUTPUT);

pinMode(Button, INPUT_PULLUP);
pinMode(Button2, INPUT_PULLUP);

}

void loop() {

int ButtonState = digitalRead(Button);
if (ButtonState == LOW)
{
if(toggle)
{
digitalWrite(motor1pin, HIGH); // motor turns on
digitalWrite(motor2pin, LOW);
delay (4000);
digitalWrite(motor1pin, LOW); // motor turns on
digitalWrite(motor2pin, LOW);
delay (100);
digitalWrite(motor1pin, LOW);
digitalWrite(motor2pin, HIGH);
delay (3000);
digitalWrite(motor1pin, HIGH);
digitalWrite(motor2pin, LOW);// motor and Redled turn off after 3 seconds after blinking finishes
delay (4000);
toggle = !toggle;
digitalWrite(motor1pin, LOW); // motor turns on
digitalWrite(motor2pin, LOW);
delay (100);
digitalWrite(motor1pin, LOW);
digitalWrite(motor2pin, HIGH);
delay (3000);
digitalWrite(motor1pin, HIGH);
digitalWrite(motor2pin, LOW);// motor and Redled turn off after 3 seconds after blinking finishes

delay (4000);
digitalWrite(motor1pin, LOW); // motor turns on
digitalWrite(motor2pin, LOW);
delay (3000);
digitalWrite(motor1pin, LOW);
digitalWrite(motor2pin, HIGH);
// motor and Redled turn off after 3 seconds after blinking finishes
delay (4000);
digitalWrite(motor1pin, LOW);
digitalWrite(motor2pin, LOW);
delay (13000);
}
else
{
digitalWrite(motor1pin, LOW);
digitalWrite(motor2pin, LOW);/// motor turns off
toggle = !toggle;
}

}
int ButtonState2 = digitalRead(Button2);
if (ButtonState2 == LOW)
{
if(toggle)
{
digitalWrite(red1, HIGH); // turn the LED on (HIGH is the voltage level)
digitalWrite(red2, HIGH);
digitalWrite(red3, HIGH);
delay(1000); // wait for a second
digitalWrite(red1, LOW); // turn the LED off by making the voltage LOW
digitalWrite(red2, LOW);
digitalWrite(red3, LOW);
delay(1000);
digitalWrite(red1, HIGH); // turn the LED on (HIGH is the voltage level)
digitalWrite(red2, HIGH);
digitalWrite(red3, HIGH);
delay(1000); // wait for a second
digitalWrite(red1, LOW); // turn the LED off by making the voltage LOW
digitalWrite(red2, LOW);
digitalWrite(red3, LOW);
delay(1000);
digitalWrite(red1, HIGH); // turn the LED on (HIGH is the voltage level)
digitalWrite(red2, HIGH);
digitalWrite(red3, HIGH);
delay(1000); // wait for a second
digitalWrite(red1, LOW); // turn the LED off by making the voltage LOW
digitalWrite(red2, LOW);
digitalWrite(red3, LOW);
delay(1000);
digitalWrite(red1, HIGH); // turn the LED on (HIGH is the voltage level)
digitalWrite(red2, HIGH);
digitalWrite(red3, HIGH);
delay(1000); // wait for a second
digitalWrite(red1, LOW); // turn the LED off by making the voltage LOW
digitalWrite(red2, LOW);
digitalWrite(red3, LOW);
toggle = !toggle;

}
else
{
digitalWrite(red1, LOW);
digitalWrite(red2, LOW);/// motor turns off
digitalWrite(red3, LOW);
toggle = !toggle;
}

}
}
CONSUMING LIFE- Christina Bowllan- Inmi Lee 

CONTEXT AND SIGNIFICANCE 

In the previous group project, we created a device that would help people learn how to dance by mimicking the teacher’s motion. The conclusion I had drawn about interaction from this project is, yes, interaction is on the surface “a cyclic process in which two actors listen, think and speak (Crawford 3)” , but within this class, we should aim to create meaningful interactions. Meaningful interactions to me means that the user is somehow learning from the interaction or is benefitting from it. One great example of this is a device called Nail O which allows you to move the computer screen up and down while scrolling along the device. This project fit all parts of my definition because not only is the user interacting with the device, but it serves a purpose which is to help people while cooking. Thus, when Izzy and I created our midterm project, the Nail O served as inspiration because I wanted our project to have an impactful effect as well. In addition, while we were researching, we looked at various whack-a-mole and memory games to get ideas of how to physically build our idea and incorporate an interactive button. 

Izzy and I for the midterm project created an interactive art piece that informed users of peoples’ dependence on consuming. We realized that a lot of our friends are obsessed with having the latest brand items and buying more than they need at stores, so we wanted to call our generation’s attention to this modern dilemma. Within the next sections, you will read about the challenges we faced and how our ideas evolved into the final project. 

CONCEPTION AND DESIGN:
While designing the project, we went  back and forth of the best way to do it. We realized from Tigoe’s reading that the interactive device should be self-explanatory, so we tried to model our idea after this. Firstly, we decided to build a realistic model of a human because we thought that the users looking at it would realize that this a phenomenon related to people. In order to build the model, we used the 3d printer to create a human heart which would have a hole for the button; This later on would be placed inside of a toy box to signal that our hearts are the “product” of consumption.

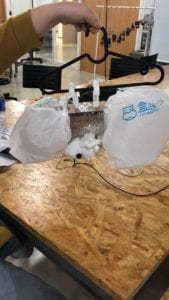
The next, and hardest part, was to craft the lungs. We used trash bags to represent lung sacs and then placed little fans inside of them in order inflate and deflate the lungs. Trash bags were a great conceptual choice because they signaled to the users that, at our core, we are becoming the consumer culture, but the material itself was really difficult to work with. We spent hours constructing a way for the fans to not touch the plastic bags when they would deflate and we ended up putting cardboard around the fans to avoid this problem.

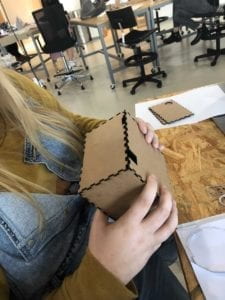
Then, we created a box using the laser cutter to hold the arduino board and the various jumper cables. The box material itself was great to work with, but we had to adjust the online sketch many times in order to make the “puzzle piece” ridges work.

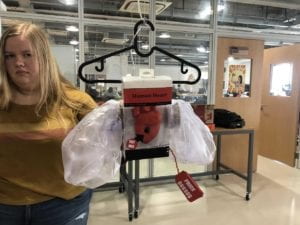
Finally, when we constructed the whole art piece, we hung the heart and lungs side by side from a hanger because the hanger looks like human shoulders and we hid the arduino box behind the other pieces. We also decided to make this a hanging art piece because we wanted the users to be at eye level with the problem. And, hanging from the box with the heart, we had a hidden button disguised in a price tag, so when the user would check the price, the lungs would start to inflate and deflate.   

(Pardon Izzy in this photo)

  • FABRICATION AND PRODUCTION:

In the previous section, that is a description of what the project physically looked like in the end but before user testing, our project had a different meaning and construction. Our first idea was to create a human body, but the trash bag lungs were supposed to represent environmental issues and how we use too much plastic. 

During user testing, however, we realized that the students and teachers did not understand this meaning because we had not decorated enough. We afterwards could have continued to strengthen the environmental idea, but we decided to create a model around consumption because we had some interesting conversations about this with the teachers. So, from this step, Izzy focused primarily on changing the code, and I focused mostly on the design. In terms of the code, we added and changed a few different things. First, we changed the direction of the fans to make it look like the lungs were inflating and deflating. Before user testing, the lungs would continuously blow up, but we heard from the users that it did not look realistic. We also added a button in the heart, and when people touched it the LED lights would turn on which provided a fun toy box effect. The biggest coding adjustment we made was we changed the sensor of the button connected to the lungs and disguised it in a price tag so the interaction had a greater meaning. The idea behind this interaction is, if the users care enough to touch the price tag to check the cost, then they are willing to buy it, and the act of wanting to buy everything consumes our life. Thus, the lungs would start to inflate showing we are embodying this lifestyle. In addition to this, in order to convey the same meaning, we put the heart inside of a box to show that we are being taken over by shopping culture. 

sketch phase 2. entire organ system on hanger

  • CONCLUSIONS:

My goal for this project was to create an interactive art piece that also possessed a greater meaning. Our final project in a lot of ways did align with my definition; We had two different types of buttons that users could interact with and it was self-explanatory how to use them. In terms of the greater meaning, we definitely had that, but the users did not understand this from the first usage. While people were interacting with it, the atmosphere was quiet which created the thought-provoking environment we wanted, but the users did not realize that the overall meaning was related to consumption. If we had more time, I think adding more body parts could help people reach the conclusion faster because they would realize that the meaning had something to do with humans. Also, maybe this would hint at our idea too much, but I think adding a poem about peoples’ obsession with consumption or something related to this topic might give a better sense of our overall meaning.

The biggest lesson I have taken away from this project is definitely patience– all great things come with time, right? While I was constructing the lungs, it took hours to make it so that the cardboard would not touch fans and then ultimately not touch the plastic bags. It was beyond frustrating at times because I would be so close to making it work, and then something would go wrong. Also, I learned from this project that accepting help and feedback is what makes the project better. I am so used to thinking that doing everything by myself is the best way to do it, but hearing everyones’ feedback during the user testing is how we learned how to fix our mistakes. 

Overall, my generation’s obsession with shopping and consuming is extremely  problematic. It seems like the more we shop and care about having the latest IPhones makes our conversations and friendships shallow because we are only concerned with superficial things. If we want to preserve authentic connections, people should be aware that when our mind and heart are consumed by the act of consumption, that is all we can handle. 

Arduino Code

int motor1pin = 6; 
int motor2pin = 7; 
// h bridge pin
int ButtonState = false;
int ButtonState2 = false;
int Button = 2;
int Button2= 4;
int red1= 8;
int red2= 9;
int red3= 10;
boolean toggle = true;
void setup() {
 
  pinMode(motor1pin, OUTPUT);
  pinMode (motor2pin, OUTPUT);
    pinMode(red1, OUTPUT);
  pinMode(red2, OUTPUT);
  pinMode(red3, OUTPUT);
 
  pinMode(Button, INPUT_PULLUP);
   pinMode(Button2, INPUT_PULLUP);
  
}
 
void loop() {
 
  int ButtonState = digitalRead(Button); 
  if (ButtonState == LOW)
  {
    if(toggle)
    { 
      digitalWrite(motor1pin, HIGH); // motor turns on
      digitalWrite(motor2pin, LOW);
       delay (4000);
      digitalWrite(motor1pin, LOW); // motor turns on
      digitalWrite(motor2pin, LOW);
      delay (100);
     digitalWrite(motor1pin, LOW);
      digitalWrite(motor2pin, HIGH);  
     delay (3000);
      digitalWrite(motor1pin, HIGH);
      digitalWrite(motor2pin, LOW);// motor and Redled turn off after 3 seconds after blinking finishes
     delay (4000);
      toggle = !toggle;
      digitalWrite(motor1pin, LOW); // motor turns on
      digitalWrite(motor2pin, LOW);
      delay (100);
     digitalWrite(motor1pin, LOW);
      digitalWrite(motor2pin, HIGH);  
      delay (3000);
      digitalWrite(motor1pin, HIGH);
      digitalWrite(motor2pin, LOW);// motor and Redled turn off after 3 seconds after blinking finishes
   
      delay (4000);
      digitalWrite(motor1pin, LOW); // motor turns on
      digitalWrite(motor2pin, LOW);
      delay (100);
     digitalWrite(motor1pin, LOW);
      digitalWrite(motor2pin, HIGH);  
      delay (3000);
      digitalWrite(motor1pin, HIGH);
      digitalWrite(motor2pin, LOW);// motor and Redled turn off after 3 seconds after blinking finishes
 
      delay (4000);
      digitalWrite(motor1pin, LOW); // motor turns on
      digitalWrite(motor2pin, LOW);
       delay (3000);
       digitalWrite(motor1pin, LOW); 
      digitalWrite(motor2pin, HIGH);
    // motor and Redled turn off after 3 seconds after blinking finishes
      delay (4000);
       digitalWrite(motor1pin, LOW);
      digitalWrite(motor2pin, LOW);
      delay (13000);
    }
    else
    {
      digitalWrite(motor1pin, LOW); 
      digitalWrite(motor2pin, LOW);/// motor turns off 
      toggle = !toggle;
    }
 
 
}
 int ButtonState2 = digitalRead(Button2); 
 if (ButtonState2 == LOW)
  {
    if(toggle)
    { 
      digitalWrite(red1, HIGH);   // turn the LED on (HIGH is the voltage level)
  digitalWrite(red2, HIGH); 
  digitalWrite(red3, HIGH); 
  delay(1000);                       // wait for a second
  digitalWrite(red1, LOW);    // turn the LED off by making the voltage LOW
  digitalWrite(red2, LOW);  
  digitalWrite(red3, LOW);  
  delay(1000);     
  digitalWrite(red1, HIGH);   // turn the LED on (HIGH is the voltage level)
  digitalWrite(red2, HIGH); 
  digitalWrite(red3, HIGH); 
  delay(1000);                       // wait for a second
  digitalWrite(red1, LOW);    // turn the LED off by making the voltage LOW
  digitalWrite(red2, LOW);  
  digitalWrite(red3, LOW);    
      toggle = !toggle;
  
    }
    else
    {
      digitalWrite(red1, LOW); 
      digitalWrite(red2, LOW);/// motor turns off
       digitalWrite(red3, LOW);  
      toggle = !toggle;
    }
 
 
}
}
P.S- Thanks to Andy, Rudy and Inmi for all of their help in the lab!!