Our Planet – You (Ian) Xu – Inmi Lee

CONCEPTION AND DESIGN:

  • Research on Social Awareness, Inclusiveness, and Interaction

To do this project, we researched the current issues of climate change. And human’s massive impact on it. We referred to the NASA website about the fact of climate change. They have already collected significant evidence to show that human is causing a severe climate change effect. Among them, carbon dioxide is a fundamental cause of it. It also addresses that de-desertification and forest are the ways to ease climate change for a while. Therefore, Vivien and I think that it is significant to address this issue in an interactive way, which could arouse the public’s awareness. As described in the documentation before, combining Vivien and my definition of “interaction” together, we believe that an interactive project with open inclusiveness and significance to the society is essential. The most significant research projects we referred to are bomb and teamLab.

  • Core Theme

Therefore, in this project, we want our users to get the information on the accelerating climate change pace. Guild them through a reflection on themselves: In what did I contribute the climate change? How possible could I pay an effort to eliminate it?

  • Game-like Art Project – ending without winning

Our project is a game-like art project that asks the user to plant trees. In return, they can compensate for their effect on climate change virtually. However, since it is a universal consensus that humans cannot stop causing climate change unless we stop all our lives and movements, meaning death, humans must keep on paying effort in the career of environmentalism. Once they stop, the climate situation will start to get worse again. To express this information to the uses and make them aware of it, we intentionally design the ending as a tragedy – explosion only, meaning that there’s no “winning” situation. Again, our project is NOT a general defined game but an interactive art project that engages the public in the conversation of preservation for climate change.

  • Collaborative instead of Competitive

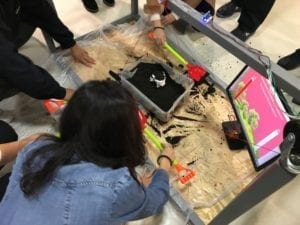
We humans or all the creatures in the globe are one entity. Facing climate change, we do not compete for resources within groups. Therefore, it is instead, a process that requires all humans’ collaborative efforts. So, in our project, we also make it collaborative instead of competitive. At most four users can shovel the dirt to plant the same tree together at the time to accelerate the growing speed of the tree, which results in a more positive effect to reduce the increasing carbon dioxide. As more users join in, the trees will grow faster; the planet will last for a longer time.

  • Materials

We initially intended to apply four masks to detect (or fakely detect) the users’ breath. Use four shovels with sensors to detect their movement. And apply the computer screen to show the virtual tree graphs to the users. Below is a rough sketch of them.
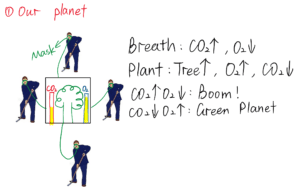
sketch for project

  • Abandon mask

However, after presenting our project to the class, we collected feedback about the concerns with the masks. Even though applying masks sounds reasonable for our project, it may be not making sense to users. Also, since multiple users will experience our project, it is complex and not environmentally friendly to change the mask every time. Wearing masks may also affect the users’ comfortable experience. Considering all these factors, we abandoned the use of masks and replaced it with a straightforward instruction on the screen that “human breath consume O2 and produce CO2.”

  • Authentic experience with dirt

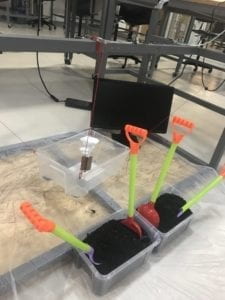
We tried to experience shovel with the tree growing animation. However, due to two reasons, we decide to have some solid materials to shovel instead of only ask the users to present the movement of shoveling. First, since the user’s behaviors and movements are not predictable, we could not think out of the way to use specific sensors to count the times a user shovel accurately. Second, it is very dull and stupid to shovel nothing. By applying dirt, we can detect the movement of the shovel by detecting the changing weight of soil; users will also have a more authentic experience of planting the tree.

  • GUI

To make the users have a sense of their progress by “planting trees,” we designed a GUI for users to keep track of everything. We apply multiple signals to alert users in the process of their interaction. Two bars regarding the level of oxygen and carbon dioxide, changing the background color, growing trees, simple texts, notification sound, and explosion animation. Each of these components is designed to orient the user into the project as soon as possible.

FABRICATION AND PRODUCTION:

  • Programming and Weight sensor

By referring to our course materials and online references, we did not meet with any unsolved programming issues. We applied OOP, functions, media, etc. into our program. This is the first version of our program.

To detect the movement of “planting trees,” we decided to use a weight sensor. However, when I first got it from the equipment office, I had no idea how it should work.
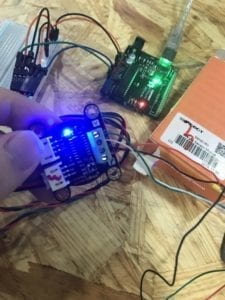
weight sensor

Then I looked up the official website of the producer about this sensor. It explains all the information about this sensor in detail. The only problem I met is that the sensor I got is broken. I successfully repaired it by myself. As instructed, it needs to work with a weight platform. The sketch is below.
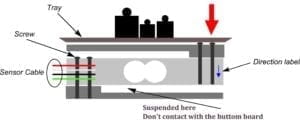
platform

However, the website that details the platform is no longer available. We first intended to design one by ourselves and 3D print it out. However, without detail information, it is too hard to design it within days. We then consulted the lab assistant and received the suggestion to hang this sensor in the air instead of putting it on the ground. Therefore, in the final presentation, we took advantage of the table to fix the sensor hanging on it.

  • User testing: user-friendly redesign

During the user testing session, we received much feedback regarding some problems with our project that makes it less friendly to the users. First, the program is not stable. Sometimes, when the box is just swinging in the air, the program will sense it as the user has put sand/dirt into the box. This misinformation may mislead the user to shovel sand out of the box instead of into the box. So, we changed some algorithm in the program to only sense larger-scale change of weight and only allowed the tree to grow a little each time regardless of how much weight is added to the box. Also, we planned to add a fake tree in the middle of the box to signal the user to put dirt into the big box. Second, the use did not get timely feedback once they shovel the sand into the box. We then add a notification sound to notify the user. Also, we mirrored our small computer screen to a bigger monitor and changed the size of some graphs in the GUI later in the presentation to make sure the user can keep track of their processes easily. Also, since we are putting the sand into different containers, some users may be misinformed by it since it looks like a competition. However, we intend to design it as a cooperating job, not a competition. So, we carefully relocate the position of the containers and shovels to make it at least look collaborative. Last but not least, some users also think it hard to build a logical connection with sand and planting trees. To avoid confusion, we changed sand to dirt so that the correlation between them should be straightforward enough. After this process, I also learned how significant it is to have the user test our project to collect their feedbacks to avoid my fixed mindset. Therefore, we can fix some design flaws to make it more accessible and friendly to users.

  • Fabrication

Our fabrication process includes drilling holes on the box, 3D printing a tree model, and build the whole project into the revenue in advance. Vivien devoted much to this process!
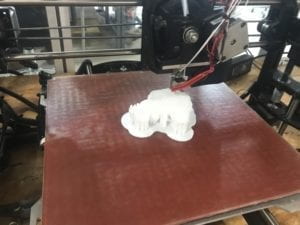
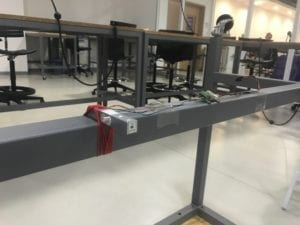
3d printsensor bondingrevenue setting

Final project presentation:

user interaction

CONCLUSIONS:

The most important goal of our project is to arouse the public’s awareness and reflection on a more significant issue of climate change. We want it to be an interactive project that addresses social problems; it is fun to interact with; it is inclusive to many users, both those directly interacting with it and others overserving it. These criteria also correspond to our understanding and definition of “interaction.” First, I think it is indeed a fun and inclusive experience for the users who interact with it. They are paying effort to shovel the dirt and get constant feedback from the program. For others who are observing the interaction, it is also fun to view the whole process, which will also leave an impressive impression on them. The only pity is that the layout of the containers, dirt, shovels, and the monitor may not be very perfect for making sure everyone has a comfortable place to view and move. And the users indeed interacted with our project in the way that we design in the last presentation. Regarding addressing social awareness, we have some successes and some failures. According to our discussion after the demonstration, they successfully get the basic information about the human’s severe impact on climate change issues and the possible actions humans can do to address it. However, we have a debate on the ending of the project. There is only one option of the ending: O2 drops to 0 and the planet explodes. Some argue that it gives out a negative message that whatever you do, it will fail in the end unless four users keep on shoveling without stop. We fully understand this pessimistic thinking pattern. However, regarding the real-word situation, we still think this reflects how severe the climate change issue is and it indeed requires humans’ continuous efforts on it or else it will cause ecological disasters. I believe this is an issue that is worth a full seminar time to discuss. We are open to any interpretation of the design of “no winning, always failure” since that is not a flaw, but part of our special design of the project. Regardless of this problem, we think there are some improvements we can make in the future according to some other feedbacks in the presentation. First, as we are running out of the dirt, we can make the box as an hourglass so that the soil could be recyclable to use. Second, we can redesign the layout of the project, use a larger projection, and have all the dirt directly on the ground if we have a bigger revenue so that all the users and observers will have a better experience. Third, if necessary, we can add a winning situation that could be hardly achieved (still need more discussion, as I state before). I also learned a lot from the process of designing and building this project both technically and theoretically. I gain many skills in programming, problem-solving, fabrication, crafting, etc. I learned how to make a project better fit for the audience by testing and hearing form their feedback. This experience also sheds my understanding of interaction deeper in its meaning that it could be so flexible that it involves many characteristics. By address the climate change issue, I also have a reflection of myself, of my understanding of the issue, and it engages me to think further and discover it.

Climate change is happening. I believe our project significantly addresses this issue in an innovative way of interaction. It is an art, meaning that the audience may have various understandings of their own. However, the presentation of the issue and their authentic experience interaction with our project makes our core theme impressive to them. Big or small, I believe we are making an impact.

Code: link to GitHub

Code: link to Google Drive

Works Cited for documentation:

“The Causes of Climate Change.” NASA. https://climate.nasa.gov/causes/

“Climate Change: How Do We Know?” NASA. https://climate.nasa.gov/evidence/

“Weight Sensor Module SKU SEN0160,” DFRobot, https://wiki.dfrobot.com/Weight_Sensor_Module_SKU_SEN0160

“Borderless World.” teamLab. https://borderless.team-lab.cn/shanghai/en/

Works Cited for programming:

KenStock. “Isolated Tree On White Background.” pngtree. https://pngtree.com/freepng/isolated-tree-on-white-background_3584976.html

NicoSTAR8. “Explosion Inlay Explode Fire.” pixaboy. https://pixabay.com/videos/explosion-inlay-explode-fire-16640/

“success sounds (18).” soundsnap. https://www.soundsnap.com/tags/success

“explosion.” storyblocks. https://www.audioblocks.com/stock-audio/strong-explosion-blast-rg0bzhnhuphk0wxs3l0.html
Final Project – Step 4: Final Blog Post – Lillie Yao

CREATIVE MOTION – LILLIE YAO – IMNI

 CONCEPTION AND DESIGN:

We wanted to create an interactive project where users would get to see the reflections of themselves through a light matrix, instead of seeing their reflections on something obvious like a camera or mirror. Since we wanted to make it very obvious what the users were doing, we decided to put the matrix (our output source) right in front of the camera (our input source). In the beginning we were just going to have them side by side but we realized that would take the attention off of the matrix since people tend to want to look at their reflection more than the light, no matter how obvious the light may be. 

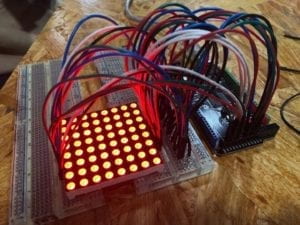
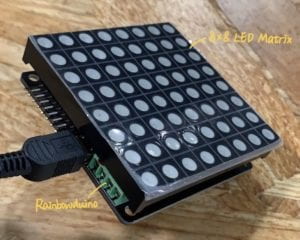
During our brainstorm period, we tried to research different light boards since we knew we wanted to have a surface of light displays instead of single LED lights. We also though that programming and using 64 or more LED lights would be very complicated. We ended up using the Rainbowduino and 8×8 LED Matrix Super Bright to create the light board as well as the Rainbowduino being able to be our Arduino/breadboard source. Since we researched a bunch of different light sources, the only one that was available to us was the Rainbowduino and LED matrix. I’m sure there would have been better options, especially because we hoped to have a bigger LED board.

FABRICATION AND PRODUCTION:

During user testing we got different feedback and suggestions from our classmates that they thought would make our project better. A lot of classmates wished that the display of the LED board was bigger so that we could make our interaction more of an experience rather than just a small board in front of their eyes. As an attempt to change that, we wanted to put together multiple LED boards to make a bigger screen. Soon after attempting that, we realized that you actually can’t put together multiple LED boards easily and make them work together. Each LED board actually operates separately from each other. As stated in our concept and design, we researched multiple different types of LED boards but a lot of the materials that were better suited for our project were not available to us in the short amount of time after user testing.

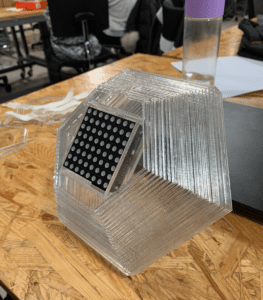
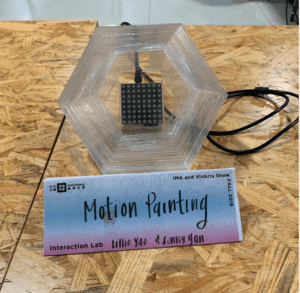
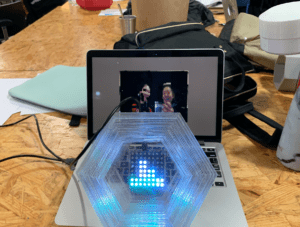
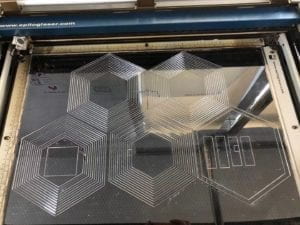
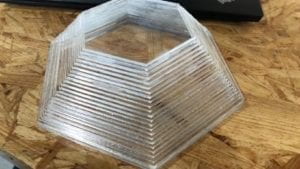
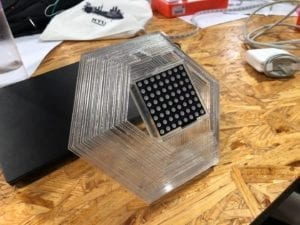
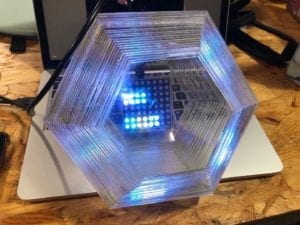
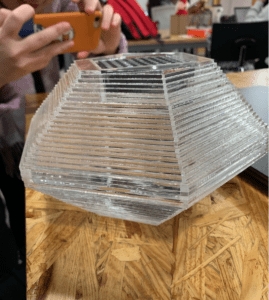
After realizing that we still had to use one LED Matrix board, we decided to make our fabrication product so that it would magnify the LED board. We decided to make a polygonal shape with the clear acrylic material where the LED would fit snug into a box on the end. We decided to go with the clear acrylic board for laser cutting is because we thought the opaque look would suit our design better than any other material. In my mind, I pictured that the LED lights would reflect off of different surfaces and it would appear more interesting if the product was see-through. We really didn’t think there would have been a better option because all of the other laser cutting materials were too dull and 3D printing wouldn’t have worked for a hollow design. After fabrication,  a fellow ( which I forgot his name…..) gave us the idea to actually put the matrix INSIDE our polygon so that the lights would reflect within our polygon. This truly changed our project because now, we were able to utilize our fabrication design in a different and better way than before.

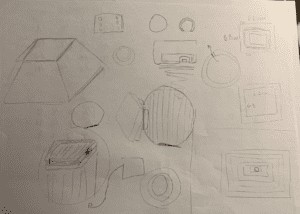
Sketching for fabrication:

Laser Printing:

Original fabrication:


Changed fabrication so the light would shine through:

Another suggestion during user testing that we had was that users wished the LED board was facing them instead of facing up because it was hard to see the board when it is not facing the user. Therefore, we decided to make the fabrication product a polygon so that it would be easier to angle the polygon to turn to the side and face the user.

Lastly, we had a great suggestion to implement sound into our project to make it more interesting rather than just seeing light, users would also be able to trigger different sounds while they move. After getting this feedback, we decided to code different sounds into our project that would trigger when you moved in different places. This really changed our project because we got to use different sounds and lights to create art, which in my opinion made our project more well rounded.

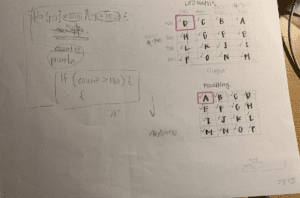
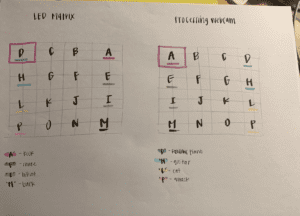
Sketches for LED board and pixels on camera:

After presenting our final project, we got some feedback saying that some of the sounds were too much and it would be better if we used all musical instruments instead of animal noises, snapshots, etc. Since we both really wanted to present our product at the IMA show, we decided to change the sounds to all instrument sounds before the show, that way it would be lighter on the ears and the users would be less confused. I think this helped our project a lot because many people really loved our project at the IMA show, even Chancellor Yu got to interact and see our project!

Chancellor Yu interacting with our project!!!!:

CONCLUSIONS:

The goal of my project was to create something that users could interact with but at the same time, have fun with. We wanted to create something that has a direct input/output as well as something users can play with for fun. As a creator, I felt like it was really cool to create something that people can interact with and have fun with at the same time.

My product result aligns with my original definition of interaction because it has both an input and an output but it will keep running whether or not it has an input. The input being the camera, will still detect changes in motion whether or not something or some one is moving. At the same time, my definition of interaction stated that interaction is a continuous loop from input to output. So if there is an input, there will 100% be an output. Which in my project, if there is any change in motion, it will change the light on the matrix and trigger the sound at the same time.

My expectation of the audience’s response was pretty similar. The only thing my partner and I didn’t really think about was that once a user sees their own reflection, they tend to focus on that instead of the lights changing. I often found myself having to explain my project instead of them figuring it out and if they did figure it out, it took a bit of time for them to do so. Other than that, my expectation of audience reactions was pretty similar.

User Reactions:

If I had more time to improve my project, I would definitely take into consideration the “experience” aspect of the project I wanted to implement. During our final project, Eric said that if really wanted to make it an experience, we needed to factor in a lot of different things. If I could change some of the things about my project to make it more of an experience I would have speakers around to amplify the sound, project the camera input onto a bigger screen, and make the LED light board bigger. 

From the setbacks and failures of my project, I learned that theres always room for improvement, even if you think there isn’t enough time. I learned that there is always going to be projects and parts of other peoples work that will be better than yours but you should never compare what other peoples capabilities are to yours. After taking this class and seeing all of the work that I have done, I am very happy with all of my accomplishments. I would have never thought that this project would come to life during our brainstorming period but I’m really glad we could make it work! I’m really glad that we were able to create a fun and interactive work or art where users were able to see themselves and make art with light as well as music and sound!

Arduino/Rainbowduino Code:

#include <Rainbowduino.h>
char valueFromProcessing;

void setup()
{
Rb.init();
Serial.begin(9600);
}

unsigned char x, y, z;

void loop() {

while (Serial.available()) {
valueFromProcessing = Serial.read();

if (valueFromProcessing == ‘D’) {
Rb.fillRectangle(0, 0, 2, 2, random(0xFFFFFF));
}
if (valueFromProcessing == ‘d’) {
Rb.fillRectangle(0, 0, 2, 2, 0x000000);
}

if (valueFromProcessing == ‘C’) {
Rb.fillRectangle(2, 0, 2, 2, random(0xFFFFFF));
}
if (valueFromProcessing == ‘c’) {
Rb.fillRectangle(2, 0, 2, 2, 0x000000);
}

if (valueFromProcessing == ‘B’) {
Rb.fillRectangle(4, 0, 2, 2, random(0xFFFFFF));
}
if (valueFromProcessing == ‘b’) {
Rb.fillRectangle(4, 0, 2, 2, 0x000000);
}

if (valueFromProcessing == ‘A’) {
Rb.fillRectangle(6, 0, 2, 2, random(0xFFFFFF));
}
if (valueFromProcessing == ‘a’) {
Rb.fillRectangle(6, 0, 2, 2, 0x000000);
}

if (valueFromProcessing == ‘H’) {
Rb.fillRectangle(0, 2, 2, 2, random(0xFFFFFF));
}
if (valueFromProcessing == ‘h’) {
Rb.fillRectangle(0, 2, 2, 2, 0x000000);
}

if (valueFromProcessing == ‘G’) {
Rb.fillRectangle(2, 2, 2, 2, random(0xFFFFFF));
}
if (valueFromProcessing == ‘g’) {
Rb.fillRectangle(2, 2, 2, 2, 0x000000);
}

if (valueFromProcessing == ‘F’) {
Rb.fillRectangle(4, 2, 2, 2, random(0xFFFFFF));
}
if (valueFromProcessing == ‘f’) {
Rb.fillRectangle(4, 2, 2, 2, 0x000000);
}

if (valueFromProcessing == ‘E’) {
Rb.fillRectangle(6, 2, 2, 2, random(0xFFFFFF));
}
if (valueFromProcessing == ‘e’) {
Rb.fillRectangle(6, 2, 2, 2, 0x000000);
}

if (valueFromProcessing == ‘L’) {
Rb.fillRectangle(0, 4, 2, 2, random(0xFFFFFF));
}
if (valueFromProcessing == ‘l’) {
Rb.fillRectangle(0, 4, 2, 2, 0x000000);
}

if (valueFromProcessing == ‘K’) {
Rb.fillRectangle(2, 4, 2, 2, random(0xFFFFFF));
}
if (valueFromProcessing == ‘k’) {
Rb.fillRectangle(2, 4, 2, 2, 0x000000);
}

if (valueFromProcessing == ‘J’) {
Rb.fillRectangle(4, 4, 2, 2, random(0xFFFFFF));
}
if (valueFromProcessing == ‘j’) {
Rb.fillRectangle(4, 4, 2, 2, 0x000000);
}

if (valueFromProcessing == ‘I’) {
Rb.fillRectangle(6, 4, 2, 2, random(0xFFFFFF));
}
if (valueFromProcessing == ‘i’) {
Rb.fillRectangle(6, 4, 2, 2, 0x000000);
}

if (valueFromProcessing == ‘P’) {
Rb.fillRectangle(0, 6, 2, 2, random(0xFFFFFF));
}
if (valueFromProcessing == ‘p’) {
Rb.fillRectangle(0, 6, 2, 2, 0x000000);
}

if (valueFromProcessing == ‘O’) {
Rb.fillRectangle(2, 6, 2, 2, random(0xFFFFFF));
}
if (valueFromProcessing == ‘o’) {
Rb.fillRectangle(2, 6, 2, 2, 0x000000);
}

if (valueFromProcessing == ‘N’) {
Rb.fillRectangle(4, 6, 2, 2, random(0xFFFFFF));
}
if (valueFromProcessing == ‘n’) {
Rb.fillRectangle(4, 6, 2, 2, 0x000000);
}

if (valueFromProcessing == ‘M’) {
Rb.fillRectangle(6, 6, 2, 2, random(0xFFFFFF));
delay(1);
}
if (valueFromProcessing == ‘m’) {
Rb.fillRectangle(6, 6, 2, 2, 0x000000);
}
}
}

Processing Code:

import processing.video.*;
import processing.serial.*;
import processing.sound.*;
Serial myPort;
Capture cam;
PImage prev;
boolean p[];
int circleSize = 10;
SoundFile a4;
SoundFile b4;
SoundFile c4;
SoundFile c5;
SoundFile cello_slide;
SoundFile d4;
SoundFile e4;
SoundFile f4;
SoundFile g4;
SoundFile violin_slide;
SoundFile guitar;

void setup() {
size(800,600);
cam = new Capture(this, 800,600);
cam.start();
prev = cam.get();
p = new boolean[width * height];

myPort= new Serial(this, Serial.list()[ 2 ], 9600);

a4 = new SoundFile(this, “a4.wav”);
b4 = new SoundFile(this, “b4.wav”);
c4 = new SoundFile(this, “c4.wav”);
c5 = new SoundFile(this, “c5.wav”);
d4 = new SoundFile(this, “d4.wav”);
e4 = new SoundFile(this, “e4.wav”);
f4 = new SoundFile(this, “f4.wav”);
g4 = new SoundFile(this, “g4.wav”);
guitar = new SoundFile(this, “guitar.wav”);
}
void draw() {
if (cam.available()) {
cam.read();
cam.loadPixels();
}
translate(cam.width,0);
scale(-1,1);
image(cam,0,0);

int w = cam.width;
int h = cam.height;
for (int y = 0; y < h; y+=circleSize){
for (int x = 0; x < w; x+=circleSize) {
int i = x + y*w;
//fill( 0 );
if(cam.pixels[i] != prev.pixels[i]){
p[i] = true;
}
else{
p[i] = false;
}
}
for (int y = circleSize; y < h- circleSize; y+=circleSize){
for (int x = circleSize; x < w- circleSize; x+=circleSize) {
int i = x + y*w;
int up = x + (y- circleSize) * w;
int down = x + (y+ circleSize) * w;
int left = (x – circleSize) + y*w;
int right = (x + circleSize) + y*w;
int upLt = (x – circleSize) + (y- circleSize) * w;
int upRt = (x + circleSize) + (y- circleSize) * w;
int downLt = (x – circleSize) + (y+ circleSize) * w;
int downRt = (x + circleSize) + (y+ circleSize) * w;
if(p[i] && p[up] && p[down] && p[left] && p[right] && p[upRt] && p[upLt] && p[downRt] && p[downLt]){
fill(cam.pixels[i]);
}
else{
fill( 0 );
}
rect(x,y,circleSize,circleSize);
}
}
int countD = 0;
for (int y = circleSize; y < 150; y+=circleSize){
for (int x = circleSize; x < 200; x+=circleSize) {
int i = x + y*w;
int up = x + (y- circleSize) * w;
int down = x + (y+ circleSize) * w;
int left = (x – circleSize) + y*w;
int right = (x + circleSize) + y*w;
int upLt = (x – circleSize) + (y- circleSize) * w;
int upRt = (x + circleSize) + (y- circleSize) * w;
int downLt = (x – circleSize) + (y+ circleSize) * w;
int downRt = (x + circleSize) + (y+ circleSize) * w;
//fill( 0 );
if(p[i] && p[up] && p[down] && p[left] && p[right] && p[upRt] && p[upLt] && p[downRt] && p[downLt]){
countD++;
}
}

println(countD);
if (countD > 100){
myPort.write(‘D’);
if(!guitar.isPlaying()) {
guitar.play();
}
}
else {
myPort.write(‘d’);
}

int countC = 0;
for (int y = circleSize; y < 150; y+=circleSize){
for (int x = 200+circleSize; x < 400; x+=circleSize) {
int i = x + y*w;
int up = x + (y- circleSize) * w;
int down = x + (y+ circleSize) * w;
int left = (x – circleSize) + y*w;
int right = (x + circleSize) + y*w;
int upLt = (x – circleSize) + (y- circleSize) * w;
int upRt = (x + circleSize) + (y- circleSize) * w;
int downLt = (x – circleSize) + (y+ circleSize) * w;
int downRt = (x + circleSize) + (y+ circleSize) * w;

if(p[i] && p[up] && p[down] && p[left] && p[right] && p[upRt] && p[upLt] && p[downRt] && p[downLt]){

countC++;
}
}

println(countC);
if (countC > 100){
myPort.write(‘C’);
if(!g4.isPlaying()) {
g4.play();
}
}
else {
myPort.write(‘c’);
}

int countB = 0;
for (int y = circleSize; y < 150; y+=circleSize){
for (int x = 400+circleSize; x < 600; x+=circleSize) {
int i = x + y*w;
int up = x + (y- circleSize) * w;
int down = x + (y+ circleSize) * w;
int left = (x – circleSize) + y*w;
int right = (x + circleSize) + y*w;
int upLt = (x – circleSize) + (y- circleSize) * w;
int upRt = (x + circleSize) + (y- circleSize) * w;
int downLt = (x – circleSize) + (y+ circleSize) * w;
int downRt = (x + circleSize) + (y+ circleSize) * w;
//fill( 0 );
if(p[i] && p[up] && p[down] && p[left] && p[right] && p[upRt] && p[upLt] && p[downRt] && p[downLt]){
//fill(cam.pixels[i]);
countB++;
}
}

println(“B: ” + countB);
if (countB > 100){
myPort.write(‘B’);
if(!f4.isPlaying()) {
f4.play();
}
}
else {
myPort.write(‘b’);
}

int countA = 0;
for (int y = circleSize; y < 150; y+=circleSize){
for (int x = 600+circleSize; x < 800; x+=circleSize) {
int i = x + y*w;
int up = x + (y- circleSize) * w;
int down = x + (y+ circleSize) * w;
int left = (x – circleSize) + y*w;
int right = (x + circleSize) + y*w;
int upLt = (x – circleSize) + (y- circleSize) * w;
int upRt = (x + circleSize) + (y- circleSize) * w;
int downLt = (x – circleSize) + (y+ circleSize) * w;
int downRt = (x + circleSize) + (y+ circleSize) * w;
//fill( 0 );
if(p[i] && p[up] && p[down] && p[left] && p[right] && p[upRt] && p[upLt] && p[downRt] && p[downLt]){
//fill(cam.pixels[i]);
countA++;
}
}

println(countA);
if (countA > 100){
myPort.write(‘A’);
if(!guitar.isPlaying()) {
guitar.play();
}
}
else {
myPort.write(‘a’);
}

int countH = 0;
for (int y = 150+circleSize; y < 300; y+=circleSize){
for (int x = circleSize; x < 200; x+=circleSize) {
int i = x + y*w;
int up = x + (y- circleSize) * w;
int down = x + (y+ circleSize) * w;
int left = (x – circleSize) + y*w;
int right = (x + circleSize) + y*w;
int upLt = (x – circleSize) + (y- circleSize) * w;
int upRt = (x + circleSize) + (y- circleSize) * w;
int downLt = (x – circleSize) + (y+ circleSize) * w;
int downRt = (x + circleSize) + (y+ circleSize) * w;
//fill( 0 );
if(p[i] && p[up] && p[down] && p[left] && p[right] && p[upRt] && p[upLt] && p[downRt] && p[downLt]){
//fill(cam.pixels[i]);
countH++;
}
}

println(countH);
if (countH > 100){
myPort.write(‘H’);
if(!a4.isPlaying()) {
a4.play();
}
}
else {
myPort.write(‘h’);
}

int countG = 0;
for (int y = 150+circleSize; y < 300; y+=circleSize){
for (int x = 200+circleSize; x < 400; x+=circleSize) {
int i = x + y*w;
int up = x + (y- circleSize) * w;
int down = x + (y+ circleSize) * w;
int left = (x – circleSize) + y*w;
int right = (x + circleSize) + y*w;
int upLt = (x – circleSize) + (y- circleSize) * w;
int upRt = (x + circleSize) + (y- circleSize) * w;
int downLt = (x – circleSize) + (y+ circleSize) * w;
int downRt = (x + circleSize) + (y+ circleSize) * w;
//fill( 0 );
if(p[i] && p[up] && p[down] && p[left] && p[right] && p[upRt] && p[upLt] && p[downRt] && p[downLt]){
//fill(cam.pixels[i]);
countG++;
}
}

println(countG);
if (countG > 100){
myPort.write(‘G’);
}
else {
myPort.write(‘g’);
}

int countF = 0;
for (int y = 150+circleSize; y < 300; y+=circleSize){
for (int x = 400+circleSize; x < 600; x+=circleSize) {
int i = x + y*w;
int up = x + (y- circleSize) * w;
int down = x + (y+ circleSize) * w;
int left = (x – circleSize) + y*w;
int right = (x + circleSize) + y*w;
int upLt = (x – circleSize) + (y- circleSize) * w;
int upRt = (x + circleSize) + (y- circleSize) * w;
int downLt = (x – circleSize) + (y+ circleSize) * w;
int downRt = (x + circleSize) + (y+ circleSize) * w;
//fill( 0 );
if(p[i] && p[up] && p[down] && p[left] && p[right] && p[upRt] && p[upLt] && p[downRt] && p[downLt]){
//fill(cam.pixels[i]);
countF++;
}
}

println(countF);
if (countF > 100){
myPort.write(‘F’);
} else {
myPort.write(‘f’);
}

int countE = 0;
for (int y = 150+circleSize; y < 300; y+=circleSize){
for (int x = 600+circleSize; x < 800; x+=circleSize) {
int i = x + y*w;
int up = x + (y- circleSize) * w;
int down = x + (y+ circleSize) * w;
int left = (x – circleSize) + y*w;
int right = (x + circleSize) + y*w;
int upLt = (x – circleSize) + (y- circleSize) * w;
int upRt = (x + circleSize) + (y- circleSize) * w;
int downLt = (x – circleSize) + (y+ circleSize) * w;
int downRt = (x + circleSize) + (y+ circleSize) * w;
//fill( 0 );
if(p[i] && p[up] && p[down] && p[left] && p[right] && p[upRt] && p[upLt] && p[downRt] && p[downLt]){
//fill(cam.pixels[i]);
countE++;
}
}

println(countE);
if (countE > 100){
myPort.write(‘E’);
if(!e4.isPlaying()) {
e4.play();
}
}
else {
myPort.write(‘e’);
}

int countL = 0;
for (int y = 300+circleSize; y < 450; y+=circleSize){
for (int x = circleSize; x < 200; x+=circleSize) {
int i = x + y*w;
int up = x + (y- circleSize) * w;
int down = x + (y+ circleSize) * w;
int left = (x – circleSize) + y*w;
int right = (x + circleSize) + y*w;
int upLt = (x – circleSize) + (y- circleSize) * w;
int upRt = (x + circleSize) + (y- circleSize) * w;
int downLt = (x – circleSize) + (y+ circleSize) * w;
int downRt = (x + circleSize) + (y+ circleSize) * w;
//fill( 0 );
if(p[i] && p[up] && p[down] && p[left] && p[right] && p[upRt] && p[upLt] && p[downRt] && p[downLt]){
//fill(cam.pixels[i]);
countL++;
}
}

println(countL);
if (countL > 100){
myPort.write(‘L’);
if(!b4.isPlaying()) {
b4.play();
}
}
else {
myPort.write(‘l’);
}

int countK = 0;
for (int y = 300+circleSize; y < 450; y+=circleSize){
for (int x = 200+circleSize; x < 400; x+=circleSize) {
int i = x + y*w;
int up = x + (y- circleSize) * w;
int down = x + (y+ circleSize) * w;
int left = (x – circleSize) + y*w;
int right = (x + circleSize) + y*w;
int upLt = (x – circleSize) + (y- circleSize) * w;
int upRt = (x + circleSize) + (y- circleSize) * w;
int downLt = (x – circleSize) + (y+ circleSize) * w;
int downRt = (x + circleSize) + (y+ circleSize) * w;
//fill( 0 );
if(p[i] && p[up] && p[down] && p[left] && p[right] && p[upRt] && p[upLt] && p[downRt] && p[downLt]){
//fill(cam.pixels[i]);
countK++;
}
}

println(countK);
if (countK > 100){
myPort.write(‘K’);
}
else {
myPort.write(‘k’);
}

int countJ = 0;
for (int y = 300+circleSize; y < 450; y+=circleSize){
for (int x = 400+circleSize; x < 600; x+=circleSize) {
int i = x + y*w;
int up = x + (y- circleSize) * w;
int down = x + (y+ circleSize) * w;
int left = (x – circleSize) + y*w;
int right = (x + circleSize) + y*w;
int upLt = (x – circleSize) + (y- circleSize) * w;
int upRt = (x + circleSize) + (y- circleSize) * w;
int downLt = (x – circleSize) + (y+ circleSize) * w;
int downRt = (x + circleSize) + (y+ circleSize) * w;
//fill( 0 );
if(p[i] && p[up] && p[down] && p[left] && p[right] && p[upRt] && p[upLt] && p[downRt] && p[downLt]){
//fill(cam.pixels[i]);
countJ++;
}
}

println(countJ);
if (countJ > 100){
myPort.write(‘J’);
}
else {
myPort.write(‘j’);
}

int countI = 0;
for (int y = 300+circleSize; y < 450; y+=circleSize){
for (int x = 600+circleSize; x < 800; x+=circleSize) {
int i = x + y*w;
int up = x + (y- circleSize) * w;
int down = x + (y+ circleSize) * w;
int left = (x – circleSize) + y*w;
int right = (x + circleSize) + y*w;
int upLt = (x – circleSize) + (y- circleSize) * w;
int upRt = (x + circleSize) + (y- circleSize) * w;
int downLt = (x – circleSize) + (y+ circleSize) * w;
int downRt = (x + circleSize) + (y+ circleSize) * w;
//fill( 0 );
if(p[i] && p[up] && p[down] && p[left] && p[right] && p[upRt] && p[upLt] && p[downRt] && p[downLt]){
//fill(cam.pixels[i]);
countI++;
}
}

println(countI);
if (countI > 100){
myPort.write(‘I’);
if(!d4.isPlaying()) {
d4.play();
}
}
else {
myPort.write(‘i’);
}

int countP = 0;
for (int y = 450+circleSize; y < 600; y+=circleSize){
for (int x = circleSize; x < 200; x+=circleSize) {
int i = x + y*w;
int up = x + (y- circleSize) * w;
//int down = x + (y+ circleSize) * w;
int left = (x – circleSize) + y*w;
int right = (x + circleSize) + y*w;
int upLt = (x – circleSize) + (y- circleSize) * w;
int upRt = (x + circleSize) + (y- circleSize) * w;
if(p[i] && p[up] && p[left] && p[right] && p[upRt] && p[upLt]){
//fill(cam.pixels[i]);
countP++;
}
}

println(countP);
if (countP > 100){
myPort.write(‘P’);
if(!c5.isPlaying()) {
c5.play();
}
}
else {
myPort.write(‘p’);
}

int countO = 0;
for (int y = 450+circleSize; y < 600; y+=circleSize){
for (int x = 200+circleSize; x < 400; x+=circleSize) {
int i = x + y*w;
int up = x + (y- circleSize) * w;
//int down = x + (y+ circleSize) * w;
int left = (x – circleSize) + y*w;
int right = (x + circleSize) + y*w;
int upLt = (x – circleSize) + (y- circleSize) * w;
int upRt = (x + circleSize) + (y- circleSize) * w;
if(p[i] && p[up] && p[left] && p[right] && p[upRt] && p[upLt]){
//fill(cam.pixels[i]);
countO++;
}
}

println(countO);
if (countO > 100){
myPort.write(‘O’);
}
else {
myPort.write(‘o’);
}

int countN = 0;
for (int y = 450+circleSize; y < 600; y+=circleSize){
for (int x = 400+circleSize; x < 600; x+=circleSize) {
int i = x + y*w;
int up = x + (y- circleSize) * w;
//int down = x + (y+ circleSize) * w;
int left = (x – circleSize) + y*w;
int right = (x + circleSize) + y*w;
int upLt = (x – circleSize) + (y- circleSize) * w;
int upRt = (x + circleSize) + (y- circleSize) * w;
//fill( 0 );
if(p[i] && p[up] && p[left] && p[right] && p[upRt] && p[upLt]){
//fill(cam.pixels[i]);
countN++;
}
}

println(countN);
if (countN > 100){
myPort.write(‘N’);
}
else {
myPort.write(‘n’);
}

int countM = 0;
for (int y = 450+circleSize; y < 600; y+=circleSize){
for (int x = 600+circleSize; x < 800; x+=circleSize) {
int i = x + y*w;
int up = x + (y- circleSize) * w;
//int down = x + (y+ circleSize) * w;
int left = (x – circleSize) + y*w;
int right = (x + circleSize) + y*w;
int upLt = (x – circleSize) + (y- circleSize) * w;
int upRt = (x + circleSize) + (y- circleSize) * w;
//int downLt = (x – circleSize) + (y+ circleSize) * w;
//int downRt = (x + circleSize) + (y+ circleSize) * w;
//fill( 0 );
if(p[i] && p[up] && p[left] && p[right] && p[upRt] && p[upLt]){
//fill(cam.pixels[i]);
countM++;
}
}

println(countM);
if (countM > 100){
myPort.write(‘M’);
if(!c4.isPlaying()) {
c4.play();
}
}
else {
myPort.write(‘m’);
}

prev = cam.get();
cam.updatePixels();

}


Creative Motion – Yu Yan (Sonny) – Inmi

Creative Motion – Yu Yan (Sonny) – Inmi

Conception and Design:

During the brainstorming phase, my partner Lillie and I tended to build an interactive project that allows users to create digital paintings only with their motions. The interaction of this project includes users’ movements as the input and the image displayed on the digital device as the output. Our enlightenment comes from Leap Motion interactive art exhibit. At this point, we thought about using multiple sensors on Arduino to catch the movements, and display the image on Processing. However, after we tried on several sensors and did some researches, we found that there is no sensor suitable for our needs and even if there is, it would take a huge amount of time to build the circuit and understand how to code. So we turned to our instructor for help and also did some further researches to see other alternative ways. Finally, we decided to use the webcam in Processing as our “sensor” to catch the input (users’ movements) and build an LED board on Arduino to display the output (painting). The reasons why we choose the webcam are that it’s easier to catch images from the camera than from the sensor, the color values detected from the camera are more accurate than from the sensor, and the code is not too difficult to learn with the help of other IMA fellows. However, when we were figuring out the Arduino part, we found it hard to build the circuit using single-colored LEDs and connect all of them on the breadboard. With our further researches, we managed to find that the 8*8 LED matrix can replace the single-colored LEDs and also generate more colors. But the first few pieces of LED matrix are not satisfactory because we don’t know how to connect them to the Arduino board and we were unable to find the solutions online (We found this video that we thought it would be helpful for us to understand how to connect the LED matrix to the Arduino, but it wasn’t). We also found a sample code to test the LED matrix, but since we were unable to connect it to the Arduino, this code became useless as well. Moreover, those pieces can only generate three colors that didn’t meet our needs.

Since we want to allow users to create paintings with more diversity, we tried to find the LED matrix that can display in rainbow colors. After consulting with other IMA fellows, we found that the Rainbowduino can work with one kind of LED matrix and display in rainbow colors. The code for this is also easy to comprehend. So eventually, we decided to use the Rainbowduino and the LED matrix in Arduino as our output device, and the webcam in Processing as our input detector. 

Fabrication and Production:

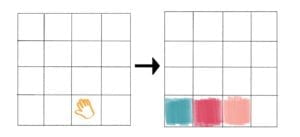
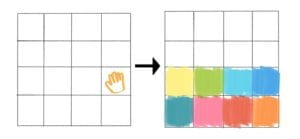
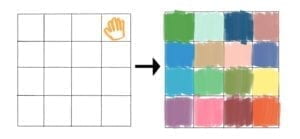
One of the most significant steps in our production process in terms of failures are the coding phase. Since when we chose materials for the output device, we tried quite a few kinds of LED matrix and also looked for their codes, we discovered that the code for previous LED matrix are too complex to comprehend. We needed to set different variables for different rows and columns of the LEDs, which is quite confusing sometimes. But after we decided to use the Rainbowduino, the code for Arduino became much easier because we can use the coordinate to code for each single LED. And with the help of IMA fellows, we managed to write the code that satisfied our needs. This experience tells us that choosing suitable equipment is very crucial to a project,  for choosing a good one can bring great convenience to the progress and save us a lot of time. Another significant step is the feedback we received during the user testing session. The good things are that many users showed their interests to our project and thought it’s really cool when displaying different colors. They all thought the interaction with the piece is quite intriguing and they liked that their movements can light up the LEDs in different colors. This feedback meets our initial goal of providing users with opportunities to create their own art using their motions. However, there were still some problems we can still improve. First of all, one of the users said that the way the LEDs lighted up could be a little confusing because it cannot well illustrate where the user moves. It’s because we didn’t separate the x-axis and the y-axis for each section of LEDs at first. The following sketches and video help explain the situation.

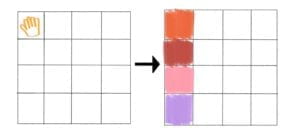
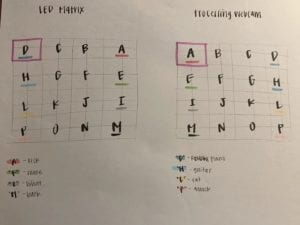
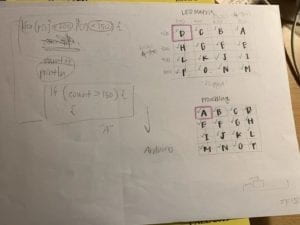
To solve this issue, we modified our code and separated the x-axis and the y-axis for each section so that it can light up without causing other sections of LEDs lighting up as well. After we showed our modified project to the user who gave us this comment, he said that the experience is better now and he can see himself moving in the LED matrix more clearly. Second, the experience of interaction could be too single and boring and it’s hard to convey our message to users through this experience. Since the interaction is only about moving their bodies and displaying different colors in the same position of their movements on the LED matrix, it might be too stuffless for an interactive project. Marcela and Inmi suggested that maybe adding some sounds to it can make it more attractive and more meaningful. So we took their advice. In addition to turning up a section of LEDs when moving to the relative area, we also added some sound files to each section of LEDs and made them play with the lighting up of the corresponding LEDs. The following sketches illustrate how we defined each section and different sound file.


Initially, we used several random sounds such as “kick” and “snare” because we wanted to bring more diversity into our project. But during the presentation, some users commented that the sound is too random and sounded chaotic when they were all turned on. One of them also mentioned that the sound of “snapshot” made her feel uncomfortable. So for the final IMA show, we adjusted all the sound files to different key notes of the piano. This change made the sound more harmonious and comfortable to hear when users are interacting with the project. Third, some users mentioned that the LED matrix is too small and sometimes they might neglect the LED and pay more attention to the computer screen instead. At first, we thought about connecting more LED matrixes together and making a bigger screen, but we didn’t manage to do that. So instead of magnifying the LED matrix, we made the computer screen more invisible and the LED matrix more outstanding by putting it into our fabrication box. The result turned out to be much better than before and we caught users’ attention to our LED matrix instead of the computer screen.

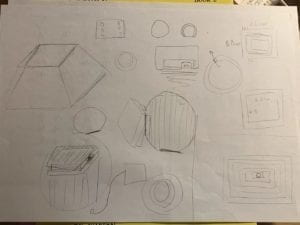
By contrast, the fabrication process is one of the most significant steps of our project in terms of success. Before we settled down the final polygon shape, we came up with a few other shapes as well. Similar to my midterm project, we also chose Laser-cut and glued each layer together to build the shape. Since we wanted to make something cool and make the most use of our material, we decided to choose transparent plastic board to make the shape. We also discovered that polygon can help build a sense of geometric beauty, so finally, we made our box into a polygon shape. At first, we tended to just put the LED matrix on the top of the polygon. But one of IMA fellows suggested that we can put the LED matrix at the bottom of the polygon so that the light can reflect through the plastic and make it prettier. Thanks to this advice, it turned out to be a really cool project!


Conclusions:

For our final project, our goal is always allowing people to create their own art using their motions and also encourage them to create art in different forms. Although we changed our single output (painting) to multiple outputs (painting and music), our goal of creating art with motions still remains the same. Initially, we defined interaction as a continuous communication between two or more corresponding elements, an iterative process which involves actions and feedbacks. Our project successfully aligned with our definition by creating a constant communication between the project and the users and providing immediate feedback to users’ motions. However, the experience of interacting with the piece is still not satisfactory enough because we could not magnify the LED matrix so that it’s too small to notice. We didn’t create the best experience to users. But fortunately, most of the users understood that they can change the image and create different sounds with their motions. They all thought that this is a really interesting and interactive project that they can play with for a long time. Some users even tried to play a full song after they discovered the location of each keynote. If we had more time, we would definitely build a bigger LED board to make it easier for users to experience the process of creating art with their motions. The setbacks and obstacles we’ve encountered are all seemed quite fair during the process of completing a project. But the most important thing is to learn some lessons from these setbacks and obstacles. What I learned from them are that we should humbly take people’s comments about our project and turn them into useful improvements and motivations. In addition, I noticed that I still didn’t pay enough attention to the experience of the project. Since experience is one of the most vital parts of an interactive project, it should always be the first consideration. However, I also learned that the reason why many people like our project is that it can display their existence and be controlled by them. Users are in charge of everything the project displays. This also shows that we have created a tight and effective communication between the project and users. Furthermore, making the most use of our materials is also very important. Sometimes it can make a big change to the whole project and turn it into a more complete version. Since nowadays many people still hold the concept that art can only be created in those limited forms, we want to break this concept by providing them with tools to create new forms of art and inspiring them to think outside of the box. Art is limitless and with great potential. By showing that motion can also create different forms of art, this project is not only a recreation but also an enlightenment to help people generate more creative ideas of new forms of art and free their imagination. It also helps make people be aware of their ability and their “power”, and let them control the creation of art. “Be bold, be creative, and be limitless.” This is the message we want to convey to our audience. 

The code for Arduino is here. And the code for Processing is here.

Now, let’s have a look at how our users interact with our project!

Familiar Faces-Christina Bowllan-Inmi Lee

Familiar Faces- Christina Bowllan- Inmi Lee

For our final project, Isabel and I wanted to address why it is that people do not naturally befriend others from different cultures. While this of course does not relate to everyone, we realized in our school that people who speak the same language oftentimes hang out together and people from the same country do as well. This does answer one part of the question, but the real problem is we fail to realize that people from other cultures are more similar to us than we think; We all have hobbies, hometowns, things we love to do, foods that we miss from our hometowns, struggles within our lives, etc. In order to illustrate this, we interviewed several workers within our school such as the aiyis and halal food people because we wanted to open their stories since they are a group in our school that we often overlook. 

827 (Video 1)

829(Video 2)

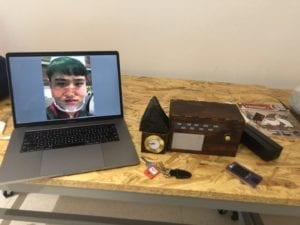
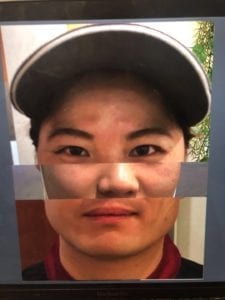
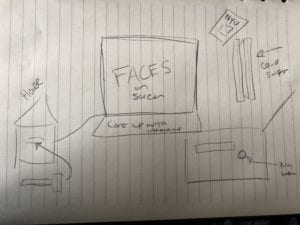
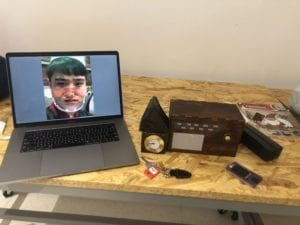
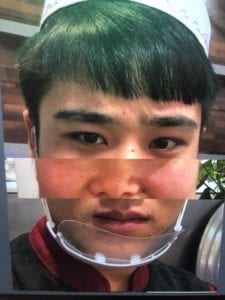
In order to create this project, we had three different sensor spots: one was a house, one was a radio and one was a key card swiper. When the user would push the key inside the house, the audio relating to the workers’ home experience would play, the radio played miscellaneous sound clips about what they missed from their hometown or what they do in Shanghai over the weekends, and the card swiper randomized their faces on the processing image. We decided to create these different physical structures because we wanted each to be a representation of a different aspect of their lives and we created the processing image in order to show people our stories are not that different than one another— after all, we all have eyes, a nose and a mouth. We tried to make the interaction resemble what people do in their everyday lives, or if they do not use a radio, for example, have different structures that the users would already know how to interact with. On the whole, this worked because people knew how to use the card for the swiper and push the radio button, but for some reason, people did not understand what they should do with the key. So, in order to construct each part, we did a lot of laser cutting as this is what our house and radio were made out of it. This proved to be a great method because the boxes were really easy to put together, they looked clean, and the radio could hold our arduino as well. In the early stages, we had thought about maybe 3d printing, but it would be hard to construct a sensor inside this material. For the card swiper, it would have been too difficult to build all of the pieces for laser cutting, so we designed it using cardboard, which proved to be effective. We were able to tape up the various sides and it held the sensor in place very well, so the interaction between processing and arduino was, spot on!

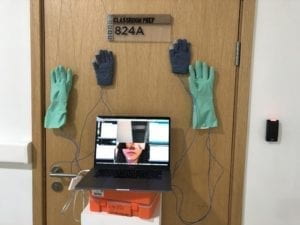
Above shows how our final project ended up, but it did not start this way. Our initial idea was to hang four different types of gloves on the wall which would all represent people from different backgrounds and classes. And the user was intended to high five the gloves which would change the randomized face simulation to show if we cooperate and get to know one another, we can understand that our two worlds are not that different. For user testing, we had the gloves and the randomized face simulation, but the interaction was a bit basic. At first we wanted to put LED lights on each glove so that people could have more of a reason to interact with our game, but the project in general was not conveying our meaning. Users found the project cool and liked seeing pictures of their friends change on the screen, but they did not recognize the high five element to show cooperation or the bigger idea. The main feedback we got was that we needed to be more specific in what it means for people from all backgrounds to come together.

At this point, we decided to create what was our final project and focus in on a certain group of people to show that we have shared identities. So, while the gloves were great, we did not end up using them, and we created the house, radio and card swiper to show different connection points between people. 

For our project, we wanted to show people that we are not so different after all and we used the different workers within our school to illustrate this idea. Our project definitely aligned with my definition; We did have “a cyclic process in which two actors, think and speak” (Crawford 3) and we created a meaningful interaction which we should strive for in this class. Ultimately, I think people did understand our project through the final version we created, but if we continued working on it, of course we could make some changes. Some examples included, we could add subtitles of the interviews so that English speakers understand and Tristan had a good idea to add a spotlight so people know which interaction to focus on. Also, I mentioned this above, but people did not really know what to do with the key… It ended up working out because I believe that slowly understanding what to do with each part resembles what it’s like to get to know someone, but this was not our intended interaction. I have learned from doing this project that “all. good. things. take. time”. I am so used to “cranking out” work in school and then not looking at it again, so it became tedious having to fix different dilemmas here and there. But, once I did the interviews and constructed the card swiper by myself, I felt a wave of confidence and that motivated me to keep working on the project. Overall, people should care about our project because if you care about building a cohesive and unified community and improving school spirit, this is an unavoidable first step. 

CODE

Arduino Code:

// IMA NYU Shanghai
// Interaction Lab
// For sending multiple values from Arduino to Processing

void setup() {
Serial.begin(9600);
}

void loop() {
int sensor1 = digitalRead(9);
int sensor2 = digitalRead(7);
int sensor3 = digitalRead(8);

// keep this format
Serial.print(sensor1);
Serial.print(“,”); // put comma between sensor values
Serial.print(sensor2);
Serial.print(“,”);
Serial.print(sensor3);
Serial.println(); // add linefeed after sending the last sensor value

// too fast communication might cause some latency in Processing
// this delay resolves the issue.
delay(100);
}

Processing Code:

// IMA NYU Shanghai
// Interaction Lab
// For receiving multiple values from Arduino to Processing

/*
 * Based on the readStringUntil() example by Tom Igoe
 * https://processing.org/reference/libraries/serial/Serial_readStringUntil_.html
 */

import processing.serial.*;
import processing.video.*; 
import processing.sound.*;
SoundFile sound;
SoundFile sound2;

String myString = null;
Serial myPort;


int NUM_OF_VALUES = 3;   /** YOU MUST CHANGE THIS ACCORDING TO YOUR PROJECT **/
int[] sensorValues;      /** this array stores values from Arduino **/
int[] prevSensorValues;


int maxImages = 7; // Total # of images
int imageIndex = 0; // Initial image to be displayed
int maxSound= 8;
int maxSound2= 10;
boolean playSound = true;
// Declaring three arrays of images.
PImage[] a = new PImage[maxImages]; 
PImage[] b = new PImage[maxImages]; 
PImage[] c = new PImage[maxImages]; 
//int [] d = new int [maxSound];
//int [] e = new int [maxSound2];
ArrayList<SoundFile> d = new ArrayList<SoundFile>();
ArrayList<SoundFile> e = new ArrayList<SoundFile>();

void setup() {

  setupSerial();
  size(768, 1024);
  prevSensorValues= new int [4];

  imageIndex = constrain (imageIndex, 0, 0);
  imageIndex = constrain (imageIndex, 0, height/3*1);
  imageIndex = constrain (imageIndex, 0, height/3*2);  
  // Puts  images into eacu array
  // add all images to data folder
  for (int i = 0; i < maxSound; i++ ) {
    d.add(new SoundFile(this, "family" + i + ".wav"));
  }
  for (int i = 0; i < maxSound2; i ++ ) {

    e.add(new SoundFile(this, "fun" + i + ".wav"));
  }
  for (int i = 0; i < a.length; i ++ ) {
    a[i] = loadImage( "eye" + i + ".jpg" );
  }
  for (int i = 0; i < b.length; i ++ ) {
    b[i] = loadImage( "noses" + i + ".jpg" );
  }
  for (int i = 0; i < c.length; i ++ ) {
    c[i] = loadImage( "mouths" + i + ".jpg" );
  }
}


void draw() {
  updateSerial();
  // printArray(sensorValues);
  image(a[imageIndex], 0, 0);
  image(b[imageIndex], 0, height/2*1);
  image(c[imageIndex], 0, height/1024*656);


  // use the values like this!
  // sensorValues[0] 
  // add your code
  if (sensorValues[2]!=prevSensorValues[2]) {
    //imageIndex += 1;
    println("yes");
    imageIndex = int(random(a.length));
    imageIndex = int(random(b.length));
    imageIndex = int(random(c.length));//card
  }
  if (sensorValues[1]!=prevSensorValues[1]) {
    //imageIndex += 1;
    println("yes");
    
    int soundIndex = int(random(d.size()));//pick a random number from array
    sound = d.get(soundIndex); //just like d[soundIndex]
    
    if (playSound == true) {
      // play the sound

      sound.play();
      // and prevent it from playing again by setting the boolean to false
      playSound = false;
    } else {
      // if the mouse is outside the circle, make the sound playable again
      // by setting the boolean to true
      playSound = true;
    }
  }
  if (sensorValues[0]!=prevSensorValues[0]) {
    //imageIndex += 1;
    println("yes");
  
    int soundIndex = int(random(e.size()));
    sound2 = e.get(soundIndex); //just like e[soundIndex]
    if (playSound == true) {
      // play the sound
      sound2.play();
      // and prevent it from playing again by setting the boolean to false
      playSound = false;
    } else {
      
      playSound = true;
    }
  }

  prevSensorValues[0] = sensorValues[0];
  println(sensorValues[0], prevSensorValues[0]);
  println (",");
  prevSensorValues[1] = sensorValues[1];
  println(sensorValues[1], prevSensorValues[1]);
  println (",");
  prevSensorValues[2] = sensorValues[2];
  println(sensorValues[2], prevSensorValues[2]);

}


void setupSerial() {
  printArray(Serial.list());
  myPort = new Serial(this, Serial.list()[ 1 ], 9600);
  // WARNING!
  // You will definitely get an error here.
  // Change the PORT_INDEX to 0 and try running it again.
  // And then, check the list of the ports,
  // find the port "/dev/cu.usbmodem----" or "/dev/tty.usbmodem----" 
  // and replace PORT_INDEX above with the index number of the port.

  myPort.clear();
  // Throw out the first reading,
  // in case we started reading in the middle of a string from the sender.
  myString = myPort.readStringUntil( 10 );  // 10 = '\n'  Linefeed in ASCII
  myString = null;

  sensorValues = new int[NUM_OF_VALUES];
}


void updateSerial() {
  while (myPort.available() > 0) {
    myString = myPort.readStringUntil( 10 ); // 10 = '\n'  Linefeed in ASCII
    if (myString != null) {
      String[] serialInArray = split(trim(myString), ",");
      if (serialInArray.length == NUM_OF_VALUES) {
        for (int i=0; i<serialInArray.length; i++) {
          sensorValues[i] = int(serialInArray[i]);
        }
      }
    }
  }
}

Familiar Faces-Isabel Brack- Inmi

Overview:

Image of our project set up

Project display including Processing images, house and key, radio, and card swiper with NYU card. (Not Pictured paper English Bios)

Throughout this project and the phases of design, fabrication, and production our project has completely transformed. Originally, our project was a game/activity in which people would place their hands against different gloves/hand. These hands would be linked up to the processing unit which would rapidly change faces split into three sections the eyes, nose, and mouth. These faces randomly cycled through in the array each time the hands were pressed against. Originally, the eyes section used the webcam to show the user’s face mixed in with the different students faces. However, during user testing we realized that the interaction itself was fairly boring and lacked a greater meaning and experience. During our user testing, we received lots of feedback about the physical difficulties with our project being the live webcam’s accessibility based on height, the connection between users’ actions and meaning is not explicit enough, and the interaction itself being non immersive and simplified. We received overall positive responses to the message and theme of our project is to try and understand and get to know different groups of people at our school that most students didn’t fully understand. Particularly we got feedback from professors and students about incorporating sound/interviews to allow people to tell their own stories. Our project we presented on Thursday is an interactive project intended to share the stories of the workers at NYUSH with the student body and faculty who often overlook them as people and classify them solely as school staff workers. This project involved a Processing element to control sound and visual which used different interview clips which we conducted and different faces which we cut up and assembled into three sections like our original project. Christina conducted most of the interviews and took the pictures along with doing fabrication, and we both contributed to design. I wrote the original code and modified it to this project adding in sound arrays with some help from various professors, fellows, and LAs. I also fabricated the physical projecta creating the buttons and helped Christina with the general fabrication of each element. In addition, I also wired the circuit and cut the audio and photo images to put into the different arrays. Our original inspiration came from face swapping interaction technology like snapchat filters and different face swapping programs, however we adapted this technology to better fit the goal we had, which was sharing the stories of workers who are often overlooked. Also, I came across a similar code to mine (in picture array context) which was inspiring for my code, specifically reminding me to place constraints on the picture. However, the use of his code was more interesting as he planned to share sexual assault survivors awareness through his interaction project, which began my thinking process on how to articulate a story through Processing.

CONCEPTION AND DESIGN:

Once we changed our plan after user testing and were influenced and informed by the user testing response we decided we would create three objects to represent each element of the story we would like to tell about the aiyi and workers at NYUSH. This was majorly informed by suggestions from user testing on what people would like to hear and see about the workers, including their interviews mostly in Chinese about work, life, where they are from, etc. People also liked the idea of seeing different faces all mashed up to show both a sense of individuality to the stories, belonging to each worker, but it also showed a bit of group identity representing the workers as a whole and how NYUSH students often overlook and generalize the workers and aiyi at our school. We chose a radio to represent the different stories the workers told with a button wired in to control an array of sound files from interviews where we asked workers a variety of questions about their everyday life including work and outside of school. The only issue we did not account for regarding this radio is once our class saw and heard what the radio did with the audio the only used the radio and disregarded the card swiper and house/house key for a few minutes. The second element to our project was the card swiper which included an NYUSH 2D laser-cut keycard designed to look like a worker’s card. The card and swiper changed the images of the processing unit each time a new “worker swiped in.”  This element was meant to bring a real work element of theirs into the interaction to help associate the interaction with our school and NYUSH staff. The last physical element was a house and key. When the user inserted the key audios about their family/home/hometown would play providing a personal connection and deeper background to each worker. This third element was directly impacted by the feedback we got during user testing, explaining people wanted deeper background information on each person to understand the person and their identity not just their face. During our prototyping we used cardboard and real gloves to make the original project, but after we changed ideas we had little time to make a prototype so we went straight to 2D laser cutting a box for the radio and a key card for the swiper. In addition, we used cardboard to and clear tape along with black paint to make our own card swiper creating a button at the bottom of the swiper which sent a 1 to Arduino every time pressure was applied with the key card. For the house and key we used my room key and built a 2D house from a laser cut box. We believed that 2D laser cutting would give us a fast, clean, and professional looking finished product will still be able to modify the final look by painting and adding details to transform the radio from a box into an old-time radio. We rejected the idea of 2D cutting the card swiper because it would be too many pieces and to complicated to add a pressure plate if we cut it. Instead we opted for cardboard and tap still getting a fairly finished look, but the building and assembly process was much quicker. Also, because of the button in the bottom of the swiper we needed access to the base which was easier with flexible cardboard. For the house and radio the 2D cut box was cleaner and we could glue all sides but one for easy access to the Arduino and the switch inside the house.

FABRICATION AND PRODUCTION:

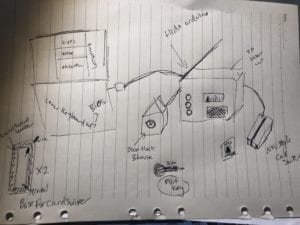
Full Sketch:

sketch of design

In fabricating and producing our final project we went through much trial and error to get the two pressure plates(learned from Building a DIY Dance Dance Revolution) we made work how we planned. Both the house and the card swiper had switches in them which we made with two wires, tinfoil, and cardboard. Each wire attached to a piece of tinfoil and the two sides had a cardboard buffer between them keeping the tinfoil from touching. But, when pressure is applied by the key card or key the tinfoil connects and sends a 1 to the Arduino. The trial and error of creating these buttons with a buffer that is not to think so a light pressure will trigger the button was quite difficult. In addition, building the radio box and physical house were the easiest as the laser cutting went well and all the pieces lined up. The User Testing completely changed our final product in the fabrication and physical output. Although the code for the first and second project are quite similar excluding the addition of sound arrays, the physical aspect of the project changed completely. Our design and production was mostly influenced by creating an accessible project and creating an interaction that connects the physical objects with the meaning to the piece more straightforwardly. We created the house and the radio to represent their background and stories. We also focused on the meaning of our project around getting to know and understand the workers of our school who are often overlooked. The card swiper, house, and radio were also more accessible to all audience no matter the height, which is why we removed the live webcam. I believe these major changes to the physical project helped connect the meaning of the project to the physical interaction and use an interface which matched the output better especially the card swiper and faces along with the radio and stories. Where are project could continue to progress in production is the language accessibility, compared to most other projects ours was geared more towards Chinese language speakers and learners, it would benefit from adding subtitles to the pictures like Tristan suggested during our presentation. The biographies were ok information however the paper interface did not match the digital Processing.

Working Card Swiper: photos change as card swipes

Working House Key: as the house key is fully inserted into the door lock the sound array of background information from different workers plays.

The Radio: As the radio button is pushed a random interview clip from a worker explains her  working conditions and how long she has lived in Shanghai.

processing display

CONCLUSIONS:

Although our project and meaning changed a lot throughout this process, our final goal was to share the stories of workers and aiyi at our school who are often misunderstood, overlooked, and even ignored. Many of the students both Chinese and international don’t have the chance or make the effort to understand and get to know the workers. We wanted to create an easily accessible interface for NYUSH students and faculty to hear the stories of the staff told by the staff along with sharing the familiar faces of the workers which people often recognize but don’t really know or understand. Through interviews with many different workers at the school including aiyi, Lanzhou workers, and Sproutworks workers we hoped to share their stories and their faces with our audience.  According to What Exactly is Interactivity?,understanding our original definition of interaction our project used input, processing, and output along with having two actors in each interaction. The input was the initial pressing of the button or using the card opr key. The processing occurred in Arduino and Processing to communicate between Arduino for the code and circuit and Processing for the code, sound, and visual. The output was the sound clips and the changing faces. However, beyond that definition of interaction, our project also created a larger interaction which made people experience and think about what these workers are saying and what their stories are, hopefully learning their names, a bit about them etc. We hope that the interaction included pushing the buttons and using they key and card but also involved understanding the stories of the workers and the broader message and a sound immersive experience. Although this project had no major user testing other that a few people we found because our final project changed completely after the User Testing, the interaction by our audience was mostly as expected people used the different elements of our project here many audio interviews with different workers and seemed eager to continue to listen and use the face changer. Once the audience used the car swiper and the key they became more intrigued and continued to use each element(but it took awhile for them to switch to the different elements other than just the radio). Overall, I would take many suggestions we heard to improve the project including adding and English element and trying to differentiate the different buttons we have to help the audience understand there are three different options. I would also like to make the piece more experiential and more interactive beyond buttons if you could somehow click on peoples faces or swap them on a touch screen to hear the different stories, but this is not fully realized. Due to the untimely setback/failure of our first project which we learned in user testing, I have learned to sketch, design, prototype, and fabricate(realize my project idea) much faster and more efficiently, which overall is an important skill. In addition, I have learned the value of enjoying your project and its message as the first project’s failure was probably partially due to my lack of understanding its purpose and meaning, but the second project was much more successful because I enjoyed working on it and understood the meaning. I believe the “so what” factor of our project was the importance of NYUSH students to not overlook the staff at NYUSH who work tirelessly to keep the building running. In addition, they should not only be not overlooked but also recognized for their work and their stories as our students often see them as just workers and not full people. One of the most interesting things I learned about these people when conducting interviews was all but one interviewee was from a different province than Shanghai, which means many of these workers are not only separated from their families but also deal with the harsh reality of China’s Hukou system.

Arduino Code:

// IMA NYU Shanghai
// Interaction Lab
// For sending multiple values from Arduino to Processing

void setup() {
Serial.begin(9600);
}

void loop() {
int sensor1 = digitalRead(9);
int sensor2 = digitalRead(7);
int sensor3 = digitalRead(8);

// keep this format
Serial.print(sensor1);
Serial.print(“,”); // put comma between sensor values
Serial.print(sensor2);
Serial.print(“,”);
Serial.print(sensor3);
Serial.println(); // add linefeed after sending the last sensor value

// too fast communication might cause some latency in Processing
// this delay resolves the issue.
delay(100);
}

Processing Code:

// IMA NYU Shanghai
// Interaction Lab
// For receiving multiple values from Arduino to Processing

/*
 * Based on the readStringUntil() example by Tom Igoe
 * https://processing.org/reference/libraries/serial/Serial_readStringUntil_.html
 */

import processing.serial.*;
import processing.video.*; 
import processing.sound.*;
SoundFile sound;
SoundFile sound2;

String myString = null;
Serial myPort;


int NUM_OF_VALUES = 3;   /** YOU MUST CHANGE THIS ACCORDING TO YOUR PROJECT **/
int[] sensorValues;      /** this array stores values from Arduino **/
int[] prevSensorValues;


int maxImages = 7; // Total # of images
int imageIndex = 0; // Initial image to be displayed
int maxSound= 8;
int maxSound2= 10;
boolean playSound = true;
// Declaring three arrays of images.
PImage[] a = new PImage[maxImages]; 
PImage[] b = new PImage[maxImages]; 
PImage[] c = new PImage[maxImages]; 
//int [] d = new int [maxSound];
//int [] e = new int [maxSound2];
ArrayList<SoundFile> d = new ArrayList<SoundFile>();
ArrayList<SoundFile> e = new ArrayList<SoundFile>();

void setup() {

  setupSerial();
  size(768, 1024);
  prevSensorValues= new int [4];

  imageIndex = constrain (imageIndex, 0, 0);
  imageIndex = constrain (imageIndex, 0, height/3*1);
  imageIndex = constrain (imageIndex, 0, height/3*2);  
  // Puts  images into eacu array
  // add all images to data folder
  for (int i = 0; i < maxSound; i++ ) {
    d.add(new SoundFile(this, "family" + i + ".wav"));
  }
  for (int i = 0; i < maxSound2; i ++ ) {

    e.add(new SoundFile(this, "fun" + i + ".wav"));
  }
  for (int i = 0; i < a.length; i ++ ) {
    a[i] = loadImage( "eye" + i + ".jpg" );
  }
  for (int i = 0; i < b.length; i ++ ) {
    b[i] = loadImage( "noses" + i + ".jpg" );
  }
  for (int i = 0; i < c.length; i ++ ) {
    c[i] = loadImage( "mouths" + i + ".jpg" );
  }
}


void draw() {
  updateSerial();
  // printArray(sensorValues);
  image(a[imageIndex], 0, 0);
  image(b[imageIndex], 0, height/2*1);
  image(c[imageIndex], 0, height/1024*656);


  // use the values like this!
  // sensorValues[0] 
  // add your code
  if (sensorValues[2]!=prevSensorValues[2]) {
    //imageIndex += 1;
    println("yes");
    imageIndex = int(random(a.length));
    imageIndex = int(random(b.length));
    imageIndex = int(random(c.length));//card
  }
  if (sensorValues[1]!=prevSensorValues[1]) {
    //imageIndex += 1;
    println("yes");
    
    int soundIndex = int(random(d.size()));//pick a random number from array
    sound = d.get(soundIndex); //just like d[soundIndex]
    
    if (playSound == true) {
      // play the sound

      sound.play();
      // and prevent it from playing again by setting the boolean to false
      playSound = false;
    } else {
      // if the mouse is outside the circle, make the sound playable again
      // by setting the boolean to true
      playSound = true;
    }
  }
  if (sensorValues[0]!=prevSensorValues[0]) {
    //imageIndex += 1;
    println("yes");
  
    int soundIndex = int(random(e.size()));
    sound2 = e.get(soundIndex); //just like e[soundIndex]
    if (playSound == true) {
      // play the sound
      sound2.play();
      // and prevent it from playing again by setting the boolean to false
      playSound = false;
    } else {
      
      playSound = true;
    }
  }

  prevSensorValues[0] = sensorValues[0];
  println(sensorValues[0], prevSensorValues[0]);
  println (",");
  prevSensorValues[1] = sensorValues[1];
  println(sensorValues[1], prevSensorValues[1]);
  println (",");
  prevSensorValues[2] = sensorValues[2];
  println(sensorValues[2], prevSensorValues[2]);

}


void setupSerial() {
  printArray(Serial.list());
  myPort = new Serial(this, Serial.list()[ 1 ], 9600);
  // WARNING!
  // You will definitely get an error here.
  // Change the PORT_INDEX to 0 and try running it again.
  // And then, check the list of the ports,
  // find the port "/dev/cu.usbmodem----" or "/dev/tty.usbmodem----" 
  // and replace PORT_INDEX above with the index number of the port.

  myPort.clear();
  // Throw out the first reading,
  // in case we started reading in the middle of a string from the sender.
  myString = myPort.readStringUntil( 10 );  // 10 = '\n'  Linefeed in ASCII
  myString = null;

  sensorValues = new int[NUM_OF_VALUES];
}


void updateSerial() {
  while (myPort.available() > 0) {
    myString = myPort.readStringUntil( 10 ); // 10 = '\n'  Linefeed in ASCII
    if (myString != null) {
      String[] serialInArray = split(trim(myString), ",");
      if (serialInArray.length == NUM_OF_VALUES) {
        for (int i=0; i<serialInArray.length; i++) {
          sensorValues[i] = int(serialInArray[i]);
        }
      }
    }
  }
}