Final Project Essay – Sarah Chung

Our final research project is titled, The Better Reader. It aims to test concentration and focus as well as memory retention. Inspired by games and exercises that help with dyslexia, our project hopes to create a fun way for anyone to exercise their brain in an educational and interactive way. The Better Reader though inspired by exercises to help for dyslexia, hopes to appeal to a range of people as well.

From personal experience with family members suffering with Alzheimer’s, mental games allow for much needed mental exercise and is not only encouraged for those who suffer with the illness but also those who don’t. Brain and memory recall not only becomes more relevant as persons get older but to students as well. Long-term memory is something we as students need to utilize every day and The Better Reader hopes to exercise that skill to lead to better information retention. With technology allowing us information at the touch of a screen, these days it seems as though all you really need to remember are the passwords to your devices. With that in mind , our project hopes to bring to light that we need to take time to challenge ourselves to exercise not only our bodies but also our minds. This aligns with my idea of interaction as it is cyclic, it is like a conversation in which the two parties think, listen and speak , there is an input and output and processing of information in between (Crawford, 1).

We want to input a range of words into our game’s memory and have them appear onscreen. Each word will be highlighted and the computer will randomly stop on a word. The player will be shown all the words played and must remember which word the computer stopped on and select it. The further the players gets the faster the words will appear and will consequently be harder to remember. For this part of the project we will utilize the random function on Arduino as well as processing. Processing will be utilized to make the words appear on screen as well as to highlight them. Arduino will be utilized for the hardware of the project. It will handle the users input through the buttons and assess whether the inputted value by the user matches the correct answer and send the information to processing .

         We realized getting persons to interact with our project may be a challenge as mental exercise is just as attractive as doing physical exercise. To combat this we hope to make our project attractive to users by creating a “flashy” or interesting interface that draws persons in. This can be achieved by incorporating pictures, sound and other media in our processing. We also hope to make the physical appearance (buttons, casing etc.) attractive as well by getting buttons similar to that of a video game. We hope to start the coding for the project within the week and test it out using the buttons from the lab. After this we hope to move onto designing the physical aspect of the project by the end of next week into the following week and making appointments to laser cut the housing for the buttons as well as purchasing more attractive buttons.
Final Project Essay

A. The Labyrinth Maze

B. PROJECT STATEMENT OF PURPOSE

Based on our task to create an ongoing, interactive experience using Processing and Arduino, I aimed to create a device that would engage the user and would provide for a fun gaming experience. Inspired by traditional corn mazes and labyrinths mazes, the intended audience for this device would be anyone aiming to challenge themselves through utilizing strategic forms of strategizing a way to solve a complex maze. The maze could additionally boost the user’s patience and persistence level, whilst improving their hand-eye coordination and concentration levels. I seek to address the challenge of successfully combining virtual projection upon a physical object, in which its complexity challenges the player in completing the challenge. I hope for the device to cause the user to strengthen their cognitive thought processes and heighten their abilities of problem solving. 

C. PROJECT PLAN

I plan to create an interactive one-player game, with the physical labyrinth placed on top of a surface that would allow for it to rotate. The player would utilize a joystick in order to tilt the surface of the maze, wherein a marble would navigate the paths of the labyrinth. The marble would act as the physical “player” in the game, starting from the point of entry to the point of exit, while navigating various “obstacles” throughout the challenge. The obstacles would be virtually projected through Processing, through projecting an image onto the physical maze. For the first week, I will first create a cardboard prototype of the physical maze, that would include the maze and the walls surrounding it. I would additionally work on the Processing image for the projection, utilizing Photoshop to draft an image of a maze with its obstacles integrated throughout it. I would Photoshop a visual of a complex maze for the player to solve that would act as the physical labyrinth. For the second week, I would work on the codes that would connect the hardware and joystick to Arduino, and that would also connect the image in Processing to the maze. I would additionally work out the details of the projection through Processing, and making sure it would correspond to the physical maze smoothly. I would utilize the laser cutting for the box and prepare the materials for the maze, including the joystick, marble, and a smaller-scale projector. For the third week, I would finalize the design and assemble the materials together, while focusing on ensuring the final design would hide the wires and hardware of the game. 

D. CONTEXT AND SIGNIFICANCE

Inspired by these wooden labyrinth games, this project would be highly reliant on the user’s input in order to work successfully. They would have to play the game and focus on navigating the marble throughout the maze from one point to the other, making for a continuous loop of interaction between the user and the device. Similar to a conversation, interaction can be closely defined as “a cyclic process in which two actors alternately listen, think, and speak,” as outlined in The Art of Interactive Design (5). For a continuous loop to occur, the user needs to be constantly using and interacting with the device, as the device responds to the user’s endless input. This sequence consists of three steps:  input, output, and processing, as outlined in Introduction to Physical Computing (Igoe & O’Sullivan, 20). This device closely aligns with interactivity, as the player is constantly giving input through using the joystick to rotate the maze, while the device is moving the marble for the player to navigate the pathways. After successful completion, the project may lead onto more advanced mazes, including adding levels of difficulty or an increased number of obstacles for the player to navigate. 

Final Project Essay-Kurt Xu

Project Name: “Echo”

The inspiration comes from the shouting’s decompression effect by natural, yet people are restrained from actually doing that by various reasons, usually the fear of disturbing others. So we try to provide the user a reason to justify their act of screaming, which is to say, providing a place for people to release their pressure. And following that thought, we consider that the use of technology to provide feedback may possibly help people understand how stressful the status they are in and thus help them to confirm the relieving effect.

The project “Echo” will mainly translate your audio input into the visual output on the computer screen and simutaneously, keep monitoring your heartrate to estimate your stage of nervousness. Considering the resources we have, the latter one may be much harder, so it may be the main problem we may face. What we are trying to solve is the lack of related knowledge and possible equipment. Besides, as the main aim is not to encourage people to keep screaming or make noise but to achieve the conforting effect through that mean.The key issue is that we focus on is the visualization of the signal, which should aim to render a relaxing atmosphere. About that points, according to the pervious research we’ve made about the existing decompression softwares’ methodologyies, they usually use gentle movement of simple objects like circles/rectangles/triangles accompanied with generally relaxing soft music. We are considering taking the similar ideology as guidance in designing the program for the patterns.

To expand our project futher, we wish to translate the movement of the users simutanously. With viberation sensor and pressure sensor, we may also take the physical movement of the tester as a mean of input, thus expanding its interactivity. We also want to persuade our audience to wear or experience our device, so we decided to design something more appealing with a more desginated visual guidance. To achieve that, we decide to adopt a the idea our classmate suggested in class that we can design a device to control the elevation of the helmet to enhance the ceremonial sense.

To me, the definition of interaction is similar to the communication between human beings, as we convey messages through not only words but gesture, facial expression and body language as well, and the process to improve the interactivity of a certain project is to expand the way it reads and expresses itself, in other words, to intercept and to output.

Recitation 8: Serial Communication – Andrew Xie

Introduction

This time, we mainly use Arduino and processing to use the two software at the same time to achieve the interaction between electronic components and screen.

Exercise One

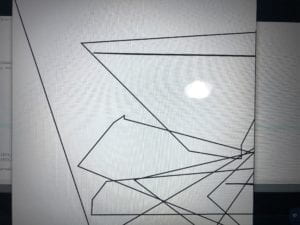
In this exercise, I encountered two difficulties. First, I wrote the code with the wrong version of quotation marks, which made the code unable to run. The second problem is that when drawing, the line can only move at the background edge.

001

At last, I found out that the wiring was reversed because of the X axis.

002

Code:

// IMA NYU Shanghai
// Interaction Lab
// For receiving multiple values from Arduino to Processing

/*
* Based on the readStringUntil() example by Tom Igoe
* https://processing.org/reference/libraries/serial/Serial_readStringUntil_.html
*/

import processing.serial.*;

String myString = null;
Serial myPort;


int NUM_OF_VALUES = 2; /** YOU MUST CHANGE THIS ACCORDING TO YOUR PROJECT **/
int[] sensorValues; /** this array stores values from Arduino **/

float preX;
float preY;


void setup() {
size(1023, 1023);
background(255);
setupSerial();


}


void draw() {
updateSerial();
printArray(sensorValues);
//float posx =map(sensorValues[1],0,1023,0,500);
// float posy =map(sensorValues[0],0,1023,0,500);
strokeWeight(4);
line(preX,preY, sensorValues[1],sensorValues[0]);
preX=sensorValues[1];
preY=sensorValues[0];

// use the values like this!
// sensorValues[0]

// add your code

//
}

void setupSerial() {
printArray(Serial.list());
myPort = new Serial(this, Serial.list()[ 4 ], 9600);
// WARNING!
// You will definitely get an error here.
// Change the PORT_INDEX to 0 and try running it again.
// And then, check the list of the ports,
// find the port "/dev/cu.usbmodem----" or "/dev/tty.usbmodem----" 
// and replace PORT_INDEX above with the index number of the port.

myPort.clear();
// Throw out the first reading,
// in case we started reading in the middle of a string from the sender.
myString = myPort.readStringUntil( 10 ); // 10 = '\n' Linefeed in ASCII
myString = null;

sensorValues = new int[NUM_OF_VALUES];

}

void updateSerial() {
while (myPort.available() > 0) {
myString = myPort.readStringUntil( 10 ); // 10 = '\n' Linefeed in ASCII
if (myString != null) {
String[] serialInArray = split(trim(myString), ",");
if (serialInArray.length == NUM_OF_VALUES) {
for (int i=0; i<serialInArray.length; i++) {
sensorValues[i] = int(serialInArray[i]);
}
}
}
}
}

Exercise Two

Because it took a long time to do exercise one, I finished it after class. With one experience, the second one is easy to do. But I didn’t do special effects on the mouse.

Code

For processing

// IMA NYU Shanghai
// Interaction Lab


/**
* This example is to send multiple values from Processing to Arduino.
* You can find the arduino example file in the same folder which works with this Processing file.
* Please note that the echoSerialData function asks Arduino to send the data saved in the values array
* to check if it is receiving the correct bytes.
**/


import processing.serial.*;

int NUM_OF_VALUES = 2; /** YOU MUST CHANGE THIS ACCORDING TO YOUR PROJECT **/


Serial myPort;
String myString;

// This is the array of values you might want to send to Arduino.
int values[] = new int[NUM_OF_VALUES];

void setup() {
size(500, 500);
background(0);

printArray(Serial.list());
myPort = new Serial(this, Serial.list()[ 4 ], 9600);
// check the list of the ports,
// find the port "/dev/cu.usbmodem----" or "/dev/tty.usbmodem----" 
// and replace PORT_INDEX above with the index of the port

myPort.clear();
// Throw out the first reading,
// in case we started reading in the middle of a string from the sender.
myString = myPort.readStringUntil( 10 ); // 10 = '\n' Linefeed in ASCII
myString = null;
}


void draw() {
background(0);

// changes the values
values[0] = mouseX;
values[1] = mouseY;/** Feel free to change this!! **/

// sends the values to Arduino.
sendSerialData();

// This causess the communication to become slow and unstable.
// You might want to comment this out when everything is ready.
// The parameter 200 is the frequency of echoing. 
// The higher this number, the slower the program will be
// but the higher this number, the more stable it will be.
echoSerialData(200);
}

void sendSerialData() {
String data = "";
for (int i=0; i<values.length; i++) {
data += values[i];
//if i is less than the index number of the last element in the values array
if (i < values.length-1) {
data += ","; // add splitter character "," between each values element
} 
//if it is the last element in the values array
else {
data += "n"; // add the end of data character "n"
}
}
//write to Arduino
myPort.write(data);
}


void echoSerialData(int frequency) {
//write character 'e' at the given frequency
//to request Arduino to send back the values array
if (frameCount % frequency == 0) myPort.write('e');

String incomingBytes = "";
while (myPort.available() > 0) {
//add on all the characters received from the Arduino to the incomingBytes string
incomingBytes += char(myPort.read());
}
//print what Arduino sent back to Processing
print( incomingBytes );
}

For Arduino

// IMA NYU Shanghai
// Interaction Lab


/**
This example is to send multiple values from Processing to Arduino.
You can find the Processing example file in the same folder which works with this Arduino file.
Please note that the echo case (when char c is 'e' in the getSerialData function below)
checks if Arduino is receiving the correct bytes from the Processing sketch
by sending the values array back to the Processing sketch.
**/

#define NUM_OF_VALUES 3 /** YOU MUST CHANGE THIS ACCORDING TO YOUR PROJECT **/


/** DO NOT REMOVE THESE **/
int tempValue = 0;
int valueIndex = 0;

/* This is the array of values storing the data from Processing. */
int values[NUM_OF_VALUES];


void setup() {
Serial.begin(9600);
pinMode(11, OUTPUT);
}

void loop() {
getSerialData();

// add your code here
// use elements in the values array
// values[0]
// values[1]

tone(11,values[0],values[1]);

}


//recieve serial data from Processing
void getSerialData() {
if (Serial.available()) {
char c = Serial.read();
//switch - case checks the value of the variable in the switch function
//in this case, the char c, then runs one of the cases that fit the value of the variable
//for more information, visit the reference page: https://www.arduino.cc/en/Reference/SwitchCase
switch (c) {
//if the char c from Processing is a number between 0 and 9
case '0'...'9':
//save the value of char c to tempValue
//but simultaneously rearrange the existing values saved in tempValue
//for the digits received through char c to remain coherent
//if this does not make sense and would like to know more, send an email to me!
tempValue = tempValue * 10 + c - '0';
break;
//if the char c from Processing is a comma
//indicating that the following values of char c is for the next element in the values array
case ',':
values[valueIndex] = tempValue;
//reset tempValue value
tempValue = 0;
//increment valuesIndex by 1
valueIndex++;
break;
//if the char c from Processing is character 'n'
//which signals that it is the end of data
case 'n':
//save the tempValue
//this will b the last element in the values array
values[valueIndex] = tempValue;
//reset tempValue and valueIndex values
//to clear out the values array for the next round of readings from Processing
tempValue = 0;
valueIndex = 0;
break;
//if the char c from Processing is character 'e'
//it is signalling for the Arduino to send Processing the elements saved in the values array
//this case is triggered and processed by the echoSerialData function in the Processing sketch
case 'e': // to echo
for (int i = 0; i < NUM_OF_VALUES; i++) {
Serial.print(values[i]);
if (i < NUM_OF_VALUES - 1) {
Serial.print(',');
}
else {
Serial.println();
}
}
break;
}
}
}

Recitation 8: Serial Communication

Intro

This week we were introduced to the ways that Processing and Arduino interact with each other.  From this recitation we saw how the two use serial communication with image and sound. 

Etch A Sketch

etch a sketch

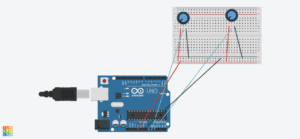
The interaction of this circuit comes from the potentiometers giving Processing an x and y location. One gives the x and the other gives the y, just like an etch a sketch. The interactivity from computer to human requires the user to turn the potentiometer for an image to be drawn. 

The Processing Code

import processing.serial.*;

String myString = null;
Serial myPort;


int NUM_OF_VALUES = 2;   /** YOU MUST CHANGE THIS ACCORDING TO YOUR PROJECT **/
int[] sensorValues;      /** this array stores values from Arduino **/
float psensorValue0;
float psensorValue1;


void setup() {
  size(500, 500);
  background(255);
  setupSerial();
}


void draw() {
  updateSerial();
  printArray(sensorValues);
   float x = map(sensorValues[0], 0, 1023, 0, width);
   float y = map(sensorValues[1], 0, 1023, 0, height);
  stroke(0);
  strokeWeight(2);
  line( psensorValue0, psensorValue1, x, y);
  psensorValue0 = x;
  psensorValue1= y;


  // use the values like this!
  // sensorValues[0] 

  // add your code

  //
}


void setupSerial() {
  printArray(Serial.list());
  myPort = new Serial(this, Serial.list()[ 73 ], 9600);
  // WARNING!
  // You will definitely get an error here.
  // Change the PORT_INDEX to 0 and try running it again.
  // And then, check the list of the ports,
  // find the port "/dev/cu.usbmodem----" or "/dev/tty.usbmodem----" 
  // and replace PORT_INDEX above with the index number of the port.

  myPort.clear();
  // Throw out the first reading,
  // in case we started reading in the middle of a string from the sender.
  myString = myPort.readStringUntil( 10 );  // 10 = '\n'  Linefeed in ASCII
  myString = null;

  sensorValues = new int[2];
}


void updateSerial() {
  while (myPort.available() > 0) {
    myString = myPort.readStringUntil( 10 ); // 10 = '\n'  Linefeed in ASCII
    if (myString != null) {
      String[] serialInArray = split(trim(myString), ",");
      if (serialInArray.length == NUM_OF_VALUES) {
        for (int i=0; i<serialInArray.length; i++) {
          sensorValues[i] = int(serialInArray[i]);
        }
      }
    }
  }
}

Code from Arduino

void setup() {
Serial.begin(9600);
}

void loop() {
int sensor1 = analogRead(A0);
int sensor2 = analogRead(A1);
Serial.print(sensor1);
Serial.print(“,”); 
Serial.print(sensor2);
Serial.println(); 

delay(100);
}

Musical Instrument 

Buzzer Buzzing

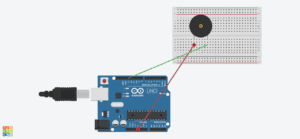
This exercise showed serial communication between Arduino and Processing through sound. The interactivity came when the mouse was pressed and moved around the screen. The sound reacted in response to this. 

Arduino Code

#define NUM_OF_VALUES 2

int tempValue = 0;
int valueIndex = 0;

int values[2];

void setup() {
Serial.begin(9600);
pinMode(13, OUTPUT);
pinMode(9, OUTPUT);
}

void loop() {
getSerialData();

if (values [1] == true) { //if mouse is pressed which is at position 1 (which is mouse press) then…
tone(13, values[0]); //at pin 11 play the mouse x values frequency
}
else {
noTone(13);
}
}

void getSerialData() {
if (Serial.available()) {
char c = Serial.read();

switch (c) {

tempValue = tempValue * 10 + c – ‘0’;
break;

values[valueIndex] = tempValue;

tempValue = 0;

valueIndex++;
break;

case ‘n’:

values[valueIndex] = tempValue;

tempValue = 0;
valueIndex = 0;
break;
/
for (int i = 0; i < NUM_OF_VALUES; i++) {
Serial.print(values[i]);
if (i < NUM_OF_VALUES – 1) {
Serial.print(‘,’);
}
else {
Serial.println();
}
}
break;
}
}
}

Processing Code

import processing.serial.*;

int NUM_OF_VALUES = 2;  

Serial myPort;
String myString;

int values[] = new int[NUM_OF_VALUES];

void setup() {
  size(500, 500);
  background(0);

  printArray(Serial.list());
  myPort = new Serial(this, Serial.list()[ 73 ], 9600);
 

  myPort.clear();
  
  myString = myPort.readStringUntil( 10 );  // 10 = '\n'  Linefeed in ASCII
  myString = null;
}


void draw() {
  background(0);
values [0]= mouseX;//frequency is changing based on moving the mouse around, sends to arduino
values [1]=int(mousePressed);// turn true or false (boolean) into an integer that can be sent 

  
  sendSerialData();

    echoSerialData(200);
}

void sendSerialData() {
  String data = "";
  for (int i=0; i<values.length; i++) {
    data += values[i];
   
    if (i < values.length-1) {
      data += ","; // add splitter character "," between each values element
    } 
   
    else {
      data += "n"; // add the end of data character "n"
    }
  }
  //write to Arduino
  myPort.write(data);
}


void echoSerialData(int frequency) {
  
  if (frameCount % frequency == 0) myPort.write('e');

  String incomingBytes = "";
  while (myPort.available() > 0) {
   
    incomingBytes += char(myPort.read());
  }
 
  print( incomingBytes );
}