Recitation 3: Sensors, Celine Yu

Date of Recitation:  March 1, 2019

Documented On: March 3, 2019 

Partner: Megan Rhoades 

Reflection:

Megan and I selected the moisture sensor as the main component for the week’s Arduino exercise and decided that we would drive an output through a buzzer. We referenced other Arduino exercises from previous recitations in order to recollect our memories of the board’s set up. To ensure that the circuit was kept both clean and organized, Megan and I only used 3 different colored jumper cables: black, red and blue. The red was used to symbolize power whereas the black signified ground. Together with the blue, we used all 3 colored sets to interconnect the Arduino board with the breadboard for the buzzer to work effortlessly. 

Circuit 1: Buzz Output

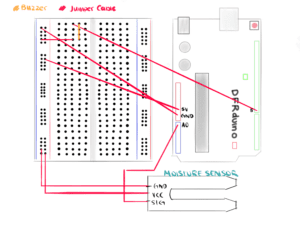
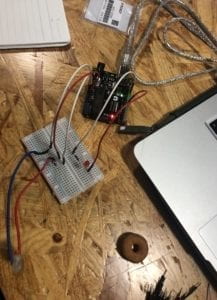
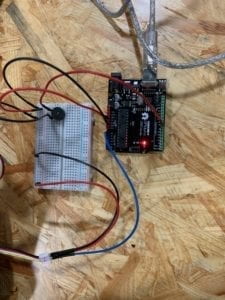
First, we attached a black wire to both the breadboard and Arduino board’s ground (GND) and proceeded to connect the Arduino’s 5V pin to the breadboard with a red cable. Next, we attached the buzzer to the breadboard through slots F26 and F29 and used one of the black wires to connect the buzzer’s anode side to the breadboard’s ground.  The cathode, on the other hand, was connected to the Arduino board’s digital PWM through pin #8 with a different red cable. The last step needed to complete the circuit was the inclusion of the moisture sensor, the component responsible for perceiving the circuit’s input. Megan and I recalled previous lectures and remembered how the yellow pin/wire needed to be connected to an Arduino board’s Analog pin. To complete this step, I took one of the blue cables and attached the moisture sensor’s yellow pin to the Arduino board’s A0 slot. 
Immediately after finishing up with the circuit, Megan and I gave our undivided attention to the code. We first set integers of sensorValue = 0, and sensorPin = A0, values that corresponded to the moisture sensor’s analog pin, as described in the previous paragraph. Next, we typed in the constant integer, buzzer = 8, in order to relate the line of code to the circuit’s digital PWM. The void setup () section was completed with usual components such as: Serial.begin (9600) and pinMode, which we had set to ‘buzzer, OUTPUT.’ Afterward followed the void loop () section of the code, which was also one of the most confusing parts of the entire assignment. We set the conditions for when sensorValue > 300, the buzzer would emit a faint sound, similar to the output of previous recitation exercises.

Believing we had everything ready to go, we selected the accurate ports and uploaded the code to the Arduino circuit. Since we required a source of water for the moisture sensor, we decided to use the excess water from my water bottle to form moisture on our fingers. I placed my index finger onto the moisture sensor after wetting it and waited for the buzzer to sound. The output, unfortunately, did not occur. We were convinced that the failure was due to the lack of moisture on my finger, in which we decided to alter the code from sensorValue > 300 to sensorValue > 150. Once again, we repeated the trial but was still unable to get the circuit working properly. This is where the buzzer caught the attention of my eyes, I suggested to Megan that the buzzer was actually the source of the problem. Megan agreed with me, thinking that the buzzer could have been positioned incorrectly in terms of its power and ground complex. Together, Megan and I chose to change the direction of the buzzer so that the anode was attached to the ground and the cathode, connected to the Arduino board (Digital PWM). We were ecstatic to learn that the circuit finally began working, as the buzzer emitted a short ‘beep’ when my finger came in contact with the moisture sensor. We then discovered that there was still a significant amount of time left before class ended. To make use of our remaining time, Megan and I decided that we would challenge ourselves with a more advanced circuit, one that made more use of our coding skills. Without changing the formatting of either the breadboard or Arduino board, we went straight to work on Megan’s laptop. 
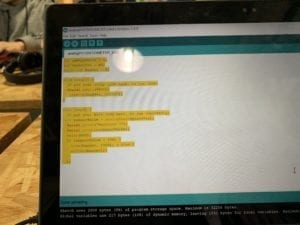
Together, we decided that we wanted to change the output of the circuit from a simple buzz to a random melody. This idea was sparked by last week’s recitation where I also used the buzzer as an immediate output. Megan and I searched for the toneMelody example under 0.2 Digital and copied and pasted the code into our own. We positioned integers Melody and noteDurations to the very top so that they functioned in the same region as the original 3 (sensorValue, sensorPin, buzzer). Next, we positioned the remaining code into the void loop () section by implementing it within ‘if’ and ‘for’ conditions. Believing that we had everything set and ready to go, we uploaded the code to Arduino and awaited our results.

Unfortunately, our first attempt did not go smoothly. Not only the did the buzzer fail to play a melody, but it also lost its ability to release a single output. Megan and I returned to the code to look for what may have gone wrong. We noticed a discrepancy between the example code and our own and immediately went on to fix it. We had accidentally forgotten to implement the ‘#include pitches.h’ component in our code, a portion extremely crucial to the circuit for it provided the Arduino with the melody’s chords and notes. Without this extra code, it was a given that the circuit would not work. We quickly added the pitches.h page, copied and pasted the defined notes from the 0.2 Digital example and proceeded to link the additional page to our main code. Following this, we made the decision to continue looking over our code to search for any other mistakes that could have occurred. This double checking turned out to be a good idea because we had discovered that constant #8 was in need of fixing. We changed the code by replacing the #8 with the constant integer we had provided it in the beginning (buzzer) and once again, uploaded the code to the circuit.
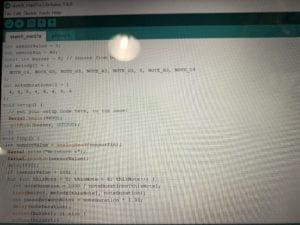
https://bpb-us-e1.wpmucdn.com/wp.nyu.edu/dist/0/13761/files/2019/03/IMG_3478-1.mov

This time around, the circuit finally worked, and just in time as well. We took turns moistening our hands with water and playing with the moisture sensor as we listened to the melody that played from the buzzer. With the remaining time in class, Megan and I decided that we would go over the challenges from our exercise in order to coordinate our documentation reports. Concludingly, we began working on the mandatory schematics sketch for the assignment on my iPad and made sure to make it as clear as possible for all audiences.

Question 1: What did you intend to assemble in the recitation exercise? If your sensor/actuator combination were to be used for pragmatic purposes, who would use it, why would they use it, and how could it be used?

Answer 1:  In this recitation, Megan and I were immediately enticed by the moisture sensor and decided that we wanted to build a circuit that would emit a notification or sound once it encountered a certain amount of moisture. A pragmatic example in which our circuit could be used is in relation to plants. For consumers who enjoy taking care of plants at home, work, or any environment, our sensor/actuator combination could be implemented beneath the plant and soil to detect moisture. Once the moisture sensor detects that the value of moisture has reached a certain minimum, it would set off the buzzer. The buzzer would then alert the consumer with either a sound effect or melody that plays on loop until the sensors detect that the value of moisture is above the minimum that is set, an output that would remind the consumer to water their plants. 

Question 2:  Code is often compared to following a recipe or tutorial. Why do you think that is?

Answer 2: I believe that when an individual is attempting anything new, they always need assistance from those who are more experienced than them. This theory can be applied to various hobbies, tasks, and careers such as cooking, makeup, constructing, etc. The need for an ‘instruction manual’ is attributed to the human’s need for knowledge and understanding of a situation and or task beforehand. Most people prefer to understand specific details about a certain task as compared to performing it blindly with no knowledge of the correct format and or methods. Most individuals, including me, require instructions and recipes to guide them through these tasks until they are somewhat comfortable with the information they’ve acquired and are confident that they can perform the task without assistance. Even when one has mastered a skill or task, there will always be room for improvement and learning. This tendency is an inherent factor that all humans share and includes the task of coding.

Question 3: In Language of New Media, Manovich describes the influence of computers on new media. In what ways do you believe the computer influences our human behaviors.

Answer 3: Throughout its existence, technology has impacted humans and their behavior in various ways, the most influential of them all include our computers and laptops, a form of mobile machinery we can take with us everywhere we go. To the millennial age, computers and phones are a necessity, items that cannot be forgotten about. There are apps and websites on the internet that users can access through their computers to educate themselves about various topics, most specifically, academic subjects. Though users have indeed enhanced and developed their cognitive thinking with the wonders of both the internet and computers/laptops, this technology also has great influences upon our human behaviors, some more negative than others. In recent years, society has witnessed the indomitable rise that is social media. As users are captured by social media and other significant apps, their eyes are fixated to their screens, a reality that ultimately affects the human being’s social skills and emotional behavior. A majority of consumers are hiding behind their screens, creating facades out of their friends and themselves, all while being unable to interact with others in real life. Though the computer (technology, internet) has evolved the world by assisting millions and millions of users, there will always be aspects of its technology that have negative effects on humans, human behavior is just a single example.
Recitation 3: Sensors by Ellie (Meng Yihan)

Circuit 1

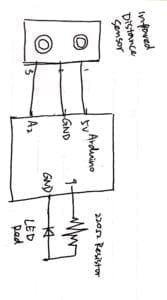
Components: 1* infrared distance sensor

1* LED

1* 220-ohm resistor

1* breadboard

1* Arduino

1 * USB A to B cable

A handful of jumper cables

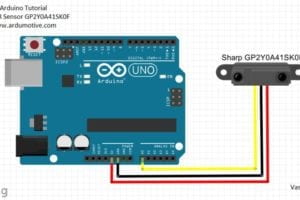
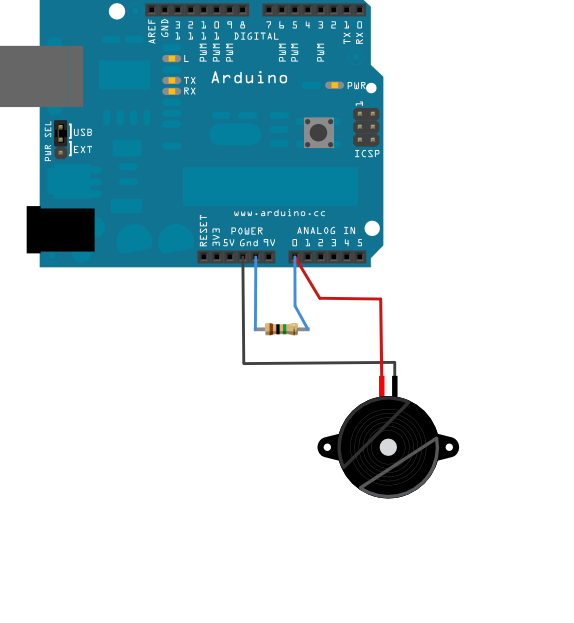
Diagram:

Process: 1. Connect the Arduino with USB. 2. Choose the suitable sensor. 3. Design the circuit. 4. Connect the circuit according to the diagram. 5. Write the Arduino programming. 6. Test the circuit.

Problems encountered: we were confused about the code on the webpage which introduce how to translate the distance into digital signals. We reached an assistant for help and he explained how the code worked and taught us how to use map(). He also checked our circuit, finding out some incorrect connection. We then tried a few more times ourselves and soon we were able to get the sensor work.

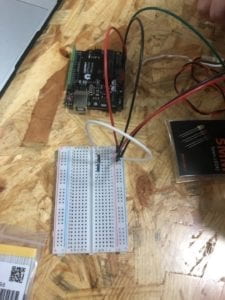
Picture:

Video:

Circuit 2

Components: same

Diagram: same

Process: we made a few adjustments to our Arduino code, trying to make the LED go off when the distance between Arduino and sensor exceed 30cm.

Problems encountered: we struggled a bit when writing the “if…else…” code, but eventually successfully worked that out without external help. However, we then found that when we move our hand away from the sensor, it would go off for a second, then somehow it gave light again.

We failed to figure it out ourselves so we reached Young for help. He checked the sensor and our circuit and it turns out we set the ceiling number at 30, which the sensor could not sense. That makes the input be seen as a blank, thus, the LED would give light again. We changed the number to 20 and it worked perfectly.

Video:

Question 1: I intended to create a circuit that if the sensor senses the infrared ray, the LED would give light. It could be used to remind people of potential danger, for instance, the circuit could be built in the high voltage box, then if someone approaches and the distance could cause danger, the caution light would shine brightly to warn people. Also, it could be used for automatic lighting device so that if someone enter the area, it would give light, saving the trouble from groping in the dark to try to find the button, also save the energy by turning off the light if no one is in the room.

Question 2: Because for a certain programming software, the language is fixed. The final product of programming is the mixture and flexible application of the standard codes. People can do almost everything they want if they follow the instruction and make good use of the codes, which is similar to recipe or tutorial: do as you are told, and you will get what it should be. Also, you can make a little bit change to the order and other things to the code to create new patterns and make it more suitable to your purpose just like different chefs do to make their cuisines more delicious and unique.

Question 3: From my perspective, I think the most significant and remarkable influence that computer has on human is that it changes our thinking method and our behavior, including emotional feelings on technology. It regulates the idea of “change” and “new”, also updates our interpretation and perception of “precise” and “time”, as well as our concept of the combination of “simpleness” and “complexity”. It brings us to the new era of everything updating and renewing all the time. Moreover, it gives us a way to interact more with a certain machine, not only follows its working routine, but create something new. From this point of view, it also improve human’s creativity, even provide a new dimension of space for being creative.

Recitation 3: Sensors-Young-by Yijia Chen(Kaycee)

Partner: Zhiqiu Wang

Circuit 1: Blink with an infrared distance sensor

Components:

1 * Arduino Uno

1 * infrared distance sensor

1 * LED

Jumper cables

Processes and problems we encounter:

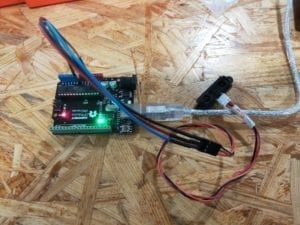
We first connected the Arduino with the infrared distance sensor like the picture above.

This recitation was not like any previous recitations because we were not provided any visual aids of the circuit. But meanwhile, we could also explore something new and add our creativity into our work. We chose the infrared distance sensor and wanted to build a circuit in which the brightness of the LED can be adjusted to the distance the sensor sensed. However, at first, we could only let the LED on when the distance that sensor sensed was above some number and let it off when the distance was under some number.  We copied some language from examples tested it. At first, the serial monitor only showed two numbers which were not even close to the fact. We asked an assistant for help and found out that we mistakenly typed 0 as our input pin number but assemble the wire into port 2. We made some adjustment and tried again. This time, the circuit worked well.

Circuit 2: Fade with an infrared distance sensor

After our first success, we still wanted to try on the fading circuit. We used the mapping formula to transit the distance that the infrared distance sensor sensed into numbers between 0 to 255. We were confused at first about how to write the Arduino. After perusing and contemplating the programming, we found that there were only two lines we needed to copy from the example the website provided. Under the guidance of professors, we made the completed code, which was much cleaner and more simple than I thought it would be.

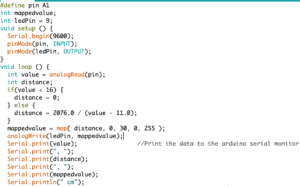
This is how the code looked like at last.

Question 1:

What did you intend to assemble in the recitation exercise? If your sensor/actuator combination were to be used for pragmatic purposes, who would use it, why would they use it, and how could it be used?

We intended to assemble a device in which the brightness of LED can adjust to the distance that the sensor sensed. I think it can be used as an energy-saving street lamp. The government can install such a device along the roads which are remote and far from the city center. Because there is usually few cars who will pass these streets, keeping all the street lamps there at full brightness can be a waste of energy. This device can save energy at a large degree. They can improve lighting levels when the infrared distance sensor detects cars coming and turn the brightness down when there are no moving things on the road.

Question 2:

Code is often compared to following a recipe or tutorial.  Why do you think that is?

When start coding, we need to first consider what variables we need in the following lines and present them at the very beginning. For example, in our second circuit, we defined pin as A1 and ledPin equals 9. Thus when we input pin or ledPin again afterward, the computer can recognize these “signals” and decide what we want it to do. This process is similar to making a recipe. The recipe maker will always present the food material this specific dish needs at the very first, then use these materials to produce something else.

Question 3:

In Language of New Media, Manovich describes the influence of computers on new media. In what ways do you believe the computer influences our human behaviors?

The computer serves as a medium in communication between human. Network drives social productivity to develop at a faster rate. There are increasing channels for people to understand and disseminate information. People can complete work and study tasks without leaving home, allowing everyone to save more time to deal with other things so that people are liberated in action and thought. However, almost every aspect of computers influence on human behavior has two sides. For example, in job marketing, computers replace workers of those hazardous work, but computers also converted them into unemployed people. Since the current network development has not yet reached a relatively perfect stage, the network still has a lot of virtuality and unreality, which leads to the development of the struggle in the ideological and political fields on the network.

Recitation 3: Sensors by Liyang Zhu (Tom)

In this week’s recitation, we tested some sensors.

Moisture Sensor

First, I followed this form and connected sensor to Arduino.

Arduino Port Sensor Port
5V Red
GND Black
White
A0 Yellow

Then I found a sample code on http://wiki.seeedstudio.com/Grove-Moisture_Sensor/.

int sensorPin = A0;
int sensorValue = 0;

void setup() {
    Serial.begin(9600);
}
void loop() {
    // read the value from the sensor:
    sensorValue = analogRead(sensorPin);
    Serial.print("Moisture = " );
    Serial.println(sensorValue);
    delay(1000);
}

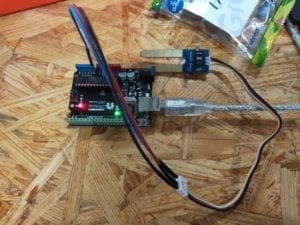
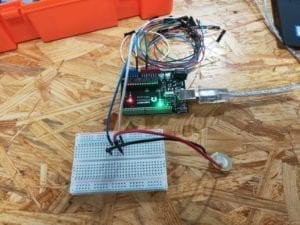
Upload. Done! Here are the photo and video.

Infrared Distance Sensor

First I followed the circuit diagram.

Picture of The Circuit

Image from https://www.instructables.com/id/How-to-Use-the-Sharp-IR-Sensor-GP2Y0A41SK0F-Arduin/

Then, I uploaded the code.

#define sensor A0 // Sharp IR GP2Y0A41SK0F (4-30cm, analog)

void setup() {
Serial.begin(9600); // start the serial port
}

void loop() {

// 5v
float volts = analogRead(sensor)*0.0048828125; // value from sensor * (5/1024)
int distance = 13*pow(volts, -1); // worked out from datasheet graph
delay(1000); // slow down serial port

if (distance <= 30){
Serial.println(distance); // print the distance
}
}

Here is what I’ve done.

Vibration Sensor

I first connect everything.

Image from https://www.arduino.cc/en/Tutorial/Knock

Then I loaded the code from Arduino IDE’s sample library.

Here is my work.

Ultrasonic Ranger

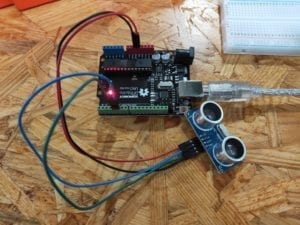
I connected the sensor to Arduino like this.

Arduino Port Sensor Port
4 Echo
5 Trig
5V VCC
GND GND

Then I used the code provided online.

int inputPin=4;
int outputPin=5;
int ledpin=13;
void setup()
{
Serial.begin(9600);
pinMode(ledpin,OUTPUT);
pinMode(inputPin, INPUT);
pinMode(outputPin, OUTPUT);
}
void loop()

{
digitalWrite(outputPin, LOW);
delayMicroseconds(2);
digitalWrite(outputPin, HIGH);
delayMicroseconds(10);
digitalWrite(outputPin, LOW);
int distance = pulseIn(inputPin, HIGH);
distance= distance/58;
Serial.println(distance); 
delay(50); 
if (distance >=50)
{
digitalWrite(ledpin,HIGH);
}
else
digitalWrite(ledpin,LOW);
}

My result:

Joystick Module

When dealing with this sensor, I had a problem with the internal button.

First, connect the module.

Image from https://www.brainy-bits.com/arduino-joystick-tutorial/

Since basically, this module is two potentiometers and one button, I tried to write the code on my own. Here is my initial code.

int X=A0;
int Y=A1;
int BUTTON=3;
void setup(void)
{
  Serial.begin(9600);
  pinMode(BUTTON,INPUT);
}

void loop(void)
{
  Serial.print("X=");
  Serial.print(analogRead(X));
  Serial.print(",");

  Serial.print("Y=");
  Serial.print(analogRead(Y));
  Serial.print(",");

  Serial.print("BUTTON state = ");
  Serial.println(digitalRead(BUTTON));

  delay(100);
}

However, as uploaded and ran the code, I found that though the X- and Y-axis worked well, the state of button stayed 0.

Later as I checked online code, I found that it was because I forgot to use the internal pull-up resistor.

To make the button working, I should either use INPUT_PULLUP as the parameter or explicitly use digitalWrite(BUTTON,HIGH); to enable internal pull-up resistor after assigning the pin as an input;

or, I build the external circuit.

Questions

Question 1

One of the sensors I intended to assemble was the ultrasonic distance sensor. For the pragmatic purpose, this sensor can be used on automatic robots. Such sensors can help robots to avoid collisions. When a robot is moving forward, the distance sensor helps it to make sure there is no obstacle ahead. If the sensors report a short distance, that means something is in front of the robot, and the robot can stop moving before severe collisions.

Question 2

From my perspective, I think the code is a bridge between human and machine. The code is what computers/microcontrollers follow strictly and what human writes to convey their purpose.  It can be both understood by human and machine. When a human wants computers to do something for them, he/she has to use code to let the computer do exactly what he/she wants.

Question 3

I think human will become lazier due to computers. Nowadays computers can help us to do lots of things. And in the future, computers will only be more powerful. More and more tasks of human will be done by computers. So computers will influence human to behave lazier.

Recitation 3: Sensors – Young- by Citlaly

  Vibration Sensor

  • Breadboard to Arduino:
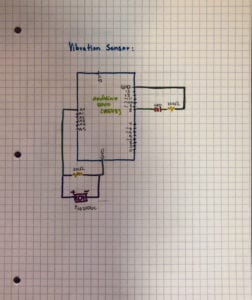
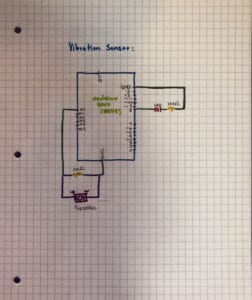
    • We used a piezo disk sensor that senses vibration and connected it to the power the Arduino and ground. then connecting the piezo disk sensor to a 1 mega-ohm resistor connecting that to the ground of the Arduino. We then connected a LED output 8 and a 220-ohm resistor into the output ground.  It did not work at first because we had the polarity reversed for the LED then we fixed it and it worked and when we hit the plate the light lit up.


https://youtu.be/oWiOaBwKTd0

  •      Code:
    • Arduino>File>Examples>0.6Sensors>Knock 

                 code from the Arduino website.

Moisture Sensor

  • Breadboard:
    • The sensor was slightly more difficult to make. First, we connected the moisture sensor first the ground to the ground of the Arduino, The Vcc (the red wire)  to the power of the Arduino, and lastly the yellow wire of the moisture sensor to A0 on the Arduino. We kept the light that we used for the circuit before. 
  •      Code:
    • The coding was also slightly tricky. Off of the website Seeedstudio we had initially copied and pasted the first example of coding :

int sensorPin = A0;

int sensorValue = 0;

void setup() {

Serial.begin(9600); }

void loop() { // read the value from the sensor:

sensorValue = analogRead(sensorPin);

Serial.print(“Moisture = “ );

Serial.println(sensorValue);

delay(1000);

}

          But when we were touching the moister sensor we notice the light was turning on and off; however, instead of showing the moisture level it was saying knock. It turned out that the coding from the last sensor was still lingering so we had to go into the coding and add the action of the light. 

int sensorPin = A0;

int sensorValue = 0; 

int ledPin = 8;

void setup() {

Serial.begin(9600); 

pinMode(ledPin, OUTPUT); 

}

void loop() {

// read the value from the sensor:

sensorValue = analogRead(sensorPin);

Serial.print(“Moisture = “ );

Serial.println(sensorValue);

delay(1000);

(sensorValue > 90)

{

digitalWrite(ledPin, HIGH);

}

else

{

digitalWrite(ledPin, LOW); 

}

       After adding the coding for the LED the instead of knocking the computer was reading the moisture.

https://youtu.be/08jdgCUSD5g

Question one:

What did you intend to assemble in the recitation exercise? If your sensor/actuator combination were to be used for pragmatic purposes, who would use it, why would they use it, and how could it be used?

Answer one:

I personally intended to find out what the vibration sensor did to see if it was the sensor I was looking for, for my video game idea. And it was? I asked questions and was told that if I were going to use one to use a more sensitive one and that if I were going to put it on the floor I should instead use some sort of board so the vibration could sense better the vibration caused by jumping or stomping. A vibration sensor realistically can be used to measure the vibrations of a machine to check whether the machine is healthy or not. Maybe a mechanic would use it on a car if an own noticed anything a little off. It might be used or already be programmed in the car and they somehow measure it and see if the vibrations are off from the usual and diagnose it an unhealthy car.

Question two: 

Code is often compared to following a recipe or tutorial.  Why do you think that is?

Answer two:

This is totally true. I think it more closely aligns with a baking recipe because with baking every ingredient must be mixed and measured to perfection.  Code is the same way because if you get a single missed letter, spelling. or capitalization wrong your cake is coming out wonky and the texture completely wrong. There is also the box cake mix of code where you copy and paste code too which you can not possibly mess up, but sometimes it does not come out right or you need to add something to make the code work for a particular situation ( like we did in the moisture one). 

Question three:

In Language of New Media, Manovich describes the influence of computers on new media. In what ways do you believe the computer influences our human behaviors?

Answer three:

It may be too soon to tell, but as gerneration Z becomes adults the changes in behavior may be more evident.  As a generation that grew up with computers and the internet the tendencies to think and generate ideas can be similar to a computer. From  Language of New Media Manovich explains periodic updates as the updating of new software. The rush of new updates and software that bombard us each day the need to be up to date can be an alteration to human behavior. The constant need to be connected to the newest thing or the new capability to create in even more detail to the average person (‘Photoshop, “Microsoft Word”) has changed human behavior to not only be apart of the next big thing but to also make it.