We got our own Arduino kits in this recitation. I felt so good building these devices using my materials although I’m still assembling circuits based on instructors’ ideas. This time we combined programming and working on circuits to carry out more complicated projects. Since Inmi told us in class that we are going to try out the if clauses in this recitation and I’m worried that I might be overwhelmed by all the logic and syntax, I previewed the codes before recitation. This has made this recitation pretty smooth and efficient for me. I don’t have to try understanding everything while paying attention to the physical electronic parts. I think this will always be a great strategy to take when it comes to coding that I’m not proficient in.
Circuits
Materials
1 * Arduino Uno
1 * USB A to B cable
1 * breadboard
1 * buzzer
2 * LEDs
2 * 220-ohm resistors
2 * 10K ohm resistors
2 * pushbuttons
A handful of jumper cables
2 * arcade buttons
Circuit 1: Fading
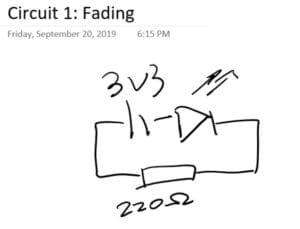
We directly used the example code from Arduino after talking about what it does. We both agreed that this code is walking the led back and forth from dim to bright by changing the PWM value sent to it using an if clause to see whether the value should go up or down, changing the brightness of light in the meantime. Therefore, we did a pretty simple circuit: linking LED to pin 9 as the example code suggests, using a 220-ohm resistor and plugging in the power source and it worked–that simple:/
Circuit 2: Buzzer
Still, the most challenging part of circuit 2 is understanding the code, since there is a new clause of for in it, and uses the function tone() that asks buzzers play music. Circuit-wise, we just needed to notice that the buzzer is polarized and pay attention to which direction electricity flows.
We searched online and it says for in C works this way:
for ( init; condition; increment ) {
   statement(s);
}
So we understood that the example code is trying to play the melody once by iterating over each note’s melody and duration by using the tone() function every time the board is reset. We looked up the reference in the toolbar, and we noticed that the third argument in tone() is optional, therefore we could also stop the buzzer playing using noTone() function. This means we can also write our song as to let the buzzer play as long as we could make out each note in it.
Circuit 3&4: Speed game
The third circuit is a fun but complicated one, especially when you put into the third and fourth players. But after we figured the code out, it seemed quite simple especially when the blueprint of the circuit is already there to be referred. This is what our circuit for two players looked like at first. The serial panel is only showing the record of player 01 pressing the button, and that’s when we realized an error occurred when we were building the left side of the circuit. We did a little troubleshoot around the second button, and it didn’t take us long to find out it was just a minor mistake of connecting both sides of the button to ground. It’s always more efficient to figure out what’s wrong if you have a primary idea of which part of the project is troublesome.
After we fixed the problem, the circuit worked pretty and smooth.
For the last 15 minutes of the recitation, we worked together with the group of Lisa Moon to build the game for 4 players. I and Lisa did the same change to the code, which was basically copying and pasting lines to assign new pins for the other 2 buttons and to record if player 3 and 4 have pressed their button, since the original logic of the code is to check when player 01 press the button and win 1 point, whether he/she has reached 10 points in all in order to champion the game, provided the other players have not championed yet. And then player 02, 03, 04… (So the program is not actually fair because if there are multiple players pressing the button exact the same time, whoever is checked first by the program always gets 1 more point) Therefore, we just need to add the sentences for player 03 and 04 to make the program work.
Our final result is quite wild.
Reflections
Reflect how you use technology in your daily life and on the circuits you just built. Use the text Physical Computing and your own observations to define interaction.
Interaction is the process in which two parties involved repeatedly send information through media such as words, sound, image, physical movements, etc while receiving the other’s information simultaneously. The more types of media are involved in the communication of information, the more interactive a relationship is.
Why did we use the 10K resistor with the push button?
Because the push button does not has ohms on its own. Since the voltage is how large we chose it, the smaller the resistor value is, the stronger the current it. In order not to fry the button with too strong a current, we need to put a resistor with a large value into the circuit.
If you have 100,000 LEDs of any brightness and color at your disposal, what would you make and where would you put it?
I think I will find a vacant space in the countryside of Shanghai, lay them on the ground into aircraft lanes, and run an open bid to let the company that offers the most money to build an airport next to it.
