Week 3: Warm Up with Programing Fundamentals! – Eszter Vigh

Homework OOP

So what did I do exactly? 

I made my input the location of my mouse (the x and y coordinates). I then worked to declare the type of movement I wanted to happen. It wasn’t anything particularly special, but this is essentially the more organized way of getting movement for multiple objects.

If I really wanted to I could have a million circles. I didn’t want to do that, because I wanted to show how the mouse input works as clearly as possible. 

I could have just as easily done the keyboard, Up, Down, Left, Right arrow keys, but I like the real time updates this way… I am kind of a press and hold sort of person and I get annoyed easily if I hav to repeatedly press the keys. 

Anyway… this is my code (you can also see it in the video).

const MAX_BALLS = 10000, balls = [];
let bg;

function setup() {
pixelDensity(displayDensity());
createCanvas(500, 500).mousePressed(createBall);
frameElement && (frameElement.width = width, frameElement.height = height);

bg = color(random(255),random(255),random(255));
}

function draw() {
background(bg);
ellipseMode(CENTER).noLoop();
strokeWeight(2.5).stroke((random(255), random(255),random(255))).fill((random(255), random(255),random(255)));
for (let b of balls) b.display();
}

function createBall() {
const b = balls.length == MAX_BALLS && balls.shift() || new Ball;
balls.push(b.setXY(mouseX, mouseY));
redraw();
}

class Ball {
static get DIAM() { return 50; }

constructor(x, y) { this.setXY(x, y); }

setXY(x, y) {
this.x = x, this.y = y;
return this;
}

display() { ellipse(this.x, this.y, Ball.DIAM, Ball.DIAM); }
}

Week #3 MLNI – Generative Art w/OOP —— Lishan Qin

Overview

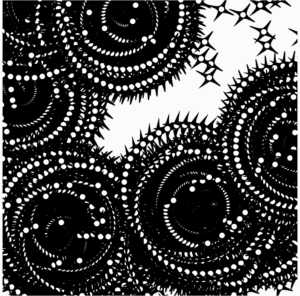
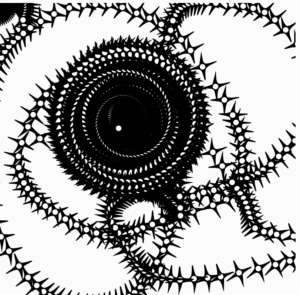
For this week’s assignment, I used p5.js to create a drawing of a series of shuriken(a Japanese weapon) vortex. First, I used beginShape(), curveVertex(), and endShape() to design the shuriken. Then I created a class called “object” to represent the shuriken. I put the x,y position of the shuriken in the constructor(), and wrote functions like move(), bounce(), display() to let the shuriken bouncing within the canvas. Then I wrote translate(), scale() and rotate() functions to allow theshuriken to appear to be rotating. Finally, I created a list a wrote a for loop so that there are more shuriken appearing in the canvas. I also changed the (x,y) in the translate() function into (mouseX,mouseY) so that the users are able to draw vortex with their mouse on their own. The code of this project can be found Here.

(Japenese Shuriken)

Porject Presentation:

Technical Problem

My initial idea is to let all of the shuriken moving, bouncing within the canvas, and rotating itself around its center, and the number of it can be determined by the users’ input. But then I found that the center of the shuriken is not as easy to be found as I thought and there always seems to be errors that make it rotate around another point that is not its center and makes the whole image looks weird. Thus, I finally decided to make it rotate around mouseX and mouseY so that the user can be in charge of the whole painting and make drawings on their own.

Week 3 MLNI – Generative Art w/ OOP (Cherry Cai)

Project: Reduce Light Pollution

For this week’s assignment, I created a generative art that utilizes object-oriented programming concept and interactivity with the mouse.

Presentation of the Project

Inspiration

This project is inspired by light pollution (aka photo pollution), which is the presence of anthropogenic and artificial light in the night environment. Cities like Shanghai, New York, and London are nowadays hardly witnessing any stars in the night due to all kinds of artificial light resources.

Code

  • vertex()

I started by drawing the generative art of a star. 

//divided a circle into 5 part
let angle = TWO_PI / 5;

//defined a halfAngle
let halfAngle = angle / 2.0;

fill(255);
translate(x, y);

beginShape();
for (let a = 0; a < TWO_PI; a += angle) {
 //cos() Values are returned in the range -1~1.
 let sx = 0 + cos(a) * 20;
 //sin() Values are returned in the range -1~1
 let sy = 0 + sin(a) * 20;
 vertex(sx, sy);
 sx = 0 + cos(a + halfAngle) * 10;
 sy = 0 + sin(a + halfAngle) * 10;
 vertex(sx, sy);
}
endShape(CLOSE);
  • class

Then I wrote it as a class so that I will be able to call it multiple times by creating an array. Also, in order to simulate the night sky, I wrote another class which embedded with little twinkle stars. 

class Star {
  constructor() {
   this.x = random(width);
   this.y = random(height);
   this.size = random(0.25, 3);
   this.t = random(TAU); //TAU = TWO_PI
  }

  draw() {
   this.t += 0.1;
   var scale = this.size + sin(this.t) * 2;
   noStroke();
   fill(255);
   ellipse(this.x, this.y, scale, scale);
  }
}

class click{
  
  constructor() {
    this.x = width/2;
    this.y = height/2;
    this.angle = TWO_PI / 5;
    this.halfAngle = this.angle / 2.0;
    this.size = random(0.25, 0.5);
    this.t = random(TAU);
  }
  
  drawStar() {
    this.t += 0.1;
    //sin() Values are returned in the range -1 to 1
    var scale1 = this.size + sin(this.t) * 0.5;
    
    translate(this.x, this.y);
    rotate(frameCount * 0.01);
    scale(scale1);
    fill(255,255,0);
    
    beginShape();
    for (let a = 0; a < TWO_PI; a += this.angle) {
      let sx = 0 + cos(a) * 20;
      let sy = 0 + sin(a) * 20;
      vertex(sx, sy);
      sx = 0 + cos(a + this.halfAngle) * 10;
      sy = 0 + sin(a + this.halfAngle) * 10;
      vertex(sx, sy);
    }
    endShape(CLOSE);
  }
}
  • mouseClicked()

After all the elements in this project all settled, I created the interactive part by using mouseClicked().

I identified the original background color as white in the global variable let gray = 255 (to symbolize the night with artificial light) and then in the mouseClicked() function I gradually decrease the light by gray -= 20, so that the background of the canvas will be turning darker gradually as the user click their mouse on the canvas.

Reflection

Overall, the coding process was smooth. I was a little bit stuck at the initial stage of generating the art graphic of the star. In the beginning, I was using direct numbers in the vertex() function and the graphic looks crappy and hard to be manipulated. So I searched online for a more mathematical way to depict the star and successfully generate the congruent star at last. The interactive might be a little bit confusing if the user has little knowledge of the intention, so maybe next time I will be adding some guidance into the project and make it more well-rounded as a whole. 

MLNI – Fireworks (Billy Zou)

FireWorks

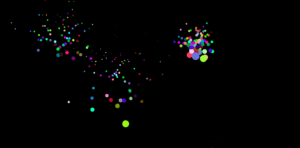
This week I developed a simulation of colorful fireworks using p5, in an object-oriented way.

fireworks

Classes 

I used two classes to implement this effect, Spark and SparkManager .

The previous one is the particle itself and the latter one is the manager of particles.

Spark

In fact, they are circles filling with different colors.

The particle has properties position, velocity, size and color. The color is totally random. In order to produce the effect of explosion, sparks close to the center are larger than sparks with higher initial velocity.

As time goes by, sparks will fall more and more quickly and at the same time, they will become smaller and smaller. Finally all sparks will disappear.

SparkManager

Basically, this class is an array of sparks and some methods to manipulate the array. In practice, this class has only one instance.

Every frame, it will update all sparks and remove sparks that are not visible. Finally it will draw all sparks. Sparks are stored in an array.

Main Process

The main process is quite straightforward. This assignment is simple, however, object-oriented-programming is what we will keep using. OOP is a powerful way to program, especially program relating to visual effects.