Recitation 8: Serial Communication Documentation by Ryan

Exercise 1: Make a Processing Etch A Sketch
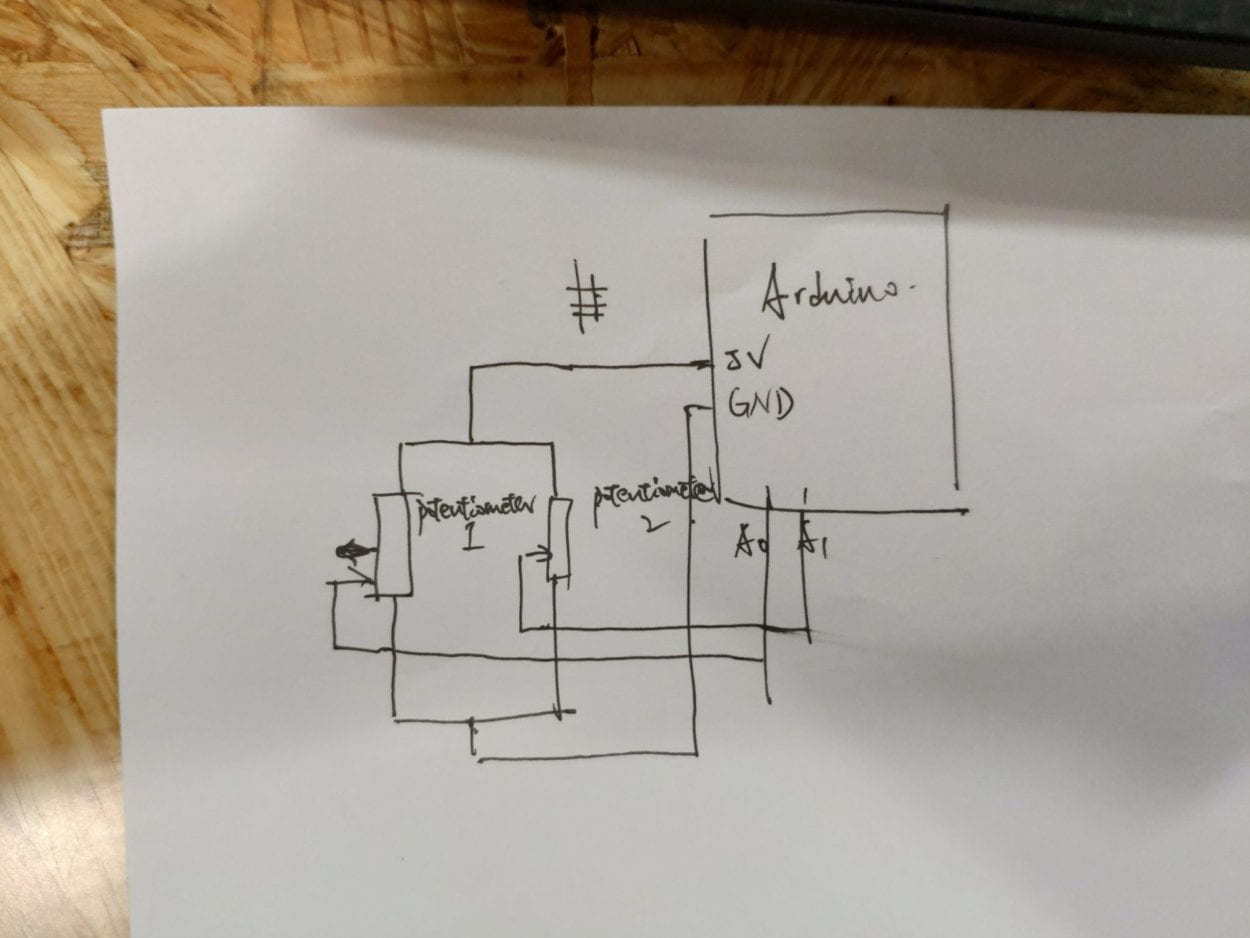
For the interaction for two steps in this exercise, both of these steps are using potentiometers to interact, the interaction given by us is just switching the knob. But the interaction given by the processing is different, the first one is simple which is just the ellipse changing its size, the second one is more interactive as I am drawing a line on the screen and it can go wherever I want in the window. Also I customize its color based on its position in the window so that I can draw a gradient line which is more interesting and more interactive. The codes are as follow.

Processing code

// IMA NYU Shanghai
// Interaction Lab
// For receiving multiple values from Arduino to Processing

/*
* Based on the readStringUntil() example by Tom Igoe
* https://processing.org/reference/libraries/serial/Serial_readStringUntil_.html
*/

import processing.serial.*;

String myString = null;
Serial myPort;

int NUM_OF_VALUES = 2; /** YOU MUST CHANGE THIS ACCORDING TO YOUR PROJECT **/
int[] sensorValues; /** this array stores values from Arduino **/
int[] preValues;

void setup() {
size(500, 500);
background(0);
setupSerial();
preValues = new int[2];
}

void draw() {
updateSerial();
printArray(sensorValues);
println("cr");
printArray(preValues);
println("pre");
//fill(sensorValues[0],sensorValues[1],sensorValues[2]);
//rect(100,100,300,300);
background(0);
//ellipse(sensorValues[0],sensorValues[1],100,100);
strokeWeight(1);
stroke(sensorValues[0],sensorValues[1],preValues[0]);
line(sensorValues[0],sensorValues[1],preValues[0],preValues[1]);

// use the values like this!
// sensorValues[0]

// add your code

//
}

void setupSerial() {
printArray(Serial.list());
myPort = new Serial(this, Serial.list()[ 0 ], 9600);
// WARNING!
// You will definitely get an error here.
// Change the PORT_INDEX to 0 and try running it again.
// And then, check the list of the ports,
// find the port "/dev/cu.usbmodem----" or "/dev/tty.usbmodem----"
// and replace PORT_INDEX above with the index number of the port.

myPort.clear();
// Throw out the first reading,
// in case we started reading in the middle of a string from the sender.
myString = myPort.readStringUntil( 10 ); // 10 = '\n' Linefeed in ASCII
myString = null;

sensorValues = new int[NUM_OF_VALUES];
}

void updateSerial() {
while (myPort.available() > 0) {
myString = myPort.readStringUntil( 10 ); // 10 = '\n' Linefeed in ASCII
for (int i =0; i < sensorValues.length; i ++){
preValues[i] = int(sensorValues[i]);
}
if (myString != null) {
String[] serialInArray = split(trim(myString), ",");
if (serialInArray.length == NUM_OF_VALUES) {
for (int i=0; i<serialInArray.length; i++) {
sensorValues[i] = int(serialInArray[i]);
}
}
}
}
}

Arduino code

// IMA NYU Shanghai
// Interaction Lab
// For sending multiple values from Arduino to Processing

void setup() {
Serial.begin(9600);
}

void loop() {
int sensor1 = analogRead(A0);
int sensor2 = analogRead(A1);
// int sensor3 = analogRead(A2);

sensor1 = map(sensor1,0,1023,0,500);
sensor2 = map(sensor2,0,1023,0,500);
// sensor3 = map(sensor3,0,1023,0,255);

// keep this format
Serial.print(sensor1);
Serial.print(","); // put comma between sensor values
Serial.print(sensor2);
// Serial.print(",");
// Serial.print(sensor3);
Serial.println(); // add linefeed after sending the last sensor value

// too fast communication might cause some latency in Processing
// this delay resolves the issue.
delay(200);
}

Exercise 2: Make a musical instrument with Arduino
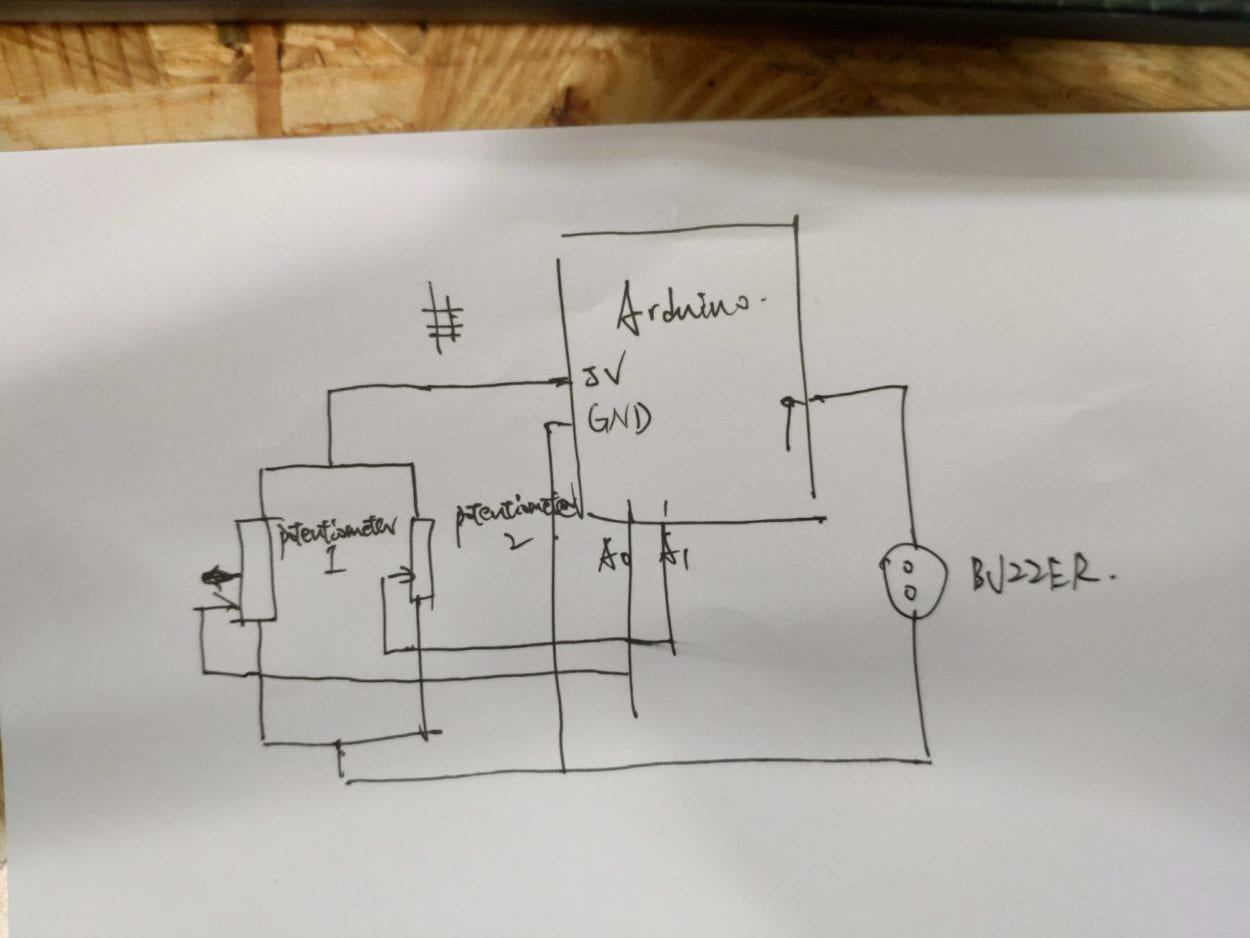
For this exercise, we can make interaction with a buzzer according to our key-press or mouse-move. It gives more ways of interaction compared to using knobs that you can only switch it and is comparatively not interactive. I can modify the keys to become a tone player that each key has a corresponding sound frequency and when pressing the keys on the keyboard in random sequence will turn out different melodies. And I can even change the frequencies to make different kinds of tones. So I think it is playful and highly interactive. The codes are as follow.

Processing code

// IMA NYU Shanghai
// Interaction Lab

/**
* This example is to send multiple values from Processing to Arduino.
* You can find the arduino example file in the same folder which works with this Processing file.
* Please note that the echoSerialData function asks Arduino to send the data saved in the values array
* to check if it is receiving the correct bytes.
**/

import processing.serial.*;

int NUM_OF_VALUES = 3; /** YOU MUST CHANGE THIS ACCORDING TO YOUR PROJECT **/

Serial myPort;
String myString;

// This is the array of values you might want to send to Arduino.
int values[] = new int[NUM_OF_VALUES];

void setup() {
size(500, 500);
background(0);

printArray(Serial.list());
myPort = new Serial(this, Serial.list()[ 0 ], 9600);
// check the list of the ports,
// find the port "/dev/cu.usbmodem----" or "/dev/tty.usbmodem----"
// and replace PORT_INDEX above with the index of the port

myPort.clear();
// Throw out the first reading,
// in case we started reading in the middle of a string from the sender.
myString = myPort.readStringUntil( 10 ); // 10 = '\n' Linefeed in ASCII
myString = null;
}

void draw() {
background(0);

// changes the values
if(keyPressed){
if(key=='a'){
values[0] = 1;
values[1] = 1000;
}
if(key=='s'||key=='S'){
values[0] = 1;
values[1] = 1100;
}
if(key=='d'||key=='D'){
values[0] = 1;
values[1] = 1200;
}
if(key=='f'||key=='F'){
values[0] = 1;
values[1] = 1300;
}
if(key=='g'||key=='G'){
values[0] = 1;
values[1] = 1400;
}
if(key=='h'||key=='H'){
values[0] = 1;
values[1] = 1500;
}
}else{
values[0] = 0;
}
//for (int i=0; i<values.length; i++) {
// values[i] = i; /** Feel free to change this!! **/
//}

// sends the values to Arduino.
sendSerialData();

// This causess the communication to become slow and unstable1.
// You might want to comment this out when everything is ready.
// The parameter 200 is the frequency of echoing.
// The higher this number, the slower the program will be
// but the higher this number, the more stable it will be.
echoSerialData(200);
}

void sendSerialData() {
String data = "";
for (int i=0; i<values.length; i++) {
data += values[i];
//if i is less than the index number of the last element in the values array
if (i < values.length-1) {
data += ","; // add splitter character "," between each values element
}
//if it is the last element in the values array
else {
data += "n"; // add the end of data character "n"
}
}
//write to Arduino
myPort.write(data);
}

void echoSerialData(int frequency) {
//write character 'e' at the given frequency
//to request Arduino to send back the values array
if (frameCount % frequency == 0) myPort.write('e');

String incomingBytes = "";
while (myPort.available() > 0) {
//add on all the characters received from the Arduino to the incomingBytes string
incomingBytes += char(myPort.read());
}
//print what Arduino sent back to Processing
print( incomingBytes );
}

Arduino code

#define NUM_OF_VALUES 3 /** YOU MUST CHANGE THIS ACCORDING TO YOUR PROJECT **/

/** DO NOT REMOVE THESE **/
int tempValue = 0;
int valueIndex = 0;

/* This is the array of values storing the data from Processing. */
int values[NUM_OF_VALUES];

void setup() {
Serial.begin(9600);
// pinMode(13, OUTPUT);
pinMode(9, OUTPUT);
}

void loop() {
getSerialData();

// add your code here
// use elements in the values array
// values[0]
// values[1]
if (values[0] == 1) {
// digitalWrite(13, HIGH);
// } else {
// digitalWrite(13, LOW);
// }

// if (values[1] == 1) {
tone(9, values[1]);
// } else {
// noTone(9);
// }
}
if(values[0] == 0){
noTone(9);
}

}
//recieve serial data from Processing
void getSerialData() {
if (Serial.available()) {
char c = Serial.read();
//switch - case checks the value of the variable in the switch function
//in this case, the char c, then runs one of the cases that fit the value of the variable
//for more information, visit the reference page: https://www.arduino.cc/en/Reference/SwitchCase
switch (c) {
//if the char c from Processing is a number between 0 and 9
case '0'...'9':
//save the value of char c to tempValue
//but simultaneously rearrange the existing values saved in tempValue
//for the digits received through char c to remain coherent
//if this does not make sense and would like to know more, send an email to me!
tempValue = tempValue * 10 + c - '0';
break;
//if the char c from Processing is a comma
//indicating that the following values of char c is for the next element in the values array
case ',':
values[valueIndex] = tempValue;
//reset tempValue value
tempValue = 0;
//increment valuesIndex by 1
valueIndex++;
break;
//if the char c from Processing is character 'n'
//which signals that it is the end of data
case 'n':
//save the tempValue
//this will b the last element in the values array
values[valueIndex] = tempValue;
//reset tempValue and valueIndex values
//to clear out the values array for the next round of readings from Processing
tempValue = 0;
valueIndex = 0;
break;
//if the char c from Processing is character 'e'
//it is signalling for the Arduino to send Processing the elements saved in the values array
//this case is triggered and processed by the echoSerialData function in the Processing sketch
case 'e': // to echo
for (int i = 0; i < NUM_OF_VALUES; i++) {
Serial.print(values[i]);
if (i < NUM_OF_VALUES - 1) {
Serial.print(',');
}
else {
Serial.println();
}
}
break;
}
}
}

Thoughts on VR tools

CARA VR

Combining 3D footages with 3D models in easier ways, so we can capture a character doing something and stitch the footage into a 3D modeling scene. This tool, from my perspective, is very good for creating movies, it can precisely locate where the footage should be put in the 3D modeling scene, so it can be used for movies that has more vivid characters.

Mantra VR

This for VR video manipulation, it has many cool presets and effects for AE and Pr. The default effects provided by AE and Pr are too few and we can hardly make effects for VR videos based on ourselves. So it is really conveninent, it is aimed for personal use for VR video editting, I think.

MOCHA PRO 2020

This impresses me the most, it has very accurate tracking system that you can draw a specific area on the video and it will track the area very precisely, so this is mainly for motion capture and creators do not really need to draw masks frame by frame to follow the motions to do certain manipulation. Also the color management function is also powerful to give more options for the color settings for the videos to form different atmosphere and will not distort the video.

I think VR and AR are getting more popular nowadays, it has become things that are within reach in daily life, and it has become something that we can not only enjoy and play with, but also something we can edit and manipulate, and we can even create VR stuffs by ourselves. And there are more tools available and more powerful than ever to help us better process the 3D videos.

Final Project Proposal By Ryan

Everything I have come up with is inspired by several following youtube videos

I see the potential and the charm that processing can achieve, I can make changing patterns based on algorithms which is very amazing. Geometry itself is already attracting for me, when it is combined and synchronized with music, it becomes even more amazing. And all of my idea are related to the sound and patterns. Also I have found library in processing used for sound visualization called Beads and Minim which are very useful for me.

Synthesizer

As what the title has revealed, this project is going to make a synthesizer based on processing and arduino. As what I have showed in the previous post

From 3:30 in this video is about a MIDI controller assembled by three keyboards which looks very interesting and inspiring. So this project is more based on touch, the processing part is just for supplement. I am thinking about using cupborads and cans to be the frame of a keyboard and the keys, also using plastic bags as pedals. The challenge is obvious, to arrange a huge amount of cans as keys to be different keys and make these sensitive, also the way of interaction is also a problem, am I going to tap them or hit them also needs to be decided. Also I have seen videos about musical instruments built on cans and the players just pat on these cans to make tunes. I need think of new ways of interaction and the way these keys are arranged to make interaction more interesting. The projet is for those who enjoys new ways of playing music, also the impact is going to be maybe adding a new way of playing music.

I have also find the conference called NIME, AKA New Interfaces for Musical Expression, very inspiring, there are many musicians in it discovering many new ways of interfaces. Following is their official website.

Compound sound visualizer

—— Fireworm Symphony  

This idea is very interesting and I really want to realize it, I was amazed by the music video called CYMATICS made by Nigel Stanford several years ago, you can find the video in the following link.

And also his personal website.

All of his works are very amazing, and this one which is related to the science of sound is one of most inspiring for me, and I really want to redo want he have done in the video to play with the resonance and sound waves. And I have done many researches on how to play with sound waves, and I find out three ways to do, Chaldni plate, lazer beam and water.

https://www.youtube.com/watch?v=AlSip26f0vA

Chaldni Patterns

For all of these visualizers need amplifier to make sound waves and effect on the meduim, sand, water and light.

For the Chaldni Plate, I need a plain board that is connected to an amplifier to let it vibrate the plate, and I spread the sand on it at a minimum amount to make the pattern clear. The pattern will change based on the sound frequency and the changes are very obvious, the most important part for this visualizer is to make sure the balance of everything. 

For the lazer visualizer, I am going to use reflection to visualize the sound, so there is a glass attached to the amplifier to be vibrated, then the lazer will be shone on it to be reflected to a screen or wall or the water visualizer that I will mention later, the reflection of the lazer will show how the sound changes based on the frequencies. 

For the water visualizer, I need a plate that can hold an enough amount of water while the water will not spill out when it vibrates with the amplifier. This visualizer will only work at a low frequency as if the frequency is too high, the water will be easily vibrated out of the plate to make a mess, so this visualizer will only be representing the bass.

I will simulate the motion of fireworm using processing and is controlled by gyroscope to trigger the strings on the screens to make certain frequency to trigger the amplifiers. The sand reminds people of the river bank with sand, while the water reminds ponds and rivers, the razer reminds the nightglow, combining everything to form a night view with fireworms.

All these three visualizers will be seperate to make sure they will not influence each other. The interaction part will be by lifting the hand or other gestures to control the sound frequencies and also will control which visualizer is on or off to make a combination of different visualizers. Also the processing will also become a visualizer of sound. So this is why the project is called a compound sound visualizer.  This will be an amazing experience to play with sound, to see sound in different forms at the same time will be interesting for everyone.

Stardust

This project is about motion capture by using processing, I find the tutorial about video capture very interesting and want to extend interaction based on it.

So I can recognize myself and the objects, what I am going to do is to make two controllers on hand to represent that theses are my hands and they will be two centers in the processing. These two controllers will also have buttons to have more functions, what I am willing to do now is to make a particle system and we can play with the particles by using the joystick. We can wipe on the scream, also we can use our hands as centers to absorb the particles around. And the particles will be colorful just like stardusts, and I will try to make these stardusts interact with sound, so we can import music as background and the color of the dust will change according to the music. I consider this project as an experience, kind of like virtual reality that feels like being in another world. I will try to make this as an immersive experience.

Recitation 7 Functions and Arrays by Ryan

int i=0;
float[]coordinateX = new float[100];
float[]coordinateY = new float[100];
color[]colorFace = new color[100];
int y = 0;
int x = 0;

void setup(){
size(800,800);
background(255);

for(int i = 0; i<100; i++){
coordinateX[i] = random(width);
}
for(int i = 0; i<100; i++){
coordinateY[i] = random(height);
}
for(int i = 0; i<100; i++){
colorFace[i] =color(random(0,255),random(0,255),random(0,255));
}

}

void draw(){
if(keyPressed){
if(key == 'r' || key == 'R'){
i = 0;
x = 0;
y = 0;
background(255);
}
if(key == 'a' || key == 'A'){
if(y<100){
background(255);
for(int i = 0; i < 100; i++){
colorMode(HSB);
face(coordinateX[i]+x,coordinateY[i]+y,colorFace[i]);
}
//noLoop();
y++;
x++;
}
}
if(key == 'o' || key == 'O'){
if(i<100){
face(coordinateX[i]+x,coordinateY[i]+y,colorFace[i]);
i++;
}
}
}

}

void face(float x, float y,color c){
//background(255);
strokeWeight(5);
fill(c);
circle(x,y,400);
arc(x-80,y-50,80,80,PI,TWO_PI,OPEN);
arc(x+80,y-50,80,80,PI,TWO_PI,OPEN);
fill(255);
arc(x,y+50,200,200,0,PI,CHORD);
line(x-60,y+50,x-60,y+129);
line(x-20,y+50,x-20,y+147);
line(x+60,y+50,x+60,y+129);
line(x+20,y+50,x+20,y+147);

}

Question 1:

In your own words, please explain the difference between having your for loop from Step 2 in setup() as opposed to in draw().

The difference between setup() and draw() is that the funcitons in setup will only be ran for one time while these in the draw while be looping unless there is a condition or a noLoop(). So the for loop in the setup, the data in the loop will be executed once and be stored while everytime the draw loops, the data in the for loop will be refreshed and restored again.

Question 2:

What is the benefit of using arrays?  How might you use arrays in a potential project?

By using arrays we give index to all the data, so if we want to know exactly the parameters of all the data, we can just go back to the array and use index to find corresponding parameteres. For usage in my potential project, array might be used to call for certain shape or pattern that I need to change, I will assign index for shapes, and at the time I need to change it, I just need to change its parameters while calling its index in the array, very accurate and useful.

Recitation 6: Processing Animation by Ryan

My work

float angle = 0.1;
boolean big = true;
int i = 1;
int size = 200;

void setup(){
size(1000,1000,P3D);
background(255);
}

void draw(){
if (i < 15 && big == true){
size += 10;
i ++;
if( i == 15){
big = false;
}
}
if ( i > 0 && big == false){
size -= 10;
i --;
if( i == 0){
big = true;
}
}
background(255);
//strokeWeight(random(0.1,1));
translate(mouseX,mouseY);
rotateY(angle+=0.01);
rotateX(angle += 0.01);
rotateZ(angle += 0.01);
noFill();
stroke(mouseX,mouseY,mouseX/(mouseY+1));
sphere(size-100);
stroke(0);
box(size+100);
}

Additional homework

boolean big = true;
int i = 1;
int size = 350;

void setup(){
size(600,600);
}

void draw(){
if (i < 40 && big == true){
size -= 5;
i ++;
if( i == 40){
big = false;
}
}
if ( i > 0 && big == false){
size += 5;
i --;
if( i == 0){
big = true;
}
}
colorMode(RGB, 255);
background(255);
noFill();
colorMode(HSB,350);
stroke(size - 100,size,100);
strokeWeight(20);
float x = mouseX;
float y = mouseY;
if(x<=size/2+10){
x = size/2+10;
}else if (x>=(590-size/2)){
x = (590-size/2);
}else{
x = mouseX;
}
if(y<=size/2+10){
y = size/2+10;
}else if (y>=(590-size/2)){
y = (590-size/2);
}else{
y = mouseY;
}
circle(x,y,size);
}

What I have learned is basically how to do the animation based on if condition, it is powerful to acheive many effects, and it is easy for me to understand as I have learned python and java before. So there are no difficulty programing these, what I need to know are the specific functions to draw shapes. Those that interest me are:

circle(x,y,radius)

colorMode()

box()

translate()

scale()

rotate()

P3D

sphere()