Overview
In the first interaction lab recitation class, we were required to build three different circuits on the breadboard and solder one button. It was my first time using these materials to build the circuits. Even though we encountered some problems when we built the circuits, we still finish all the tasks that we were required to do and we even make something beyond the original task. Here is the documentation of some process in the recitation class.
Materials
- 1 * Breadboard
- 1 * LM7805 Voltage Regulator
- 1 * Buzzer
- 1 * Push-Button Switch
- 1 * Arcade Button
- 1 * 220 ohm Resistor
- 1 * 10K ohm Resistor
- 1 * 10K ohm Variable Resistor (Potentiometer)
- 1 * LED
- 1 * 100 nF (0.1uF) Capacitor
- 1 * 12 volt power supply
- 1 * Barrel Jack
- 1 * Multimeter
- Several Jumper Cables (Hook-up Wires)
Circuit 1:

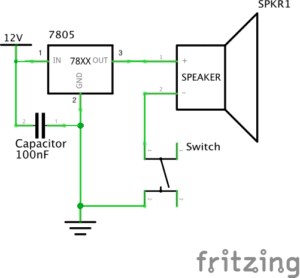
The first circuit is a doorbell. If we pressed the button, the doorbell would be turned on.
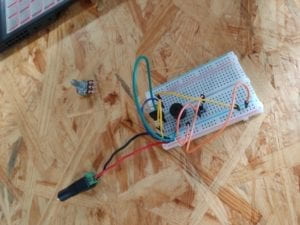
Although it’s an easy circuit, we still encountered some problems when we build the circuit. It was the first time we used the breadboard to build the circuit so we were not
 familiar with the use of the breadboard. The first circuit we built was not even a closed circuit. So it didn’t work. After asking the learning assistant for the use of breadboard, we succeeded in finishing the first circuit. And here are the video and photo of our first circuit.
Circuit 2 & 3
For the processes of the second circuit and the third circuit, they were much more smooth than the first one. However, as the circuits became more difficult and complicated, we had to deal with the problem of the order of the jumper cables. Since the number of cables became more, we needed to make everything in order. I realized that when building the circuits, we should keep cables not entangled with other cables so that when we encounter some problems in the circuits we can easily fix it. In addition, understanding the principles of all the electronic materials are also important for us to successfully build a circuit. And here are videos of the second and the third circuits.
Additional Work
After finishing all the tasks we were asked to do. We used the materials we had to build a new circuit which includes the speaker and the LED. The process of building a new circuit was pretty fun. Moreover, the new circuit we built is also meaningful. For those who are trapped because of the earthquake, it can give them more possibilities to be rescued than those who have nothing to help them. For example, if you are trapped under a building, you can first press the button to turn on the speaker, then other people can easily get your possible location after hearing the sound. You can keep pressing the button to turn on the light so that other people can get your exact location after seeing the lights. Then you can survive in the earthquake. And here is the video of our own circuit. And in this video, I was also conveying the signal of “SOS”.
Reflection
In the first recitation class, I didn’t encounter anything that really confused me. We had dealt with all the problems we had during the process of building the circuit and soldering the button. Besides, even though the circuits we built in the recitation class were simple, we have to be careful of the electricity every time we build circuits.
Reading Questions
- The main idea of The Art of Interactive Design is that interactivity contains three parts: input, processing, and output. The circuits we built included interactivity in the way that after we finished building it, we pressed the button and then we could hear the sound or see the light. The action of pressing the button can be seen as the input. The flow of the electricity in the circuits can be seen as processing. And the sound we heard and the light we saw can be seen as the output of the circuits.
- In my opinion, interaction design is like the foundation of Interactive Art. And physical computing is like the approach to achieving all the requirements of the interaction design. For example, if we see Interactive Art as a building, then interaction design is the base of the building and physical computing is the bricks of the building. To create Interactive Art, we need to first come up with the idea of what we want to create. This process can be called interaction design. Then we can use both hardware and software to turn the interaction design into reality. This step is physical computing. Interactive Art cannot be called Interactive Art without either interaction design or physical computing.