Recitation 4: Group Project by Zhiqiu Wang(Eugene)

The definition of interactive has always been a big mystery for me. I spent a lot of time trying to touch the vague boundary of interaction. After reading the first week’s article, Crawford’s idea helps me solidify my thoughts. According to Crawford’s opinion, interaction is a kind of special conversation which is composed of some “cyclic process”(“The Art of Interactive Design”, Crawford, pp.3). The conversation that Crawford talks about is not like the conversation between human beings with human languages but conversation based on the programming and codes. And it is the codes that help human to control the device and the device to react. After four weeks of’ learning IMA interactive classes, seeing so many impressive projects and ideas, I gradually get to know the meaning of interaction. Different from a single way output, interaction is more like a return ticket which allows information to travel forth and back.

So from my perspective, the existence of interaction requires at least two objects giving and receiving information of a certain language and giving feedback to each other through a serious of the process so as to achieve some kind of goal.

The first project I chose is the “100% Chair” actually doesn’t fit my definition of interaction. The chair is designed for Algorithmic Landscapes, however, it reflects on the reality itself without interaction with human beings. It is more like a multifunctional smart vehicle than an interactive project. 

The second subject I chose is “Anti-Drawing Machine”. Though there is no actual use in our everyday life and seems a bit ridiculous, the action of destroying the artwork after getting the information from human beings is undoubtedly a kind of interaction.

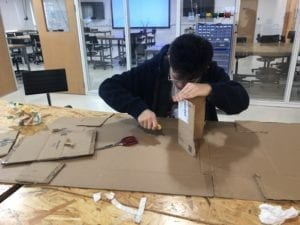
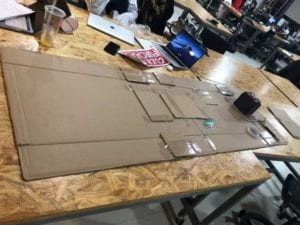
As for our own project this time, we designed a 4D holographic interactive billboard for a hundred years later. Our inspiration came from the billboards on the street attracts a few people’s attention. Though the ordinary billboards of our time are put into the market on a large scale they fail to meet the needs of the target customers. The goal of our project is to create a personalized service for the passers-by to attract enough attention from them and make successful deals with them. Our billboard has the ability to project a digital salesman/saleswoman which can detect your physical condition then give personal service for you. Comparing to the original billboards, our project is more eye-catching and more tailored for each customer. What’s more, our billboards also can analyze big data, so we can interact with your potential interest in order to introduce you the product that fits you most. And the customers can easily reject the service by saying no or even waving their hands, this is another act of interaction.
RECITATION 3: SENSORS BY ZHIQIU WANG

Recitation 3

Partner: Yijia Chen

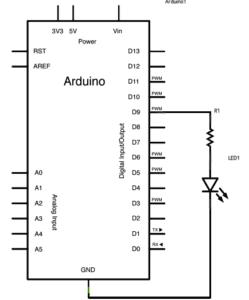
Circuit 1: blink with infrared distance sensor

Components:

1 * Arduino Uno

1 * infrared distance sensor

1 * LED

Jumper cables 

Processes and problems we encounter:

For this recitation, we weren

Question 1:

What did you intend to assemble in the recitation exercise? If your sensor/actuator combination were to be used for pragmatic purposes, who would use it, why would they use it, and how could it be used?

I would like to use the blink device circuit to make a wardrobe which will automatically turn on while human is detected to come close and automatically turn off while human leave. This device can save a lot of the energy easily.

Question 2:

Code is often compared to following a recipe or tutorial.  Why do you think that is?

Because code is the language which is used to help human to communicate with electrical devices. So it is like a tutorial or a recipe which we tell the circuit or the device how to function correctly. In this way, the code is quite similar to a recipe or tutorial.

Question 3:

In Language of New Media, Manovich describes the influence of computers on new media. In what ways do you believe the computer influences our human behaviors?

I believe computer facilitate our human’s life tremendously. In ancient time, people need to travel a long distance only to convey a piece of massage while computers help us solve this problem easily. On a larger scale, computer generates the society’s production and consumption. For example, online shopping has largely changed human’s modern life style. In conclusion, I believe the computers’ benefit is more than its disadvantage.

Recitation 2 by Zhiqiu Wang

Recitation 2. Arduino Basics by Zhiqiu Wang

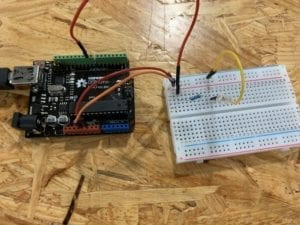
Circuit 1: Fade

Components:

1 * Arduino Uno

1 * USB A to B cable

1 * breadboard

1 * LED

1 * 220 ohm resistor 

Hook-up wires


Process:

We had a very smooth start of building the circuit because we have accumulated experience in the previous classes. With the diagram, we successfully connected every component together 

There was one thing that confused us most which is two jumper cables connected on both sides of the breadboard which seems to be useless but appeared on the diagram. So we turn to the instructors for help and got the answer that they are used to connect both two sides so that no matter which side of the component was connecting, it is always included in the circuit. In this circuit, these two jumper cables are not necessary because only one side’s cable were enough for the connection of the circuit.


Circuit 2: Tone Melody

Components:

1 * Arduino Uno

1 * USB A to B cable

1 * breadboard (optional)

1 * buzzer

Hook-up wires


Process: 

The process of building the second circuit also went very well because this circuit itself is a simple one. The whole circuit can function properly even without the breadboard. However, we still chose to keep the breadboard in our circuit because it provided a more stable connection and the buzzer and the hook-up wires were more easily to be connected.


Circuit 3: Speed Game

Components:

1 * Arduino Uno

1 * USB A to B cable

1 * breadboard

2 * LED

2 * 220 ohm resistor 

Hook-up wires

2 * 10K ohm resistors

2 * pushbuttons

1 * buzzer


Process:

The third circuit building process was not that successful comparing to the previous two. When building up the circuit, we had some problems on differing resistors of different ohm. Though we can solve this problem by only try different resistors until it works, we decided to find a way which can tell the differences at a glance in the future. After our close observation of two different resistors we found that the distance between two colored lines are different and the color itself is actually different. 

Eventually, we successfully built the circuit and played twice with the device.


Question 1

Reflect how you use technology in your daily life and on the circuits you just built. Use the text Physical Computing and your own observations to define interaction.


In my everyday life, technology is a word that I think is quite far away from me. The closest technology that is with in my reach is probably my phone and my laptop. However, in the IMA classes, after learning physical Computing, I have gradually changed my mind that technology actually can be something closely related to me and can even interact and created by me. This is the deepest impression that IMA has left on me.


Question 2 

If you have 100,000 LEDs of any brightness and color at your disposal, what would you make and where would you put it?

I would put it on some of the landmark buildings in our city and add some voice sensor to it so as to display how noisy it is now in this city so as to remind the citizen to make our city a more peaceful place. 


Week 1: Recitation Documentation –Zhiqiu Wang

Week 1: Recitation Documentation – Young

Recitation 1: Electronics and Soldering

Instructor: Young

Partner: Kaycee Chen

Materials Used in Circuits:

  • Breadboard – a device used for carrying and  connecting different materials 
  • LM7805 Voltage Regulator – the components used to maintain voltage output 
  • Buzzer – the out put, beep when working
  • Push-Button Switch – the device used to control the current
  • Arcade Button – another device used to control electrical flow through the circuit
  • 220 ohm Resistor – used to limi the voltage that flows in the circuit 
  • LED – out put, light up when electricity flows through
  • 100 nF (0.1uF) Capacitor – used to protect the circuit 
  • 10K ohm Variable Resistor (Potentiometer) – used to control the voltage that flows to the LED so as to control the brightness of the LED
  • 12 volt power supply – supply the circuit
  • Multimeter – can be used to test different information of different components
  • Several Jumper Cables (Hook-up Wires) –used to connect different components

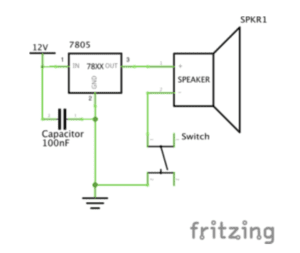
Circuit 1: Lamp

Components used:  Breadboard, LM7805 Voltage Regulator, Buzzer, Push Button Switch/Arcade Button, 100 nF (0.1uF) Capacitor, 12 volt power supply, Barrel Jack

This small model is the first project that I have ever completed. Though it is very simple, it helps me to get to know about how do different components works together and function properly. Our group actually met with several obstacles at first, the LED didn’t light up after several attempts. After turn to Instructor Young for help, he examine all the components one by one and told us there is something wrong with the breadboard. So we changed a new breadboard and eventually saw the light given out from the LED. The second time we rearrange our jumper cables in a more organized way because Instructor Young told us it will be easier to debug in this way and we finished it much faster than we did it the first time.

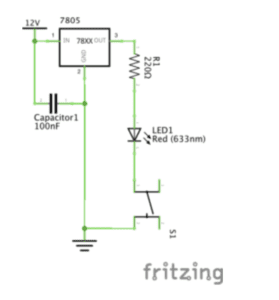
Circuit 2: Door Bell

Components used: Breadboard, LM7805 Voltage Regulator, Buzzer, Push-Button Switch/Arcade Button, 100 nF (0.1uF) Capacitor, 12 volt power supply, Barrel Jack, 220 ohm Resistor, LED

With the experience of the first circuit assembling, my partner and I made the second circuit much faster. However, the Buzzer didn’t beep no matter how we test it. We turn to Instructor Young again and after checking our circuit he told us to pay attention to the direction of the switch. We found it very tricky but there is still tiny difference in it so we rearrange it and succeeded. 

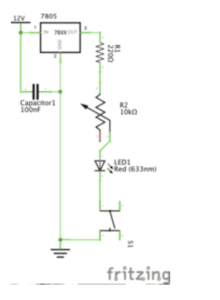
Circuit 3: Dimmable Lamp

Components used: Breadboard, LM7805 Voltage Regulator, Buzzer, Push-Button Switch/Arcade Button, 100 nF (0.1uF) Capacitor, 12 volt power supply, Barrel Jack, 10K ohm Variable Resistor (Potentiometer), LED 

After succeeded twice, we finished this one quickly and successfully. It is really proud to see the brightness of the LED being manipulated by us.

Since I have experience of connecting jumper cable in a competition I took part in during my high school, it wasn’t a difficulty for me. I finished efficiently and helped my partner.

Question 1:

The Lamp light up, the buzzer beeps, the brightness of the LED changed when we press the button or turn the Variable Resistor. It is a kind of interaction between the circuit that we built and us.

Question 2:

I think more controllable components or sensors that will respond to motion, heat etc. can be used to create the interaction Design and Physical Computing because interaction means the project must interact with human beings so these components are very necessary to a successful Interaction art.