Spinning Star by Lily

Description

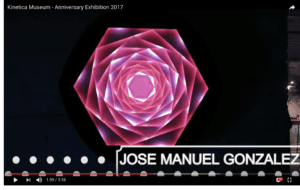
My project is a spinning object that imitates the star lights. I got inspiration from Jose Manuel’s artwork. This art piece is stationary, with different layers lit up at a different time. I want to make a similar sculpture with three layers of stars which can spin. And there are changes of lights in every layer over time.

It was too hard for me to make three layer spin at a different speed since the connection of slip rings and the layers is very complex, so instead I chose to make the whole sculpture with three layers spin as a whole. I also soldered three parts of led strips together so that I will only need one slip ring to connect them to the circuit. Correspondingly, I will use code to control different sections of lights to have varying effects, like bouncing dot or rippling light effects.
Perspective and Context

I want to put the audience in a space-like surrounding where the stars are flashing by. What’s more,  I also express that the whole universe is spinning continuously by using a motor underneath the object. 

The kinetic part is mostly the spinning of the motor, but actually the changing effect of lights is also a movement visually. So I combine these two parts together in order to achieve a more diverse movement, where the stars are flashing by and they are also asters revolving around us. 

Development and Technical Implementation

————————————  Physical Part  —————————————-

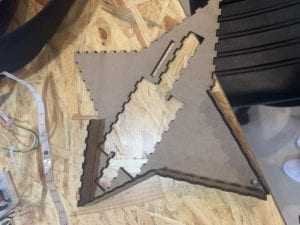
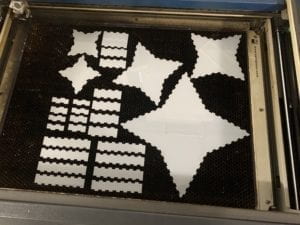
    • First I laser cut the smallest star on the top with a sample code with rippling effect online. https://pastebin.com/LfBsPLRn
    • Then I laser cut the two bigger layers under it. In order not to waste acrylic material, I tested whether it worked on wood pieces. The fingers connected quite well, so I used acrylic material to get the final layers. 
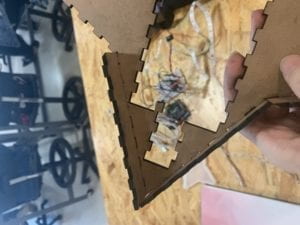
    • After gluing every piece together, I tested whether the DC motor I bought fit into the hole I cut. It turned out the layer can move with the motor quite well.
    • The next step is to solder the three parts of led strips in every layer together. I also counted the numbers of pixels in every part in order to control them separately later in the code. In this way, the three layers can be glued together.
    • The last physical part was to connect the strip and the motor to the circuit. I encountered the problem that the wires from the strip would be tangled together unless I use a slip ring. With a slip ring, I can make the side with the motor (the part underneath the whole object) stationary, while the side with the led strip can spin freely. However, I didn’t get the essence of how it functions until Eric explained to me several times and about how to connect it.  A huge thanks for his patience.
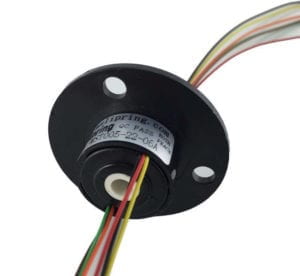
    • More importantly, I cut a big acrylic box to hide the circuit and stabilize the slip ring. And there is also a hole on one side of the box to connect the power. Finally, the whole object was able to spin! 

————————————  Code Part  —————————————-

Since I want three layers to have varying effects, I first added a composition where every separate layer will be lit and fades out in sequence. Then I added a dot bouncing from the bottom to the top of the object. The third effect is accumulating orange and yellow color dots from the top. In the end, I put the edited version of the rippling effect I found online. 

The link to the complete code: https://gist.github.com/lilyunverwundbar/99b6c4c0fbabae06896b81a9dc09cffa

The link of the reference: https://pastebin.com/LfBsPLRn 

Presentation

When I show this project in class, the best thing was nothing about the circuit or the code went wrong which happened a lot to me. The feedback was mainly about the scratching sound it makes. The sound results from the unbalance of the object which touches the lid of the box beneath it.  Nick suggested that I use a ball bearing to lift the downward side up. I used it during the IMA show, the sound was eliminated but the object would be stuck after some time spinning. 

What people liked about my project is the light composition, especially when the orange and yellow lights are accumulated gradually toward the bottom. I was glad to know that they thought the change of light was beautiful. I also like it when people gave me different ideas about what the object is since I didn’t think of a certain thing to name it. 

Conclusion

    • Be more realistic about what you are going to make. Initially, I want to make three layers spin at a different speed, so I bought three motors and slip rings. But after I had a long talk with Eric, I decided to merge three layers together instead. Because if I want to do so, I cannot stick three layers together and I don’t know how to display the whole object in that sense. Also, I need to stabilize every slip ring with a small square box.
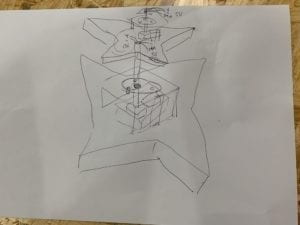
    • Think about details earlier. I didn’t realize I have so many specific things to pay attention to until I talked to Eric. The connection and stabilization of the slip ring, the connecting part between the motor and the slip ring, etc. This also means start doing the important part earlier so that I can encounter the problems earlier.
    • Having a production schedule is helpful. Although I adjusted the schedule several times due to the change of my idea, I still benefited from having a clear timeline in the last two weeks. In this way, the work will be more organized.
    • What I am most proud of is that I finally figured out how to make the connection of slip ring with the object more stable, using a 3D printed connector and a hole on the lid of the box to let the slip ring wedge into it.
    • For future development, I would definitely add more layers to it so that I can play with more changes of light. 
    • Lastly, I really appreciate IMA fellows for giving me advice, especially Andy who helped me so much with 3D printing. And of course, huge thanks to Eric who helped me with laser cut and suggestions on the physical part of my project and my code.

Final Project Proposal (Lily)

Perspective and Context

Guy Brett suggests a way to show artworks without further explanations. And in the field of kinetic art and light art, a lot of work can be comprehended just by the personal experience of the spectator. I have found some light artists whose work inspired me.

The first artist is Alexander Catanese. He made a light installation with many long led strips, and there is light flashing by every strip. This looks like a star shower where the starlight is passing through the sky. 

For my project, I want to create something similar to a star shower or fireworks, where the lights will flash by in different speed controlled by the spectator. But rather than just bare led strips, I want to cover them with tubes.

The second artist is Horacio Garcia Rossi. He used a lot of thin cylinders with lights behind them. The cylinders look like blinking while the brightness of the lights changes quickly. This flashing effect and displaying of lights is similar to what I want to achieve in my project.  

https://www.youtube.com/watch?v=eXCdxg2dxu0

Project Description

I want to make several clusters of light strips and to make light flash by each strip, which looks like a star shower. 

If a user approaches, the clusters will shake and there will be a star shower effect, meaning that there will be a light sequence flashing through the strips in every cluster. I will probably add some rings to add sound to the shaking.

The whole installation will look like this

Production Schedule

April 25 Hunting for materials

April 27 Start coding on one single led strip for testing, and then       put various led strips together

April 28: Test solenoid to have the shaking effect on the strips, and test the sensors

April 29 —May 1: Put the led strips into the silicone tubes and tie them together

May 3: Add sensors so that when a user approaches, the led strips will go on shining. Also, continue finishing the physical displaying

May 5: Improve coding to have better and fancier effect

May 7: More testing and improvement

May 9:  Hide the circuit at the root of all the light clusters

May 11—May 14: Test the final effect before critique session

Project2: Under the Sea (by Lily)

Description

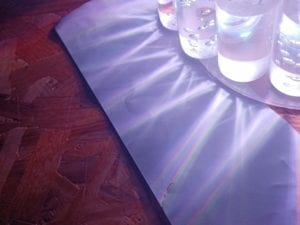
For this project, I want to imitate the underwater scene using digital led strips and some special materials to make the lights look like water. I have this inspiration from my group assignment where we used glasses of different shapes. I found the globe best distorted the lights and actually magnified the lights and it looked a bit like water. So this time I also want to create something totally like water.

Perspective and Context

Art is about experiencing. My project is to give people the experience similar to what they feel when they are diving into the sea and surrounded by the water. There are all kinds of light and color changes in the marine world. For example, the deeper you dive, the darker the color you will see. Although the installation itself doesn’t move, the different speed of light change will make the illusion that you are actually diving deeper and deeper. This is the relative motion of two sides: the light of the sea and the audience.

And in the World of Perception, the author asserts that the object we perceive is actually its properties. “An object is a system of properties which present themselves to our various senses and which are united by an act of intellectual synthesis” (Merleau-Ponty 59). In my project, I will show the audience the color of the sea, and the texture of water through light modified by a certain material since these two properties can make people immediately relate to the sea.

Development & Technical Implementation

According to the experience of my group assignment on the digital LED light strip, I started to search online for transparent cylinders. At first, I could only find some vases. Then I suddenly recalled that we were suggested to work with acrylic, then I search “transparent acrylic cylinders”, and I found a whole bunch of materials I want. 

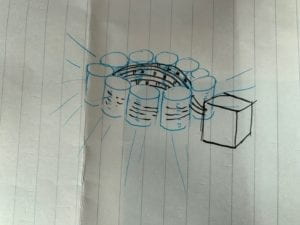
Then I thought carefully what size of the cylinders I needed before I purchased them. I alsodrew a draft of how I will display the whole sculptural object. 

Before the materials arrived, I was trying on the technical part: coding. I used Fadecandy, and it was quite similar to our group assignment. I imported an image I edited, and connect three digital led strips. I also used the Image library to import some small pictures of fish, and wrote the code to make the fish move with my mouse. At first, I wanted to make the moving light dots an actual shape of a fish, but I was told it was not very possible, that the shape will be very vague.  So instead, I changed my idea to give the audience an impression that there is some creature swimming by.

The picture I use in Fadecandy to make the light dots the color of the picture when it scrolls down        

My code is here: https://gist.github.com/lilyunverwundbar/66d2268a4202890f89c63392674fc6ae

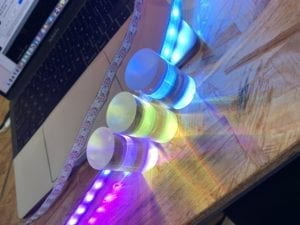
After I received the materials, I started to assemble them together. I used laser cutting to make a wooden box to hide all the wires and breadboard, and a round acrylic lid to place on the cylinders. I glued the cylinders as a big circle and put three strips on the inside of the circle. 

Before gluing: the relection is great
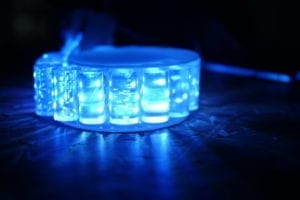
When I finished the physical display, I tried the code and the cylinders reflected the light really well, just likewater. And there is some lines of light diffusing from the connecting point of two cylinders, which was unexpected but very pretty. The audience will have the feeling of seeing underwater views from the outside of the cylinders. 

Presentation

Before the class started, I discovered the lights weren’t working. But it worked normally when I placed them on the shelf the day before. I was very anxious then, luckily Professor helped me fixed it, although I had to break the box to check the circuit.  

When it was my turn to show the project, my classmates reported that they felt the composition really made them feel underwater, which is good. However, there is some feedback that I could place the object on a white paper to show the lights more clearly. We tried with a small piece of paper and wow it was really beautiful. Also, I can improve more on the physical displaying. Rather than just making one layer of cylinders, I can add more on top to make a pyramid, thus people can also see from the above. For now I am only using an acrylic lid to cover the light strips.

A video of the whole composition:

Some pictures:


Conclusion

This time I did better than the first project. I researched earlier to get proper materials. And I made it look a bit better than last time. But I can still work more on the appearance of the installation, to make it neater, more creative and I should be more daring on the display. Next time I should have more faith in myself and try out different outcomes to choose from. (Like the pyramid displaying of this project which I could try)

RGB and Digital LED Strips––Lily

Analog RGB LED strip assignment

For this assignment, I used a pressure sensor.  My idea was to create a face, when you are not pressing it, the colors will be calm and gentle, like blue and purple. But when you are pressing it, the colors will change faster and become more aggressive, like red and orange. However, I didn’t make the eyes and mouth of the face.

What I can improve: First I did not make it into a required composition, the duration of the work is too short. Second, my classmates suggested that I could make the led strip to pass through the paperboard in order to make a face so that I don’t need to cut it into too many pieces to connect to the microcontroller.

Here is the video: (The color change of the pressing part was not included here but this is the only video I have)

Gist for the analog rgb strip : https://gist.github.com/lilyunverwundbar/daf2fc2e862caa6358328fe5bac43b9b

Digital LED strip assignment

Teammates: Sylvia, Ivy

For this group assignment, we used FadeCandy to make a sequence of lights to represent the change of a whole day. The lights will change according to the long edited picture we made. It starts from the scene of a forest in the day, and a blue sky with birds flying by, then there comes the dusk, lastly the dawn.  After the coding part, I was experimenting with the material I bought that I thought would be useful. I used a box of transparent nails and several pieces of glasses of different shapes. I put the nails near the strip to best reflect the lights, and add the glasses to magnify the lights. And the effect was great. However, it could be improved if we did not put the strips and decorations on a bare piece of paperboard.

Here’s the video of the

whole composition: https://youtu.be/bNeftPO0kRI

Gist for the digital strip: https://gist.github.com/lilyunverwundbar/b5305c9e2bc54d6ee0e00f150985c2da

Project 1 : Vibrating Self by Lily Wang

Project Description
My inspiration came from an installation where the sound emitting from the back of the mirror distorts the reflected view in the mirror. Here is the Youtube link of that work: https://www.youtube.com/watch?v=gLOs6ZTkBQQ

Likewise, at first I wanted to make a pair of glasses or headwear device. The person who wears it can see through the half-transparent sheet, and the sheet will be vibrated by some kind of motor. Ideally, the user can feel the vibration and see the vibrated view at the same time. 

Perspective and Context
My project aims at transforming feeling to vision. In Maurice Merleau-Ponty’s work The World of Perception, he asserts that “a work of art is something we perceive” (101). During the whole process, I also discovered different people have different understandings of my work, which is really interesting and inspiring. My project tend to give people a new way to comprehend their surroundings and themselves. 

Development & Technical Implementation
At first I was thinking of plastic sheet to be the distorted lens for the user. But I tried several plastic sheets from some stores, they cannot make your view distorted when you shake them. Then when I was scrolling down on Taobao page, there appeared a relevant store that sells double-sided mirror paper. It’s a foldable piece of paper, and it can either function as a mirror or let you see the outside while the people outside won’t see you. So I bought the material after my failed trials of plastics, only 3 days before the deadline.

When I received the material, I discovered it is not transparent enough, it is only like a soft mirror. Making the paper into glass lens would be too dizzy for the user. Instead, I was trying to make it a rounding headwear device.

In the meantime, I was testing the vibration motors I borrowed from the equipment room. 

I was thinking that when the mirror is vibrated by the motors, you can see, respondingly, a shaking self of you.

I picked some deserted package boxes from the storage room and cut a hole to stick the paper. I tried different ways to stick the paper, but it works the best when the paper is a little bent. And here is the final work.

When I tested it with my friend, one of them gave me a very interesting feedback: She felt like she was a cellphone when it started to vibrate. And the paper looks like the screen. Maybe that is also a good way to interpret my project, as people can connect the different modalities of perception to a specific object when they experience it.

This is the GitHub link to my coding part. https://github.com/lilyunverwundbar/Kinetic-Light-Project-1

Presentation
I was a bit afraid that people would not get the idea of my project because the effect is not too obvious. My first participant described that he experienced the distorted image of himself when the motor started to vibrate. 

But overall, other users thought the effect was not too obvious, which is true. And they thought it might be better to manually vibrate the sheet. And professor also suggested me to polish the appearance of the device. I found these advice really helpful.

Conclusion
The most vital lesson I learned is that try planning beforehand as early as possible. The duration of this project is intense, but I spent two more days thinking of the idea after our proposals in class. I should have done more research to settle down my project idea on the proposal day so that I can have more time testing different materials and changing my plan accordingly. 

Second, user testing is important. They will give you various perspectives on your project which you may not notice. And possibly they will give you suggestions on improvement.

The most pitiful thing about my work is that it is not as viable as I thought. And I didn’t have enough time to make the device look better. 

Conclusively, leave every step of your project enough time for adjustment, and open to others’ suggestions when you are stuck in the middle.