Recitation 6: Processing Animation by Ian (You Xu)

Recitation

For the recitation, based on my work for the last recitation, I want to make some animation by clicking the mouse. I found there are some quadrangles in certain positions on the canvas. Therefore, I want to make them rotate while clicking. I started with an easier task which makes one block of shape appear and disappear by every click of the mouse. I shared some major progress I made during the process of achieving it.

void mousePressed() or if(mousePressed)

First all, I put the code under corresponding void setup and void draw function. Then I modified the code for drawing the first shape on the topic. I set the algorithm that in every loop of draw function, when the mouse is pressed (I use if(mousePressed) here), if the shape is drawn last time, then do not draw this time, vise Versa. Then I tried to run the code, and I found the problem.

As the video shows, when clicking the mouse once, the shape is flashing. I soon realized the problem that in class, we discussed the difference between void mousePressed() and if(mousePressed). Since I use if(mousePressed) here, within the time of every click, the code may have been executed multiple times, making the shape flashing. And this is not what I want. Therefore, I moved this block of code under the function of void mousePressed(). Then, the code will only be executed once for every click.

Creating a list

Then, I started to code for rotating the quadrangles in the middle of the canvas. Since I want the quadrangle to rotate certain angles every time, I recalled what I learn about Python’s “list” data type. I want to store all the rotating angles into a list so that I can call it easily without writing it every time. However, when I tried to declare a list variable, processing responded to me with an error message. Therefore, I searched online for the correct use of the list data type in Java. I learned at https://www.w3schools.com/java/java_arraylist.asp about the declare, add an item, access item for a list and applied it to my work. By using for loop, I added 10 different angles with equal intervals into the list.

ArrayList<Float> angleList = new ArrayList<Float>();

  for(int i = 0; i <= 20; i++){

    angleList.add(PI*i/10);

  }

rotate() and translate ()

Then I was trying to make the quadrangle rotate. By checking the reference, “rotate()” is straightforward to use. However, when I first put the angle into the rotate function, I met two unexpected problems. The first one is that when I clicked once, the majority of the shapes rotate. I then realized the rotate function makes all the following drawings rotate. So, I add a line of code that “rotate(-angleList.get(rotate_1));” to rotate the rest of the shapes back to the normal place. However, this time, when I click the mouse, the quadrangle disappeared.

I tested it for different angles, then I realized that the quadrangle is rotating around the (0, 0) instead of the center of the shape so that it went outside of the canvas. Then I recalled the “translate()” function we discussed in class but I was not sure how it could be useful at that time. I then figured it out by translating the origin point to the center of the shape, then rotate it. After that, I translated it back so that it would not affect other drawings.

Note: I only code for one quadrangle since for others, it only repeats the steps above without additional difficulty level.

Homework Assignment

Scale()

Step 1 is very straight forward to me. However, when doing step 2, I intuitively want to use scale() function. I tried to use “scale(1.1)” and assumed that while every loop of the draw function is executed, the circle will expand to 1.1 times than before. However, it did not perform in this way. The circle remained still. Then I realized since every time it will draw a new circle so that the magnification did not change. So I abandoned using scale() and applied another variable to update the diameter within every draw loop.

HSB

By applying the hint, I set the color mode to HSB. However, the color is always black when I adjust the value of H. Then I looked it up online and did some research about how H, S, and B will affect the color. In Erik D. Kennedy’s “The HSB Color System: A Practitioner’s Primer,” it describes that “Hue = “Color of the Rainbow”, Saturation = “Richness”, and Brightness = Brightness, Duh.” The website also gives some examples. Based on it, I realized that I need to set S and B to a higher value and make H changing to fulfill the requirement of the assignment. Step 4 is straight forward as well since we had some similar practices during class.

Interesting function:

rotate()

translate ()

ArrayList<Float>

colorMode(HSB)

void mousePressed()

code for recitation: link to google drive

code for assignment: link to google drive
Recitation 5: Processing Basics by Ian (You Xu)

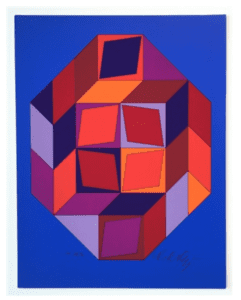
For this recitation, I chose an art piece. When I first saw this picture, the various colors are very eye-catching to me. The perfect symmetrical shaping and asymmetric color make this piece of the image a balanced art. I believe that by using Processing, I could perfectly represent the framework and details of this art. I also think choosing this one to work on would be very challenging since it has different shapes of patterns with all different colors. Therefore, for the purpose of challenging myself, I decided to emulate the original work as much as possible.

Original Work:

Original

Vasarely, Victor. Untitled #7 (blue, red and purple). http://www.artnet.com/artists/victor-vasarely/untitled-7-blue-red-and-purple-a-yqJv_4mtDacDa5WPyKeEZA2

Step 1: Measuring.

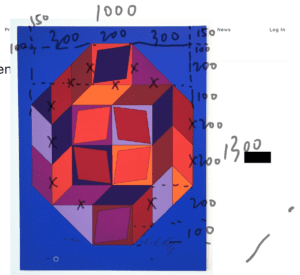
I started my work by measuring the original work. I export the website as a pdf document and measured the ratio of the length and the width of every shape as well as their exact position in the piece. I roughly labeled it on the pdf document. The screenshot of the file is attached below.

Measuring

Step 2: Color

Besides, I also need to figure out the color of each component. Therefore, I want to figure out the RGB of each color in the picture. I used an online website where I can directly get the RGB information by clicking the corresponding part of the image. However, since there are too many blocks of shape in the picture, it would be very time consuming and inefficient to match every one of them to a group of RGB data. Instead, I tried to categories them to certain colors. In Processing, I created variables with these color names and store the corresponding RGB data so that I do not need to refer back to the online website every time when I draw a new shape.

Step 3: Coding and Drawing

The remaining part is very straight forward since I had already had the precise data. In case to return back and check the code, I draw the image layer by layer and show it clearly in the coding part. One thing I found very interesting is that the sequence of the four corners to draw a quadrilateral is very important. It is like connecting multiple points with straight lines on paper. Following different sequences to connect them will result in different shapes.

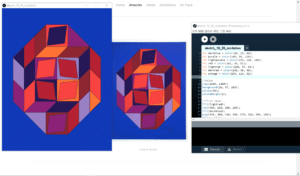
Processing Work

My work is in the left and the original work in the middle. Since the code is too long, I attached it to the link via Google Drive.

Reflection:

During this recitation, I learned much about the functions to draw certain shapes by practicing. I also understand better the concept of RGB. Comparing my work to the original work, the high similarity may demonstrate that it is a good way to use Processing to emulate this work. However, I believe I could do better if I can get inspired by the concept the art to create other art forms by computer that continue to inspire others.

Ian (You Xu) – Inmi – Midterm Reflection

Before we started our midterm project, we discussed the difference between “responsive” and “interactive” during the class. Therefore, I think my previous definition of “interaction” needs revising. Our group project – “doglar” – has a lot of functions that fulfill and respond to the dog’s needs. However, I reflect that it does not emphasize the continuous communication between the machine and the user or uses themselves – dog and the dog owner. Besides taking input, processing the information, and giving corresponding responses by the output that does something useful or entertaining, now I believe there is another key to making a project “interactive.” Therefore, every participant in the project equally stands to each other. An interactive project should also build a constant communication environment with the user or between users and learn new information from it. I think the concept of “interaction” to me is very relative to “Artificial Intelligence.”

Thinking from this point, my partner and I put our focus on making a continuous communication environment between users. An idea occurred to us that during Recitation 2 Assignment, we found it was fun and exciting to compete with another on who reaches the number 10 first by clicking buttons. However, we assess that it is not interactive enough since it lacks providing constant feedback for each other to continue the communication process when one user gives a response. Therefore, deriving from this basic framework, we planned to visualize the competing process by building a concrete user interface with fabrications and connect the two uses closely to each other throughout the playing process.

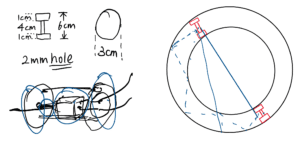
To achieve the goal of communication, we tried to align a few abstract variables to sensory information. Therefore, we designed a car race game. The place of the car in track represents Scores (times of clicking the button); the distance between the two cars and the melody represents the ranking; the sound and car crash position represents the result. With both sound and vision, the game is also accessible to certain disables. Keeping this goal in mind, we sketched a sample diagram. We initially built a straight track. Then we realize it would be better to design a circular track so that two users can face each other with constant focusing on the relative position of the two cars.

Abstract Blueprint

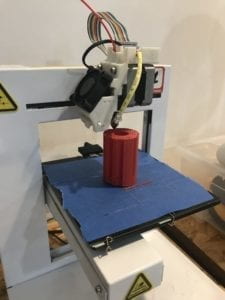
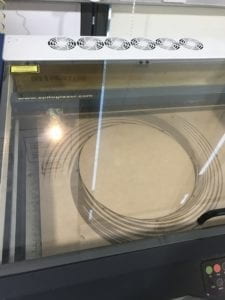
We referred to the sample circuit of the DC motor to drive the car. We laser cut the track, and 3D printed out the model of the car, where we insert the DC motor.

3D Print Car Laser Cut Track
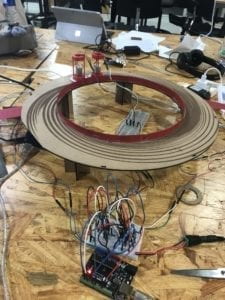
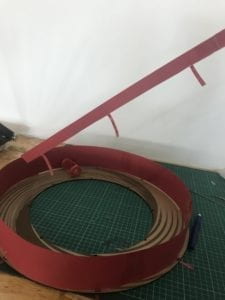
In the process of making the product, we encountered many obstacles, and we solved most of them accordingly. They include but not limited to: wired get messed with each other solved by setting up the track and adding another breadboard; cars do not go on the right direction solved by repositioning the car; cars do not go forward solved by stick crystal glue to the inner baffle; the surface of the wooden track is too smooth solved by adding a piece of cardboard to the car. During the user test session, since we had not had the sound working, we received a lot of helpful feedback that the user may felt a little lost after starting to play since they do not understand the ultimate ending of the game. This reflects that our consideration of the communication function is essential to the user’s experience of interacting with this project. We then get out of the unnecessary components, add sound to notify users about the process and made some necessary decorations: adding cardboard to support the button, setting the “start line” and so on so that the user may feel more friendly. Based on the final presentation, these improvements are successful since it arouses not only the users but also the audience’s intention to empathy on the game process.

Final Product Process
The goal of the project is to bring two users into communication by linking them together with an interactive game. I believe the process of improving our project reflects my new definition of “interaction” that addresses the constant communication between the two users. From visualize the ranking, making track circulate, and adding notification sound, users gradually feel the connection and tension between another player while playing the game. If it is only a game that tells me the final result, like the recitation assignment, the user may not feel the existence of another user in the process of the game. This is significant since the visualization and multisensory give constant feedbacks that link the two players together. Otherwise, if the user does not feel the sense of authentic communication, instead of calling it interactive, it could only be responsive.

Link to the Arduino code (Google Drive: NYU Access only): Changzhen devoted much to it!  

Performance video:

Recitation 4: Drawing Machines by Ian (You Xu)

In this recitation, I tried to work individually by building the circuit. I encountered a few problems throughout the process, and I figured them out by myself.

Step 1:

As instructed by the “H-bridge circuit diagram,” it is quite easy to build up the circuit. However, I still encountered two problems.

First, when I tried to put the H bridge to the breadboard, I suddenly realized that it might have a certain direction. However, I forget which side should head up. I searched it online but failed to find it in the first attempt.  So I asked another student and got the answer.  After the recitation, I spent some time looking up the theory online and got to know how H bridge actually works.

Then, after finishing building the circuit, I tried to upload code to Arduino. However, when I link the Arduino board to the computer, the power of Arduino is not on. I tried to unplug the ground and power from Arduino to the breadboard, and it could be normally powered. I think there must be something wrong with the circuit that I build on the breadboard. Since all the wires are in a mess, I can hardly find out the problem. It turned out that I wrongly connect the power and ground together so that it caused a short circuit. Therefore, I think it would be better if I can use certain colors and link different components more reasonable next time.

Step 2:

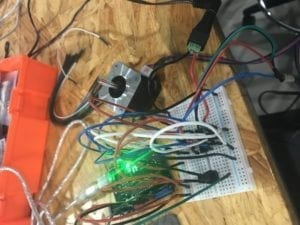
After done with the circuit for step 2, I found out that the stepper motor did not respond to the potentiometer correspondingly. Therefore, I opened the serial monitor to get the analog input data from the potentiometer. Then I found out that the data from the potentiometer never changed and stayed 826.  I solved this problem by link it to another analog-in pin of the Arduino board. I guess there may be some problem with the poor contact somewhere.

Circuit

Step 3:

Since we are running out of the time, we did not have enough time to try drawing something meaningful with the drawing machine we built. But it actually works! Also, because I was in a rush, I did not map the input of the potentiometer to a certain range so that it may be easier to control. Maybe I can try to improve it in future works.

Question 1:

What kind of machines would you be interested in building? Add a reflection about the use of actuators, the digital manipulation of art, and the creative process to your blog post.

Answer: We are now familiar with components that can both sense the world (sensor) and also make changes to the world (motor). Therefore, I believe we can make many traditional static arts more dynamic. So I am interested in machines that are meant for human beings to think beyond themselves. We can achieve much more than before where we did not have digital manipulation in the forms of art. By applying these interactive technologies, the audience can feel more involves and more inspired in thinking.

Question 2:

Choose an art installation mentioned in the reading ART + Science NOW, Stephen Wilson (Kinetics chapter). Post your thoughts about it and make a comparison with the work you did during this recitation. How do you think that the artist selected those specific actuators for his project?

Answer: After reading “ART + Science Now,” I am deeply impressed by the project “Waves” by Daniel Palacios Jimenez. The mechanism of this project is similar to the work that I did for this recitation. The two projects may both use a similar motor and algorithm to make the project work. However, the purpose and outcome are completely different. My work during the recitation is a more practical project that is under human’s subjective control, which is useful stuff. “Waves” is art for the audience to feel, think, and reflect on themselves. It inspires people. As described, “waves” may “create complex sound and visual wave oscillations.” Therefore, with these purposes in mind, I believe that the artist was trying to find corresponding actuators that can make certain sounds and images. 

Group Research Project Reflection by Ian (You Xu)

I think interaction is a process that takes input from the outside world (human or nonhuman factors), processes the corresponding information, and finally outputs the response to the user. It also needs to have specific functions as an item to make life easier or entertain living beings.

As Chris Crawford says in the book The Art of Interactive Design, Chapter “What Exactly is Interactivity” that it defines “interaction” as “a cyclic process in which two actors alternately listen, think, and speak” (Crawford 5). This is an interesting metaphor that compares the interaction device/technology to actual human beings. To accomplish this process, it requires the design of the interactive technology to be able to take “input,” “process” information, and “output” the response as Igoe and O’Sullivan defines similarly in “Introduction” of Introduction to Physical Computing that “interaction: input, output, and processing” (Igoe and O’Sullivan XX). Besides, according to Crawford, he “concerned with interactivity that has some blood in its veins” (Crawford 6). Therefore, I believe entertainment or utility is also significant to the design of interaction. Otherwise, it is of no use.

Based on the understanding of interaction, I researched two projects. The first one is “#WinningHalloween costume execution.” This project shows many fancy costumes to the audience at a little cost as a form of contemporary art. According to the main characteristics of “interaction:” “input, output, processing, and functional,” this project only fulfills the criteria of “output and functional.” It only gives information to the audience which is showing the fancy clothing to them and make them happy and feeling excited. Even though it is a successful art performance and is super creative that is so fascinating, and it still lacks the most important part of “interaction,” “input.” Therefore, I could not regard it as an interactive project but rather an art.

Another project I researched is “Artificial Arcadia – Measured and adjustable landscapes.” Based on the changing geographic factor, real climate change data, and human’s moving routine while experiencing the project, the white ceiling automatically moves up and down, showing the relationship between humans and nature. This is a successful example of “interaction.” It takes input from both human and nonhuman. After processing the information, the ceiling moves as a response to give output to the audience. More importantly, this is quite interesting for humans to experience, and it arouses humans to concern about our relationship with nature and cares about climate change. Therefore, it entertains humans and has social functions.

For our group’s project “Doglar” – a device that fully takes care of the dog for the dog owner – I think we successfully applied the definition of “interaction” to our design. We want it to receive information from human and nonhuman, then after processing, gives output that is significant or entertaining. We think it is a problem that many dog owners are having trouble taking care of their dogs and balance it with their own lives. If we can design an interactive device to assist them, it must be significant, hopefully entertaining. We design the device to take input from the dog. However, at first, we output most of the responses to the owner, though phone applications, to ask the owner to take further actions. We then realized that phones are not the best output because it requires another interactive device, which means we can make it smarter. So, we redesigned most of our functions to output to the dog directly. For instance, when the device detects that the dog is hungry, instead of only notify the owner on his/her phone, the food dispenser will automatically open. By this optimization, we believe that the “doglar” is more interactive and smarter.

Works Cited

Crawford, “What Exactly is Interactivity,” The Art of Interactive Design,  pp. 1-5.

Igoe and O’Sullivan, “Introduction,” Introduction to Physical Computing.