Strike!-Barry Wang-Inmi

Finally, this semester’s journey has come to an end. With the final project done, I am now writing this blog post to record the process of the whole project in the meanwhile try to reflect and synthesize the achievements and flaws to be improved.

Part I. CONCEPTION AND DESIGN

When started thinking about our final project, we have defined that the experience we would like to create should involve body interaction rather than just pressing down keys and buttons. As Joseph and me are both game players, so we decided to bring a game with body interaction controlling. We chose a retro aircraft war game, because its classic and easy to be understood. We thought that it would be more interesting while adding some difficulty if the user can open up their arms and control the aircraft with their body by tilting left and right. Just like the way aircraft banks. Thus, we decided to use accelerometer to detect the motion of the user and mapping them into the game. Besides, we think that such a body interaction game should completely get rid of touching the computer, so that the users don’t have to press the keys or move the mouse while wearing devices with long cables. Thus, we decided to make our game, all the menus and selection controlled by body interaction too. On the material side, since we modelled a retro game, we would also like to recreate and arcade game box to bring some sort of retro feeling. So, we designed the box that fits the test computer, and laser cut it out using wood plank. To be frank, using a projector might be simply a better choice, since the interaction involving body should be displayed on a huge screen. Using a computer gives a feeling of unbalance while the user has to stare at a small screen while standing at a distance from it. We did not think about this point, this is an idea that definitely worth improving. Besides, on the material of wearable devices, there were several choices, like gloves, bands, and even clothes. Finally, we decided to use bands. Just like the way people wear a watch. In one way, a light band does not add any extra unnecessary weight to the device. In another way, using a band can make sure to the largest extent that our sensor gets the correct value. Since most people wear a watch in the same way, that makes it much easier when detecting the motion.

Part II. FABRICATION AND PRODUCTION

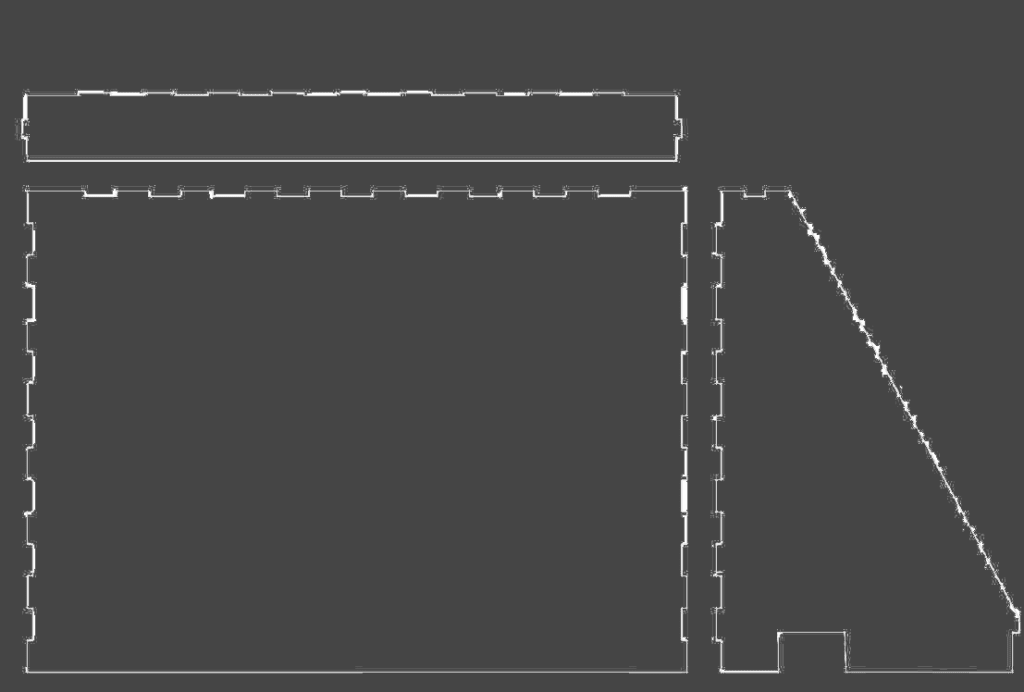
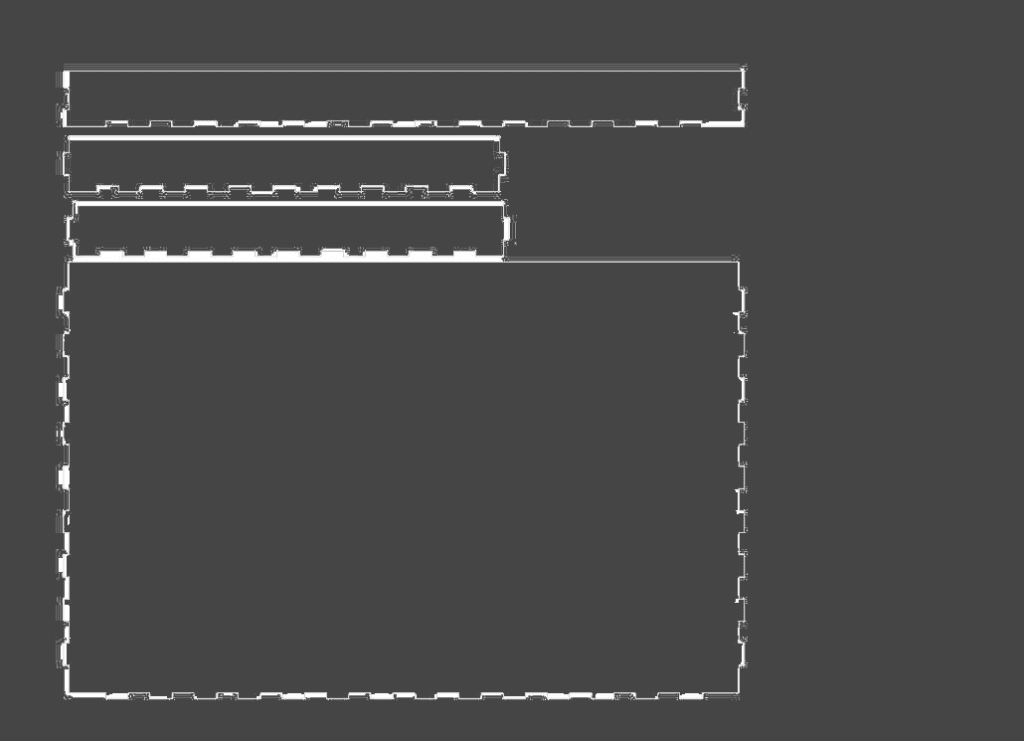
In the process, there were a lot of achievements that we had never done before, but also, I have to say that there were simply a lot of difficulties that were completely beyond our imagination. I would like to start with the successes. First of all, is the most basic game elements and aircraft controlling. The basic component of the game includes music effects, images, and game logic. The music effects and images are relatively easy to solve. The game logic, which includes collision detection, grade and level, multi forms of enemies take some time. For the collision detection, we set a radius for each enemy aircraft, adjust them until they are accurate to the best. For the level system, we let the aircraft adjust the bullet images and amounts according to the current score. Though they are not difficult, but they are indeed time-consuming. For the controlling part, we used serial communication between Arduino and Processing. But one problem is that, the accelerometer is actually quite sensitive, causing the aircraft flickering on the screen. Also, using an accelerometer means that there might be a possibility that when user make severe movement, the acceleration value might be too big for the map function. Thus, we define a threshold that, when the value of accelerometer changes minutely, the signal does not send, and while the value change drastically, we let the value change slowly and gradually and finally to the point where the user wants to be. All these mechanisms work invisibly behind the screen, but it takes a lot of time and effort to tuning and choosing different threshold values to make sure the aircraft is stable on the screen so as to create a better user experience. Another important achievement we make is the body-controlled cursor system. It moves the cursor on the screen by moving the arm up and down by the user. This important system makes our ideal, free of keyboard and mouse controlling mode come true. To be specific, the mechanism is that, the user moves the cursor by body, stay on an item for three seconds, boom, the item is selected. The latency, in our case, is three seconds. This is set to make sure the user only gets into the item that he or she wants to get in. To give the users clear information, we have to use an indicator to show that the system is running, don’t worry. We use an empty circle, that completes itself a third every one second to indicate the cursor status. Once the circle completes, the system chooses the item where the cursor stays at. This mechanism is also user friendly to avoid users moving and clicking while dragging long cables. Besides, we have the well-cut case that is done completely by Joseph. I know it is not easy to make those finger connections between boards, especially for a not rectangle box. But he finally did it, making the computer looks a small arcade. Also, I would like to express my gratitude to him here. I believe all of these achievements are what we can be proud of.
Next comes to the difficulties. The biggest one is the I2C communication. We planned to have a two-player mode, which obviously requires two sensors. However, the two accelerometers have the same physical I2C address. It is basically impossible (or just impossible for my level) to communicate without an I2C shield or a multiplexer on a Arduino with one SDA&SCL pin. We tried different ways but did not get improvements. This is why we were showing up in user test session with only one sensor.

Speaking of user test, the trouble of using one sensor immediately reveals. The users only use one arm to control, which is not the way that we expected it to be. Using one arm does not feel like an aircraft at all. Besides, some indicates the instructions could be clearer and more new playing method can be involved. But still, most of our feedback are positive. A lot of users think it is cool and they like it.

User Test Session Videos

After the user test session, we made according improvements. First, the sensor problem. We finally choose to use two Arduino boards with one sensor on each. And to utilize this sensor, we develop another advanced mode, where user can control the aircraft vertically. Though this mode is extremely difficult which really requires coordination between arms since they are not moving in the same way. At least, with two sensors, the users start to use both arms, which creates that feeling of flying. Besides, we improved our instruction to make it as clear as possible. These improvements are quite effective, since a lot of users, enjoy our game in the IMA show.
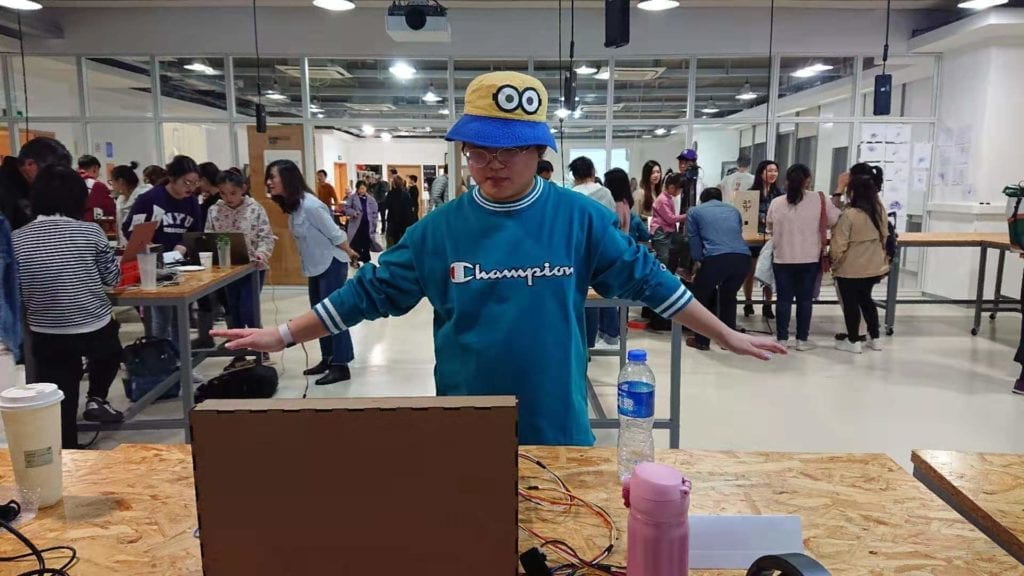
User Playing During IMA Show

Part III. CONCLUSION

Reflecting back to our definition of interaction. We defined it as a highly user-involving, body interaction. I think our project has tried to align with it as much as possible. In order to make the user concentrate and being involved, we used game as the carrier of the interaction. In order to make body interaction, we try to model a motion controlling experience. The users seem to enjoy it. They play with their arms open, trying their best to hit every enemy plane. Some users tried the advance mode, alone or cooperate with friends. It’s difficult, but they play with smile on their face. We have developed a leaderboard, and the users are really competing with each other in the IMA show. A lot of users take pictures or record a video of him/herself enjoying the game. Another user who reached the highest score, (really high score) took a photo of the leaderboard. All these makes us happy. But this is not a perfect project. There are flaws that we need to improve. Using two simple sensors are definitely not the best way, we will try to use Kinect in the future projects if possible. Also, we will try to utilize the code so that the game runs more smoothly. We can also definitely make this game complete rather than playable by now. Moreover, we can definitely create more new elements into this game or adapt the body control concept to another application to create a who new experience. But on this point, I still want to say that, being new does not mean a completely new way of controlling for me. The application of the body control idea on this game is new because not much people tried to do so and not much player enjoyed this new application. It is because of new that a lot of players would enjoy our game. However, the keeping the idea of being new is always good and enlightening point in any interactive developing process. We will persist in this idea and try to do better in the future.

Finally, to wrap the whole thing up, to make a game is to make the gamers enjoy it. That is why we choose to make a game. And it is the ultimate goal that this project wants to bring. This is the significance we are doing this. The most important thing from this project, or even from this class is to always keep trying. A lot of our successes are resulted from some accidental trials. And keep moving, no matter what the failure is.

Thank you, to the best professor Inmi, my partner Joseph, all my classmates, and the people who are reading this page.
Recitation 10 Workshops by Barry Wang

Recitation 10 Workshops

In this week’s recitation, I attended two workshops, which are map() function workshop and OOP workshop

For the map() function, it is pretty straightforward.

map(Variable name, lower bound of domain, upper bound of domain, lower bound of codomain, upper bound of codomain), which accept a variable name and 4 float data as range.

For the OOP part, a definition of class starts with

class (class name){

}

Then we define local variables within the class, and write an initialize funtion within the class, whose name is same as the class itself. It goes like:

class (test){

float x = 0;

float y = 0;

test(parameters){

    ……        

}

}

When creating a new instance of class, we use 

test instance = new test(parameters);

In my final project, I wrote a class of bullets in my game since all the bullets are similar objects and can be put together.

class Balls {
  float x_pos;
  float y_pos;
  float vy = 10;
  PImage bullet;
  Balls (int n,int m,int p,float x,float y){
	x_pos = (x-50*width/height) + ((m+1)*100*width/height)/(n+1);
    y_pos = y;
	switch (n){
		case 1:
			switch(p){
			case 1:
			bullet = loadImage("bullet1.png");
			break;
			case 2:
			bullet = loadImage("bullet3.png");
			break;
			}
			break;
		case 2:
			switch(p){
			case 1:
			bullet = loadImage("bullet2.png");
			break;
			case 2:
			bullet = loadImage("bullet4.png");
			break;
			}
			break;
		case 3:
			switch(p){
			case 1:
			bullet = loadImage("bullet2.png");
			break;
			case 2:
			bullet = loadImage("bullet4.png");
			break;
			};			
		default:
			bullet = loadImage("bullet4.png");
			break;			
	}
  }
  void update(){
    //fill(255);
    //ellipse(x_pos,y_pos,8*width/1000,8*width/1000);	
	image(bullet,x_pos,y_pos,25*width/1000,25*width/1000);
    y_pos -= vy * 0.9;
  }
}
        

Recitation 9 Media Controller by Barry Wang

Recitation 9 Media Controller

In this week’s recitation, I tried to make a brief test on the sensors that we would like to use in our final project. So I checked out a accelerometer and use it to control the speed that the video plays.  We hooked the accelerometer to the Arduino, and realize the communication between Arduino and Processing by serial communication.

The tilt of the accelerometer on x-axis represents the speed we would like to be. If I tilt to the left, the video plays reversely; if I stay in the middle, the video pauses; if I tilt to the right, the video plays forward. We managed to make it and it proved that this sensor is completely functional in our final project.

Here is a short test video:

Code on Arduino:

#include <LSM303D.h>
#include <Wire.h>
#include <SPI.h>

/* Global variables */
int accel[3]; // we’ll store the raw acceleration values here
int mag[3]; // raw magnetometer values stored here
float realAccel[3]; // calculated acceleration values here
float heading, titleHeading;
int v;

#define SPI_CS 10

void setup()
{
char rtn = 0;
Serial.begin(9600); // Serial is used for debugging
// Serial.println(“\r\npower on”);
rtn = Lsm303d.initI2C();
//rtn = Lsm303d.initSPI(SPI_CS);
if(rtn != 0) // Initialize the LSM303, using a SCALE full-scale range
{
// Serial.println(“\r\nLSM303D is not found”);
while(1);
}
else
{
// Serial.println(“\r\nLSM303D is found”);
}
}

void loop()
{
// Serial.println(“\r\n**************”);
//getLSM303_accel(accel); // get the acceleration values and store them in the accel array
Lsm303d.getAccel(accel);
while(!Lsm303d.isMagReady());// wait for the magnetometer readings to be ready
Lsm303d.getMag(mag); // get the magnetometer values, store them in mag

for (int i=0; i<3; i++)
{
realAccel[i] = accel[i] / pow(2, 15) * ACCELE_SCALE; // calculate real acceleration values, in units of g
}
heading = Lsm303d.getHeading(mag);
titleHeading = Lsm303d.getTiltHeading(mag, realAccel);
v = int(realAccel[0]*10)+10;
// Serial.println(v);
Serial.write(v);

delay(10); // delay for serial readability
}

Code on Processing:

import processing.video.*;
import processing.serial.*;
Movie myMovie;
Serial Port;
float value;

void setup() {
  printArray(Serial.list());
  background(0);
  size(480, 480);
  myMovie = new Movie(this, "dancing.mp4");
  myMovie.loop();
  Port = new Serial(this, "COM11", 9600);
}
void movieEvent(Movie movie) {
  myMovie.read();  
}
void draw() {    
  while ( Port.available() > 0) {
    value = Port.read();
    println(value);
  }
  image(myMovie, 0, 0);   
  float newSpeed = map(value, 0, 20, -1, 1);
  myMovie.speed(newSpeed);
} 

Reflection:

In the Computer Vision reading, the part that I am most engaged with is the Myron Krueger’s point. He states that the “entire human body ought to have a role in our interactions with computers”. This is the exact point that me and my partner try to realize in our final project. In Krueger’s Videoplace project, the interaction is carried out through motion capture. Though we can out reach that point so far, what we can try is to fit the sensors into wearings like gloves, glasses and so on to create a similar interaction process. By doing so, the traditional interaction way of using mouse and keyboard is greately improved. And that is definitely a way that we need to pursue in the upcoming future.

Final Project Essay by Barry Wang

Final Project Essay – Aircraft War
A. PROJECT STATEMENT OF PURPOSE

The final project we would like to create is an aircraft shooting game called Aircraft War, in which the user controls the aircraft to attack other enemies to reach a high score or to finish a specific task.  We would like to create a strong sense of participation for the players who enjoy this kind of airspace, shooting themed game and all users who just would like enjoy the thrill of destoying and winning. 

Preparatory Research:

Sky Force Reloaded

This is a popular game that runs across plalforms from PC, mobile devices, Nintendo Switch and so on. Also, this is the game we would like to re-create. But the flaw of this game is that, though is a thrilling flying and shooting game, the players are always controlling the game by joystick, button or keyboard. Here, another research project enlightened us.

Kinect Flying Game

We would like to strengthen this experience by introducing a high level interaction. We would like to build our interaction on the level of all body. Which means that the user controlls the banking of the aircraft, shooting actions and other features by moving their body around. The fly lovers would always want to have an experience of flying, though we could not make it realistic, but still we try to improve their experience. This way of controlling adds fun and challenge in the game, which we believe would facilitate the gamers batter. Though Kinect and Leap Motion are banned, but we will try to figure a way out.

Besides, we would like to add some new elements to the game. Most of these shooting games are just composed of different levels for the users to pass. While we would like to add story to this game, so that the user does not only get an experience from the achievement made in the game but also viewing through a story. By doing so, we would like the game to be a kind of media that conveys some other emotions other than joy from the game itself, maybe sorrow, sad or relief, moving etc.

B. PROJECT PLAN

The plan goes parallel for me and Joseph. Joseph would try to write a story that fits the theme of this game, and prepare pictures, video and other forms of media. The preparation of the medias can last longer, but we would like to finsh the basic frame of the story by the end of next week. While on my side, I need to figure out a way as a substitution of Kinect. I need to check out the acclerometor, gadgeteer, distance sensors and see if some combination of these sensors can create a good user experience. This should also be finished by the end of next week. In the following week, we need to work together to finish the coding and fabrication process. We are going to help and cooperate, but basically I will be in charge of the coding part while he focuses on fabrication. Since we are going to consider the aesthetic value of our project, it also take some time to utilize and polish our project. In the last week, we are going to make some final adjustments to the project accoring to the feedback from the users and other new ideas.

C. CONTEXT AND SIGNIFICANCE

I would like to reclaim my definition of interaction again. A successful interaction should be continous, interesting, and strongly user involved. The most significant impact that the preparatory researches make is that, we need to give the users a continous and strong interaction experience. To make the interaction continous, we decided to make a game so that the user is constantly focusing on the input and output of the interaction. To make the game interesting, we tried to add different elements to the game. To make a stronger experience, we believe the way of controlling the game should be our whole body instead of just fingers and keys. It is these ideas that guide us to create a unique experiecnce that users cannot get from a similar game. The unique points we would like to realize are a improved, strongly user involved, body controlled game experience and the story mode in this game, which can bring the users some other feelings and emotions while playing the game. If this project works successfully, more improvement can be made such as using a better system of motion capture or using some relatively advanced game engine (like Unity) to add other complicated features and cool effects, so that the user experience improves in a deep and comprehensive way.

Recitation 8 Serial Communication by Barry Wang

Recitation 8 Serial Communication

In this week, I learded the serial communication between Arduino and Processing. During the recitation, it is required to create a Processing Etch which sends data from Arduino to Processing  and a musical instrument which sends data from Processing to Arduino.

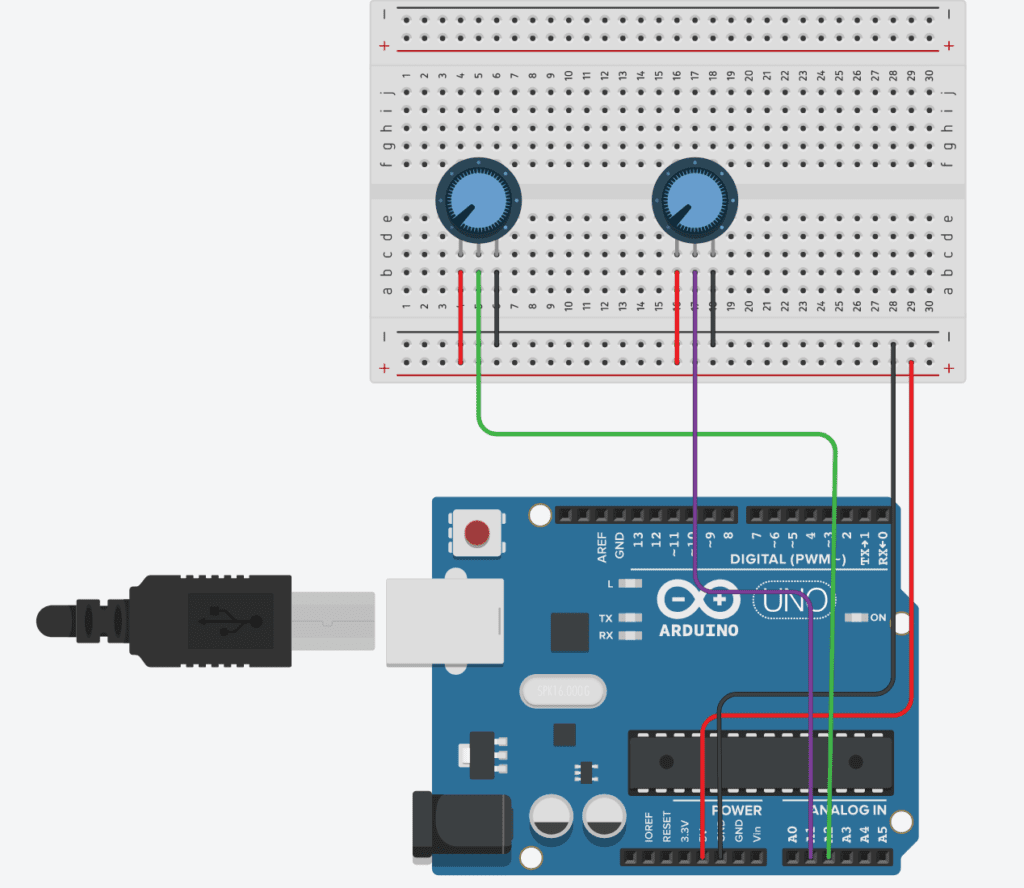
1. Processing Etch

Step 1. Controlling an Ellipse

Step 2. The Drawing Machine

The interaction here is to control the “pen” using two knobs which control x and y coordinate seperately. It’s an interesting but challenging process since it really difficult to create an exquisite picture.

Code on Processing:

// IMA NYU Shanghai
// Interaction Lab
// For receiving multiple values from Arduino to Processing

/*
 * Based on the readStringUntil() example by Tom Igoe
 * https://processing.org/reference/libraries/serial/Serial_readStringUntil_.html
 */

import processing.serial.*;

String myString = null;
Serial myPort;


int NUM_OF_VALUES = 2;   /** YOU MUST CHANGE THIS ACCORDING TO YOUR PROJECT **/
int[] sensorValues;      /** this array stores values from Arduino **/

void setup() {
  size(500, 500);
  background(255);
  setupSerial();
}


void draw() {
  float x_prev = sensorValues[0];
  float y_prev = sensorValues[1];
  updateSerial();
  printArray(sensorValues);
  float x = sensorValues[0];
  float y = sensorValues[1];
  strokeWeight(5);
  line(map(x_prev,0,1023,0,500),map(y_prev,0,1023,0,500),map(x,0,1023,0,500),map(y,0,1023,0,500));


  // use the values like this!
  // sensorValues[0] 

  // add your code

  //
}


void setupSerial() {
  printArray(Serial.list());
  myPort = new Serial(this, "COM10", 9600);
  // WARNING!
  // You will definitely get an error here.
  // Change the PORT_INDEX to 0 and try running it again.
  // And then, check the list of the ports,
  // find the port "/dev/cu.usbmodem----" or "/dev/tty.usbmodem----" 
  // and replace PORT_INDEX above with the index number of the port.

  myPort.clear();
  // Throw out the first reading,
  // in case we started reading in the middle of a string from the sender.
  myString = myPort.readStringUntil( 10 );  // 10 = '\n'  Linefeed in ASCII
  myString = null;

  sensorValues = new int[NUM_OF_VALUES];
}


void updateSerial() {
  while (myPort.available() > 0) {
    myString = myPort.readStringUntil( 10 ); // 10 = '\n'  Linefeed in ASCII
    if (myString != null) {
      String[] serialInArray = split(trim(myString), ",");
      if (serialInArray.length == NUM_OF_VALUES) {
        for (int i=0; i<serialInArray.length; i++) {
          sensorValues[i] = int(serialInArray[i]);
        }
      }
    }
  }
}

Code on Arduino:

// IMA NYU Shanghai
// Interaction Lab
// For sending multiple values from Arduino to Processing

void setup() {
Serial.begin(9600);
}

void loop() {
int sensor1 = analogRead(A0);
int sensor2 = analogRead(A1);
// int sensor3 = analogRead(A2);

// keep this format
Serial.print(sensor1);
Serial.print(“,”); // put comma between sensor values
Serial.print(sensor2);
// Serial.print(“,”);
// Serial.print(sensor3);
Serial.println(); // add linefeed after sending the last sensor value

// too fast communication might cause some latency in Processing
// this delay resolves the issue.
// delay(10);
}

The test video:

2. Musical Instrument

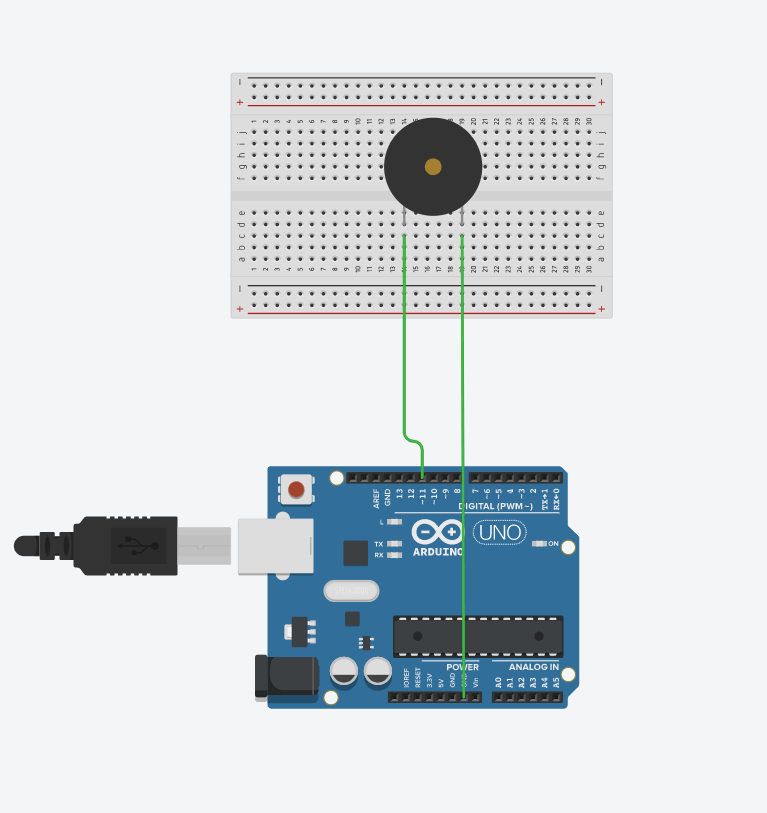
In this little project, the interaction is to map the position of mouse into the pitch and duration of the tone made by the buzzer. It’s interesting to hear how the note changes linearly according to the movement of the mouse. This simple idea can be furtherly developed into some music game, especially on a touch screen, where we can easily detect the position of the finger by the position of mouse.

Code on Processing:

// IMA NYU Shanghai
// Interaction Lab


/**
 * This example is to send multiple values from Processing to Arduino.
 * You can find the arduino example file in the same folder which works with this Processing file.
 * Please note that the echoSerialData function asks Arduino to send the data saved in the values array
 * to check if it is receiving the correct bytes.
 **/


import processing.serial.*;

int NUM_OF_VALUES = 2;  /** YOU MUST CHANGE THIS ACCORDING TO YOUR PROJECT **/


Serial myPort;
String myString;
boolean state = true;

// This is the array of values you might want to send to Arduino.
int values[] = new int[NUM_OF_VALUES];

void setup() {
  size(500, 500);
  background(0);

  printArray(Serial.list());
  myPort = new Serial(this, "COM10", 9600);
  // check the list of the ports,
  // find the port "/dev/cu.usbmodem----" or "/dev/tty.usbmodem----" 
  // and replace PORT_INDEX above with the index of the port

  myPort.clear();
  // Throw out the first reading,
  // in case we started reading in the middle of a string from the sender.
  myString = myPort.readStringUntil( 10 );  // 10 = '\n'  Linefeed in ASCII
  myString = null;
}


void draw() {
  background(0);

  // changes the values
  //for (int i=0; i<values.length; i++) {
  //  values[i] = i;  /** Feel free to change this!! **/
  values[0] = mouseX;
  values[1] = mouseY;
  //}
  if (state){
  // sends the values to Arduino.
  sendSerialData();

  // This causess the communication to become slow and unstable.
  // You might want to comment this out when everything is ready.
  // The parameter 200 is the frequency of echoing. 
  // The higher this number, the slower the program will be
  // but the higher this number, the more stable it will be.
  echoSerialData(200);}
  else{
  myPort.write("pn");
  }
}

void sendSerialData() {
  String data = "";
  for (int i=0; i<values.length; i++) {
    data += values[i];
    //if i is less than the index number of the last element in the values array
    if (i < values.length-1) {
      data += ","; // add splitter character "," between each values element
    } 
    //if it is the last element in the values array
    else {
      data += "n"; // add the end of data character "n"
    }
  }
  //write to Arduino
  myPort.write(data);
}


void echoSerialData(int frequency) {
  //write character 'e' at the given frequency
  //to request Arduino to send back the values array
  if (frameCount % frequency == 0) myPort.write('e');

  String incomingBytes = "";
  while (myPort.available() > 0) {
    //add on all the characters received from the Arduino to the incomingBytes string
    incomingBytes += char(myPort.read());
  }
  //print what Arduino sent back to Processing
  print( incomingBytes );
}
void keyPressed(){
  if (key == ' '){
    if(state){
    state = false;}
    else{
    state = true;
    }
  }
}

Here, I added a simple improvement, which is to pause when pressing SPACEBAR.

Code on Arduino:

[code] // IMA NYU Shanghai
// Interaction Lab

/**
This example is to send multiple values from Processing to Arduino.
You can find the Processing example file in the same folder which works with this Arduino file.
Please note that the echo case (when char c is ‘e’ in the getSerialData function below)
checks if Arduino is receiving the correct bytes from the Processing sketch
by sending the values array back to the Processing sketch.
**/

#define NUM_OF_VALUES 2 /** YOU MUST CHANGE THIS ACCORDING TO YOUR PROJECT **/

/** DO NOT REMOVE THESE **/
int tempValue = 0;
int valueIndex = 0;
/* This is the array of values storing the data from Processing. */
int values[NUM_OF_VALUES];

void setup() {
Serial.begin(9600);
pinMode(8,OUTPUT);
}

void loop() {
getSerialData();
tone(8,map(values[0],0,500,0,1000),values[1]);

// add your code here
// use elements in the values array
// values[0] // values[1] }

//recieve serial data from Processing
void getSerialData() {
if (Serial.available()) {
char c = Serial.read();
//switch – case checks the value of the variable in the switch function
//in this case, the char c, then runs one of the cases that fit the value of the variable
//for more information, visit the reference page: https://www.arduino.cc/en/Reference/SwitchCase
switch (c) {
case ‘p’:
values[0] = 0;
break;
//if the char c from Processing is a number between 0 and 9
case ‘0’…’9′:
//save the value of char c to tempValue
//but simultaneously rearrange the existing values saved in tempValue
//for the digits received through char c to remain coherent
//if this does not make sense and would like to know more, send an email to me!
tempValue = tempValue * 10 + c – ‘0’;
break;
//if the char c from Processing is a comma
//indicating that the following values of char c is for the next element in the values array
case ‘,’:
values[valueIndex] = tempValue;
//reset tempValue value
tempValue = 0;
//increment valuesIndex by 1
valueIndex++;
break;
//if the char c from Processing is character ‘n’
//which signals that it is the end of data
case ‘n’:
//save the tempValue
//this will b the last element in the values array
values[valueIndex] = tempValue;
//reset tempValue and valueIndex values
//to clear out the values array for the next round of readings from Processing
tempValue = 0;
valueIndex = 0;
break;
//if the char c from Processing is character ‘e’
//it is signalling for the Arduino to send Processing the elements saved in the values array
//this case is triggered and processed by the echoSerialData function in the Processing sketch
case ‘e’: // to echo
for (int i = 0; i < NUM_OF_VALUES; i++) {
Serial.print(values[i]);
if (i < NUM_OF_VALUES – 1) {
Serial.print(‘,’);
}
else {
Serial.println();
}
}
break;
}
}
}
[/code]