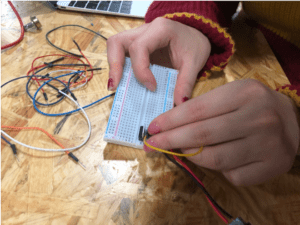
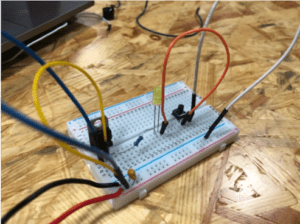
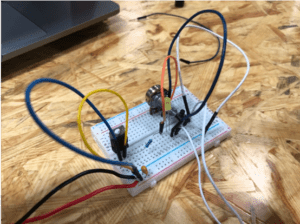
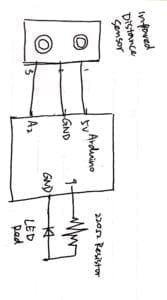
Recitation 4: Drawing machines by Ellie (Meng Yihan)

Step1&2(individual)

Materials:

1 * 42STH33-0404AC stepper motor

1 * SN754410NE IC chip

1 * power jack

1 * 12 VDC power supply

1 * Arduino kit and its contents
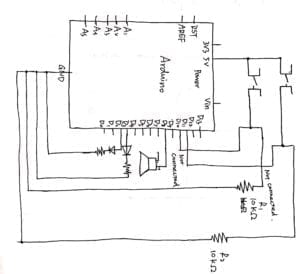
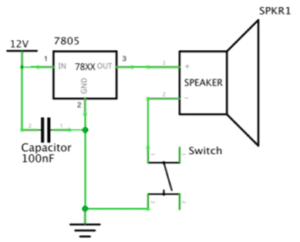
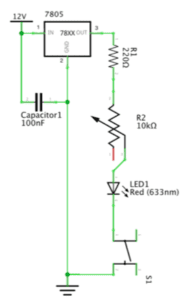
Diagram:

step 1
step 2

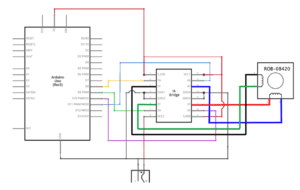
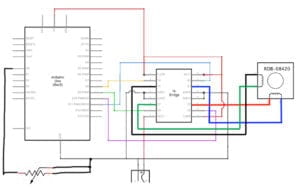
(https://wp.nyu.edu/shanghai-ima-interaction-lab/category/recitations/)

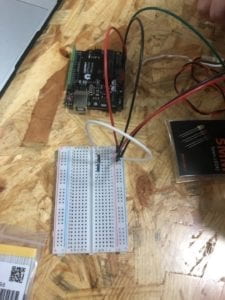
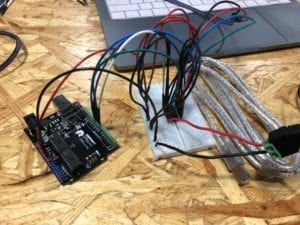
Process:1. Connect the circuit on Arduino Uno and breadboard as instruction indicates. 2. Double check the circuit before connect it to the power and my computer. 3. Open the code in Example in Arduino. 4. Check connecting port and other possible mistakes. 4. Run the code.

Problems encountered: for Step 1, I wasn’t bothered with any problems since it just need carefulness to connect all the components properly (though I did feel a little nervous when connecting the USB to my computer). Step 2 was much harder with the need to complete the coding. I did several attempts to code by myself but all failed. When I worked with my partner, we still could not figure out a proper way. After turning for help, I realized that it was the problems that I mistook the meaning of last line of code which exist in the example. “precious=value” means to give the variable a new value (the input). After that, I recode the map() line and after being checked by assistant, I connect the USB again and it worked perfectly.

Reflect: Through all the learning process both in classes and in recitations, I feel that my weakness lies in coding. I had no previous coding experiences and it is hard for me to follow up in classes. I need to practice more and study deeper on it.
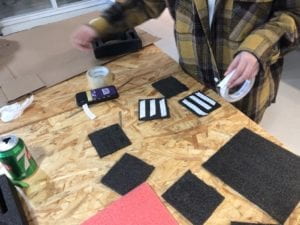
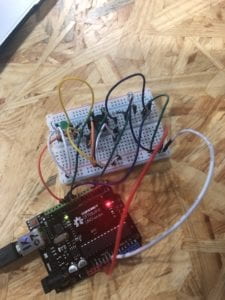
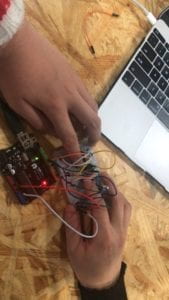
Picture:

Video:

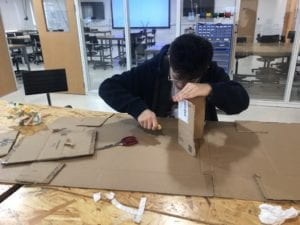
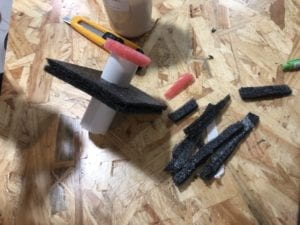
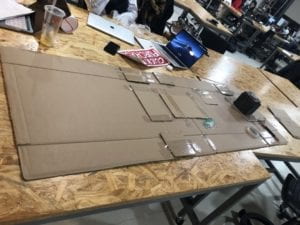
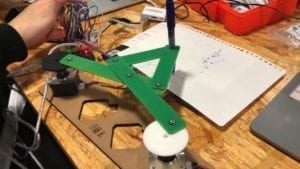
Step 3 (partner: Wang)

Materials:

2 * Laser-cut short arms

2 * Laser-cut long arms

1* Laser-cut motor holder

2 * 3D printed motor coupling

5 * Paper Fasteners

1 * Pen that fits the laser-cut mechanisms

Paper

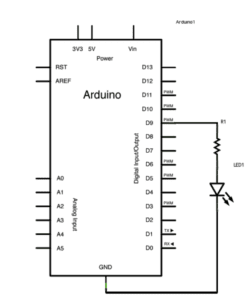
Diagram: same as step 2

Process: 1. Connect all the laser-cut arms together with paper fasteners. 2. Connect it with both motors. 3. Run the codes and control the motor to make the Drawing Machine draw lines.

No problems encountered. Things went pretty smoothly and finally seeing the machine running was excited and relieved.

Picture:

Video:

Question 1:

I would be interested in building machines that are easier to control (than this Drawing Machine) and could be more entertaining or practical. There is one thing that I would like very much to do and the servo motor could serve the purpose greatly. It is always hard to track the stars now in the city, since there are too much pollution and the sky at night is always grey and foggy with no light from stars, even the Polaris would disappear most of the time. I want to build a machine that could precisely point towards the Polaris even if the star itself is invisible from our sight to remind people of the shiny bright night that we used to enjoy as well as giving a sense of determination and faith in modern society.

First research and find the trail of Polaris and how long it takes to rotate around Earth once. Then calculate the speed of the motor. Code it. Attach a silvery arrow to the side of motor which should be pointing at the Polaris all the time. build a holder and place the motor carefully on it. As Polaris rotate, the motor would rotate at exactly the same speed. Therefore, the arrow will always point at the Polaris.

Question 2:

I would like to talk about the Firebirds created by Paul DeMarinis in 2005. From my point of view, this is an extremely creative, interesting and attractive installation. In comparison, our work on Drawing Machine is of far less interest and exploration than his work. It not only uses the air wave to reveal the mysterious sound wave, but also presents thoughts on social problems, which is the role of authority and power. However, though this high-tech installation is much more visually attractive, it lacks a sense of interaction. Human is almost not involved in the process since it just need the recorded speech of all the powerful people. It is more like a piece of work in an exhibition and artistic collection (and actually it is). Our machine is much more involving and interactive because it needs us to handle and draw. The artistic use gas flames and electrical sound modulator to serve his purpose. From my perspective, it is a brilliant choice. Fire flames can best present the idea of “power” and it could at the same time heat the air to make the sound wave sensible.

Reflection on Group Project: 4D Interactive Billboard by Ellie (Meng Yihan)

During the period of time when I struggled to figure out where the true meaning of “interaction” lies, Crawford’s idea helped me a lot after I went through the reading for week 1. In his article, he defines interaction as a special conversation and “a cyclic process in which two actors alternately listen, think, and speak” (“The Art of Interactive Design”, Crawford, pp.3). The process of interaction is exactly like a conversation. No matter such communication happens between human and human, human and creature or human and artificial objects, it must always go through the three stages of listening, thinking and speaking since it is how we share information and how ideas are conveyed between different individuals. The following process of digesting and collaboratively responding can only happen when the intention and perception are fully delivered. For the modern era, where the new media has become an extremely important part of our daily lives, Igoe and O’Sullivan further give a more accurate expression of these three stages. It is stated: “Most physical computing projects can be broken down into these same three stages…input, processing, and output” (Introduction to Physical Computing, Igoe and O’Sullivan). These three stages are the basis of interaction, but I would rather describe them as receiving signals, digesting information and giving reactions. When I think about the subject of interaction, I feel that interaction can involve more than two participants, which often happens in doing a group project and dealing with complex equipment.

So here is my definition of interaction. Interaction is a series of processes involving two or more actors’ effort to achieve a mutual goal (for entertainment or live more effectively and conveniently) and is based on the ability, which creatures or artificial objects possess, to give reactions to external stimuli (to each other) through thinking or processing. This kind of action can usually display people’s intention and idea and realize the value of objects.

Two Projects that I choose to better and clearer state my idea of interaction are “Anti-Drawing Machine” and “Open Highway”. Though the “Anti-Drawing Machine” seems unreasonable and funny, it does interact with people since it could sense human’s intention of drawing and do movements to destroy their artwork after “thinking” about the signal while people at the same time would receive the information of “my masterpiece” is being destroyed and would give reactions immediately to fulfill their work. The efforts of two result in achieving the goal of entertainment and successfully create a new picture. On the contrary, the “Open Highway” aligns less well with my definition of interaction since it is basically a map with modern technology. Though it clearly depicts the “hidden highways” beneath the city, it only navigates people rather than involve them in some kinds of interactive activities. People do not need to give responses to this map and neither does the map need their feedback.

For our design, we’ve successfully presented this idea of interaction. We started from thinking about what people would like to have in 100 years and not yet exists now. “Nanny machines” would be perfect but it does not correspond to our perception of interaction that well since it is designed to take care of everything and does not rely on people’s reactions. Thus, we thought about what aspect of daily life could involve people far more than now with the use of advanced technology. The answer was the advertisement. Ads today are more like one-way broadcast rather than an activity of interaction with people’s feelings and reactions involved. With 4D project technology and artificial intelligence, the advertisements in the future could be more humanized and individual-tailored.


The appearances and emotional feelings of people would give the information for the billboard to listen (receiving signals), and it would go through a stage of automatically analyzing the need of people (digesting information), after which it would give highly-fitted recommendations (giving reactions). Same for people, after unintentionally conveying the information, they would receive signals from the billboard and they would say “no” by waving, “yes” by clicking or “change a recommendation” by asking after they digest the information. With these processes going on and on, our 4D Interactive Billboard successfully achieves interaction.

Recitation 3: Sensors by Ellie (Meng Yihan)

Circuit 1

Components: 1* infrared distance sensor

1* LED

1* 220-ohm resistor

1* breadboard

1* Arduino

1 * USB A to B cable

A handful of jumper cables

Diagram:

Process: 1. Connect the Arduino with USB. 2. Choose the suitable sensor. 3. Design the circuit. 4. Connect the circuit according to the diagram. 5. Write the Arduino programming. 6. Test the circuit.

Problems encountered: we were confused about the code on the webpage which introduce how to translate the distance into digital signals. We reached an assistant for help and he explained how the code worked and taught us how to use map(). He also checked our circuit, finding out some incorrect connection. We then tried a few more times ourselves and soon we were able to get the sensor work.

Picture:

Video:

Circuit 2

Components: same

Diagram: same

Process: we made a few adjustments to our Arduino code, trying to make the LED go off when the distance between Arduino and sensor exceed 30cm.

Problems encountered: we struggled a bit when writing the “if…else…” code, but eventually successfully worked that out without external help. However, we then found that when we move our hand away from the sensor, it would go off for a second, then somehow it gave light again.

We failed to figure it out ourselves so we reached Young for help. He checked the sensor and our circuit and it turns out we set the ceiling number at 30, which the sensor could not sense. That makes the input be seen as a blank, thus, the LED would give light again. We changed the number to 20 and it worked perfectly.

Video:

Question 1: I intended to create a circuit that if the sensor senses the infrared ray, the LED would give light. It could be used to remind people of potential danger, for instance, the circuit could be built in the high voltage box, then if someone approaches and the distance could cause danger, the caution light would shine brightly to warn people. Also, it could be used for automatic lighting device so that if someone enter the area, it would give light, saving the trouble from groping in the dark to try to find the button, also save the energy by turning off the light if no one is in the room.

Question 2: Because for a certain programming software, the language is fixed. The final product of programming is the mixture and flexible application of the standard codes. People can do almost everything they want if they follow the instruction and make good use of the codes, which is similar to recipe or tutorial: do as you are told, and you will get what it should be. Also, you can make a little bit change to the order and other things to the code to create new patterns and make it more suitable to your purpose just like different chefs do to make their cuisines more delicious and unique.

Question 3: From my perspective, I think the most significant and remarkable influence that computer has on human is that it changes our thinking method and our behavior, including emotional feelings on technology. It regulates the idea of “change” and “new”, also updates our interpretation and perception of “precise” and “time”, as well as our concept of the combination of “simpleness” and “complexity”. It brings us to the new era of everything updating and renewing all the time. Moreover, it gives us a way to interact more with a certain machine, not only follows its working routine, but create something new. From this point of view, it also improve human’s creativity, even provide a new dimension of space for being creative.

Recitation 2: Arduino Basics by Ellie(Meng Yihan)

Partner: Mimi(Cai Shuyang)

Circuit 1: Fade

Components: 1 * Arduino Uno

1 * USB A to B cable

1 * breadboard

1 * LED

1 * 220-ohm resistor

1 * Multimeter

A handful of jumper cables

Diagram:

https://wp.nyu.edu/shanghai-ima-interaction-lab/category/recitations/

Process: 1. connect the Arduino with USB. 2. Plug in the LED and resistor in the right holes according to the given diagram and picture. 3. Double check the circuit and make sure there is nothing wrong. 4. Connect the Arduino to PC and run the procedure.

Problems encountered: nothing went wrong.

Picture:

Video:

Circuit 2: toneMelody

Components: 1 * Arduino Uno

1 * USB A to B cable

1 * breadboard

1 * buzzer

A handful of jumper cables

Diagram:

https://wp.nyu.edu/shanghai-ima-interaction-lab/category/recitations/

Process: 1. connect the Arduino with USB. 2. Connect the buzzer to the breadboard and connect the breadboard to Arduino with power and ground cables according to the given diagram and picture. 3. Double check the circuit and make sure there is nothing wrong. 4. Connect the Arduino to PC and run the procedure.

Problems encountered: on our first try, we connected the circuit right but failed to get the buzzer buzz when we tried to upload the codes. We asked Young for help and were told that we did not choose the right port. We fixed that and the circuit went well.

Picture:

Circuit 3: Speed Game

Components: 1 * Arduino Uno

1 * USB A to B cable

1 * breadboard

1 * buzzer

2 * LEDs

2 * 220-ohm resistors

2 * 10K ohm resistors

2 * pushbuttons

A handful of jumper cables

1 * Multimeter

Diagram:

Process: 1. connect the Arduino with USB. 2. Connect all the necessary components to the breadboard according to the given diagram and picture. 3. Connect the Arduino with the breadboard with power and ground cables 4. Double check the circuit and make sure there is nothing wrong. 5. Connect the Arduino to PC and run the procedure.

Problems encountered: 1. On our first try, we found that the LED on Arduino was not shining as usual. We replace the USB and Arduino itself but could not figure out the problem. Then we reached Nick for help. With his presence, we connect it again and this time, the green LED gave out light. (but we still do not know why it would not shine. Maybe it was because we did not plug the USB tightly into the computer.) 2. After we fixed our first problem, another one popped up. We found that every time we push the button, the red LED on Arduino kept shining. Nick told us that it was because there is something wrong in the circuit that created a short circuit. We checked our circuit again and found that it was because we connected the button improperly, making two cables both connect to the power. We fixed that and it succeeded.

Picture:

Video:

Question 1: In our daily, we are surrounded by the interactions. For example, we press the bottom, the light would be on. Phones, one thing that we couldn’t live without, contain a lot of interactions. For example, Siri. If you shout to your phone,Hey Siri ! Then Siri would reply and interact with by answering your questions and executing the work you want it to do. In the circuit, interaction can be presented as you build up the circuit and input the code to it, then it will follow the instruction. In my opinion, interaction is a serious of reaction happened between human and human or human with other objects. Once a signal is set up at any side, the other side must have reactions to response to it. That is my opinion about interaction.

Question 2: Recently, I have been suffering from practicing piano and figuring out where I do wrong. So I think maybe using the LEDs to help me would be a great idea. First, it could serve as a reminder of where the player has got wrong. attach one LED to each key and use the sound sensor to see if the key is giving sound. Then program the music score into electric signals that could connect to each key. The program goes like this: if the sound is not the same as the music score, the circuit will be connected and the LED will give light to remind the player that he/she has made a mistake.  Moreover, each LED could also be programmed with a chord when practicing accompaniment. Another possible use for these LEDs is that they could be used to make the process more interesting by assigning different colors of LEDs to different keys.

Ellie(Meng Yihan)-IxLab (Young)- First Documentation

Partner: Mimi (Cai Shuyang)

Circuit 1:

Components: 1 Breadboard: serve as a platform on which we can plug things in.

                     1 Voltage Regulator: regulate the voltage so the circuit could be served with the correct voltage. (not 220V)

                     1 Capacitor: store and let out the electricity charge.

                     A few Hook up wires: connects other components.

1 Buzzer: it serves as the speaker so that the “doorbell” could ring.

                     1 Push button(switch): to connect the circuit to make the buzzer ring.

1
circuit 1

⬆️https://wp.nyu.edu/shanghai-ima-interaction-lab/category/recitations/

Process:

The first step was to connect the power source. However, we encountered some problems. Due to the reason that we were not adequately familiar with how the breadboard functioned, we connected it vertically instead of horizontally. In that way, we created a short circuit and that led to our first failure of attempt.

1
incorrectly building circuit 1

After seeking help from instructor Young, we understood how the metal things were connected inside the board and that the blue line stood for the same thing of “connecting to the ground” as the diagram on the website. After another attempt, we got it right and also positioned the capacitor correctly.

circuit 1-2

Another problem we’ve encountered was that we failed to connect the switch correctly to the circuit—we didn’t understand the reference on the web page and positioned it in the wrong direction. Again, with Young’s help, we got to know the right way to connect it.

Circuit 2:

circuit 2/ 

⬅️https://wp.nyu.edu/shanghai-ima-interaction-lab/category/recitations/

Components: 1 breadboard, 1 voltage regulator, 1 capacitor, a few wires, 1 push button

             1 220-ohm Resistor: reduce the electric current so that the circuit would not be over-loaded.

              1 LED: it would give out light when the circuit is connected so the “lamp” could work.

Process: As the process of building the first circuit provided us some great and useful experience, the second one went quite smoothly without any trouble except for reorganizing the components so that they could all fit in the breadboard. We did it after several adjustments.

Circuit 3:

https://wp.nyu.edu/shanghai-ima-interaction-lab/category/recitations/

Components: breadboard, voltage regulator, capacitor, wires, push button, 220-ohm resistor

Variable Resistor: adjust the resistance of the circuit. In this circuit, we can use it to change the luminance of the LED so that the lamp could be dimmable.

Process: we did find it hard to figure out the right direction to position the variable resistor, but eventually we got it right by reading the instruction page and comparing the real component with the reference image.

Question 1:

          The interactivity that the circuit includes can be considered from two perspectives.

          First, a successful operation of the circuit is based on two condition: a person push the button and the circuit is correctly connected. From this point of view, this process includes two basic components of an interactive action: two actors and a process of alternatively exchanging signals. Though it is a low-level procedure seeing from the degree of interactivity, it does serve as a good start point for a beginner like me and could bring much joy.

       Second, there is a certain procedure of input-process-output during the operation, and that is: the operator giving an input signal to the circuit by pushing the button, the circuit being connected and deliver the electric charge, and it giving an output by lightening the LED or making noise using the buzzer.

       These processes make the circuit interactive.

Question 2:

       Basically, Interaction Design provides creative ideas while Physical Computing figures out the practical plans and turns them into reality.

       In everyday life, we are communicating with technology and interact with computer all the time without consciousness. According to Zack Lieberman, computing is also a form of art, a practical art which can help us turn virtual into reality. Considering that, interactive art is related to physical computing tightly. However, without creativity, computing is nothing more than just a vain skill. Interaction design is the core of the interactive art. It could provide the newest and the most thrilling ideas. We can only create interactive art by combining interaction design and physical computing and make good use of both.