The original idea of making something entertaining was raised by my partner Robert. Based on that idea, we made a lot of efforts to make our project more interactive and practical. In my previous researches, one thing that I learned inspired me a lot in the designing process of our project. In many projects that aims at entertaining people, one common characteristic appears repeatedly. That is, the machine not only have a mutual final goal with the player, but would also set many barriers to, to some extent, prevent the players from accomplish their goal. Though the process of making achievements becomes more difficult, it stimulates the players’ wish to win and gets them immersed in the game. For example, in the design of “Anti-Drawing Machine” (Created by Soonho Kwon, Harsh Kedia and Akshat Prakash), the inventor purposely gets the machine distract people from drawing things. It turns out that most people get even more enthusiastic and joyful in creating a picture with the machine. Therefore, from my perspective, creating barriers for users are equally important as sharing a mutual goal and reacting accordingly in an interactive project for entertainment since it gets people’s emotional feelings involved. My definition of interaction was thus enriched: Interaction is a series of processes involving two or more actors’ effort to achieve a mutual goal (for entertainment or live more effectively and conveniently) and be conscious about emotional feelings or ideological morality by giving reactions to external stimuli (to each other) through thinking or processing. Based on this idea, we set a final goal of heart rate that is higher than usual to make users pay more effort to achieve that, at the same time obtain a sense of joy. As a game, the project is intended for people who is curious and passionate about using their body. by using visible components to represent heartbeat, it could satisfy people’s desire of viewing the invisible things happening in their bodies and use it to achieve something.
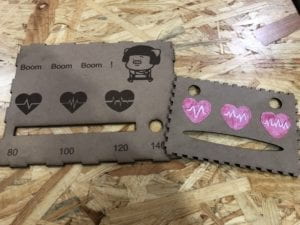
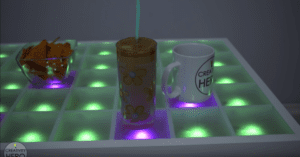
We had great consideration on choosing our components. We chose LEDs and a fan to represent the heart rate based on two criteria: visually attractive or vivid and being easy to understand. The colorful LEDs add to the aesthetics of our project and the fan, which could give wind, is placed at the final goal – heart rate of 140 with the music, to give sense of success and reward. For our project, we would like users to enjoy playing with it and could sense the change between each stage. Therefore, in our design, we cut a rectangle to place the row of LEDs and a hole for the fan. We had them placed in a single line to show the linear change of heart rate. Also, we cut a few holes at the back of the box to let the music be clearly heard to strengthen the feeling of success.
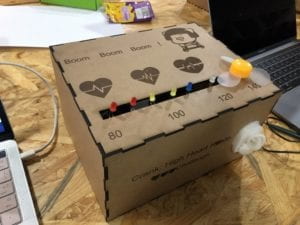
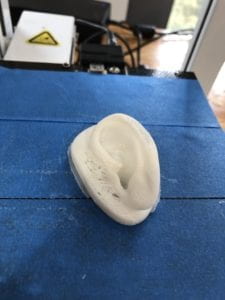
From my perspective, the most significant step in our production is how we managed to present the heart rate. At first, we intended to use an LCD to directly print the heart rate. However, we then give it up for two reasons. Firstly, the circuit and code of LCD in Arduino is too complicated exceed our capability. Secondly, we found it unnecessary to use LCD to directly show the heart rate since we do not really need precise numbers. Rather, we use a row of LEDs to show the raise of heart rate, which involves more visualized signals and aesthetics. Apart from this process of figuring how to represent the heart rate, we also made a lot of adjustments according to feedback obtained from User Testing Session. The most important adjustment was the “instructions” to use the machine. Since we only designed the project based on our presupposed ideas and neglect the experience of users when designing, a lot of users who did not have previous experience of using ear-clip had no idea how to even start running the machine and some expressed their confusion on the meaning of the fan and LEDs. We then realize the importance of accessibility of the project. After receiving feedbacks, we added more information like printing the words on the box, 3D-printing an ear model with the ear-clip placed on and printing the number of heart rate under the LEDs and the fan to guide users on using the machine and added to its accessibility. These adjustments were of great use and in the presentation, peers showed much interest in our project and the 3D-printed ear model received high praise.
The goal of our project is to create something using heart rate that is both entertaining and could motivate people to work out. Our machine provides a mutual goal of achieving a certain heart rate with users while also create some barriers to stimulate people’s emotional feelings, which aligns perfect with my definition of interaction. From the ultimate results in live demo and presentation, I am more than delightful to find that, though there are still things that could be improved, people’s reaction, including their interest and effort in raising the heart rate and their feeling of joy, had perfectly reached our expectation. If we have more time, I would like to add a sign with words like “congratulations” written on, which would show up after people reaching the heart rate of 140 controlled by the stepper motor. From the process of making the project, I have realized the importance of the accessibility of machines and the ability to present data in multiple and vivid ways. Our project and the idea behind it are actually more than a “game”. The heartbeat is a very precise and transparent element that could represent a lot of things in real life. The emotional feelings, the health condition, the capability of dealing with things… Encouraging people to work out is just a small aspect of its use. Such machine could be applied to fitness equipment, making the process more fun. It could also be used in hospitals to encourage young patients to willingly receive the detection and treatment. We are already living in a stressful society and having pressure on everything. Why not make some necessary experience a little bit more joyful?

Code:
#define NOTE_B0 31
#define NOTE_C1 33
#define NOTE_CS1 35
#define NOTE_D1 37
#define NOTE_DS1 39
#define NOTE_E1 41
#define NOTE_F1 44
#define NOTE_FS1 46
#define NOTE_G1 49
#define NOTE_GS1 52
#define NOTE_A1 55
#define NOTE_AS1 58
#define NOTE_B1 62
#define NOTE_C2 65
#define NOTE_CS2 69
#define NOTE_D2 73
#define NOTE_DS2 78
#define NOTE_E2 82
#define NOTE_F2 87
#define NOTE_FS2 93
#define NOTE_G2 98
#define NOTE_GS2 104
#define NOTE_A2 110
#define NOTE_AS2 117
#define NOTE_B2 123
#define NOTE_C3 131
#define NOTE_CS3 139
#define NOTE_D3 147
#define NOTE_DS3 156
#define NOTE_E3 165
#define NOTE_F3 175
#define NOTE_FS3 185
#define NOTE_G3 196
#define NOTE_GS3 208
#define NOTE_A3 220
#define NOTE_AS3 233
#define NOTE_B3 247
#define NOTE_C4 262
#define NOTE_CS4 277
#define NOTE_D4 294
#define NOTE_DS4 311
#define NOTE_E4 330
#define NOTE_F4 349
#define NOTE_FS4 370
#define NOTE_G4 392
#define NOTE_GS4 415
#define NOTE_A4 440
#define NOTE_AS4 466
#define NOTE_B4 494
#define NOTE_C5 523
#define NOTE_CS5 554
#define NOTE_D5 587
#define NOTE_DS5 622
#define NOTE_E5 659
#define NOTE_F5 698
#define NOTE_FS5 740
#define NOTE_G5 784
#define NOTE_GS5 831
#define NOTE_A5 880
#define NOTE_AS5 932
#define NOTE_B5 988
#define NOTE_C6 1047
#define NOTE_CS6 1109
#define NOTE_D6 1175
#define NOTE_DS6 1245
#define NOTE_E6 1319
#define NOTE_F6 1397
#define NOTE_FS6 1480
#define NOTE_G6 1568
#define NOTE_GS6 1661
#define NOTE_A6 1760
#define NOTE_AS6 1865
#define NOTE_B6 1976
#define NOTE_C7 2093
#define NOTE_CS7 2217
#define NOTE_D7 2349
#define NOTE_DS7 2489
#define NOTE_E7 2637
#define NOTE_F7 2794
#define NOTE_FS7 2960
#define NOTE_G7 3136
#define NOTE_GS7 3322
#define NOTE_A7 3520
#define NOTE_AS7 3729
#define NOTE_B7 3951
#define NOTE_C8 4186
#define NOTE_CS8 4435
#define NOTE_D8 4699
#define NOTE_DS8 4978
#define melodyPin 3
int melody[] = {
NOTE_E7, NOTE_E7, 0, NOTE_E7,
0, NOTE_C7, NOTE_E7, 0,
NOTE_G7, 0, 0, 0,
NOTE_G6, 0, 0, 0,
NOTE_C7, 0, 0, NOTE_G6,
0, 0, NOTE_E6, 0,
0, NOTE_A6, 0, NOTE_B6,
0, NOTE_AS6, NOTE_A6, 0,
NOTE_G6, NOTE_E7, NOTE_G7,
NOTE_A7, 0, NOTE_F7, NOTE_G7,
0, NOTE_E7, 0, NOTE_C7,
NOTE_D7, NOTE_B6, 0, 0,
NOTE_C7, 0, 0, NOTE_G6,
0, 0, NOTE_E6, 0,
0, NOTE_A6, 0, NOTE_B6,
0, NOTE_AS6, NOTE_A6, 0,
NOTE_G6, NOTE_E7, NOTE_G7,
NOTE_A7, 0, NOTE_F7, NOTE_G7,
0, NOTE_E7, 0, NOTE_C7,
NOTE_D7, NOTE_B6, 0, 0
};
int tempo[] = {
12, 12, 12, 12,
12, 12, 12, 12,
12, 12, 12, 12,
12, 12, 12, 12,
12, 12, 12, 12,
12, 12, 12, 12,
12, 12, 12, 12,
12, 12, 12, 12,
9, 9, 9,
12, 12, 12, 12,
12, 12, 12, 12,
12, 12, 12, 12,
12, 12, 12, 12,
12, 12, 12, 12,
12, 12, 12, 12,
12, 12, 12, 12,
9, 9, 9,
12, 12, 12, 12,
12, 12, 12, 12,
12, 12, 12, 12,
};
int underworld_melody[] = {
NOTE_C4, NOTE_C5, NOTE_A3, NOTE_A4,
NOTE_AS3, NOTE_AS4, 0,
0,
NOTE_C4, NOTE_C5, NOTE_A3, NOTE_A4,
NOTE_AS3, NOTE_AS4, 0,
0,
NOTE_F3, NOTE_F4, NOTE_D3, NOTE_D4,
NOTE_DS3, NOTE_DS4, 0,
0,
NOTE_F3, NOTE_F4, NOTE_D3, NOTE_D4,
NOTE_DS3, NOTE_DS4, 0,
0, NOTE_DS4, NOTE_CS4, NOTE_D4,
NOTE_CS4, NOTE_DS4,
NOTE_DS4, NOTE_GS3,
NOTE_G3, NOTE_CS4,
NOTE_C4, NOTE_FS4, NOTE_F4, NOTE_E3, NOTE_AS4, NOTE_A4,
NOTE_GS4, NOTE_DS4, NOTE_B3,
NOTE_AS3, NOTE_A3, NOTE_GS3,
0, 0, 0
};
int underworld_tempo[] = {
12, 12, 12, 12,
12, 12, 6,
3,
12, 12, 12, 12,
12, 12, 6,
3,
12, 12, 12, 12,
12, 12, 6,
3,
12, 12, 12, 12,
12, 12, 6,
6, 18, 18, 18,
6, 6,
6, 6,
6, 6,
18, 18, 18, 18, 18, 18,
10, 10, 10,
10, 10, 10,
3, 3, 3
};
int sensorValue;
int outputValue;
#define LED 11
boolean led_state = LOW;
unsigned char counter;
unsigned long temp[21];
unsigned long sub;
bool data_effect = true;
unsigned int heart_rate;
const int max_heartpluse_duty = 2000;
int redPin= 7;
int greenPin = 6;
int bluePin = 5;
void setup() {
pinMode(9, OUTPUT);
pinMode(LED, OUTPUT);
pinMode(12, OUTPUT);
pinMode(11, OUTPUT);
pinMode(10, OUTPUT);
pinMode(9, OUTPUT);
pinMode(8, OUTPUT);
Serial.begin(9600);
pinMode(3, OUTPUT);
pinMode(13, OUTPUT);
Serial.println(“Please ready your chest belt.”);
delay(5000);
arrayInit();
Serial.println(“Heart rate test begin.”);
attachInterrupt(digitalPinToInterrupt(2), interrupt, RISING);
pinMode(redPin, OUTPUT);
pinMode(greenPin, OUTPUT);
pinMode(bluePin, OUTPUT);
}
//this will run forever
void loop() {
digitalWrite(LED, led_state);
if (heart_rate >= 80){
digitalWrite(12, HIGH);
}
if (heart_rate >= 85){
digitalWrite(11, HIGH);
}
if (heart_rate >= 95){
digitalWrite(10, HIGH);
}
if (heart_rate >= 100){
digitalWrite(9, HIGH);
}
if (heart_rate >= 110){
digitalWrite(8, HIGH);
}
if (heart_rate >= 120){
setColor(255, 0, 0);
delay(500);
setColor(0, 255, 0);
delay(500);
setColor(0, 0, 255);
delay(500);
setColor(255, 255, 255);
delay(500);
setColor(170, 0, 255);
delay(500);
}
if (heart_rate >= 140) {
detachInterrupt(digitalPinToInterrupt(2));
digitalWrite(13, HIGH);
delay(3000);
sing(1);
sing(1);
sing(2);
}
// if (dataTime.Second = 10000 && heart_rate <= 140){
// sing(2);
// }
}
void sum()
{
if (data_effect)
{
heart_rate = 300000/ (temp[5] – temp[0]); //60*20*1000/20_total_time
Serial.print(“Heart_rate_is:\t”);
Serial.println(heart_rate);
}
data_effect = 1; //sign bit
}
/*Function: Interrupt service routine.Get the sigal from the external interrupt*/
void interrupt()
{
temp[counter] = millis();
Serial.println(counter, DEC);
Serial.println(temp[counter]);
switch (counter)
{
case 0:
sub = temp[counter] – temp[5];
Serial.println(sub);
break;
default:
sub = temp[counter] – temp[counter – 1];
Serial.println(sub);
break;
}
if (sub > max_heartpluse_duty) //set 2 seconds as max heart pluse duty
{
data_effect = 0; //sign bit
counter = 0;
Serial.println(“Heart rate measure error,test will restart!” );
arrayInit();
}
if (counter == 5 && data_effect)
{
counter = 0;
sum();
}
else if (counter != 5 && data_effect)
counter++;
else
{
counter = 0;
data_effect = 1;
}
}
void arrayInit()
{
for (unsigned char i = 0; i < 5; i ++)
{
temp[i] = 0;
}
temp[5] = millis();
}
int song = 0;
void sing(int s) {
// iterate over the notes of the melody:
song = s;
if (song == 2) {
Serial.println(” ‘Underworld Theme'”);
int size = sizeof(underworld_melody) / sizeof(int);
for (int thisNote = 0; thisNote < size; thisNote++) {
// to calculate the note duration, take one second
// divided by the note type.
//e.g. quarter note = 1000 / 4, eighth note = 1000/8, etc.
int noteDuration = 1000 / underworld_tempo[thisNote];
buzz(melodyPin, underworld_melody[thisNote], noteDuration);
// to distinguish the notes, set a minimum time between them.
// the note’s duration + 30% seems to work well:
int pauseBetweenNotes = noteDuration * 1.30;
delay(pauseBetweenNotes);
// stop the tone playing:
buzz(melodyPin, 0, noteDuration);
}
} else {
Serial.println(” ‘Mario Theme'”);
int size = sizeof(melody) / sizeof(int);
for (int thisNote = 0; thisNote < size; thisNote++) {
// to calculate the note duration, take one second
// divided by the note type.
//e.g. quarter note = 1000 / 4, eighth note = 1000/8, etc.
int noteDuration = 1000 / tempo[thisNote];
buzz(melodyPin, melody[thisNote], noteDuration);
// to distinguish the notes, set a minimum time between them.
// the note’s duration + 30% seems to work well:
int pauseBetweenNotes = noteDuration * 1.30;
delay(pauseBetweenNotes);
// stop the tone playing:
buzz(melodyPin, 0, noteDuration);
}
}
}
void buzz(int targetPin, long frequency, long length) {
// digitalWrite(13, HIGH);
long delayValue = 1000000 / frequency / 2; // calculate the delay value between transitions
//// 1 second’s worth of microseconds, divided by the frequency, then split in half since
//// there are two phases to each cycle
long numCycles = frequency * length / 1000; // calculate the number of cycles for proper timing
//// multiply frequency, which is really cycles per second, by the number of seconds to
//// get the total number of cycles to produce
for (long i = 0; i < numCycles; i++) { // for the calculated length of time…
digitalWrite(targetPin, HIGH); // write the buzzer pin high to push out the diaphram
delayMicroseconds(delayValue); // wait for the calculated delay value
digitalWrite(targetPin, LOW); // write the buzzer pin low to pull back the diaphram
delayMicroseconds(delayValue); // wait again or the calculated delay value
}
// digitalWrite(13, LOW);
}
void setColor(int redValue, int greenValue, int blueValue) {
analogWrite(redPin, redValue);
analogWrite(greenPin, greenValue);
analogWrite(bluePin, blueValue);
}

 (source: