Recitation 4: Drawing Machines by Gloria (Yixuan) Liu

Components

1 * 42STH33-0404AC stepper motor
1 * SN754410NE ic chip
1 * power jack
1 * 12 VDC power supply
1 * Arduino kit and its contents

2 * Laser-cut short arms
2 * Laser-cut long arms
1* Laser-cut motor holder
2 * 3D printed motor coupling
5 * Paper Fasteners
1 * Pen that fits the laser-cut mechanisms
Paper

Step 1: Build the circuit
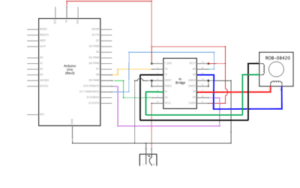
Diagram
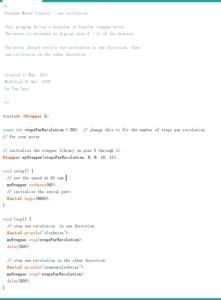
Code

For the circuit building, since there were so many wires. Therefore, I double-checked the pin number and the H-bridge, connected the Arduino board to my computer, and uploaded the code.

Step 2: Control rotation with a potentiometer
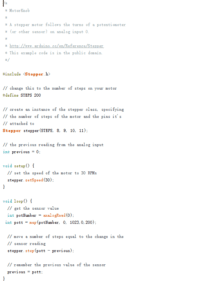
Code

For the next step, we need to write the code by ourselves, at which I was confused. With a fellow’s reminding, I worked out how to use the map function and set the proper range of value to make the stepper work properly. I changed the code many times.

Step 3: Build a Drawing Machine

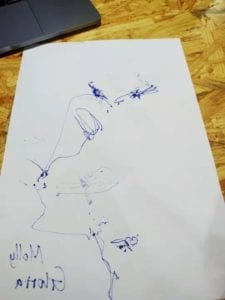
Then, Molly and I connected our motor to the arms and set the pen. After powering the whole circuit, the two stepper motors started to work, and the pen created some patterns on the paper, although in a messy way. However, we did not have time to figure out how to let the pen draw in a more linear way.
Question 1:

What kind of machines would you be interested in building? Add a reflection about the use of actuators, the digital manipulation of art, and the creative process to your blog post.

I would like to build a machine which can track the bugs in the room automatically and help people to kill them. The use of actuators is convenient in two ways. Although the function of actuators seems simple, the utility if it actually varies a lot, depending on what purpose people want it to achieve. The other way is that the process of fixing or removing the actuator is pretty simple. Therefore, the actuator plays an important role in the process if digital manipulation. The reason is that digital manipulation is a fusion of the creativity of humans and mechanical manipulation. Digital manipulation is also a connection between the use of actuators and the creative process of people. For the creative process, with the help of actuators and the digital manipulation of art, it would convey people’s thoughts and emotions in a more vivid way, and would save the manpower.

Question 2:

Choose an art installation mentioned in the reading ART + Science NOW, Stephen Wilson (Kinetics chapter). Post your thoughts about it and make a comparison with the work you did during this recitation. How do you think that the artist selected those specific actuators for his project?

The art installation I choose is called Mechanical Mirrors by Daniel Rozin. This installation gives me a warm impression for two reasons. The first is that the material it uses such as wood actually has an emotional impact on people who walked by. The other reason is that the installation would portray the face of people in an aesthetic way. Comparing with my work, this installation contains more emotional elements. My work was just about how to create a drawing machine using actuators. However, this installation is more variable, since it gives different responses to different people who try this installation. Although the function of each actuator may be simple, the output they created jointly is actually variable, giving the audience not only an impressive visual pleasure but also an emotional shock on people’s heart.
Recitation 4: Group Project by Gloria Liu

My Definition of Interaction

According to Crawford, interaction is a conversation completed by no less than two actors, in which both of them respond to each other (Crawford). There are some features which should be highlighted if you want to call a process interaction. The first feature is that if there is only one actor responding to himself, the process cannot be called interaction. Secondly, the actions of the actors should not be simply reacting. Instead, it should be communicating and responding to each other, clarified by Crawford. In other words, one actor’s respond should be meaningful and can make the other actor respond later on, forming an iterative circle.

Apart from agreeing with Crawford’s definition, I also want to add that, interaction is a process, which follows certain rules. On the one hand, the two actors communicate with each other in the language and principles making sense to either side, so that they can complete a task jointly. On the other hand, another rule guiding the process of interaction is that the task to be complete by actors should have some meaning to the world, such as personal emotion, moral responsibility, and culture insight. According to Crawford, this could be an interaction at a low level.

Two Interactive Projects

The project aligning with my definition of interaction is called “SUN”. It is an installation using sensors to give passersby an interactive experience of watching the sunrise and sunset. Users can change the scenery on the wall and the position of the sun on the wall by raising or dropping the huge physical ball in front of the wall. This project aligns with my definition of interaction. The first reason is that the process of changing the scenery on the wall was completed by many actors, which contains the passerby, the ball, and the sensible wall. Secondly, the actors communicate to each other, since the position of the ball decide the corresponding position of the sun on the wall to change the whole scenery on the wall, including the color of the sky, the sea, and the brightness of the wall. Thirdly, the rule of this process is the FMRI data and sensors on the wall, making each actor understand each other. In addition, this process is meaningful, since it can bring those exhausted people who walk by a sense of relaxation and aesthetics.

The project which does not align with my definition of interaction is called DESCENT. This is an aminated film narrating the Black Death in Europe, and the mediation of the darkest time of humanity. Whatever you click, the computer is indifferent to your order and keep playing those scary and depressing scenes. This interactive project does not align with my definition for interaction, because the only action done by people was downloading the movie and clicking the play. The process is more likely that people listen to the narratives of the computer, instead of communicating and corresponding to each other. If there is some interaction, then it would be people’s playing the film and computer’s being indifferent to people’s order and causing a depressing feeling for people.

Group Project 

We decided to get inspiration from the most common but unsolvable problems in our daily life. After discussion, we found out that almost every student is faced with a problem that it is really hard for us to wake up on time. If we wake up late, we will miss the shuttle bus and have to squeeze into the crowded metro without time to wash face or eat breakfast. Therefore, we decided to make a bed to wake people up, drive people to school, and save people’s time for getting prepared.

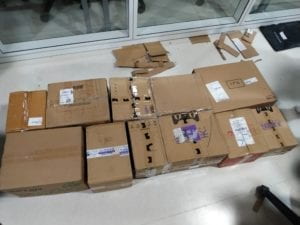
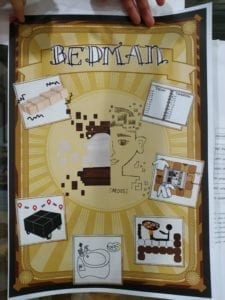
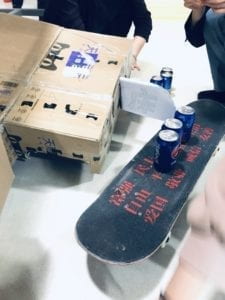
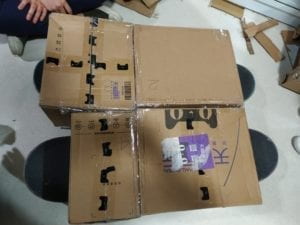
The name of our project is called Bedman, which embodies an interaction between a human and the bed. We use the package boxes to build this bed, showing that this bed is re-groupable and flexible according to how people want to use it. We bind those boxes with many tapes so that they will not loose. Then we carved many blocks on the boxes so that the wheels of the skateboards can be stretched out. Since the boxes are empty, they will be easily destroyed once our group member sits on it. Therefore, we came up with the idea of filling the boxes with soda tins, so that our “bed” is solid enough. The bed can first of all store the to-do list for people, and the remind people what to do by vibrating at the time set by people. Since the bed is re-groupable and flexible, it can be reshaped into a means of transportation by stretching out two wheels. We used two skateboards provided by Ning to make the bed movable. The box constituting the bed plays a role of a closet to store clothes, toothbrush, and even a hand-washing sink, and a food storing and heating machine as well, so that people can do these things on the way to school or work.

This project responds to my definition of interaction in various ways. First of all, after reminding people to finish a term on the to-do list, it will encourage people to finish the task on time if people want to cancel it. This embodies the feature of interaction that two actors communicate with responding to each other. Secondly, it can finish the order set by people within the range of its capability, such as taking out clothes and toothbrush for people, heat food, and be reshaped into a means of transportation if people ask. Therefore, the two actors communicate in a language which makes sense to both, which can maintain the iterative procedure of this conversation.


References:

Crowford, Chris. “What Exactly Is Interactivity?” The Art of Interactive Design, pp. 1–6. s3-ap-southeast-1.amazonaws.com/ima-wp/wp-content/uploads/sites/3/2017/08/05164121/The-Art-of-Interactive-Design-brief.pdf

Recitation 3: Sensors by Gloria Liu

Question 1:

What did you intend to assemble in the recitation exercise? If your sensor/actuator combination were to be used for pragmatic purposes, who would use it, why would they use it, and how could it be used?

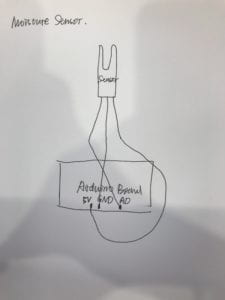
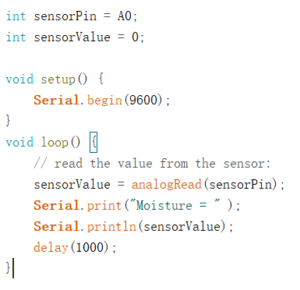
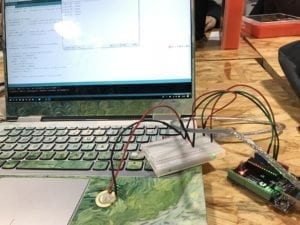
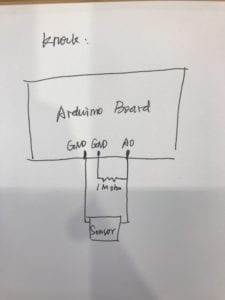
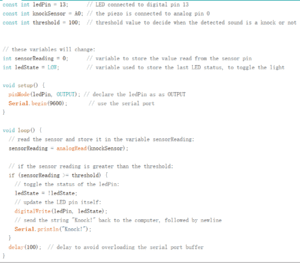
For this recitation, I intended to assemble a moisture sensor and a vibration sensor, using the Arduino board and the Serial Monitor. Following the given instruction, I built these two circuits quickly, since there were not many components in the circuit. After finishing building the circuits, I copied the codes from the instruction and opened the Serial Monitor. When the sensor sensed the change of moisture or vibration, the data shown on the Serial Monitor would change. 

1. Moisture Sensor

Diagram of Moisture Sensor
Codes for Moisture Sensor

Using the Serial Monitor and holding my hand on the sensor, if my hand is dry, the data shown by the monitor is zero, but if my hand is wet, the data on the monitor would rise. In reality, the moisture sensor would be used to test the moisture of the soil for the plants. It would be widely used by greenhouses and labs, so that planters and experimenters can know if they need to change the status of moisture in the soil to create a most advantaged environment for the growth of plants. According to the number given by the system, if it is too low, then people should water the plants, otherwise, people should decrease the amount of water in the soil.

2. Vibration Sensor

 
Vibration Sensor
Diagram for Vibration Sensor
Codes for Vibration Sensor

Knocking the vibration sensor, the Serial Monitor showed “Knock!”. This sensor can be used to monitor theft for stores or museums, fixing it on the windows or the door. If someone attempts to enter the room by breaking the glass or prying the door, the sensor can sense the strong vibration and the alarm connected in the same circuit with the vibration sensor will be triggered immediately.

Question 2:

Code is often compared to following a recipe or tutorial.  Why do you think that is?

This is a vivid description of the function of the code. Coding is like designing or defining a logical system or a calculating system to make the computer understand our order and finish that task. Only if the computer follows this instruction or system can it understand the task, follow the logic flow, and accomplish the order. If some steps in this instruction were missed, the computer cannot understand our order and cannot accomplish the task.

Question 3:

In Language of New Media, Manovich describes the influence of computers on new media. In what ways do you believe the computer influences our human behaviors?

According to Manovich, computers have the feature of automation. In reality, this feature can help people avoid doing some simple tasks repeatedly since computers would understand the process of accomplishing a task through those codes which contain principles of calculating and logic. Therefore, human behaviors would contain less repeated and simple tasks, which can be completed by computers. As the result, human behaviors would be accountable for more activities of creativity and designing.

In addition, the computer makes it possible for people to transform their idea into reality, through the process of art-data-art, according to Manovich. Therefore, people can express their artistic ideas in a more direct and concrete way since computers can help people express and exaggerate their abstract ideas by means of vision and sounds.

However, the physical communication between people decreased, since they are so fascinated by social media and video games.

Recitation 2: Arduino Basics by Gloria (Yixuan Liu)

Date:  February 22, 2019

Partner:  Molly

Materials:

1 * Arduino Uno
1 * USB A to B cable
1 * breadboard
1 * buzzer
2 * LEDs
2 * 220 ohm resistors
2 * 10K ohm resistors
2 * pushbuttons
2 * arcade buttons
A handful of jumper cables
1 * Multimeter

Circuit 1: Fade

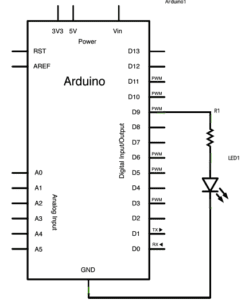
Circuit 1 Diagram
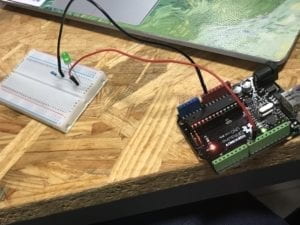
Circuit 1

Given the detailed instruction, we finished this circuit quickly. First, we connect wires with the Arduino board according to the number of pins given by the instruction, then we connected the resistor and the LED on the breadboard, after checking the difference between the two legs of the LED. Then we uploaded the codes for Fade in Arduino IDE, the LED lighted and faded.

Circuit 2: Tone Melody

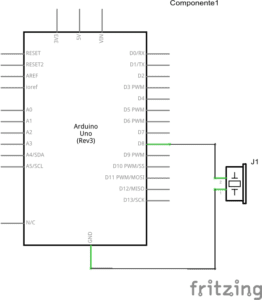
Circuit 2 Diagram
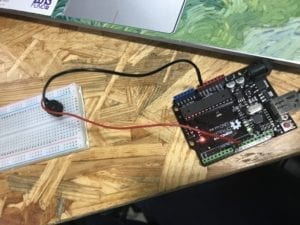
Circuit 2 

We finished building this circuit quickly since it is quite similar to the previous one. However, the buzzer had no reaction. We cut off the power and found out the problem, which is that we did not press the buzzer to the very bottom. After fixing that, the buzzer played the melody.

Circuit 3: Speed Game

Circuit 3 Diagram
Circuit 3

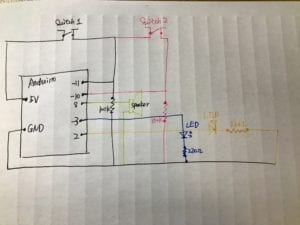
At first, we spent a long time figuring out how this circuit is connected because there were so many wires in it. Then, we started to put wires into the Arduino board, and set those components on the breadboard. Finally, we connected the Arduino board and the breadboard, and removed redundant wires. However, the circuit had no reaction. After checking the wires, we found out that there was a short-circuit. After removing the problematic wire and executed the code, the computer only recognized the buzzer and player 1’s button. We changed the LEDs since they may be burnt by the short-circuit, and the computer recognized those two LEDs. With the help of a fellow, we change one number of a Digital pin and changed the corresponding number in the codes, and the computer finally recognized the button of player 2. Opening the Serial Monitor, the number of pressing the buttons and the result can be recorded.

Question 1:

Reflect how you use technology in your daily life and on the circuits you just built. Use the text Physical Computing and your own observations to define interaction.

In my daily life, I use technology to not only make my life convenient but also express myself. Taking my laptop, for instance, it stores all the important notes and slides that I need, collects, calculates, and analyzes a huge amount of data that I want, and shows me other parts of the world without letting me move a step. What is more, I use photoshop, iMovie, and many other software to show my life in a more aesthetic way.

For the circuits I just built, technology was used to make interesting connections among the Arduino board, components, and the laptop, which were totally separate before. It was also used to create the interaction between people and the machine by executing certain codes which can create a conversation between these two actors. For example, thanks to technology, the computer can recognize the circuit people built and monitor the speed game. Technology translated the human language into the form that can be understood by computers.

According to the text Physical Computing, interaction is an iterative process to create a conversation between computer and people, letting them listen, think and speak to each other to complete a task jointly. For me, interaction means an activity, in which players’ action has an impact on each other, and they respond to each other.


Question 2:

If you have 100,000 LEDs of any brightness and color at your disposal, what would you make and where would you put it?

If I have 100000 LEDs, I would decorate a park, using a system containing sensors. I would put them on the running track in the park. The speed of LEDs’ flashing would be decided by the speed of people who run by.


Recitation 1: Electronics & Soldering- Gloria (Yixuan Liu)

Partner: Julia (Qianyue Fan)

Circuit 1:

Breadboard: the platform for connecting the circuit

12-volt power supply: providing electricity for the circuit

Voltage Regulator: adjusting the voltage to make it close to the value needed by the circuit

Buzzer: a signal to show the circuit has electricity and is complete by making sounds

Push-Button Switch: controlling whether the current can go through, deciding whether the circuit is cut or not

Capacitor: storing electricity when the current goes in, and releasing energy when the circuit is without the current

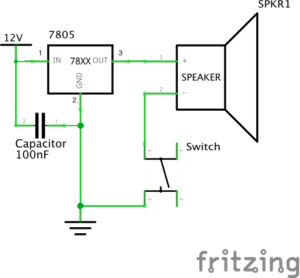
Circuit 1 Diagram
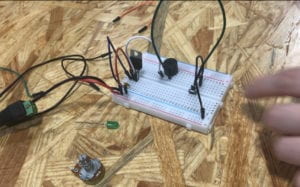
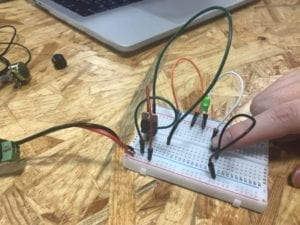
Circuit 1

Building this circuit was really difficult for me since it was the first time that I had ever seen a breadboard. Therefore, we spent some time figuring out the function of each part of the breadboard. At first, we were confused about the voltage regulator, because we were not sure about the function of the three feet of it. With the help of the instruction, we set the voltage regulator correctly. Later, we did not know how to set the button, since it has 4 corners to be connected with 2 wires. With the help of an IMA fellow, we learned that we have to test which two corners to use by using a multimeter. Only if the number remains 0 can we use the tested 2 corners on the button, otherwise the LED would be on before pressing the button. Then we set the capacitor and finished this circuit.

Circuit 2:

Breadboard: the platform for connecting the circuit

12-volt power supply: providing electricity for the circuit

Voltage Regulator: adjusting the voltage to make it close to the value needed by the circuit

LED: making sure that the electricity goes in a single direction, and showing whether the circuit is complete and correct or not

Push-Button Switch: controlling whether the current can go through, deciding whether the circuit is cut or not

220-ohm Resistor: limiting current to protect the circuit

Capacitor: storing electricity when the current goes in, and releasing energy when the circuit is without the current.

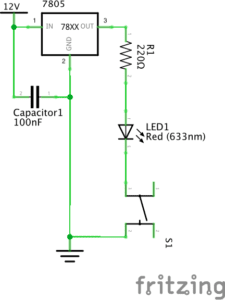
Circuit 2 Diagram
Circuit 2

It was easier to build this circuit since we were kind of familiar with the breadboard. However, with too many components in the same circuit, it is hard to judge where to put the wires. At first, we thought our circuit was correct, but actually, we did not notice that there was a spare line connecting the capacitor and the power supply. Therefore, it is important to check whether all of the wires are necessary after building it.

Circuit 3

Breadboard: the platform for connecting the circuit

12-volt power supply: providing electricity for the circuit

Voltage Regulator: adjusting the voltage to make it close to the value needed by the circuit

LED: making sure that the electricity goes in a single direction, and showing whether the circuit is complete and correct or not

220-ohm Resistor: limiting current to protect the circuit

Variable Resistor: having adjustable resistance for the current

Push-Button Switch: controlling whether the current can go through, deciding whether the circuit is cut or not

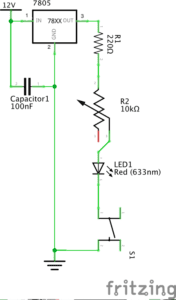
Capacitor: storing electricity when the current goes in, and releasing energy when the circuit is without the current.

Circuit 3 Diagram
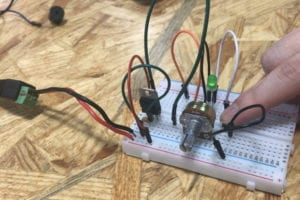
Circuit 3 

We finished this circuit quickly, because it was based on the previous circuit, and we only need to add a variable resistor. With the reminder of a fellow, we plug off the circuit to avoid getting shocked when making adjustments to the circuit. However, the circuit did not work even if it seemed correct. Later, we found out that we put the pins of the voltage regulator into the wrong holes, and we turned the variable resistor to its biggest value. After fixing these problems, the LED light was on.

Question 1:

After reading The Art of Interactive Design, in what way do you think that the circuits you built today include interactivity? Please explain your answer.

According to the reading, interactivity contains two actors, and they respond to each other’s action back and forth. For the circuits I built with my partner, the two actors are people and the circuit. When the circuit is completed, people get the signal that it can work, responding to it by pressing the button. The circuit responded to people’s action by letting electricity go throw, lightening the LED.

Question 2:

How can Interaction Design and Physical Computing be used to create Interactive Art? You can reference Zack Lieberman’s video or any other artist that you know.

Interaction Design and Physical Computing can be used to create Interactive Art, by building interaction between human body and computer. They exaggerate and concretize people’s inner incentive and emotion. A computer can react to the energy given off by bodies, and bodies can give different choices reacting to different signals given by the computer. According to Zack Lieberman’s project, Eye-writer, Interaction Design, and Physical Computing were used to help people who are not able to move to create arts. Therefore, Interaction Design and Physical Computing can be used to enable people who are unable to move to express themselves through a more convenient way, and concretize people’s inner feeling, artistic thoughts, and abstract emotion, by setting computers to react to and transform the energy given off by bodies.