INTM-SHU 101 – 005 Recitation 8 Documentation by Sam Li

Exercise 1: Make a Processing Etch A Sketch

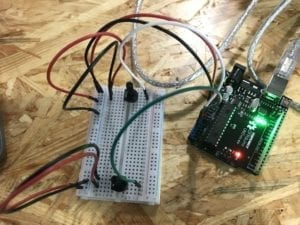
To create the processing Etch A Sketch game, I started by building the circuit with two potentiometers on my arduino board. I connected two potentiometers to pin A0 and A2, to the power source and the ground. I used the multiple value from arduino to processing code example. When finished, I uploaded the code and checked in my serial monitor. Sensor value 1 and sensor value 2 changes according to how I change the two potentiometers.

Below is the schematics for my circuit:
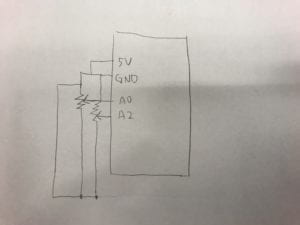
circuit 1
circuit 1

Then, I revised the code for processing. I checked and revised my port index number to 1. First, I used the map function to map values from two sensors to a range between 0 and the width and height. Then, I used the ellipse function and setting two sensor values respectively as the x coordinate and y coordinate of ellipse. This happens within the draw loop. When finished, as I twist two of my potentiometers, I was able to draw ellipses in different directions and created a curvy line effect.

Below is a video documentation:

potentiometer_drawing

Exercise 2: Make a musical instrument with Arduino

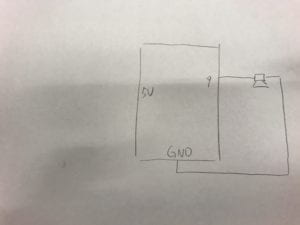
For the second exercise, I started by building the buzzer circuit. I connected the buzzer to the ground and pin 9 as suggested in the code example. I used the multiple value, from processing to arduino code example. In processing, I used the line function to draw lines based on the current position and previous positions of my mouse. I put value of mouseX into index values[0], mouseY into index values[1], and int(mousePressed) into index values[2]. I also used the mousePressed function, when I press the mouse, the drawing resets or begins.

Below is my schematics:

:

In arduino, I used values from index values[0] and values [1] from the array from processing. I used the tone function so that values from index values[0] will control the frequency of the tone and values from index values[1] will control the duration of the tone. As I drew the line in different directions, the buzzer created different sounds.

Below is my video documentation:

drawing_buzzer

Coding documentation:

1.Code for potentiometer drawing:

-Arduino

void setup() {
Serial.begin(9600);
}

void loop() {
int sensor1 = analogRead(A0);
int sensor2 = analogRead(A2);

Serial.print(sensor1);
Serial.print(“,”);
Serial.print(sensor2);
Serial.println(); // add linefeed after sending the last sensor value

// too fast communication might cause some latency in Processing
// this delay resolves the issue.
delay(100);
}

-Processing

import processing.serial.*;

String myString = null;
Serial myPort;

int NUM_OF_VALUES = 2;
int[] sensorValues;
int[] oldsensorValues;
int radius; /** this array stores values from Arduino **/

void setup() {
size(900, 500);
background(0);
setupSerial();
radius = 10;
//framerate

}

void draw() {
updateSerial();
printArray(sensorValues);

float value1 = map(sensorValues[0], 0, 1023, 0, width);
float value2 = map(sensorValues[1], 0, 1023, 0, height);
fill(234,33,15);
stroke(255);
ellipse(value1, value2, radius, radius);

// add your code

//
}

void setupSerial() {
printArray(Serial.list());
myPort = new Serial(this, Serial.list()[ 1 ], 9600);

myPort.clear();
// Throw out the first reading,
// in case we started reading in the middle of a string from the sender.
myString = myPort.readStringUntil( 10 ); // 10 = ‘\n’ Linefeed in ASCII
myString = null;

sensorValues = new int[NUM_OF_VALUES];
}

void updateSerial() {
while (myPort.available() > 0) {
myString = myPort.readStringUntil( 10 ); // 10 = ‘\n’ Linefeed in ASCII
if (myString != null) {
String[] serialInArray = split(trim(myString), “,”);
if (serialInArray.length == NUM_OF_VALUES) {
for (int i=0; i<serialInArray.length; i++) {
sensorValues[i] = int(serialInArray[i]);
}
}
}
}
}

2.Code for Line musical exercise

-Arduino:

#define NUM_OF_VALUES 3 /** YOU MUST CHANGE THIS ACCORDING TO YOUR PROJECT **/

/** DO NOT REMOVE THESE **/
int tempValue = 0;
int valueIndex = 0;

/* This is the array of values storing the data from Processing. */
int values[NUM_OF_VALUES];

void setup() {
Serial.begin(9600);
pinMode(9, OUTPUT);
}

void loop() {
getSerialData();

// add your code here
// use elements in the values array
values[0];
values[1];

// if (values[0] == 1) {
// digitalWrite(13, HIGH);
// } else {
// digitalWrite(13, LOW);
// }
//
// if (values[1] == 1) {
// tone(9, values[2]);
// } else {
// noTone(9);
// }
tone(9, values[0], values[1]);

//if statement

}

//recieve serial data from Processing
void getSerialData() {
if (Serial.available()) {
char c = Serial.read();
//switch – case checks the value of the variable in the switch function
//in this case, the char c, then runs one of the cases that fit the value of the variable
//for more information, visit the reference page: https://www.arduino.cc/en/Reference/SwitchCase
switch (c) {
//if the char c from Processing is a number between 0 and 9
case ‘0’…’9′:
//save the value of char c to tempValue
//but simultaneously rearrange the existing values saved in tempValue
//for the digits received through char c to remain coherent
//if this does not make sense and would like to know more, send an email to me!
tempValue = tempValue * 10 + c – ‘0’;
break;
//if the char c from Processing is a comma
//indicating that the following values of char c is for the next element in the values array
case ‘,’:
values[valueIndex] = tempValue;
//reset tempValue value
tempValue = 0;
//increment valuesIndex by 1
valueIndex++;
break;
//if the char c from Processing is character ‘n’
//which signals that it is the end of data
case ‘n’:
//save the tempValue
//this will b the last element in the values array
values[valueIndex] = tempValue;
//reset tempValue and valueIndex values
//to clear out the values array for the next round of readings from Processing
tempValue = 0;
valueIndex = 0;
break;
//if the char c from Processing is character ‘e’
//it is signalling for the Arduino to send Processing the elements saved in the values array
//this case is triggered and processed by the echoSerialData function in the Processing sketch
case ‘e’: // to echo
for (int i = 0; i < NUM_OF_VALUES; i++) {
Serial.print(values[i]);
if (i < NUM_OF_VALUES – 1) {
Serial.print(‘,’);
}
else {
Serial.println();
}
}
break;
}
}
}

-Processing:

import processing.serial.*;

int NUM_OF_VALUES = 3; /** YOU MUST CHANGE THIS ACCORDING TO YOUR PROJECT **/

Serial myPort;
String myString;

// This is the array of values you might want to send to Arduino.
int values[] = new int[NUM_OF_VALUES];

void setup() {
size(500, 500);
background(0);

printArray(Serial.list());
myPort = new Serial(this, Serial.list()[ 1 ], 9600);
// check the list of the ports,
// find the port “/dev/cu.usbmodem—-” or “/dev/tty.usbmodem—-”
// and replace PORT_INDEX above with the index of the port

myPort.clear();
// Throw out the first reading,
// in case we started reading in the middle of a string from the sender.
myString = myPort.readStringUntil( 10 ); // 10 = ‘\n’ Linefeed in ASCII
myString = null;
}

void draw() {
//background(0);

stroke(255);
line(mouseX, mouseY, pmouseX, pmouseY);

// changes the values
//for (int i=0; i<values.length; i++) {
// values[i] = i; /** Feel free to change this!! **/
//}

// sends the values to Arduino.

values[0] = mouseX;
values[1] = mouseY;
values[2] = int(mousePressed);

sendSerialData();

// This causess the communication to become slow and unstable.
// You might want to comment this out when everything is ready.
// The parameter 200 is the frequency of echoing.
// The higher this number, the slower the program will be
// but the higher this number, the more stable it will be.
echoSerialData(200);
}

void mousePressed() {
background (0);
}

void sendSerialData() {
String data = “”;
for (int i=0; i<values.length; i++) {
data += values[i];
//if i is less than the index number of the last element in the values array
if (i < values.length-1) {
data += “,”; // add splitter character “,” between each values element
}
//if it is the last element in the values array
else {
data += “n”; // add the end of data character “n”
}
}
//write to Arduino
myPort.write(data);
}

void echoSerialData(int frequency) {
//write character ‘e’ at the given frequency
//to request Arduino to send back the values array
if (frameCount % frequency == 0) myPort.write(‘e’);

String incomingBytes = “”;
while (myPort.available() > 0) {
//add on all the characters received from the Arduino to the incomingBytes string
incomingBytes += char(myPort.read());
}
//print what Arduino sent back to Processing
print( incomingBytes );
}
INTM-SHU 101 – 005 Preparatory Research and Analysis-Sam Li


Our group research project helps me understand interaction as a process in which one or more human actors engage in reciprocal exchange of information with other human beings, objects, systems, or the outer environment. Human actors and human experiences are at the essence of interaction, as I defined. After executing my midterm project, my definition adds in the emotional element as we discovered through presenting our midterm project, the button-triggered pipe. I came to redefine interaction as one that is more inviting, engaging, and amusing to the users. For instance, when users interacted with our Button, No? Project, many of them would “wow” when they observed the reciprocal responses from the LEDs, and the experience interacting with an art object was an engaging and amusing one. Executing our midterm project enabled me to rethink the relationship between human subjects and objects. The audience/user was no longer spectators passively receiving information from products/objects. Instead, users actively shape and reshape, alter, and reinterpret the messages they reciprocally exchange with the objects.

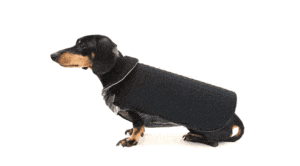
Disco Dog (click the image for gif effect)

For our final project, I have been greatly inspired by the following three interactive projects: Disco Dog, Lonely Sculpture, and Speaking Through Emoji. Disco Dog is a smartphone controlled dog vest embedded with numerous LEDs. Dog owners can change the colors of LEDs and even create captions on the LED vest through a phone app. As shown in the project’s video, when someone walks the doggie with a LED vest at night, it was as if the dog is dancing disco with all the lights on. I immediately fell in love with this project and I think it aligns well with my definition of interaction, because users can alter the messages created by the vest, by changing the colors and captions shown on the disco vest. Besides, this project further facilitates connection between everyday pedestrians and make people feel something . If I ever see a dog wearing this disco vest, it would really light up my day and make me laugh. I feel strongly that this project should be included in the slides for Interaction Lab!

https://www.kickstarter.com/projects/prtyny/disco-dog-the-smartphone-controlled-led-dog-vest

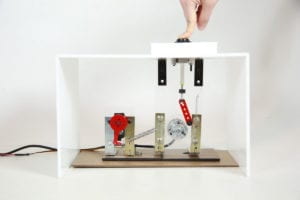
Lonely sculpture project is basically an automated device that helps avid tinder users to swipe right on the profiles people like on the dating app. The project was initially created as an art piece. The artist, Tully Arnot’s design intention was to pinpoint and propel us to rethink the alienation of pointless interaction between the digitally fabricated finger and profiles on the tinder app. The device, although making it convenient to like as many people as possible, does not actually facilitate human connection. The project was later turned into a commoditized product with tag lines like “Automating your love life” and “More swipes means more connections”. The commoditized version of this project deviated from my definition of interaction. It simply became a functional tool to facilitate pointless swipes, instead of fostering meaningful conversations or matches among modern humans. The initial value that Arnot attached to his artistic creation was lost in the product.

Another project that I have researched is called Speaking through Emoji. Users can generate a series of instructions to the device by choosing preferences on the set up of switches, and the device will print out different kinds of emojis as response. This device enables users to express how they feel through the visual language of emojis. This project makes me think about finding a way for users to generate their own sets of instructions for my device, such as choosing preferences about their feelings, and my to-be-created device will give back a response based on the choices the users put.

Based on my research and my projects in Interaction Lab, I came to a new definition of interaction: Interaction is a reciprocal dialogue engaging human subjects, objects, and their embedded social contexts. The dialogue not only involves the exchanges of logical information, but it also generates meanings and values unique to human beings, as well as triggering emotional responses from humans.

My definition intends to refute the canon declaring that interaction is purely a logical process, focusing on how machines or computers follow logical steps and prescribed instructions. However, I feel more strongly that interaction, if with human presence, inherently involves feelings and emotions. When humans interact with each other, not only do we signal and decode linguistic and cultural meanings from each others, but we also sense feelings and emotions. Same should be applied to the narrative about interaction in a more general sense.

If humans are the essential participants in any given interaction, such a dialogue between human subjects and objects should not only arouse physical perceptions, but also trigger emotional response and feelings; whether connection, happiness, melancholy or wrath. If the human subjects are apathetic, and they are not interested, the interaction is poorly designed. My definition also emphasizes how interaction is contextualized in various settings. Interaction happens in specific time and space. Besides, the diversity of users also generate complexities to how we define interactions. Users see, interpret, and interact with objects in specific ways, based on their unique cultural and social imprinting. 

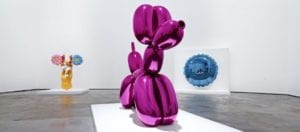
Jeff Koons, "Ballon Dog".
Jeff Koons, “Ballon Dog”.

Quoting from artist, Jeff Koons, When I view the world, I don’t think of my own work. I think of my hope that, through art, people can get a sense of the type of invisible fabric that holds us all together, that holds the world together” (New York Times Interview with Jeff Koons) Same applies to the field of interaction design. My hope is that interaction is always designed for humans and their surrounding world, and interaction design can possibly connect those elements instead of alienating them apart. 

INTM-SHU 101 – 005 Recitation 7 Documentation by Sam Li

Recitation In-Class Animation Exercise:

In recitation 7, I converted the motifs I recreated from Vasily Kandinsky’s Three Sounds into an animated recreation. My design intention was to change the color of shapes when my mouse moves on top of certain shapes. To make this animation happen, I created a color variable and setting it to the color of a certain shape. Then, I use an if statement to get the color state of my mouse. If the color state of my mouse equals the color state I set, change the color of the shape to another one. For instance, when my mouse is on the purple circle, the color will change into light green. In the end, I animated the color of a light blue pentagon, three triangles, a large purpose circle, and two small yellow circles.

Below is a video showing my animation: IMG_5551

Recitation Homework Exercise:

In the homework assignment, I started by creating a hollow circle at the center of my canvas. I created int variable ballX and ballY referring to the  center location of the circle. I also created an int variable, radius, to set the radius length. I drew the circle with the ellipse function and setting wider stroke weight.

Then, I used an if statement to change the circle size larger and smaller iteratively. I created an int variable, growspeed, with an initial value of 5. I set that radius will keep growing at grow speed of 5. I used an if statement to say, when radius reaches 150, radius will start to decline. Another if statement saying if radius becomes smaller than 5, radius will increase. I learned that in creating animation, I always have to set a background for each frame. If not, I will see my animation on each frame.

Third, I used the color mode function at setup, changing color mode to HSB. I also created a float variable, c,  for the color to change. Number of c only changes between 0 and 255Under draw function, I used an if statement and said if float variable c is greater or equals to 255, c becomes 0. If not, c increases by one.

Lastly, I used keyPressed() function to move the circle. For instance, I used an if statement to say, if I press the left arrow key and x coordinate of the ball center is greater than the circle’s diameter, x coordinate of the ball center will decrease by ball Speed.

Below is a video showing the size and color changes of my circle. When I pressed the directional arrow keys, my circle will move around the screen. Besides, I also set the condition that the circle will not move out of the screen.

IMG_5550

List of interesting functions I used:

strokeWeight(); //setting stroke weight of the shapes

ellipse(); // create circles

get(); //get the value of something

colorMode(HBS); //set color mode into HBS

frameRate(60); set the speed of frames changing

keyCode == LEFT ; // if you press the left arrow key

keyPressed(); //when certain keys are pressed, something will happen

Code for in-class exercise:

//set the size of the canvas
void setup() {
size (700, 700);
}

void draw () {
background(15, 21, 57);

//section 3
//big purple circle-1
fill(104, 83, 142);
stroke(10);
strokeWeight(2);
ellipse(450, 120, 150, 150);

color a = color(104, 83, 142); //set condition of the color state

if (a == get(mouseX, mouseY) ) { //create a boolean variable; if position of the mouse ditects color purple, changes the color to green
fill(183, 198, 172);
stroke(10);
strokeWeight(2);
ellipse(450, 120, 150, 150);
}

//circle 2
fill(216, 186, 109);
stroke(10);
strokeWeight(1);
ellipse(400, 200, 30, 30);

color b = color(216, 186, 109); //set condition of the color state

if (b == get(mouseX, mouseY) ) { //create a boolean variable; if position of the mouse ditects color purple, changes the color to green
fill(155, 76, 64);
stroke(10);
strokeWeight(2);
ellipse(400, 200, 30, 30);
}

//circle 3
fill(216, 186, 109);
stroke(10);
strokeWeight(1);
ellipse(250, 300, 15, 15);

color c = color(216, 186, 109); //set condition of the color state

if (c == get(mouseX, mouseY) ) { //create a boolean variable; if position of the mouse ditects color purple, changes the color to green
fill(155, 76, 64);
stroke(10);
strokeWeight(2);
ellipse(250, 300, 15, 15);
}

//circle 4
fill(216, 186, 109);
stroke(10);
strokeWeight(1);
ellipse(450, 200, 15, 15);

color d = color(216, 186, 109); //set condition of the color state

if (d == get(mouseX, mouseY) ) { //create a boolean variable; if position of the mouse ditects color purple, changes the color to green
fill(155, 76, 64);
stroke(10);
strokeWeight(2);
ellipse(450, 200, 15, 15);
}

//big light blue shape
fill(215, 230, 232);
noStroke();
triangle(180, 135, 105, 300, 400, 230);
quad(105, 300, 400, 230, 600, 460, 180, 500);

color e = color(215, 230, 232); //set condition of the color state

if (e == get(mouseX, mouseY) ) { //create a boolean variable; if position of the mouse ditects color purple, changes the color to green
fill(250, 159, 13);
noStroke();
triangle(180, 135, 105, 300, 400, 230);
quad(105, 300, 400, 230, 600, 460, 180, 500);
}

//triangle 1

fill(112, 135, 191);
stroke(10);
strokeWeight(1);
triangle(290, 290, 310, 450, 180, 420);

color f = color(112, 135, 191); //set condition of the color state

if (f == get(mouseX, mouseY) ) { //create a boolean variable; if position of the mouse ditects color purple, changes the color to green
fill(198, 48, 53);
stroke(10);
strokeWeight(1);
triangle(290, 290, 310, 450, 180, 420);
}

//triangle 2
fill(147, 96, 82);
stroke(10);
strokeWeight(1);
triangle(320, 310, 370, 390, 280, 375);

color g = color(147, 96, 82);

if (g == get(mouseX, mouseY) ) { //create a boolean variable; if position of the mouse ditects color purple, changes the color to green
fill(198, 48, 53);
stroke(10);
strokeWeight(1);
triangle(320, 310, 370, 390, 280, 375);
}

//triangle 3
fill(193,172,182);
stroke(10);
strokeWeight(1);
triangle(280,340,300,480,260,440);

color h = color(193,172,182);

if (h == get(mouseX, mouseY) ) { //create a boolean variable; if position of the mouse ditects color purple, changes the color to green
fill(172,193,178);
stroke(10);
strokeWeight(1);
triangle(280,340,300,480,260,440);
}

//section 1 all other shapes unchanged
//bottom rectangle
fill(0,0,0);
stroke(10);
strokeWeight(1);
rect(80, 530, 550, 20);

//left stroke
fill(0,0,0);
stroke(10);
strokeWeight(1);
triangle(75, 120, 95, 120, 85, 560);

fill(69, 95,77);
stroke(10);
strokeWeight(1);
triangle(75, 560, 95, 560, 85, 580);

noFill();
stroke(10);
strokeWeight(4);
beginShape();
vertex(260,260);
quadraticVertex(360, 270, 300, 110);
endShape();

noFill();
stroke(10);
strokeWeight(4);
beginShape();
vertex(270,270);
quadraticVertex(360, 270, 300, 110);
endShape();

noFill();
stroke(10);
strokeWeight(4);
beginShape();
vertex(270,270);
quadraticVertex(370, 280, 310, 120);
endShape();

//section 2 rectangles on the right side
//black rect
fill(0,0,0);
stroke(10);
strokeWeight(1);
rect(560,280,140,50);

//green rect
fill(187,211,164);
stroke(10);
strokeWeight(1);
rect(560,285,35,20);

//brown rect
fill(155,144,117);
stroke(10);
strokeWeight(1);
rect(598,285,70,20);

//another kinds of brown
fill(75,61,35);
stroke(10);
strokeWeight(1);
rect(575,305,45,20);

//another kind of dark green
fill(24,52,18);
stroke(10);
strokeWeight(1);
rect(625,305,70,20);

}

Codes for homework exercise:

int ballX;
int ballY;
int radius;
int ballSpeed;
int growSpeed;

float c;
float size = 300;//create a variable if you want to change the value of something
boolean pulse = false; //create a boolean variable to define the state of increase/decrease

void setup() {
size(400, 400);
colorMode(HSB); // float variable c only changes between 0 and 255, when setting the color mode to HSB
smooth();
frameRate(60);

ballX = width/2;
ballY = height/2;
radius = 10;
ballSpeed = 20;
growSpeed = 5;
}

void draw() {
background(255);

if (c >= 255) {
c=0;
} else {
c++;
}

//color changes
strokeWeight(20);
noFill();
stroke(c, 255, 255);
ellipse(ballX, ballY, radius*2, radius*2);

//circle size changes larger and smaller in a loop
radius = radius + growSpeed;

if(radius > 150) {
growSpeed = -2;
}
if(radius < 5) {
growSpeed = 2;
}

}

//pressing arrow keys in four directions will make the circle move

void keyPressed() {
if ( (keyCode == LEFT) && (ballX > radius*2) ) //setting the condition that pressing left arrow key and x coordinate of the ball must be greater than radius
{
ballX = ballX – ballSpeed;
}

if ( (keyCode == RIGHT) && (ballX < width-radius*2) )
{
ballX = ballX + ballSpeed;
}

if ( (keyCode == UP) && (ballY > radius*2) )
{
ballY = ballY – ballSpeed;
}

if ( (keyCode == DOWN) && (ballY < height-radius*2) )
{
ballY = ballY + ballSpeed;
}
}

Button, No? – Sam Li – Eric Parren

Project Name: Button, No? 

Project Members: Sam Li & Amily Yang

CONTEXT AND SIGNIFICANCE

Our group research project helps me understand interaction as a process in which one or more human actors engage in reciprocal exchange of information with other human beings, objects, systems, or the outer environment. We researched interactive projects like the Expressive Tactile Controls and the Eye Writer project.

Expressive Tactile Controls Project by Hayeon Hwang

Both projects made me realize that interaction design creates human experiences that are not simply visual, never spectatorship in one direction. It’s mutual and reciprocal, in which multiple senses of the human bodies are stimulated and engaged. For instance, users interact with the “Expressive Tactile Controls” project by touching various kinds of buttons and receiving diverse kinds of responses. The enjoyment of this project is not about watching a video of how the buttons respond in different ways, but rather being able to experience and feel movements of the buttons, to observe the changes and react emotionally to the project.

Inspired by our group research project and my interest in fine arts, I came up with the idea to use arduino and electronic components to create a new type of interaction with exhibits in an art space. Suppose one walks into the Guggenheim in New York or the Rockbund Art Museum in Shanghai. The experience interacting with art objects and spaces can be intimidating or even uninviting. By the unspoken norm, you sort of knowing that you’re not supposed to touch anything, speak too loud, or act crazily in a gallery or museum space.

You should look, but not too closely. The appreciation always comes with a sense of awe and a mystifying aura surrounding the objects. With what we learned in Interaction Lab, I cannot help but wonder: what if I can re-imagine the experience interacting with an art object, one that makes the audience touch, feel, and even laugh and rejoice. Therefore, the user archetype of the project is the general public interacting with an art gallery or museum space. At this point, my teammate and I had some preliminary ideas about 3D printing some kinds of art objects, maybe an Ancient Greek sculpture or a piece of Chinese jade, in order to reshape the interaction between the audience and fine arts objects.

CONCEPTION AND DESIGN

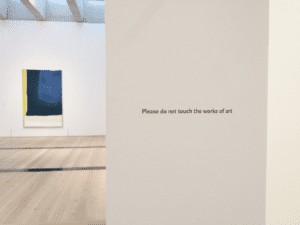
The initial design concept is to create the context in which an art object is exhibited in a gallery or museum setting. Through researching how art objects are exhibited in museums, we were also wondering if we could mimic and make fun of those museum signs which say things like, “DO NOT TOUCH”.

DO NOT TOUCH sign at a gallery space

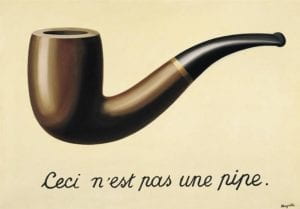
We hoped to use sensors through which the visitors can interact with the art object beyond simply observation. Our intention was to design an interaction between the users and an object, which is visually compelling, easily understood, and tacitly humorous. Our desired outcome is that when a user interact with the the object, the person is able to laugh at it; users will “wow” when their interaction with the piece creates unexpected but funny outcomes; the piece sparks dialogues between the users. RenĂ© Magritte’s painting, “The Treachery of Images,”  immediately came to mind as I was looking for an art piece that has a tacit sense of humor. This surrealist painting is composed of an illustration of a smoking pipe with a line of French at the bottom, saying, “This is not a pipe”. If executes well, the users will get the tacit joke/reference and they are able to rethink the Rene piece in different way.

René Magritte, The Treachery of Images. 1929.

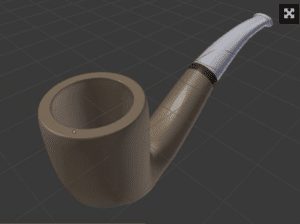
After discussing with my teammate Amily, we decided to mimic Magritte’s painting but add in more interactive elements that we’ve learned in the class. The basic idea is to mimic Magritte’s painting by 3D printing the pipe and shown as an art exhibit (Source of the pipe 3D printing model).

pipe 3D printing model
Pipe 3D printing model

We thought about putting a pressure sensor around it, so that when users touch the sensor, the pipe might light up with built-in LEDs. Because the pressure sensor was extremely not sensitive, we tried to place a heavy magnifying glass on top of the pressure sensor, and the removal of the magnifying glass will trigger the sensor. However, it did not work out as well as we imagined. We were also thinking about distance sensors or temperature sensors, but none of those worked out nicely, as it was hard to anticipate where exactly will the users touch the object, or which exact spot should we place the sensors.

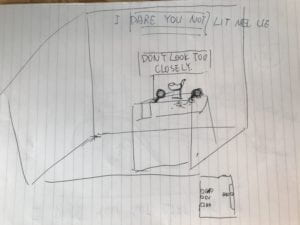
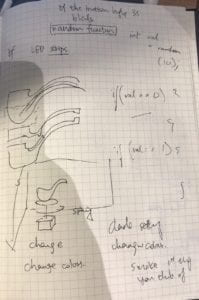
Project Sketch
Project Sketch

FABRICATION AND PRODUCTION

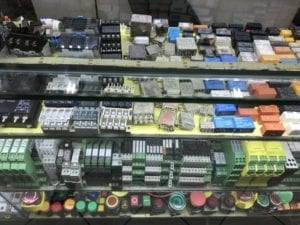
Initially, we built the circuit with a pressure sensor connected to the arduino board and two LED lights. The initial design was when user press the pressure sensor, the LED lights will be on (light up the pipe!), else they will be off. Because the pressure sensor was extremely not sensitive, we decided to try some other kinds of sensors. With help from Professor Parren, we realized that a big button might be a visually compelling sign suggesting ways for users to interact with the piece. I got a big red button from the Shanghai Electronics Market.

A pile of buttons at the electronics market.

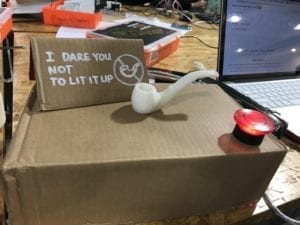
We built the circuit connecting the button switch and two LEDs. Our code was simply when someone presses the button, the LEDs will be on. When one presses the button again, the lights will turn off. We placed our circuits inside a neat cardboard box, showing only the pipe and the big red bottom for the users. To make jokes about those intimidating signs in museums, we put a sign saying, “I DARE YOU NOT TO LIT IT UP”.

First prototype of Button, No?

Video Link: First generation of Button, No?

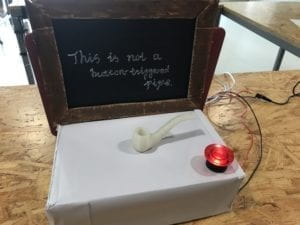
We did some preliminary user testing with people at the IMA lab the night before our user testing session. The feedbacks we heard were both frustrating and revealing. People told us that the signs seem to suggest that they could not touch anything. Some others also told us that they were expecting more unexpected things to happen after pressing the button. The most revealing findings was that our first prototype failed to create the sense of an art object as we originally imagined. Based on the feedbacks, we specifically changed the way our object is presented to the audience. I used cardboards to create a painting frame and decided to write something on it, similar as Magritte’s piece. We also wrapped the box with some white papers, making the display more elegant. The object was then contextualized in front of an art frame, with captions saying, “This is not a button-triggered pipe.” We also changed out code for the LEDs. The lights will be on continuously after pressing the button.

Second generation of Button, No?

Video Link: Second generation of Button, No?

On the day of our user testing, the piece turned out nicely because most of the users got the idea that our piece was presented as an art piece. We observed how the users interacted with our piece and heard from their feedbacks. It was interesting to observe how some users immediately tried to touch the pipe or the box, without getting the meaning from our caption or trying to press the button. These are usually the people who did not know about the Magritte painting in advance. For them, our piece was confusing because they did not know what to do or expect from the piece. For those who had seen the Magritte painting, our piece provoked laughters, and they interacted engagingly with the button. Our users suggested that we could perhaps changed the caption and make it more comprehensible; others also suggested that we make more changes in the LED lights, create sounds or even smokes, if possible.

Feedbacks from user testing

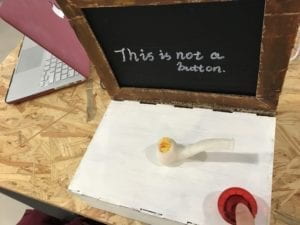
Over the weekend and Monday, we used laser cutting to create a nice wooden box, painted in white for display. We also rewrote the code for the LEDs. We added one more LED, used the …. code, so that the brightness of the lights will change constantly, creating the effect of a blaming pipe.

Third generation of Button, No?

Video Link: Third generation of Button, No?

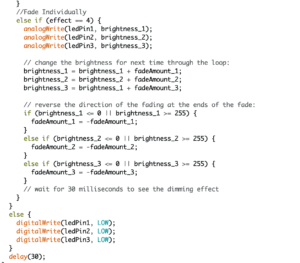
Here are the sources we resorted to for our code. (millis function, blink finction, fade function, fade in sequence) Screenshots of our final code are attached at the bottom of the blog post.

CONCLUSIONS

On the day of our midterm presentation, it was happy to hear that people in the class understood the context we created for this interaction, and it was funny to observe how the users enjoyed pressing the button constantly. The tactile experience and the reciprocal response from the pipe were indeed powerful compared with visual interrogation in front of a static painting. Our design intention was to create an interaction with art objects that is more inviting, engaging, and amusing. Our project was able to make our audiences “wow” when they observe the reciprocal responses from the LEDs, and the experience interacting with an art object was an engaging and amusing one. However, it could have been more desirable if we could borrow a speaker and created some sound effects, or that we could better engage audiences who have not seen the Magritte painting.

Video Link: Button, No?

My biggest lesson learned from the project was definitely the value of rapid prototyping and iteration in the design process. It was through constantly receiving user feedbacks, iterating and improving our project that we landed on a much better project than what we originally started. I learned that if I ever have a great idea, share it with others and hear other’s thoughts or feedbacks. Ideas built upon each other. Most importantly, if there’s a great idea, do something about it. Make something, even just a scrappy prototype. The prototyping process helps to communicate my ideas and challenge taken-for-granted assumptions.

The project also made me rethink my own relationship with art objects as a viewer, and as a creator. Our project was intended to better spark dialogues between the audiences and the object, between people, and between people and the situated space. The audience was no longer spectators passively receiving information from static art pieces, but instead active users constantly shaping, changing, and interpreting the messages they reciprocally exchange with the piece. Hopefully, our project has sparked such dialogues between our users and our art piece.

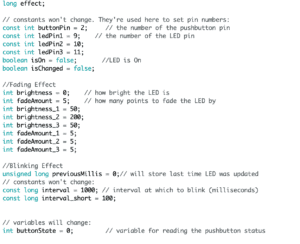
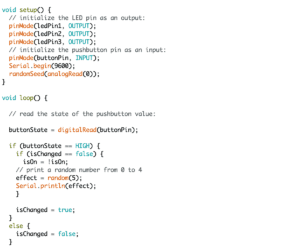
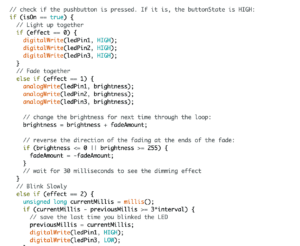
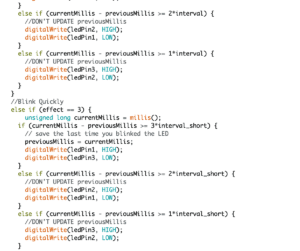
Appendix: Screenshots of our final code (LEDs blink in sequence)

1 2 3 4 5

INTM-SHU 101 – 005 Recitation 6 Documentation by Sam Li

Recitation 6 Documentation Blog

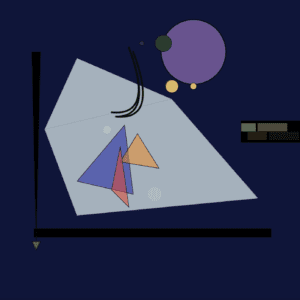
Re-creation of Kandinsky's "Three Sounds"
Re-creation of Kandinsky’s
“Three Sounds”

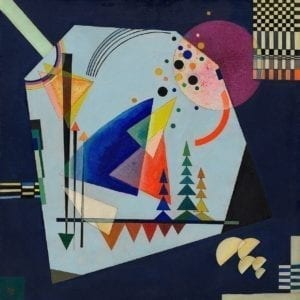
I picked Vasily Kandinsky’s Three Sounds as the motif I tried to recreate through Processing. I chose this piece because of I was immediately drawn by this piece when browsing all the paintings. The blueness of the background, the triangles making up shapes of trees, and circles coming in different colors and shapes all make me think of a silent summer night in the woods, but in the most abstract and geometric form.

Three Sounds by Vasily Kandinsky

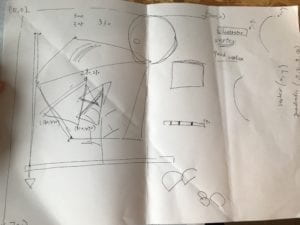
I wanted to recreate this piece in Processing, by creating geometric shapes through coding. To achieve this goal, I started by sketching the geometric shapes I wanted on a piece of paper. It helped me better measured the coordinates of each shape. I created a big purple circle on the upper right corner.

Sketch on paper
Sketch on paper

Then, I added in other elements like a long, thin rectangle at the bottom, as well as triangles in different colors in the middle. With the help of IMA fellows, I tried the quadraticVertex() function for creating the arcs that I want.

My final creation mimicked the basic structure of Kandinsky’s painting, with the navy blue background, the sky blue shape, circles and triangles. However, because of the time limitation in class, I did not have the time to re-create trees with gradient colors in triangular forms. I think using processing is a good means to realizing my design, because coding comes with more precision, compared with drawing with my bare hands. It would have been easier if I had used illustrator to measure the exact coordinates of shapes in the original painting, so that I can better locate the shapes in my Processing creation.

Below are the codes for my Kandinsky re-creation:

//set the size of the canvas
size(700, 700);

background(15,21,57);

//big purple circle
fill(104, 83, 142);
stroke(10);
strokeWeight(2);
ellipse(450,120, 150,150);

//smaller circle
fill(216, 186, 109);
stroke(10);
strokeWeight(1);
ellipse(400,200, 30,30);

fill(216, 186, 109);
stroke(10);
strokeWeight(1);
ellipse(250,300, 15,15);

fill(216, 186, 109);
stroke(10);
strokeWeight(1);
ellipse(450,200, 15,15);

fill(216, 186, 109);
stroke(10);
strokeWeight(1);
ellipse(450,200, 15,15);

fill(46,55,75);
stroke(10);
strokeWeight(1);
ellipse(330,100, 10,10);

fill(46,55,75);
stroke(10);
strokeWeight(1);
ellipse(360,450,34,34);

fill(38,62,45);
stroke(10);
strokeWeight(1);
ellipse(380,100,38,38);

//bottom rectangle
fill(0,0,0);
stroke(10);
strokeWeight(1);
rect(80, 530, 550, 20);

//left stroke
fill(0,0,0);
stroke(10);
strokeWeight(1);
triangle(75, 120, 95, 120, 85, 560);

fill(69, 95,77);
stroke(10);
strokeWeight(1);
triangle(75, 560, 95, 560, 85, 580);

fill(215,230,232,191);
noStroke();
triangle(180,135, 105,300, 400,230);
quad(105,300,400,230,600,460,180,500);

noFill();
stroke(10);
strokeWeight(4);
beginShape();
vertex(260,260);
quadraticVertex(360, 270, 300, 110);
endShape();

noFill();
stroke(10);
strokeWeight(4);
beginShape();
vertex(270,270);
quadraticVertex(360, 270, 300, 110);
endShape();

noFill();
stroke(10);
strokeWeight(4);
beginShape();
vertex(270,270);
quadraticVertex(370, 280, 310, 120);
endShape();

fill(16,22,160,127);
stroke(10);
strokeWeight(1);
triangle(290, 290, 310,450,180, 420);

fill(240,136,31,127);
stroke(10);
strokeWeight(1);
triangle(320,310, 370,390, 280,375);

fill(234,70,45,127);
stroke(10);
strokeWeight(1);
triangle(280,340,300,480,260,440);

//black rect
fill(0,0,0);
stroke(10);
strokeWeight(1);
rect(560,280,140,50);

//green rect
fill(187,211,164,127);
stroke(10);
strokeWeight(1);
rect(560,285,35,20);

//brown rect
fill(155,144,117,127);
stroke(10);
strokeWeight(1);
rect(598,285,70,20);

//another kinds of brown
fill(75,61,35,127);
stroke(10);
strokeWeight(1);
rect(575,305,45,20);

//another kind of dark green
fill(24,52,18,127);
stroke(10);
strokeWeight(1);
rect(625,305,70,20);